Repairing your computer yourself is a complete guide. Too bad: we can't find this page! The computer cannot be turned on
- Most hardware problems are related to poor connections or minor glitches. Wherein HDD will be fine, that is, your files will not be affected.
Create backup copy content hard drive. Do this before you begin repairing your computer. To do this, remove the hard drive from your computer, connect it to another computer via an IDE-USB adapter (or a SATA-USB adapter for older hard drives) and create a backup copy of your hard drive on another computer.
Check the power cable. Double check that the power cord is connected to the computer and to the electrical outlet, and that the outlet is working.
- Plug your computer directly into an electrical outlet to see if the surge protector or extension cord is causing the problem.
- If you are using a laptop, make sure the power adapter is securely connected to it.
Try a different monitor. If your computer is on but the screen is black, there may be something wrong with your monitor. Double check your monitor connection and then try connecting a different monitor (if possible).
Remove the battery from the laptop and connect the power adapter to it. You can work on a laptop without a battery if you connect it to a power source. If the laptop starts without a battery, there is something wrong with the battery that will need to be replaced.
Check the power supply cables. Make sure the cables coming from the power supply are securely connected to the motherboard.
Check the power supply . Old power supplies often fail, but they are fairly easy to test. A faulty power supply is the most common reason why a computer won't start.
Look for loose screws. A loose screw may cause short circuit on the motherboard. Gently shake the computer case and listen for metallic rattling sounds. Use your fingers or long tweezers to remove the screw from the computer case.
Inspect the cables. Look for cables without insulation, as exposed wiring can cause a short circuit. Replace such cables.
Reinstall the components. Try removing and then reinstalling the video card and modules random access memory; do the same with all cables. If any connection is loose, this may be the reason why your computer won't start.
- You can also try to reinstall the processor, but this is a difficult task and most likely the processor is not the cause of the problem. Moreover, when reinstalling the processor, it can be damaged - in this case, the computer will not work at all.
Remove the discrete graphics card (if equipped). Now connect the monitor to the built-in video card (on the motherboard). A faulty video card can cause your computer to not start.
- If necessary
In this section, we will look at how to repair a computer yourself. First of all, let's come to an agreement that computer repair actually consists of two independent procedures: identifying the cause of its inoperability ( diagnostics) and, actually, the stage of troubleshooting ( repairs).
How to repair a computer? This is a question a person often asks himself when his faithful iron “friend” suddenly refuses to turn on or begins to “freeze”, spontaneously reboot, or detect any other defects in its operation.
Remember? First things first: do-it-yourself repair computer begins with diagnosing the problem. From a visual examination of the “patient” :) With time and experience in this matter, some strange feeling appears, which can be roughly compared with intuition. Are you starting to “feel” the computer hardware? :)
You must also understand that computer repair is (quite often) a banal replacement of one or more of its inoperative components. This is, in fact, a large-modular reassembly of it. It also happens that you need to sit on it with a soldering iron, but more on that a little later :)
Naturally, in order to successfully repair a computer, we need spare parts. Moreover, the more there are, the better. Sometimes it happens (especially with older equipment) that one replaced part works great on one computer, but does not work on another, or vice versa. In my case, there are no problems with this: there are enough different “hardware” in the work warehouse, choose any, but what to do at home?
I can give advice: it’s trivial to collect everything that comes into your field of vision (a processor that was left after the motherboard burned out, “unnecessary” due to an upgrade, a RAM module, an outdated video card that doesn’t work well) new game etc). I think you understand me? I can assure you that over time, with this approach, you will have a sufficient collection of various spare parts and components at home that can be used to repair your computer.
Over time, you will absolutely easily be able to assemble yourself from such parts, for example, a second computer (especially for tests), organize your own local mini network at home, and in general - get the necessary basic experience of “tinkering” with computer hardware. For example, at my house now there are three completely assembled computer, connected into a small network and it is always possible to collect several more from what is stored on special shelves.
What am I getting at with this introductory article? Moreover, the question of how to repair a computer cannot be effectively resolved without a sufficient number of spare parts. This is a very important point! Have you ever walked into the assembly and repair department of any small computer company? I assure you that there you will see a very wide variety of components that often help the guys there successfully diagnose computer faults.
At the end of our introductory material, I would like to note that before repairing a computer, we (as banal as it may sound) will need to rid our “patient” of the dust that has accumulated in it. It must be said that sometimes it happens that this procedure itself replaces the entire repair :) For this purpose, an old (Soviet) vacuum cleaner, switched to a mode not for blowing in, but for blowing air away from itself, is very suitable for us. Simply unscrew the “trunk” of the vacuum cleaner from the front and screw it on from the back.
I wanted to supplement the article with some practical material, otherwise it turned out to be a lot of letters and not enough specifics. I would like to introduce (those who don’t know) you to such a wonderful program as “” (you can download its version for 32 and 64-bit systems from the link).
Don’t think that the program will not tell you how to repair your computer, but it will significantly facilitate some aspects and practically allow you to “look” into system unit without opening it. Well, here I exaggerated a little, but just a little :)
What is so special about the CPU-Z program? Firstly, because it does not need to be installed. It runs immediately in RAM. Its main advantage is that it will show us the complete and detailed information about the basic elements of our computer:
- processor, its connector type (socket);
- motherboard (separately with information about its “northern” and “southern” microcircuits);
- we will be able (without opening the case) to determine how many RAM slots are installed on the motherboard, which of them are occupied and what is installed in them;
- Data on the graphics adapter (video card) is displayed separately;
As you can see, there is a whole basket of advantages. And all this happiness fits into 2 megabytes! Let's take a closer look at the program, which will be very useful to us, even if not in the process of repairing the computer itself, but at the stage of collecting data about it.
After launch, we see the following window:
This is the first tab called "CPU" (processor). Let's look at it in more detail:
- The “name” field is the model of our processor;
- “Code name” “Max TDP” - the code name of its core and the maximum power consumption in Watts;
- “Package” - name of the processor socket (slot or socket);
- "Technology" and "Core Voltage" - using which technological process(45 nanometers) made and voltage on the core;
- “Specification” - the full name of the product and its clock frequency(2.80 GigaHertz)
- At the bottom of the screenshot, the system bus clock frequency and the characteristics of the first and second level cache are indicated;
Let's look at the "Mainboard" tab - motherboard.

- The “Manufacturer” field indicates the manufacturer (Asus);
- “Model” is the full name of the board model;
- "Chipset" - chip manufacturer (Intel) and its model (G41). This - " north bridge" chipset;
- "Southbridge" - data about " south bridge";
- Section “BIOS” - provides information about the motherboard chip of the same name;

- The “Type” line tells us the type of RAM (DDR2) and the mode of use (dual-channel);
- The “Size” field displays its full volume installed in the system;
- The “Timing” section shows the frequency at which it operates (Frequency) and its various delays (timings);
And let’s look at another screenshot - a very useful tab “ SPD"(Serial Presence Detect) or - "sequential detection circuit".

It is remarkable in that it gives us the opportunity, by opening the list under the inscription “Memory Slot Selection,” to “see” how many RAM slots are installed on the motherboard (in this case, two: slot#1 and slot#2). This greatly simplifies the situation when, for example, you need to quickly determine whether it is still possible to add a module to the computer and whether it has free connectors for this? We don't need to open it for this.
Below is detailed information on each slot separately. You can see which chips are used, which manufacturer, serial number products (once I used this number to check additional characteristics branded module "Corsair" on the manufacturer's website). Again - operating frequency, operating voltage (Voltage).
Now - let's move on to practice and find out how to repair a computer if it breaks down?
If your computer breaks down, you don’t have to take it to a service center when you can fix it yourself, it’s not as difficult as it seems at first glance. The computer repair methods given below are also designed for beginners. 20% of the repair methods here will solve approximately 80% of the entire problem (20/80). In computer services and so-called “Programmers”, in 8 cases out of 10 these methods are used. These methods are so simple that it is even strange why people pay so much money for repairs when they can do everything themselves.
Diagnostics
In order to repair something, you need to find out what is broken. That is, carry out diagnostics, but you should not neglect it because 100% confidence that it needs to be repaired will save not only money but also your nerves.
The computer does not turn on, there is no image on the monitor
What is the computer beeping at us?
CLICK HERE!!!
The most common repair methods
80% of all breakdowns are usually fixed using the same methods (the 20/80 principle); all of them are accessible and understandable; they can be found in this section:
In this chapter you will get acquainted with:
We repair your computer using safe mode
CHKDSK From Under command line windows, cleaning hard drive
System Restore
The magic F8 key
CHKDSK command, system reboots at startup
CLICK HERE!!!
OS installation (windows)
Sooner or later the time comes to reinstall or install operating system(Windows). Many people think that this is very difficult, but this is not so, anyone can cope with this, and this section will help you with this. In this chapter
You will meet:
Types, methods, methods of installing an operating room windows systems
Step-by-step instruction By Windows installation XP
CLICK HERE!!!
Setting up OS (windows)
This section is devoted to setting up and optimizing the operation of your computer; here you will find articles that answer the question of how to make it comfortable to work on your computer.
In this chapter you will get acquainted with:
Why doesn't video play on a computer or why codecs are needed
How to hide or show computer files and folders
How to remove a password Windows user XP if you don't know it
How to disable standard Windows firewall XP
Cleaning startup standard means
CLICK HERE!!!
Working with drivers
In this section you will find information related to computer drivers.
In this chapter you will get acquainted with:
How to find required driver for your computer
Computer drivers, what they are and why they are needed
How to install drivers on a computer
- Installing the driver for sound
The computer reboots
Troubleshooting
Problems or breakdowns of a computer are an everyday thing, in this section you will find their description and possible methods eliminating them.
In this chapter you will meet
: - How to restore computer speed
Worker windows table doesn't load completely
Required to press F1 key when starting computer
The time on the computer is reset
The computer reboots itself and overheats
CLICK HERE!!!
We fight viruses
Viruses are one of the most common computer problems, and you will find how to deal with them in this section.
In this chapter you will get acquainted with:
How to unlock automatically: task manager, registry, shutting down the computer and more
Task Manager is disabled by the administrator, how to enable it
What a virus cannot do or myths about computer viruses
We remove the virus that asks for SMS and blocks the computer
CLICK HERE!!!
Other
In this section you will find various and very useful information, of course related to computer technology.
In this chapter you will get acquainted with:
CISS. Continuous Ink Supply System for Epson printers, Canon, HP.
Beginner computer technician - getting tools Nella solneshko
Hi all. The last couple of weeks have been a lot of work, so the blog posts suddenly stopped appearing.
Now that I have free time, it’s time to do a pleasant and useful thing - blogging. Today we will talk about repairing your computer yourself. Which can be done not only for free, but also better than some masters. It is difficult to imagine the modern world without a personal personal computer or PC. We are used to the fact that computers surround us everywhere - at home and at work, in stores and other various institutions.
Wherever we are, everyone is working on computers. We use them for work, write diplomas and term papers, read interesting books and find out the latest news, play various computer games and watch interesting programs. And most importantly, we have the opportunity to communicate with our favorite friends scattered around the world.
However, it happens that such an irreplaceable thing as Personal Computer, fails. Do not rush to contact the service center specialists. In addition, the price of future repairs may slightly discourage you.
Let's try to understand the computer, find out and diagnose its breakdown, and try to repair the computer ourselves. Well, if it doesn’t work out, then we will always have time to contact a service workshop.
In addition, each user is able to carry out simple repairs on their PC themselves, without resorting to the help of specialists from a service center.
Will help you get rid of electrical surges in the network network adapter or UPS - uninterruptible source nutrition.
It won’t be difficult to purchase one; read more about how to choose a UPS in one of the following articles so you don’t miss it. Power surges electric current networks can most often arise when electrical appliances are incorrectly connected to the network, when you receive a large unevenly distributed load on one power line - for example: you plugged into one outlet through an adapter: a microwave oven, a heater and a kettle, which individually each take a lot of voltage, and together - a lot.
And if you also connect a PC, you will probably get that very sharp surge in electrical voltage that will damage your computer. It is very rare, but quite possible, that there may be a general breakdown of the transformer box, or a very strong wind “shakes” the wires and antenna, and so on.
Static stress in the human body may seem insignificant and almost invisible to the eye, but it can also affect the operation of your computer.
To remove it, simply place your hands against the battery or something iron, shake vigorously a couple of times, and after that you can safely begin repairing your PC with “clean”, non-electrified hands.
If the power supply is working properly, it is quite possible that the power button does not work when you turn on the computer. To check its functionality, you need to remove the power button connector and close it with a screwdriver. If the computer's power does not turn on, then the power button is not the cause of the malfunction of your PC, but most likely it is the power supply.

By shorting the power button, you may have the cooling fan turn on for a second. There may be several of them in a PC, and only thanks to them does case dust accumulate inside the PC.
Since complex electronics do not like dust, do not forget to clean and periodically blow out your PC. A vacuum cleaner, a can of compressed air or a soft watercolor brush are suitable for this. Read more about how to properly clean your computer in the article -.
1.1 The computer turns on and then turns off
In this case, the fault may lie either in the PC's motherboard or in its processor.
Capacitors located on the motherboard serve to rectify the overall voltage. When they overheat, they fail, losing capacity. To prevent this from happening, it is important to ensure that the PC does not overheat.
Straightaway motherboard don't throw it away. Due to overheating, it gradually fails. The computer freezes and “ blue screen death,” and only after a few months the computer’s motherboard may finally fail. Then you will change it. More about critical Windows errors read the article - BSoD errors.
The fact that the PC often turns off may be due to insufficient cooling of the processor. And it is likely that the computer's processor is fine.
In this case, having removed the static voltage from the hands in a way known to us, we disconnect the PC from the power supply, remove the cover, and carefully get to the processor located under the large radiator and large fan-cooler on the motherboard of your computer.
Disconnect the three intertwined wires of the cooler fan. Carefully remove the cooler from the radiator. Try not to use a screwdriver when doing this. Most likely, the cooler-fan is attached to the radiator with a clamp and can be easily removed.
Carefully removing the radiator with cooler, we will see a metal box, the lid of which we also carefully open by pressing the metal tab. And very carefully remove the computer processor.
If the processor is burned out, you will see it immediately. Take a close look at where the processor is installed; perhaps one of the legs is bent.
One option is to try to straighten it with a thin needle, but only as a last resort and last resort. Purchase thermal paste from a computer store that transfers heat from the PC processor to its heatsink. Using thermal paste, you can eliminate all the tiny gaps between the heatsink and the processor.
First clean the computer processor of old thermal paste and only then apply new one. Carefully return the processor to its old place, then install the radiator in its place and connect the cooler.
Try turning on your PC. If the computer does not turn on, the processor needs to be replaced. When replacing an old processor with a new one, be sure to lubricate the new computer processor with thermal paste.
1.2 The computer turns on and beeps
The PC turned on, but beeped. And this indicates a malfunction of some part of it. We all know that when turned on, the computer makes one short beep. This shows us that all the components and parts of our PC are working properly and the initial test has been successfully passed.
The set of PC fault melodies is different. Their purpose depends on the computer manufacturer and its BIOS model. It's easy to find out. To do this, find the BIOS chip on the motherboard.
If the chip is marked AMI, see the table given in this. If Award, look at the following table given in the same article. If the inscription on the chip is different, you will need to check it on the Internet.
To do this, enter your name in a search engine. BIOS chips on your computer's motherboard.
1.3 Overheating of computer components
One of the most common reasons The reason why the computer constantly reboots is due to overheating of the computer's processor or video card. Always monitor the working condition of the fan-cooler located on the PC video adapter.
You can view the values of temperature sensors using the program that I talked about in the article -.
During the summer heat, it is better to refrain from playing energy-intensive games on your computer. Initially, the appearance of a blue screen of death or artifacts on the screen is associated with the inability to fix an error in the operating system kernel itself.
If any executable program or computer driver wants to execute an impossible command. You can try to eliminate the blue screen by simply restarting your computer. But if you do nothing, the error will return again.
The sound of a computer being turned on if one of the cooling coolers is humming is reminiscent of a running tractor. The computer cooling system with fan-coolers wears out, the seal in the bearing becomes thinner, dust and dirt get there, which leads to inevitable vibration and humming.
In this case, find out which fan is making this sound and replace it with a new one. This turns out to be quite simple. The cooler of the computer power supply practically does not hum, which means that the cooler remains on the video card, processor and case.
You have identified a humming cooler-fan and decided to eliminate it, which means that you no longer feel sorry for such a worn-out cooler and you can make an attempt to revive it. Then carefully remove it from the radiator with a small Phillips screwdriver and place it in front of you on the table.
1.4 Remove the cooler and try to clean it
The place where the wires exit is usually covered with adhesive tape. After removing this film, see if it is possible to disassemble the fan-cooler according to components. If this is possible, then we carefully do it. The cooler plug can be removed using a small flathead screwdriver.
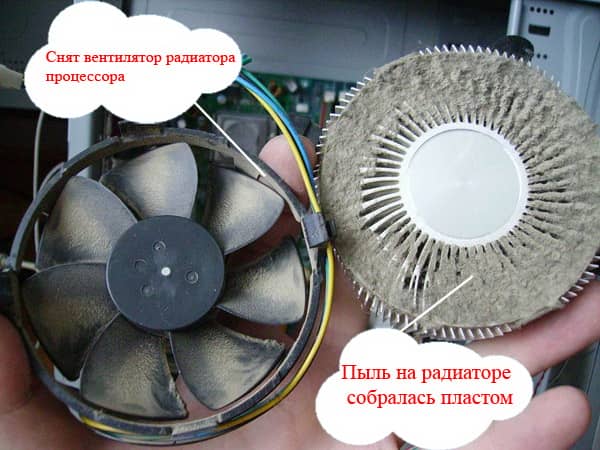
We release the axis with the fan blades. The dirty white piece of plastic that appears is the worn-out remnant of our fan gasket. This is what causes the loud and harsh sound of the computer.
Moisten a cotton swab with cleaning agent or cologne, and clean the fan axis and the place where it will be inserted in the future. Now it’s time to make a new gasket.
To do this, use a stationery knife to cut a small piece from the core of the gel pen. The resulting thin ring will be your new gasket for the cooler fan axis.
Use a small drop of machine oil or similar as a lubricant. Now put the axle in place with a new gasket, secure everything with a plug.
At correct installation old fan-cooler into your computer, you will no longer hear an unpleasant sound when plugged into the network.
1.5 Slow startup and computer performance
The computer is turned on, but the system boots too slowly. The folders required for work “load” for more than a minute, as does the launch of other programs on the computer.
Most likely the hard drive is to blame - such a malfunction in the PC is typical only for it. Perhaps your hard drive is dusty, just try to carefully blow it out. Keep it sealed - no need to disassemble.
If this does not help, then you will need to fully optimize your computer. I described in detail how to do this in the articles:
To protect your computer's hard drive, it is better to always have a backup copy of all your data on a removable external hard drive connected to the computer via a USB connector or on a separate drive in the form of an image created using special program Acronis. The capabilities of which I described in the article - .
It is best to store photos and other personal files and the operating system reinstallation program on an external optical drive, in the original box in a convenient place in plain sight.
General computer operating tips
1. When finishing work on your computer, try to turn it off from the power supply. This will protect your PC from sudden power surges, which happen quite often. The fact that the computer's power button is turned off will not save it from sudden changes in voltage in the electrical network.
Because of power surges, the power supply of my computer, printer and active column. Now I don’t step on the same rake.
2. It is better to leave the computer running all day than to constantly turn it on and off. This adversely affects his working resource.
This is primarily due to increased wear and tear on computer components, the elements of which expand at high temperatures and contract at low temperatures (when the computer is turned off). Therefore, computers in the gaming room, where they work day and night, last much longer than in your home, for example.
3. The computer does not tolerate sharp impacts on the case. At best, this will shake up the internal system dust.
At worst, a heavy radiator central processor it may fall off from a rough impact, which will lead to a temperature jump inside the case and failure of the PC processor itself, as well as damage to the video card and its connector.
The hard drive also cannot withstand sudden shaking and can easily break. And in total, computer repair will cost you a lot. By the way, the hard drive must be firmly fixed in the computer case. This will protect it from vibrations during operation.
4. Try not to drink any drinks while on the computer. Accidentally spilling liquid on a computer case can damage your computer.
5. When working with a computer, use an anti-virus program. Virus programs - Trojans, as a rule, zombify your computer to hack some of your files.
This means your PC will be hacked without your permission and knowledge. It won't actually harm your computer. If your PC gets a virus that can disrupt the computer’s control algorithm, then most likely something in the computer’s operation will fail.
If you often have problems with viruses on your computer, I advise you to read the section -. It contains articles with which you can easily remove the most evil versions of viruses.
7. When going to the store to buy a new computer part, be sure to take with you a broken old part to compare the part you need to replace your computer. This will make it easier for you to determine what exactly you need. It is quite possible that you are offered to buy something that is completely unsuitable for your computer model.
2 Conclusion - DIY computer repair
This article outlines the main points for repairing your computer with your own hands. If other malfunctions are detected, it is better to contact computer repair specialists or a service center that has all the equipment necessary to repair your computer.
Each PC element and part has its own resource reserve. It is not at all necessary that after the allotted period for operation of a PC part has expired, it will fail. This durability is typical for older computers.
As a rule, when correct operation, they only need to replace the fans. However, their performance is several times less than that of some modern mobile phones.
In the future, we will consider more complex repairs of computer components, such as repairing the power supply, for example.
so as not to miss. That's all, may your computer serve you much longer than you expect :)
Hello, it's been a while since I wrote on my blog. It’s a lack of time, or a lot of things to do, or a spring mood, or maybe I’m just looking for “excuses.” Apparently, we need to find a way to “kick ourselves.” Perhaps you should read some book on motivation. Okay, let's move on to the post itself. Since my blog is dedicated to the topic, I simply had to write this post. I think the situation is when the computer just won't turn on familiar to every PC user. What to do in such a situation? You just need to read my article and take a couple of methods to note. I'm sure the answer to this question has been written thousands of times already, but I know that helpful information
There is no such thing as too much, and I will try to make my contribution. Perhaps someone will want to immediately take the computer to specialists, but there is no need to rush, I sure that in half the cases you can fix it yourself. Just imagine in 50% of cases you don’t have to spend at all
I will give a short list of steps that will help you, if not fix your computer, then at least identify the problem. Knowing what exactly is faulty is already half the battle; you can try to replace the part yourself or still take the computer to be repaired, but be sure that they will not “hang noodles on your ears.”
So let's look at 2 options for computer failure:
- the computer does not start at all;
- The computer starts up, but there is no image on the monitor.
Let me make a reservation right away that there is no universal repair algorithm that is 100% suitable for any computer. My article is more of a guide to actions that even an unprepared user can take to repair his desktop PC.
Option 1. The computer does not turn on (the coolers do not spin, the indicators do not light up).
Let's take the path from simple to complex.
Checking the power supply
First, you should check the electricity in the outlets. Yes, yes, don’t be surprised, but many people don’t think about this basic action. This is especially true for apartments with separate electricity circuits for lighting and sockets. That is, the lights in the house may be on, but the sockets may not work.
Then be sure to check all connections from the outlet to the power supply itself, since the surge protector or UPS may be turned off.
The power supply went into protection
Quite often, the computer refuses to turn on after a power outage. The fact is that all modern power supplies have a function of protection against voltage surges or short circuits electrical circuit. In such cases, it simply “goes into defense,” that is, it does not supply power to system board.
To bring it back to life, just unplug the power cord from it for a few seconds (10-20 seconds), then plug it back in and try to turn on the computer. It is very interesting to watch the surprise of users when this method works =)
If this time everything is quiet, then don’t be upset and have to arm yourself with a Phillips screwdriver. First of all, remove the left cover of the system unit.
Disable everything unnecessary
After we get to the computer components, we just need to carefully inspect the motherboard and other components. If you do not see any signs of overheating or other visible signs of a malfunction, then we try one by one turn off the power to the hard drive and optical drive , you can even remove the RAM, which will help eliminate their malfunction. In addition, by turning off the components one by one, we reduce the load on the power supply, which can also cause a malfunction (this is written a little below). After each disconnected part, we try to turn on the computer, if it eventually works, we try to return the components to their places, finding out which part is causing the malfunction.
I almost forgot, pay special attention to the capacitors on the motherboard, if they are swollen, they need to be replaced. If you have no experience in soldering components, it is better to contact a service center.
This is what a good and swollen leaked capacitor looks like.
Checking the power and reboot buttons
After disconnecting the components, you should try to disconnect the front panel of the computer to prevent malfunction or sticking of the power and reboot buttons themselves. To do this, you need to find a connector on the motherboard that is connected to 3 or 4 thin wires from the front panel of the case. Typically, such a connector is signed as “ f-panel", and the connectors for the power or reset buttons are " power sw" And " reset sw" respectively. You just need to pull these connectors out of their places, but before that it’s better to remember how they were located.

After disconnecting the button connectors, you need to try to close the contacts of the power button with a screwdriver (indicated as power sw or +pw- on the board itself), as in the photo below!!! Be careful not to short-circuit anything unnecessary, as this may lead to undesirable results.

In my case, I bridged the 3 and 4 upper left contacts. On the motherboard designation they are signed as “ +PW-»
If after this procedure the computer does not turn on, return the button contacts to their places and move on to the next step.
Checking the power supply
If the basic steps do not help, we can assume that the power supply is faulty. It’s good if you have a spare unit at hand, then we simply connect the power supply to the processor and motherboard from a new power supply unit; if there is no spare unit, then we try to test the voltage of the installed one. How to do this, I wrote in the article How to check the power supply.
Quite often, the cause of a power supply malfunction is swollen capacitors, which require replacement in service center They will take about 500 rubles.
Turn it on on your knee
Let's assume that all the previous steps did not produce results, then you can try to turn on the computer on your knee. What is the essence of this method?
You need to remove the motherboard from the case, having first disconnected all the wires from it and unscrewed several bolts (usually 6 or 8). Thus, we will receive a motherboard with an installed processor, cooler and RAM. You also need to connect the wire from the monitor to the video card, which will have to be plugged into the connector if there is no built-in one. After the motherboard is removed, connect power to the processor and the board itself. That is, we must reproduce the process of assembling a computer, only outside the case.

Then you need to put it on cardboard or any other non-conductive surface and try to “start” it by closing the contacts with a screwdriver, as described above. Do not place the motherboard on carpet - be aware of static electricity!
If this method worked, then you need to look for a problem when assembling the computer inside the case. For example, sometimes the cause of a malfunction is a bolt that got lost during assembly and gets between motherboard and the body and, accordingly, closes the contacts on the back side of the board.
If none of the above methods have made the computer work, then you need to prepare yourself for one of the most unpleasant breakdowns - replacing the motherboard. Of course, this should be done if you are confident that other components are in good working order. It’s good if the model is not too old and you can buy a new one with similar parameters at a component store. Quite often it happens that it is not possible to find a new analogue, then there are two options:
- buy a used board (which I do not recommend);
- buy a modern motherboard with replacement of the corresponding components (processor, RAM, cooler).
Option 2: The computer turns on, but nothing on the monitor
We rule out a malfunction of the monitor itself
As a rule, on working monitors, an orange/yellow or red indicator should light up when turned on, and after a signal is received from the computer’s video output, the indicator changes its color to green or blue. If you are not sure how the monitor works, then you can check it by connecting it to another computer or to the video output of a laptop.
Quite often, the cause of monitor malfunction is a dead backlight. This malfunction can be diagnosed if with the computer turned on try turning the monitor off and on again. If the “picture” appears for 1 second and disappears, then the monitor backlight is faulty. Alternatively, you can also try looking at the screen from above from a higher angle. In some cases, you will be able to see a barely visible familiar image, which will also indicate a malfunction.
Checking the video card
If we are confident that the monitor is working properly, we proceed to inspect the system unit.
Of course, the first thing you should do is check the integrity of the video cable connection. If there are no problems with this, then the first thing that comes to mind in this situation is a faulty video card, but checking its performance is quite problematic if there is no integrated video card or a spare one. Therefore, in such cases, the simplest thing would be to check the RAM, and leave checking the video card for later if nothing else helps. You can also ask your friends for a video card and try to run it with it. The only condition is that the video card connectors must match, and it is advisable not to take a very powerful one, since your power supply may not have enough power.
Checking RAM
I already wrote an article about how to test memory modules using the MemTest program, but such a test is suitable for cases when the computer spontaneously reboots or goes into BSOD.

In a situation where no image is displayed on the monitor, you need to try removing all memory modules. If they are absent, the computer should emit a continuous squeak. If you hear this, this is very good and means that the computer is getting to the point of checking the RAM, which means that most likely the problem is in the “slats” themselves. In this case, it is worth trying to install the modules one by one and find out which of them is causing the failure.
Resetting the BIOS
Reason for resetting BIOS there may be unsuccessful dispersal measures computer system by the user or setting incorrect settings. One way or another, this simple action will help avoid many problems.
At the next step, it is also advisable to make sure that the power and reset buttons are not stuck. How to do this is written above.
As you can see, any user can perform all these actions independently. I really hope that my tips will help you fix your computer. And only if none of the above actions bring results, you can give the computer to specialists for a more thorough study of the problem.