What you need to assemble a computer. How to build a budget home computer yourself
Hello friends! If you are a computer enthusiast, then learn on your ownAssembling a computer will not be difficult for you.
When I wrote this article, I immediately showed it to a person who had never assembled personal computer. He read it carefully and began asking me questions, from which I realized that the publication urgently needed to be supplemented with many little details, only then would it become understandable to beginners. As a result, I almost completely rewrote the article several times and only now am I offering it for your consideration.
In my last publication, I explained to you, but today we will independently assemble a classic PC.It is best to assemble a computer on a table so that you can see everything and be as comfortable as possible. Let's start withapplying thermal paste to the processor and installing it in the motherboard socket, then we assemble the processor cooler and connect it, after that we insert RAM modules into special connectors on the motherboard, then mount the power supply into the case and tighten the wires, secure the SSD, HDD in the system unit, and only after that install the motherboard in the case...
How to assemble a computer yourself
First, we need to buy thermal paste and apply a thin layer to the processor. It is inexpensive and is usually sold together with a special hard card, with the help of which it is literally smeared over the surface. Why do you need thermal paste? During operation, the processor heats up very much and, with the help of thermal paste, effectively removes heat from itself to the cooling radiator.

Installing the processor into the motherboard
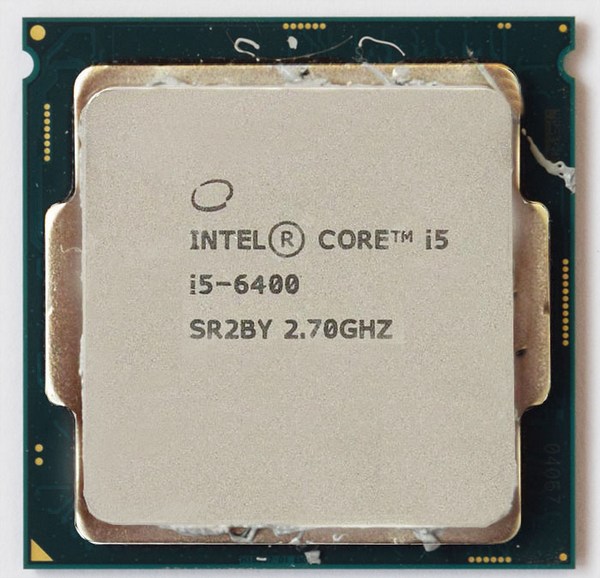
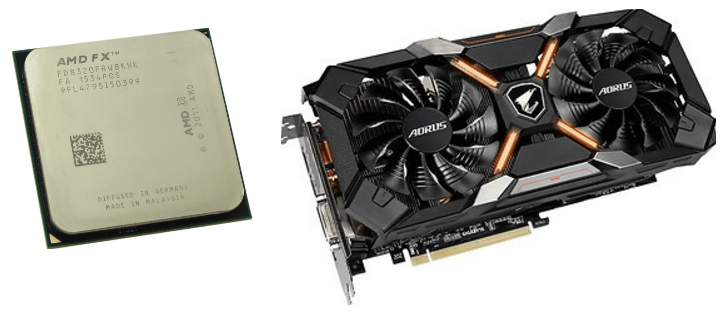
Now let's install processor in, in my case i5 6400 and Asrock z170m pro4s. Install the processor into the socket very carefully and carefully so as not to damage it. This especially applies to AMD processors, since, unlike Intel processors, which have contact pads, first there are so-called “legs”, bending which the processor will stop working. So, we open the socket on the motherboard using the side latch and look at the keys that show us how to insert the processor correctly.


We take the processor in our hands and see that it has corresponding recesses and a triangle in the corner, thanks to which it will be difficult to make a mistake during the installation process.
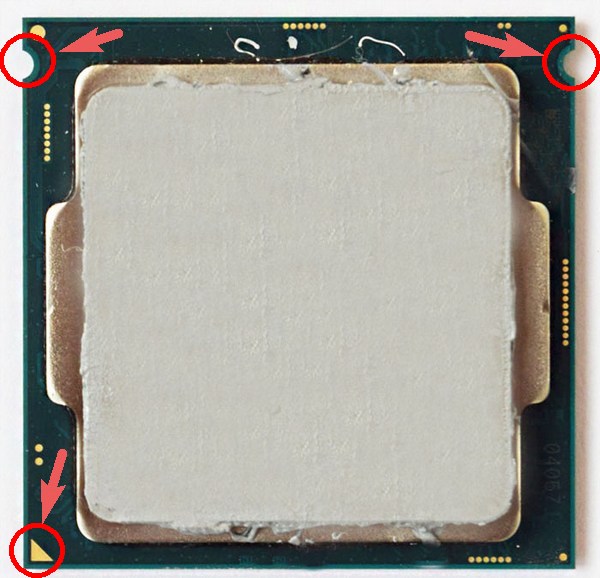
With a gentle movement of your hand, simply place the processor in the socket,

We make sure that it does not hang out there and close the side latch.

CPU cooler
Next, I prefer to outfit the motherboard with full program and I install RAM on it immediately, outside the case, because personally, with my big hands doing this in a tight space (inside the case) is problematic.
So, we look at the motherboard and see special connectors for mounting the cooler, and that’s where we’ll install it.


This is done simply, take the cooler, put the special legs into the holes and snap them into place.

After installation everything will look like this.


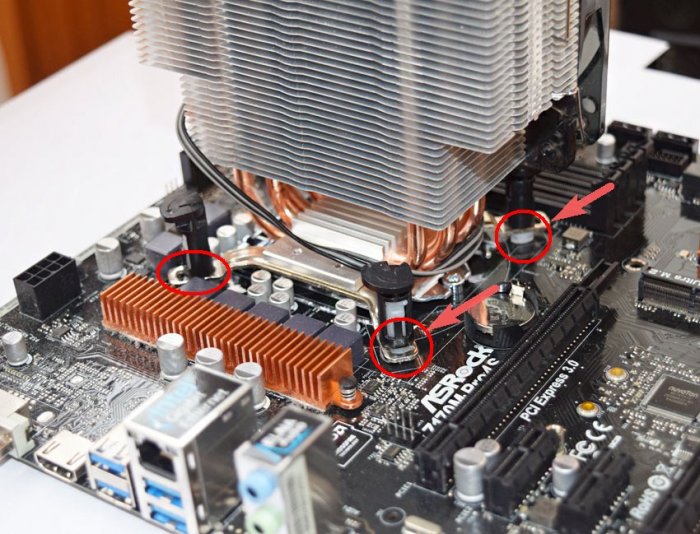
Don’t forget to also connect the cooler’s power to a special connector on the motherboard called CPU FAN.


RAM
power unit
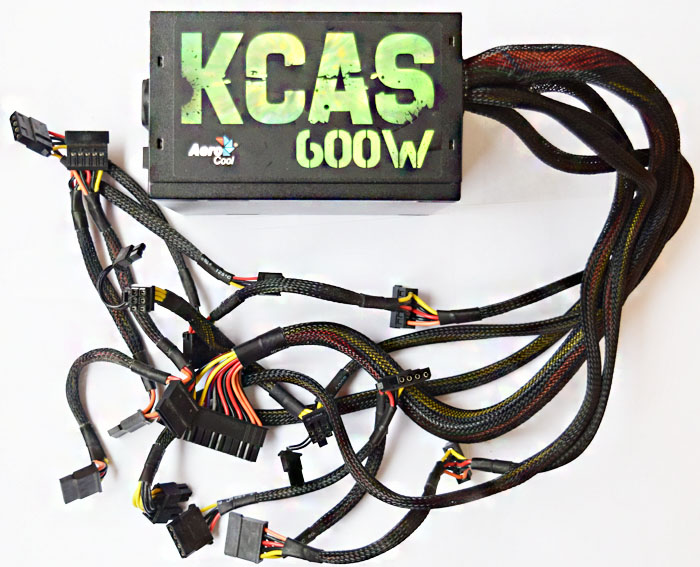
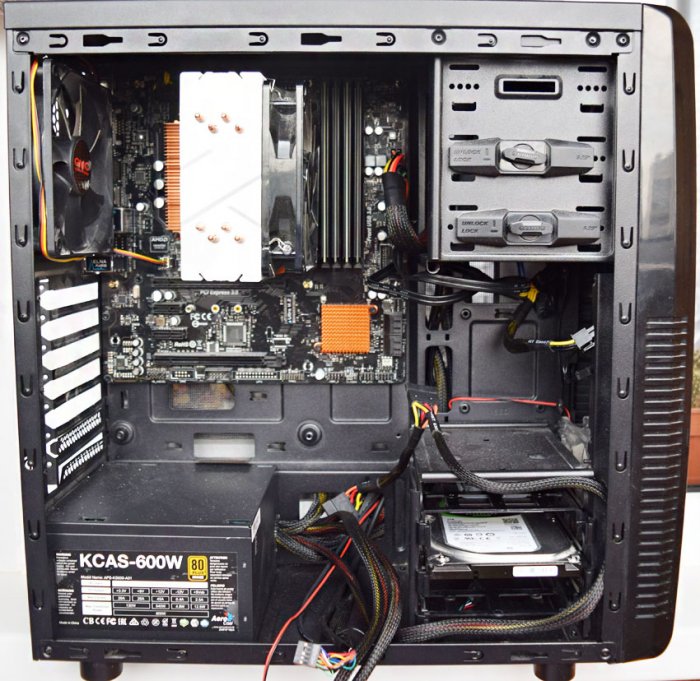
Now that motherboard fully charged, proceed to installation in the case. Many people advise installing the motherboard into the case first, but I prefer and recommend that you start with the power supply, because if you follow my advice, you can stretch all the necessary wires properly and avoid damage to the motherboard, since the unit is usually very large and takes up a lot of space . One awkward move and you can easily damage the microcircuits - goodbye motherboard. In my case, the GMC Forge case and the Aerocool KCAS 600W power supply.
Installing the unit is a very simple process. We install, stretch the wires as desired and screw the screws into special holes on the back of the case.


I would like to note that the power supply is always installed so that the fan is directed downwards when the unit is mounted at the bottom. The inside of the case has its own microclimate and its own temperature, so it will be better if the power supply draws in cool air from the outside rather than warm air from the inside.
SSD and HDD
Now before installing the motherboard for the same reason as with the power supply. We insert the solid-state drive and hard drive into the corresponding cages, if they exist; if they do not, then simply screw them to the case. I will have a Patriot Spark 128gb and a Seagate Barracuda 7200 1000gb working hard on my system.


Motherboard
Let's move on to installing the motherboard into the case. The mother itself has special holes for fastening; depending on the model, the number of these holes may vary. We insert the motherboard into the case in accordance with these fasteners and tighten it with the screws that are included with the case.

CPU power
And finally, all we have to do is connect all this stuff together. Let's start with processor power. The power connector can be 4pin or 8pin and is usually located directly next to the processor. We find the corresponding cable at the power supply and connect it.


Motherboard power


Case cooler
Let's move on to connecting case coolers for injection/exhaust. They are connected to the corresponding connectors on the motherboard with the name CHA FUN or SYS FAN or similar.


Now let's connect our drives using SATA interface cables to the corresponding slots on the motherboard.

Don't forget to connect additional power to our drives. In my case, this can be done from the back of the case.

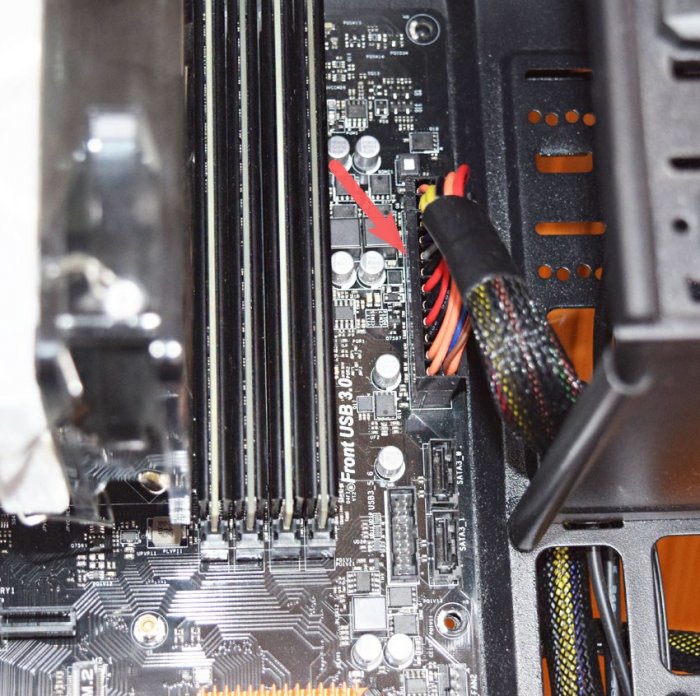
Connecting Front Panel Cables to the Motherboard
And finally, I decided to leave the most difficult thing, which causes some problems for most users, namely connecting the power to the front panel. All connectors are located at the bottom of the motherboard. Let's start with the audio outputs. Take the wire with the name AUDIO and connect it to the connector with the same name.

Greetings to all readers of my blog! Today’s publication is devoted to a topic that interests many active PC users: “How to build a computer yourself and from scratch?” Therefore, I will try to help you in choosing parts for a desktop computer that is relevant for 2016-2017.
We will look at the components for the system unit, figure out how to install them, and discuss which components will be best choice. I will also tell you how to choose a good monitor. And to provide more detailed information as examples, I gave several assemblies suitable for different price ranges. Let's get started!
System unit components
As you yourself understand, the most important thing in desktop computer- This system unit. Putting all the necessary ingredients together, checking their compatibility, and then making candy out of it with your own hands is much more difficult, and also longer. So let's start with it.
So, the system unit usually includes: a cooling system (cooler), hard drive, power supply and motherboard on which the processor, video card, audio card and RAM. Let's look at everything in detail.
Essentially it is a frame for other components. Before purchasing it, and indeed before starting to select components for your PC, you should decide for what primary purpose the computer will be assembled: for training or office work, for games, or maybe for developing heavy projects?
Depending on this, the search for suitable spare parts for the future car will be significantly narrowed.
So, for example, to support graphics at the maximum level in various heavyweight modern games or in other situations where high-quality frame display is required, you will need two video cards. This means you should choose a motherboard with two slots for them.
Well, if you plan to replenish your machine with new gadgets after use, then choose a board with a larger number of connectors. This also applies to assembling gaming computers. Typically these motherboards are ATX format.
Be sure to check the compatibility of the processor with the motherboard. Their connectors must match.
When choosing an equipment manufacturer, first of all, pay attention to products from the Asus and Gigabyte brands. They have proven themselves well in the market.

Processor power directly affects the speed of a personal computer. The most powerful processors have a clock frequency of more than 4 GHz and a cache memory of 8 MB or more. However, they are quite expensive.
If you are looking for this part cheaper, and you don’t need such power, then your requirements will be fully satisfied by standard processors with clock frequency about 2 GHz – 3 GHz.
Today, the market leaders among processor manufacturers are Intel and AMD. Many people prefer the first company, since their equipment is somewhat more powerful. But similar AMD components are a little cheaper.

Or, random access memory (RAM) is needed to store temporary data and executable machine code, which in turn are processed by the processor.
There are types of RAM such as DDR2, DDR3 and DDR4. The first species is on the verge of extinction, but the young DDR4 is rightfully considered the leader. It entered mass production in 2014 and has leapt ahead in its performance, significantly increasing transmission speeds while reducing the machine's power consumption.
For office computers, a memory capacity of 2 GB is suitable; for ordinary home use, it is advisable to install more. The optimal volume would be 4-8 GB. However, if you want to get the most out of your computer, you can increase the RAM size to 16 GB or more.

If you want to store personal information on a PC, then you will need an SSD (solid-state drive) or HDD (hard drive) with a large amount of memory. They are responsible for long-term data storage.
Perfect for home use hard drives with a rotation speed of about 7200 rpm and with a memory capacity in the range of 500 MB - 1 TB. The most famous brands: Toshiba, Fujitsu and Western Digital.
As for SSD, this type of drive will cost much more and is more suitable for corporate machines. The leaders among manufacturers are: Intel, Samsung and Micron. However, there are other good companies. Their list is quite long.))

The main characteristic of a power supply is its total power across all outputs (buses). It must be 40-50% greater than the total power consumed by all components of the system unit. This will save money in the future when upgrading your PC, and will also reduce the likelihood of PSU failure.
Most machines are suitable for a 350 W power supply, for gaming machines - 500-700 W.
I think here you will have a question: “Is it possible to find out exactly what indicator is required for my assembly?” Yes you can. There are special online calculators for this. In addition, you can always consult with specialists in hardware stores before buying a power supply.
I advise you to take a closer look at the products of STM, FSP and Cooler Master. I also want to emphasize that good power supplies cost no less than $40-$50.
Collecting details into a single picture
Now you are familiar with the main components of the system unit, but you still don’t know in what order and where to connect them. Let's look into this.
- To start, you'll need a case. Select it so that it circulates air well (it is open or, better yet, has good system cooling). Sometimes cases already have built-in power supplies;
- First, insert the I/O controller into back panel housings;
- Afterwards, the drive is usually installed in the front panel;
- If you bought the power supply separately, now is the time to connect it. It is secured with screws in the rear upper part of the case;
- To install the processor, you need to open the socket on the motherboard using a lever. It will be in the shape of a triangle. Place the processor with the correct side to the connector so that the shape of the triangles coincides, and connect the latter with light pressure. Then secure the processor by pressing the lever;
- This step involves connecting the cooler/radiator. Follow the attached instructions;
- RAM is very easy to install. You just need to find the slots suitable for the RAM contacts on the board (they stand out from the rest externally) and after matching, connect the first one with a light press;
- Now we are introducing the motherboard itself into the system unit. To do this, match the holes for the screws on the case and the motherboard, and secure everything with screws;
- At this point you should connect the cables of other components to system board. Here the connection methods vary, so it is better to consult the instructions for help.
10.Install the video card(s);
11.And finally, you should connect the motherboard and power supply.

Now you know how to assemble a system unit yourself.)
Examples of finished assemblies
In this chapter, I tried to answer your question: “Can you give examples of assemblies and tell me approximately how much they will cost?”
About 30,000 rub.
About 55,000 rub.
About 75,000 rub.
More expensive than 100,000 rubles
| Intel Z170 Express | |
| Intel Core i7-6700K, 4 cores, 4.0 (4.2) GHz, 8 MB L3 | |
| 2x 16 GB DDR4-2400. | |
| Storage | 2x SSD, 480-512 GB + HDD, 2 TB, 7200 rpm |
| Video card | NVIDIA GeForce GTX 1080, 1607 (1733) MHz, 8 GB GDDR5X |
| Thermaltake Neva 750 W | |
| CPU cooler |
The computer configurator with compatibility check allows you to quickly assemble a system unit with the user’s needs technical characteristics. Using our online designer, you can easily assemble a reliable office machine, a home multimedia system unit, or a powerful gaming setup.
Computer assembly online
Nowadays, like many years before, assembling a computer from independently selected components is popular. This is a good opportunity to choose what you want. Nothing limits you; there are hundreds of options available for assembly, among which there is sure to be one you like.
Our online store offers the opportunity to assemble a computer online through the configurator. In it, this process is presented in the form of categories of components, from the processor to the power supply. Each category contains an expanded range of models with descriptions of characteristics for ease of selection.
To simplify the selection of components, the configurator has a compatibility filter for the main components of the assembly. For example, by selecting a specific processor, the following components are automatically filtered by compatibility. Also, you will be presented with a choice to install operating system. After completing the assembly process, you receive the final result based on three parameters: price, technical data, rendered image. After placing an order and confirming it by phone, our specialists assemble this kit and check its functionality.
The advantage of this method of purchasing a system unit is that you not only choose the components you want, but also have the opportunity to choose the brand or manufacturer of the part.
Having assembled a certain configuration and completed by clicking the assemble/buy buttons, the assembly is assigned a certain serial number, by typing in the product search bar, you can find this PC and send a link to it to friends or acquaintances for consultation or recommending them for purchase.
An important feature of our configurator is the “get an expert’s opinion” function by sending your request via this form, You will receive a detailed answer with a recommendation for email, specified by you.
Try it and see for yourself - assembling a computer online is easy and simple! In case of difficulties, you can always get advice from our specialists on all issues that interest you.
It is worth noting the following point. Budget motherboards are equipped with a 4-pin CPU power connector. So, we divide the existing 8-pin cable into two 4-pin cables with our hands and connect to the board. Expensive motherboards, on the contrary, are equipped with an additional connector in addition to the 8-pin connector. The trick is that in this case everything will work from one 8-pin wire. An additional port is needed if, for example, you seriously overclock CPU. But then you will need an accompanying power supply or adapter.
Step #5: installing storage drives and optical drive
For desktop PCs, there are two most common drive form factors: 2.5-inch and 3.5-inch. Plus they are gaining popularity solid state drives with M.2 connector. As for the latter, everything is simple with this form factor: the device is installed directly into a port soldered on the motherboard. But 2.5- and 3.5-inch drives must first be secured in the case.
In 99% of cases, the case is equipped with a special basket with a slide. The manufacturer also indicates in the specifications the number of slots for 2.5- and 3.5-inch drives, as well as 5.25-inch devices. In the case of the Fractal Design Define R5, two metal baskets are used. The first (top) can accommodate five 3.5-inch or the same number of 2.5-inch drives. The second (bottom) is three. In some cases these baskets may be removable. Plus, this particular case has two seats for 2.5-inch drives behind the chassis.
Not all computer cases optionally support the installation of 2.5-inch drives. True, many SSD manufacturers complete their products with special adapters for 3.5-inch sleds. They are usually packed in cardboard boxes, but not sealed in a blister.
Assembling a new computer is quite a task, because everywhere you look, store shelves are simply bursting with all kinds of PC components. How to choose among this squeaking, buzzing, winking mass of light bulbs what is worthy of becoming the “internal organs” of your future “family member”? And so that these “organs” are compatible with each other?
Some people think that it is better to entrust the choice of filling for the “iron pet” to specialists or to purchase a system unit already assembled, but we are not looking for easy ways. Assembling a gaming computer is not such a difficult task when you have a helper. Today we will learn how to use the free web service “Online PC Configurator” from one computer store and create 3 builds for games in 2017: up to 30,000 rubles, up to 50,000 rubles and up to 100,000 rubles. Believe me, even a second grader can do it!
How to Determine What Hardware You Need
The selection of components for a PC is usually followed by choosing the motherboard and other parts, taking into account compatibility. When assembling a gaming machine, I advise you to change this order a little, because...No, I don’t urge you to sweep the latest generation of powerful and expensive video cameras off the shelves. To buy exactly what will meet your needs and not spend too much, it’s better to do this:
- Make a list of toys that you are going to play on your new computer (after all, we are building a machine for games).
- Go through the official websites of the selected games and write them down system requirements. It is also advisable to look at resources where gamers communicate and take a closer look at their recommendations for choosing hardware. Sometimes these tips are more practical than those from the developers.
- Take the highest system requirements as the basis for the future build.
The key link when selecting components for a gaming PC is the combination of processor + video card (sometimes + monitor). We select the rest for them.
How to properly distribute your budget
The budget allocation survey is no less important than the correct selection of hardware, because when putting together an assembly there is always a temptation to add something extra to it, and money tends to run out unexpectedly.The set of components for the system unit of a gaming computer includes 7-15 items. Our task is to divide them into 3 groups according to degree of importance:
- A key link in the future assembly – processor and video card. These are the most important and usually the most expensive devices.
- Equipment of the 2nd stage– what is necessary for the operation of a PC and what you cannot do without. This includes: a motherboard, a drive for installing the OS and programs (optimally SSD), a processor cooler and a power supply. The power supply is one of the last to be included in the assembly, but we reserve funds for it in advance, since “”.
- Equipment of the 3rd stage. This group includes what you can do without if you don’t have enough money (to buy more later) and what you can save on: RAM (instead of 32 GB, 4-16 GB is enough for the first time), a second drive, optical drive, discrete sound card, peripherals, system unit case. As for cases: if the design with bells and whistles and the famous brand, which mainly determine their cost, are not particularly important to you, buy a regular inexpensive case that is suitable in size.
Devices of the first and second stages are 80-90% of your costs. Cutting the budget for them is extremely undesirable, because this is what will bear the main burden “on its shoulders” for the next 3-5 years. If the optimally fitting part seems too expensive to you, it is better to look for it in other stores.
When choosing equipment of the third stage, do not go for cheapness. Savings should in no case concern the quality side of devices! Only quantitative.
Economy gaming computer for 30,000 rubles (without peripherals)
Well, we've sorted out the theory, it's time to start practicing. Free online configurator, which I mentioned above, belongs to the computer store "DNS". This is not an advertisement, just this service seemed to me the best among analogues specifically for untrained users. It does a good job of checking the compatibility of devices based on various parameters, has an automatic calculation of the cost of goods, and sometimes provides useful hints. In addition, it is very easy to use, and the finished assembly can be saved in your account on the store website. There is no need to buy anything after this.Before the build starts, the service page looks like this:
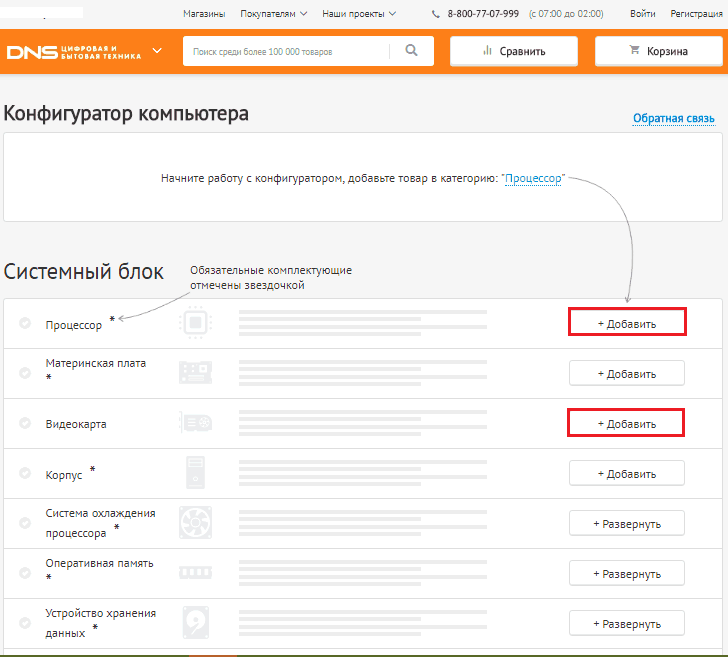
Let's start by including two key devices in it (I think everyone understands how to do this). The first is the processor. The main parameters for choosing a product (filters) are collected in the column on the left. Here are the criteria I set to select the models that suit me:
- Manufacturer: AMD. Since we are building a budget gaming computer, I give preference to this family.
- For a gaming computer.
- With a free multiplier and 8 cores.
- No cooling system included.
The configurator selected 5 processors for me at prices ranging from 6,900 rubles to 11,300 rubles. The cost of the first three is almost the same, the performance is the same, so I will choose the less hot and most energy efficient model AMD FX 8320E. To add it to the assembly, press the button " Included».

- For gaming PC.
- Manufacturer: AMD.
- Video memory capacity 2-4 GB.
An automatic filter is also included here " Compatible" It is present in every tab, but sometimes it is worth turning it off. I'll tell you why a little later.
The service selected 14 models. By brief description In the catalog it is difficult for me to understand how they differ. To see all the characteristics of the device I like, I will double-click on its name. This will open the product card for me with detailed description and pictures.
To return to the configurator I will click " Back to catalog».
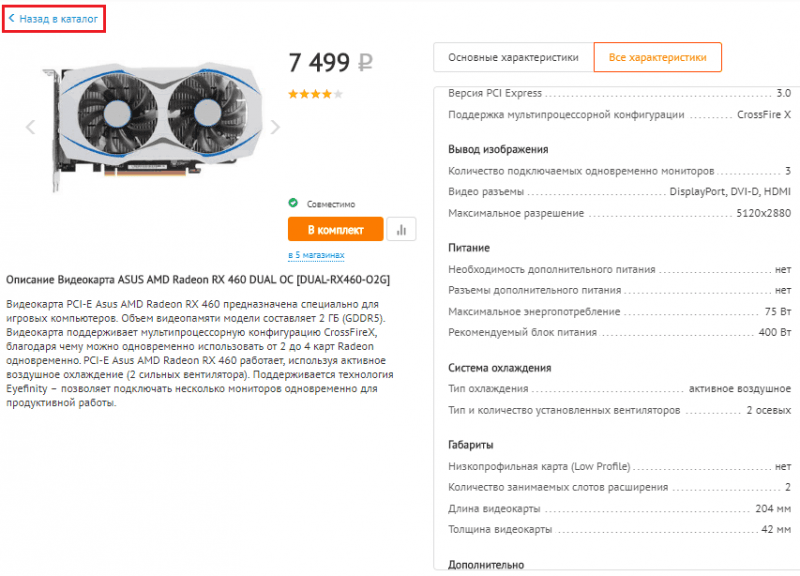
Having looked through all the models that suit me in terms of parameters and price, a not too expensive one is sent to the kit ASUS AMD Radeon RX 460 DUAL OC. By the way, it does not require additional power.

So, the key components have been selected, let's move on to the devices of the second group. Next up is the motherboard.
The configurator found 4 models for me that were compatible with the processor and belonged to the gaming class. After comparing their characteristics, reading reviews and testimonials, I send them to the assembly MSI 970A SLI KRAIT EDITION, since, all other things being equal, it is slightly cheaper than the others.

It's time to choose a cooler. My criteria:
- Power dissipation – from 100 W (I focus on the TDP of the processor – 95 W).
- Base material – copper.
- Type - tower.
- Connector – 4 pin.
Socket AM3+ compatibility is automatically set. The choice fell on inexpensive DEEPCOOL GAMMAXX 200T.

I wonder if I'm on budget? At the top of the configurator the total cost of my potential purchases is displayed. There are about 9,000 rubles in stock, so so far everything is fine.

What is this red-green stripe next to the price and why does it say “Compatibility Issues” and “Non-Optimal Power Consumption”? It turns out that this is also normal, because I have not yet included the power supply and case in the assembly. If the problem notification (red icons) remains after adding all parts of the system unit to the kit, then you have made a mistake somewhere.
- Capacity 120-128 GB.
- Interface SATA-3.
I'll look at other characteristics in the descriptions of the models.
I’ll take the fastest one available to me at a price - Sandisk SSD Plus. 120 GB is quite enough for the first time. Later I will buy an additional hard drive to store files.
By the way, if you did not add a PC case to the package, the configurator will consider the SATA interface incompatible with your devices. Why this was done, I don’t know. To avoid this distraction, simply uncheck the "Compatible" box.

The second group is almost finished. There is still a power supply left, but I will choose it a little later. First the RAM. I plan to equip my computer with 8-16 GB of memory, but since I no longer have the funds for this, I will buy 1 4 GB stick for now. Let it be a memory JRam– DDR3 with a frequency of 1600 MHz.

The total power consumption of my current build was 244 watts. The characteristics of the video card indicate the recommended power of the power supply - 400 W. You also need some reserve for possible upgrades and overclocking of the system. Accordingly, the power supply for the PC being assembled must be at least 450-500 W. And of course, it must be of high quality and reliable.
Following these wishes, I am sending a 500-watt Accord ACC-500W-80BR.
In addition to performance, I pay attention to the presence of all the required connectors (the main thing is 4+4 or 8 pin for powering the processor) and an 80+ Bronze energy efficiency certificate.

Well, all that remains is to find a cozy “house” for all this stuff. An expensive fancy “cottage”, alas, did not fit into my budget plans, so I’ll settle on a simple steel case AeroCool V3X Advance. The main thing is that it suits me in size and the presence of the necessary parts: shelves for 2.5-inch drives, a cutout in the area of the CPU cooler, 2 built-in fans and a USB 3.0 connector on the front side.

The configurator shows that all selected devices are compatible, and their total cost was 31,843 rubles.

It turned out to be a slight overrun, but this is an approximate price, because it is not necessary to buy all the hardware in one store. It may be sold cheaper in other places.
Now I can save the configuration in personal account(registration on the DNS website is required) in order to be able to return to it again (track price changes), edit and show it to other people (share a link).
Mid-budget gaming PC for just 50,000 rubles (without peripherals)
Let's consolidate the skills we've acquired and put together another gaming PC build worth about 50,000 rubles. This time without detailed explanations.Let's start with the processor + video card combination. Since you can’t get away with this amount either, let’s turn again to the AMD line and throw a CPU into the kit AMD FX-8320(compared to the FX-832E, it withstands high heat better and more stable). It will be paired with a video card Gigabyte AMD Radeon RX 580 AORUS – a decent gaming model with 8 GB of memory on board.
Next we select devices of the second stage. This is a gaming motherboard based on AMD 970 chipset GIGABYTE GA-970-Gaming, cooler DEEPCOOL GAMMAXX 300 at 130 W and SSD ADATA SU800 for 128 GB. Let's take the same power supply as in the previous assembly. Its power is just enough for all equipment, taking into account overclocking, plus the kit includes all the required connectors and a bronze certificate 80+.

The final chord is the RAM and the case. I throw in the set 1 RAM module with the desired parameters at the lowest price. This Goodram Play with a capacity of 8 GB and a frequency of 1866 MHz. In the future, the memory capacity can be increased to 32 GB. And all this will “live” in the “house” BitFenix Nova. This case is also not particularly fancy, but it has everything you need. Its main advantages are the lower placement of the power supply (important, since the processor and video card here are much hotter than in the previous assembly, and the power supply needs cold air) and the presence of a compartment for laying wires behind the rear wall (the fewer wires inside, the better the heat sink + it's convenient).
As a result, goods amounted to 56,794 rubles. Also an overspend, but gaming video cards are expensive these days.

Let's go for a walk! Gaming system unit for 100,000 rubles
With a hundred thousand rubles at your disposal, you can afford not to save. We will collect for this amount full-fledged computer for the most resource-intensive toys and, perhaps, there will still be funds left for additional goodies.So, here's what I got:
- Processor + video card: Intel Core i5-6600K And MSI GeForce GTX 1070 AERO OC.
- Motherboard: MSI H270 GAMING PRO CARBON(Intel H270 chipset).
- Cooler DEEPCOOL GAMMAXX 200T.
- SSD PlextorM8SeY with PCI-E interface and read/write speed of 2400/1000 MB/s.
- power unit Seasonic 550W(80+ Gold).
- Memory Goodram Play– DDR4, 2 modules of 8 GB, frequency 2133 MHz.
- Hard drive Toshiba P300– capacity 2 TB, speed 7200 rpm. It was not present in previous builds.
- Optical drive BD-RE LG BH16NS40 with the function of reading and writing 2-layer Blu-ray discs. It was not present in previous builds.
- Frame AeroCool Aero-500 with fan control unit and the ability to install liquid cooling.

The cost of the configuration was 100,343 rubles. Completely done! The only thing missing was discrete sound, but even without it it turned out very well.
I will not claim that the above assemblies are “ultimately true”, because they are compiled from the assortment of one store. Most likely, they can be supplemented and improved without going beyond the allotted budget, but to do this you need to browse online stores, read reviews, look at test results, compare and analyze the experiences of other users. However, this is what you need to do before purchasing; fortunately, the service allows you to save your assembly in your personal account, but, unfortunately, only one.If you do not have experience in selecting computer components yourself, do not rush to place an order immediately. First, consult with knowledgeable people (not from among the store employees), and only when the assembly is approved by several experts, buy.


