How to make a windows system image. Creating an operating system image, storing and deploying it
Creating a system imageWindows 7. You have no idea how many times this image he helped me out during serious system crashes and various troubles, and he saved me so much time. Hope you can apply successfully this information in practice.
Note: Friends, this article was written two years ago, read our more complete article on this topic - by using standard means archiving on DVDs, or on a portable USB hard drive and how to recover from these images, you will also learn how to connect a SATA, IDE or old hard drive to your laptop, netbook and store your backups on it.We also have an article - or another hard drive using the tools built into the operating system.
Creating a system image
Sometimes, due to our own erroneous actions on the computer or a virus attack, it is not possible to download Windows 7 by any means. Or it will be possible to load the operating system, but working in it can be simply unbearable, due to serious problems and malfunctions, and if you imagine that there is not one computer, but ten. There are also many friends who, unfortunately, also have computers and in the evenings you have to solve their problems, such a life would truly seem like a nightmare if such a tool as Creating a system image.
This image may be useful if none of the remedies did not help you, and therefore all our previous articles did not either. First I will describe how create a system image Windows 7 using the Computer Data Backup tool, then we will restore our Windows 7 from the image. Below are examples of recovery from an image: separate files your data.
- It is important to know that when you restore Windows 7 from a system image, all information from the hard drive partition to which you are deploying the image will be deleted and replaced with the contents of the image. By the way, this operation can be carried out using the program.
Creating a system image
Start->Control Panel->Backup computer data->Create a system image.
In the dialog box that appears in front of us - Where should the archive be saved? The operating system will give us a hint, for example in mine Windows case 7 chose Local disk(E:), with a capacity of 339.19 GB, located on the second hard drive (I have two hard drives), one contains the system itself, and the second contains Images Windows systems 7, made using our computer data archiving tool. If you have one hard drive, then the system image needs to be created on a free partition.

Just in case, I am attaching a screenshot of the Disk Management window on my computer.

Important Note: The ideal option for storing system images is a portable USB hard drive or a specially purchased SATA hard drive. If you choose DVDs, you will need a lot of them, this option is in my opinion the most inconvenient, you can also store images online, but this method deserves a separate article. You also need to know that, unlike the archives of our data, the system image can only be saved on a disk with the NTFS file system.
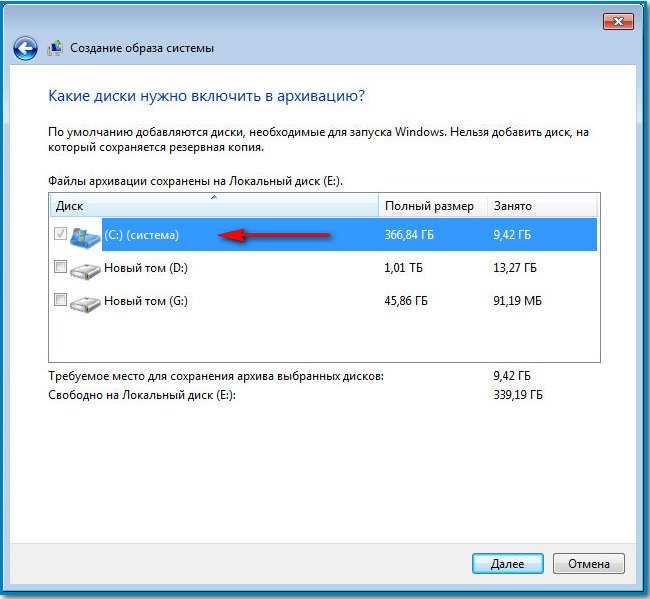
Which partitions of your hard drive should be included in the backup? By default, the Local disk with the Windows 7 operating system will always be selected, in our case (C:). You can additionally choose to include in the system image any disk with your personal data or all disks, this means that the System Image you create will contain all the information stored on your computer, as long as there is enough space on the media where you are creating the image. Click next.
We confirm the archiving parameters, we see a warning that to create a system image in my case you will need 9.42 GB, your requested space may be more. Click Archive, the process of creating a System Image will begin, which may immediately result in an error if we do not have enough space to store the image.


At the end of the process, you are prompted to create
When replacing hard drive to a new one, for example, a more capacious or high-speed one, as a rule, there is a need to transfer information from the old drive to it.
If you do it manually - reinstalling the system, programs and copying user files, you can spend the whole day.
It is much more convenient to entrust this to automation - special programs for cloning hard drives. With their help, all files, settings and the system itself will simply “move to a new location” in the form in which they were on the old media.
Hard disk cloning is a procedure for low-level sector-by-sector data transfer from one medium to another. In this case, the clone disk will be an exact copy of the original disk.
Hard drive cloning
Many paid and free programs have been released to create clone disks. Among them there are universal ones, working with any HDD and SSD, and highly specialized ones, designed for drives of a certain brand, for example, only Samsung or only Western Digital.
Let's look at five popular and easiest-to-use programs for cloning hard drives to SSDs or HDDs from any manufacturer.
EASEUS Disk Copy
Farstone RestoreIT Pro is primarily a tool for restoring system and user data after crashes, virus attacks, changes and accidental deletion.
This program does not create disk clones as such, but can create backups of any information on them.
The frequency of backups in RestoreIT Pro can be configured at least hourly. And restoration to a saved copy is done by pressing one button.
RestoreIT Pro features:
- the ability to restore the system even after bootloader damage;
- 2 backup modes - full and cumulative (saving only changed data);
- monitoring the entire disk or only selected partitions;
- storing the entire history of file changes, not just the last saved version.
The disadvantages of the program are the paid license ($24.95) and the lack of a disk cloning function.
Category ~ System utilities – Igor (Administrator)
Features of creating a disk image
Disk imaging programs have quickly become popular tools for most users, mainly due to their convenience, speed and ease of use. With the help of such programs, the user can safely restore his computer after a system crash or serious virus infection, without worrying about the need to reformat the disk and reinstall the operating system. Such instruments nullify almost all reasons for Windows reinstallation, since they offer you the opportunity to restore all hard drive much faster and essentially do the same thing while saving all your programs and data. For many users, this approach has made file backup programs completely unnecessary.
There are two types of disk imaging programs: online and offline. Nowadays, most of these programs are online programs, which means that they can create an image while the operating system is running.
Offline programs perform their tasks only on an alternative operating system such as ms-dos or a system booted from a LiveCD. Those. create and restore backup images while Windows is not running. Although most users prefer programs of the first type, which have normal graphical interfaces and do not require any additional actions on the part of the user. You should always remember that each type has its own advantages and disadvantages.
Most applications offer various options for creating disk images. For example, you have the option to back up only used disk space, excluding areas that are not used by the file system. This option will make the final image much smaller in size than when creating a full clone of the hard drive. The name "clone" comes from the fact that such a copy contains absolutely all sectors of the disk, including unused areas. The resulting images can be saved to an external drive, a flash drive, a separate partition of the hard drive, on a network resource, and generally wherever you want. Some applications may use the created images as some kind of semblance backup copy. They mount images as separate disks, so you can restore individual files and folders rather than the entire image. There are several other approaches to creating a system image that may also be of interest to users. But, as practice shows, launching programs with default parameters is what will be sufficient in most cases.
Despite the claims, I cannot be completely unbiased in my reviews. Moreover, the phrase “impartial person” is itself an oxymoron. When writing this review, two points played an important role: the presence of additional bells and whistles and high-quality support for existing customers for each product.
No matter what developers claim about the capabilities of their products, these programs must be able to perform their tasks. Of course, when choosing, everything very much depends on personal preferences. But, my experience suggests that within the criteria that users need to apply when selecting such programs, the first place should still be the criterion “whether the program is able to faithfully create and restore a disk image.” It seems to me that factors such as GUI, speed of operation and others - more like a matter of personal preference, or due to the scope of the equipment used and operating system. Agree that if a program, with all its bells and whistles, cannot consistently create and restore an exact copy of the image, then it is useless. Do you agree?
Note: If you use disk images frequently, there are a couple of tools that are definitely “must haves.” The first is EasyBCD (free for non-commercial use). The program is designed to configure the boot configuration of Windows, Linux, Mac OS X and BSD operating systems. But that's not all the program can do. It can also boot the system from an image (.ISO files), which, for example, is stored on your disk. The program can also correct most errors in the boot sectors of the disk. The second program is Super GRUB2 Disk (SGD). And although it is of greater interest to Linux systems, it may also be useful to you. The program will save you if you have serious problems with the MBR. She will also be able to detect boot images among the .ISO files. Unfortunately, it is impossible to say 100% that the program will be able to boot the system from iso images. But, in this case, you can easily use EasyBCD, so there will always be a way out. These two tools will save you a huge amount of time and nerves.
Review of free programs for creating disk images
Macrium Reflect Free Edition is a solid disk imaging application
Macrium returned to first place after the release of version 5, which fixed a number of errors, mainly related to installing the necessary drivers. Also, starting from version 5, the program has learned to clone a running operating system.
Most offline solutions can look quite intimidating to inexperienced users, and be difficult to learn. But, not PING. It is made quite well. The program will guide you step by step through all the steps required to create the image. At the same time, a small explanation will be given for each point, so it will be quite difficult to get confused.
The program can create incremental images, which will allow you to save a lot of time and space. She also knows how to create backup and restore BIOS settings. Plus can create boot disk recovery, which in total will make the entire system recovery process much simpler and easier. In general, the program was developed as a free alternative to the very popular Norton Ghost. And over the years, it's included quite a powerful feature set that puts it ahead of Ghost somewhat, so it's definitely a great choice for anyone.
Clonezilla is one of the most popular offline disk imaging programs
Quick Guide (links to download free programs to create a disk image)
Macrium Reflect Free
| Simple and fast. Can recover individual files. Works with Linux systems. Cloning hard disks - including the system partition, when the operating system is running. Backup Scheduler. Stable and reliable. Great compression of backups. Can be converted to VHD. Includes Windows recovery P.E. Updates are released frequently. | ||
| IN free version Differentiation/incrementation of changes to the image and working with network resources are not supported. |
Backup & Recovery Free
| Fast backup and recovery. Differential/incremental backup. Basic partition management capabilities. Can recover individual files. Good compression algorithms. Can clone hard drive. | ||
| Some Linux compatibility issues. There is no PE recovery environment. The program requires registration to download. |
DriveImage XML
| Copying from disk to disk. Recovering individual files from images. Capable of restoring images from different media. Using plugins you can connect the WinPE environment. Simple, with a basic set of tools, reliable. | ||
| Does not support differentiation/incrementation of changes to the image. Compared to analogues, it creates images very slowly. Mostly only essential options. There is no compression by default. To schedule tasks, you will need to use the standard Windows Scheduler. |
Clonezilla
| Supports a huge variety file systems. Very reliable and stable. Included in various Boot CD recovery packages. This program also has its own LiveCD. | ||
| Offline program. When using for the first time there may be slight difficulties (due to lack of habit). Does not support differentiation/incrementation of changes to the image. Cannot restore files from an image. Slow. |
The new backup utilities in Windows 7 are truly impressive. System imaging is available in all editions of Windows 7. Today we'll look at a way to create a backup image of your machine without using third-party utilities like Ghost or True Image.
Let's say you just finished installing a fresh copies of Windows 7 to your computer and configure it the way you like. Now the first thing you need to do is create a disk image that will help you quickly recover in case of failure. An image is an exact copy of everything on your disk. It is best to create it when the system is still clean and organized. This will make the image smaller in size, and will allow you to quickly restore your system in case of unforeseen circumstances.
Creating an image in Windows 7
To create an image, go to Control Panel - System and Security - Backup and Restore.

You can include multiple hard drives in your image, but this will increase the final image size. The drive on which Windows is installed will be enabled by default. Also, the image cannot include the disk where you are going to save your image (unless, of course, you are saving it to disk).

In the confirmation window, you will be able to see how big your image will be and what disks will be included in it. If you find an error here, you can go back and correct everything.

A progress bar appears as the image is created. In our example, creating a disk image with 15GB of data on external drive took approximately 20 minutes. However, the creation time varies depending on the system and where the image is saved.

Once the process is complete, you will be prompted to create a recovery disk. To which you must give your consent and ensure that the disk is stored in a safe and secure place.
When it comes to recovery (if it comes), you can use your recovery disk and its System Image Recovery option in System Recovery Options to get your system back.
Vista Ultimate, Business and Enterprise also allow you to create a system backup image. True, Vista Home and Home Premium do not have this feature. The process is similar to creating an image in Windows 7. To begin, simply type backup followed by the Start menu search box and then click on Backup and Restore Center.

Then click the Back up computer button and you will see a backup wizard that will guide you through the image creation process.

Conclusion
All the utilities described above are extremely convenient and really work well. It's also good that they will be available in all editions of Windows 7, and not just in the higher ones (like, for example, Vista). This will allow you to save your money (approximately $50-80) on third-party utilities.
It is necessary to create an image when the system is still fresh, so that it does not turn out to be huge and allows you to quickly recover in the event of a failure. For example, we created an image after installing the operating system, office Office package 2007 and several other programs we use most often. As a result, the image took us 10GB, which we could easily place on an external hard drive.
If something suddenly happens to your operating system, it can lead to a huge number of problems. In the best case, you will have to reinstall it, search on the Internet for drivers and installers of the programs you need. In the worst case, there is a risk of completely losing all personal information, unique photographs, important documents and projects. Typically, restoring the OS in this case is unlikely to help - it only works with Windows settings. Therefore, to save your data, it is important to know how you can create a backup disk image of your Windows 7.
Types of images
You don't need to have the DVD itself for this. There is specialized software (for example, the UltraISO utility) with which you can do everything you need right on your computer. You prepare a set of folders and files, and use the program to create a disk image.
The second type is a backup copy of the operating system. It can even be made standard using Windows. It is needed to restore your OS in case of unforeseen emergency situations.
In fact, this is a cast of the hard drive. The computer scans the entire contents of the specified HDD and packs it into a special archive. If something happens, you can always restore everything back.
Windows Backup
To create a backup of data on disk, no additional software no need to install. You just need to do the following:

The whole process can take quite a long time. The volumes of stored data are usually large. In general, the duration depends on the amount of information being copied, the generation of USB or SATA/SAS interfaces, network speed (depending on where the backup is saved) and computer performance.
Recovery disk
After completing the backup process, the system will prompt you to create a special recovery disk. This is a complex useful programs, which can help users if their OS stops starting. You can find recovery utilities there boot sector MBR, kits system files, required for startup, and so on. 
Creating an ISO image
If you want to burn DVD or CD content to digital ISO format, you will need special program. The simplest and most reliable example of such a utility is free application ImgBurn. 
It can be downloaded from the official website http://www.imgburn.com/index.php?act=download. Follow the link and select one of the suggested mirrors for downloading. After this, you need to run the downloaded installer and install the OS, following the instructions of the Install Wizard. 
For ISO creation you need to launch the application and click on the “Create image file from disk” button. Select the drive, indicate where to place the image, and the process will begin.


