Setting up BIOS on an ASUS X550c laptop. Setting up BIOS on an ASUS X550c laptop Asus x550c how to boot from disk
BIOS. To the uninitiated, this abbreviation sounds like a curse word. What does it really mean? If you don’t go into details of decoding and terminology, the BIOS provides communication between the system and hardware “1” ...
So short and clear. It is thanks to this set of functions and commands that the processor, RAM, keyboard, and so on can successfully interact with the operating system and together ensure the normal operation of the computer. Accordingly, if one of the particularly important elements of the laptop (for example, video) is missing, the BIOS will display a corresponding message and refuse to boot the system.

How to configure loading data from a flash drive for asus x550c.
How to set up BIOS on an ASUS laptop
So, how to set up BIOS on an ASUS laptop? First of all, it should be mentioned that BIOS is now (in the last two years) divided into two types - classic (for machines k56c, x502c, x550c, x551m, and so on) and UEFI. We will not consider the second one, since everything there is already in Russian, with built-in explanations and tips, etc. So let’s deal with the classic BIOS, especially since it is now installed on 95 percent of machines.
Video clip: how to install Windows 7 instead of Windows 8 on an ASUS x550 laptop.
Let's look at all the tabs separately. This means that we turn on the computer and BEFORE the operating system starts loading, press the F9 key. If it doesn't work, try F2, F5, F8, F12 or, as a last resort, Delete. Why such a large selection? Claims against developers - as they want, so they assign. Not good.
Main. Well, as the name implies, here you can view and configure basic parameters - time, date, amount of RAM, processor, and so on.
Advanced. Tab for advanced users. Settings and parameters of the system bus, memory, various built-in devices. It is better not to go here without preliminary preparation.
Security. Security, access control, and so on. It’s better not to come here even with preliminary preparation.
Show more
Power. Power management. Theoretically (theoretically!), by playing with the settings on this tab, you can slightly increase the battery life of the laptop. Question: is it possible? We look at the answer in the second or third points.
Boot. Wow. This is the very tab that everyone who has ever entered the BIOS of their own free will has visited. It is here, using a function called “Boot Device Priority” (the name may differ in small details, but in general it’s approximately the same), you can set the boot order of devices – hard drive, external drive, flash drive. That is, to boot from a disk, to boot from a flash drive, to install Windows 7, you need to go here.
Exit. Here, in general, everything is clear too. Either we exit, canceling all changes, which is useful for those who have no idea what they just clicked (in this case, select Exit without changes), or we save the changes and go to reboot to apply them (Save & Exit).
Video instructions: How to enter and configure the BIOS of an ASUS K73 laptop to install WINDOWS 7 or 8 from a flash drive or disk.
In a nutshell, about the UEFI BIOS... Well, despite the fact that this system has become widespread only in recent years, it was first used back in the distant year 2000. What is its advantage? More settings, functions and capabilities, convenient and intuitive interface. Flaws? Firstly, most of these same settings are not needed by anyone, and secondly, on laptops with UEFI, in most cases, ONLY Windows 8 or 8.1 can be installed.
Video Review: Asus X551MA. BIOS firmware, installing windows 7 x64.
How to configure the BIOS on an asus k56c, x502c, x551m, x550c laptop to boot from a disk, from a flash drive to install Windows 7, video
Learn more about how to configure the following models on an asus laptop: x550c, x551m bios, instructions on how to install and restore windows 7. Read more about how to boot from a flash drive via power, reset the bios of a laptop from the manufacturer asus x.
How to install Windows 7 instead of Windows 8 on a laptop. Hello admin! I want to tell my story about how I tried to install Windows 7 instead of Windows 8 on a new laptop with a UEFI BIOS; the GPT hard drive partition style had to be converted to MBR.
Administrator's note: Friends, we recently published several more articles on this topic:
- If you have an ASUS or HP laptop, then you can.
If the "UEFI" option is enabled in the laptop's UEFI BIOS and the UEFI BOOT option is enabled, then the installation of Windows 7 ends at the very beginning, even before selecting partitions, with the following error: "Boot failure - a proper digital signature was not found"
If the “Secure Boot” option is disabled in the laptop’s UEFI BIOS, but the UEFI BOOT option is enabled, then the installation of Windows 7 again freezes at the very beginning, even before selecting partitions.
Distribution of Windows 7 Professional 64-bit Rus. (OEM) real, store bought. I tried everything, scoured the entire Internet, created a UEFI flash drive, used another Windows 7 distribution, but everything was useless. Something is blocking the installation at the very beginning!
By the way, when purchasing an operating system in a store, I was told that it would not be possible to install Windows 7 instead of Windows 8 on a GPT disk. You can demolish Windows 8, then convert the hard drive to MBR and install Windows 7. But I was advised to think very hard before demolishing Windows 8, since on a new laptop I won’t be able to install Windows 8 again, even if I have the distribution kit! Because there is no special key on the bottom of the laptop; they say it is built into the laptop’s BIOS.
Even if I buy Windows 8 with a new key, I simply have nowhere to enter it; when I reinstall Windows 8, I will receive an error even before entering the key: “The entered product key does not match any of the Windows images.”
Windows 8 can only be restored at a service center for money. I was told the same thing on the Microsoft Community Forum!

Even disabling the “Secure Boot” option in the BIOS and switching the UEFI mode to “Legacy OS” or “CMS OS” will not help.
Please note, admin, if previously the Windows key was registered on the bottom of the laptop, now it is not there, don’t you think that strange things are happening in this world! Eustace.

How to install Windows 7 instead of Windows 8
I agree with everything said above, so friends, before install Windows 7 instead of Windows 8 read these three of our articles, create a backup of Windows 8 and put it on the shelf just in case, maybe you will need it someday.in the manufacturer's built-in Recovery Media Creator program.
.
.
These articles also describe in detail how to restore Windows 8 if necessary.
Information for those who want to return Windows 8! If you have already removed Windows 8 (without creating a backup) and installed Windows 7 instead, disabling UEFI on the new laptop and converting the hard drive instead of GPT to MBR, and now you want to install Windows 8 back instead of Windows 7, then you need to do the following:
Find the installation disk with your version of Windows 8, most likely it was called Windows 8 for one language (Windows 8 Single Language), then enable UEFI in the BIOS and install this same Windows 8 Single Language, the key embedded in your BIOS will be inserted automatically.
Or you can install another version of Windows 8 on a laptop, for example Windows 8 Professional. To do this, you need to create two system installation configuration files (EI.cfg) and (PID.txt) and add them to the sources folder of the Windows 8 distribution. Everything is written in detail in our article " How to reinstall Windows 8 on a laptop" Link to article above.
To install Windows 7 instead of Windows 8, we take the following steps.
Second, the flash drive must be connected to a USB 2.0 port, since Windows 7 does not support USB 3.0 (ports are usually colored blue)
Third, go to the BIOS Security tab and disable the “Secure Boot” option (set it to Disabled), it is this that checks the operating system boot loader certificate, and only Windows 8 has such a certificate, if you are wondering why this is so, read our article.


In the BIOS, in the "Advanced" tab, find the "System configuration" option and enter it,

here we see the “BOOT MODE” or “OS Mode Selection” option, set it instead of the UEFI OS position (maybe UEFI BOOT)

To the “CSM Boot” or “UEFI and Legacy OS”, “CMS OS” position


Which will give us the opportunity to boot our laptop from an installation disk with any operating system.
After that, save our changes in the BIOS, press F10


And we boot from the installation disk or flash drive with Windows 7. For example, on my laptop, to get to the boot menu, you need to frequently press the F12 key when booting,

A menu will appear, select our DVD-ROM from it.

When the message “Press any key to boot from CD or DVD” appears on the screen, press any key on the keyboard, thereby agreeing to boot from the installation disk.


Install.

We accept the terms of the agreement. Select the full installation.

Friends, here you can simply click on the “Disk Setup” button and delete all existing partitions,


Next, install Windows 7 into unallocated space. Windows 7 automatically converts the hard drive to the MBR standard during installation.
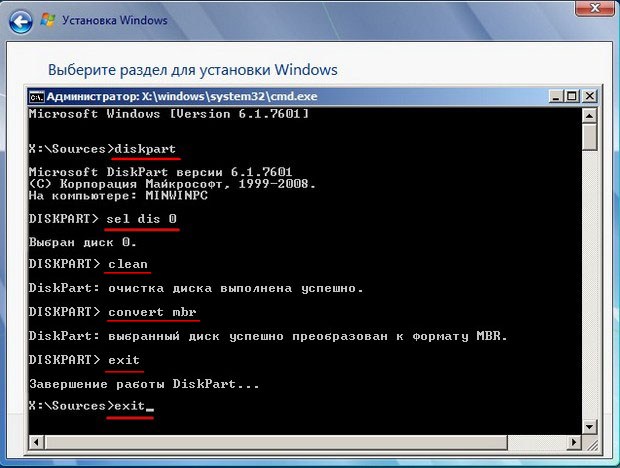
Or we call the command line, press Shift + F10 on the keyboard and convert our hard drive to the MBR standard in the command line, all partitions and data on the disk will also be deleted. Press Shift + F10 on the keyboard. On the command line, enter the commands sequentially:
diskpart
seldis 0
clean
convert mbr
exit
exit
Click Update.


Which should end well.

After installing the Windows 7 operating system, go to Disk Management, right-click on our disk and select Properties,


Article on this topic: which has only USB 3.0 ports and no optical drive! How to download and install drivers after installing the system, since the network adapter and USB 3.0 ports will not work for you
The Asus x550c laptop is no different in principle from laptops from this and other manufacturers. Besides, installing Windows 7 on Asus x550c does not pose any particular problems. And if you have already had experience installing an operating system on computers, then this procedure should be easy and without problems. Therefore, this article is to help those who are installing an operating system for the first time or want to once again make sure that the procedure is correct.
It is worth noting that Asus x550c laptops have 4 GB of RAM. Therefore, you need to install the 64-bit version of Windows 7. Otherwise, the system will only be able to see 3.5 GB of RAM.
First stage
The operating system is installed on the system drive “C”, this partition will be formatted, therefore, if important information is stored on it, it must be copied to another drive, or to removable media. Be sure to look at your desktop and make sure there is no important information there either. The desktop is also located on the system disk and will be deleted during reinstallation.
Installing boot from CD/DVD drive
To do this, you first need to get into the BIOS, so press the DEL or F2 key immediately after turning it on. The Asus x550c laptop motherboard requires pressing the F2 key. If in doubt, you can look at the hint at the bottom of the screen. If the BIOS has opened, go to the BOOT menu and here we assign the CD/DVD drive to boot first. If everything is ready, click the F10 key, and then Y. 
Installation process
 The operating system is loaded from the disk when you press any key in response to the system request “Press any key from boot to CD”. This happens at the very beginning of loading. It may happen that the request does not appear, in which case you need to check the BIOS settings again.
 First of all, the files necessary for further installation are copied from the DVD. It will take some time. If files have been copied, the message "Starting Windows" and then the usual Windows-style window 7. Installation begins.
During the installation process, you must follow the instructions provided in the dialog boxes. First you need to select a dialogue language. Then click “Next”.
 A new window appears and at this stage you need to select an action. Often users do not need to install the system from scratch. In this case, it is advisable to select the “System Restore” command. In our case, select “Install”.
In the dialog box that opens, you need to select the edition of the Windows 7 operating system. The choice should be made on the one that will subsequently be activated. Usually on laptops it is indicated on a piece of paper with a key, which is located on the bottom of the device. The serial number is entered at the very end of the installation. 
The Asus x550c laptop, as mentioned above, supports the 64-bit version of Windows and it is best to install it, because then the full amount of RAM will be available. Select the desired option and click “Next”.
In a new window you can view the license terms. Check the box next to “I accept the license agreement” and click the “Next” button again. Without a checkmark, installation will not continue. 
In the window that appears, select the “Full installation” command.
In the new window that opens, you need to select the partition that will be used to install Windows 7. Care is required here. One of the partitions is reserved by the system and its size is displayed in megabytes. You need to choose from the following sections, and to simplify the task, it’s worth looking at how many gigabytes are on drive “C” even before starting the installation.
If there is only one partition on the hard drive of the Asus x550c laptop and its size exceeds 250 GB, and in reality this is the case, then it is best to create two local disks. The first partition will be for installing Windows and it is recommended to allocate approximately 50 to 100 GB here. All other gigabytes will remain on the other drive, and your personal information will be stored here. 
It is worth paying special attention to the fact that the partitions you create must have the names Disk 0 Partition 1, 2, 3 ... Otherwise, the system will not be able to see a disk with a name, for example, “Free disk space.”
After creating the necessary sections, click “Apply”.
This is where complications can arise. The operating system may ask the driver to allow the installation to continue. Often the installer cannot see the hard drive. This happens if the hard drive is not partitioned into two or more partitions. To correct the situation, you need to return to the BIOS and switch the operating mode of the SATA controller from AHCI to IDE! You can also install the hard disk controller driver, if available.
If all these issues are resolved, select the “System” section and start formatting. We agree to delete all data from the disk and wait for formatting to complete.  Then click “Next”. The installation process has started.
Completing the installation
Typically the entire installation process will take approximately 15 to 25 minutes. After it finishes, a window will appear where you need to enter the computer name and user name. If desired, enter a password and a hint. 
Installation requires specifying the serial number. If it is available, enter it in the specially designated field. If there is no number, uncheck the box next to “Automatically activate when connected to the Internet” and click “Next”. 
A couple more small settings indicating the security policy, time zone, network type, and the installation of Windows 7 on the Asus x550c laptop is completely completed. Don't forget to go into the BIOS and set the priority to boot from the hard drive. And be sure to install all the necessary drivers. They are supplied on disk with the laptop or downloaded from specialized sites.