How to properly connect a hard drive from a computer to a laptop via USB. How to connect a hard drive to a computer yourself? Do-it-yourself HDD connection Connector for connecting a hard drive via USB
The ability to connect additional hard drives will be very useful to you if there is a lack of free disk space on the ones already installed. You can connect the HDD to a personal computer:
- Installed into the system unit using standard SATA connectors on the motherboard.
- Installed into the system unit using the SAS RAID controller connectors.
- Using a USB-SATA adapter.
This is interesting! PredecessorSATA was the interfaceATA (another name isIDE). The difference lies in the method of data transmission - serial transmissionSATA, parallelATA. It is generally accepted that serial transfer is faster, however, for the average user the difference is invisible.
SATA
Step 1. Remove the case cover of your system unit.
Step 2. Attach the data cable to the connector on the motherboard.
On a note! The connector number is not important. The bootable hard drive is determined by the software installed on it.

Step 3. Connect the data cable to the connector on the hard drive.

Step 4. Connect the power cable to the hard drive connector.

Important! When connecting the cable, the computer's power must be turned off. When connecting a cable with voltage applied to it, there is a high risk of damage to the hard drive controller, or the controllerSATA motherboard! In the event that your power supply has power connectors only for hard drivesIDE, use a special adapter.

Step 5. Secure the hard drive to the case with screws.

Important! Make sure that the cables do not come into contact with the cooler blades of the system unit.
If you are using a 2.5-inch drive, use special slides to secure the hard drive more tightly inside the system unit.

Connecting the hard drive inside the case to the connectorsSAS
These connectors are backward compatible, that is, SATA can be connected to SAS, but SAS cannot be connected to SATA.
Step 1. Install the hard drive into a special structure (sled) of the appropriate size.
On a note! The designs are designed for certain form factors, that is, inserting a 2.5-inch drive into the controller cage of 3.5-inch hard drives will not work.

Step 2. Insert the slide into the controller basket and push until the slide handle locks in the desired position.

Important! Don't forget to check the cable connectionRAID to the motherboard and change your controller settings.

Connecting a 3.5-inch hard drive using an external power adapter
Step 1. Attach the adapter to the hard drive.

Step 2. Connect the adapter and the desired port on your computer using a USB cable.

Step 3. Connect the power cable to the adapter.

Step 4. Apply power to the adapter by switching the toggle switch to the working position.

Step 5. If necessary, install drivers for the connected equipment.
Connecting a 2.5" hard drive using a 3.5" adapter
2.5" drives are commonly used in laptops. The connectors are no different from the connectors for 3.5 drives, but the laptop hard drive is attached to the case using a special basket (sled).

Step 1. Remove the slides or other structures from your hard drive.

Step 2. Follow the instructions for connecting a 3.5 hard drive using an adapter.
Connecting a 2.5-inch hard drive using the appropriate adapter
When using a special adapter for 2.5 hard drives, you do not need to remove the slide. As a rule, such adapters do not have external power and receive voltage from the computer’s USB port.

Step 1. Connect the adapter to the hard drive.

Step 2. Connect both ends of the USB adapter cable to the computer ports.
Important! Two ends of the cable are needed because one of them transmits information, and the other carries power to the adapter.
Video - How to connect a hard drive
Conclusion
We looked at three different ways to connect hard drives with SATA connectors to a personal computer. Each of them requires the purchase of additional equipment, at least cables. If you decide to use a SATA drive as an external one (connected via a USB adapter), it is recommended to purchase a reliable protective case for the drive. When working with the device, the cover should be removed to avoid overheating. Some parameters of hard drives working with different technologies are presented in the summary table.
| Name | Data transfer rate, Mb/s | Number of devices per port |
|---|---|---|
| IDE (ATA) | 133,5 | 2 |
| SATA R.1 | 150 | 1 |
| SATA R.2 | 300 | Up to 15 |
| SATA R.3 | 600 | Up to 16 |
| SAS R.150 | 150 | Up to 4 |
| SAS R.300 | 300 | Up to 4 |
| SAS R.600 | 600 | Up to 4 |
If you are going to purchase accessories for computer repair, then a SATA USB adapter is the first thing you need to pay attention to. Such a device allows communication between the two most common interfaces. The SATA standard is used on almost all internal drives of personal computers and laptops. Any modern PC is equipped with USB ports.
What can this adapter be used for? This is exactly the tool you will need in case of hard drive failure. If things go wrong with the HDD, there is a high chance that the computer will become unbootable. In this case, you will have to replace the disk, but the information that was stored on the previous drive will be lost.
If the HDD is partially damaged, this does not mean that all files on it are lost forever. By using a USB to SATA adapter, you will likely be able to recover most of your data. Even if the disk does not initialize, there are many free programs that will allow you to scan partitions and detect any information that can be recovered.
Hardware failure is not the only reason to use an adapter. For example, a user may want to upgrade to a larger and faster SSD drive. Using the adapter, you will be able to transfer all the old data to the new disk yourself, without turning to specialists for help. In addition, HDDs have become incredibly cheap. Any user who regularly updates their computer usually has at least 1 drive with a capacity of more than 500 GB. With this simple adapter you can turn your HDD into an external drive to access your old files.
Anker USB 3 to SATA Converter
Not all SATA USB devices are created equal. Some use an outdated standard that negatively impacts throughput. Others may not be compatible with newer drive types. There are varieties of adapters that stand out from the rest. First of all, you should pay attention to Anker USB 3 to SATA Converter Adapter Cable.
Studying Anker products, one can come to the conclusion that the company has no shortage of components and peripherals for computers. Judging by numerous reviews, users rate everything from chargers to cables or adapters very highly. You may not have seen the products of this company in local retail outlets, but you can easily find them in online stores.
Anker's USB to SATA adapter is a simple device that gets the job done. The adapter is equipped with only the most necessary equipment, and there are no unnecessary components. The developers have done everything possible to ensure that the device copes perfectly with the task assigned to it. The USB SATA adapter is a black rectangular box. This allows you to place it on a flat surface, preventing the drive from detaching during use.
There are 2 cables that can be connected to the back of the device: USB 3 for data transfer and an optional power cord for use with high-power drives. The cables are reliable and durable, making this adapter useful even if the distance between the computer and the SATA 2 device is short (causing the cables to be bent). Thanks to its impeccable design, the device will look great in an office or digital repair shop.
Adapter capabilities from Anker
Unlike some other adapters on the market, Anker comes with a hardware SATA 3 controller. If the device relies on software to convert the signals, this can lead to performance and compatibility issues. Luckily, the Anker hardware controller used is standard and has been thoroughly tested with a variety of devices. This means that almost any computer or drive that can be physically connected to this adapter will work. Thanks to the built-in power adapter, the device supports both 2.5- and 3.5-inch drives.
The USB 3 port is only capable of delivering a relatively small amount of power. This is enough to power compact 2.5-inch drives and SSD drives. But 3.5-inch devices will require a little more power, and a power adapter will help in such a situation. In terms of compatibility, you can use hard drives, SSDs, Blu-Ray drives, DVD recorders, and combo drives. The adapter works with almost all operating systems from Microsoft, from Windows 98 to Windows 10. Mac OS is also supported. Theoretically, there is no reason to think that a SATA to USB adapter will refuse to work with Linux, but this system is not officially supported.
Thanks to the USB 3 interface, data transfer occurs according to an accelerated procedure. The theoretical limit is 5 Gbps, but this is quite difficult to achieve in practice. When using an SSD, read speeds are typically around 350 Mbps and write speeds are around 250 Mbps. Record data transfer rates can only be achieved if you use the fastest SSDs available on the market. In cases with regular PC hard drives, the maximum speed is 120 Mbps for reading and 100 Mbps for writing. In this case, the reduction in USB throughput is not due to the adapter, but to outdated HDD technology.
There are not many additional functions on this adapter, because simplicity is its main advantage. The operating system does not recognize it as an adapter, but simply sees a standard external drive via USB. This means that all built-in backup software will work without interruption. You can use any data recovery program or create images without any special drivers or settings. Due to the lack of drivers, the SATA USB adapter will operate in safe mode, making it ideal for diagnostics and repairs.
Inateck USB 3 to IDE/SATA Converter
The Inateck Universal USB 3 to IDE/SATA Converter is created by a popular peripheral device manufacturer that develops not only consumer, but also professional devices. Many of Inatek's products offer advanced functionality, while its prices are comparable to its competitors.
Despite the large number of options, the adapter is compatible with all types of operating systems and drives via USB. The only major difference between the adapter and other similar devices is its support for IDE drives. Such drives have long gone out of fashion, but they are still used by some users. This connection standard is used for PCs, laptops, CD and DVD drives, as well as devices that read floppy disks.
Many adapters are only compatible with small IDE drives because they don't have a power connection. But in this case, thanks to a special power cable, you can easily use not only 3.5-inch, but also 5.25-inch drives. The adapter works with OSX, as well as operating systems from Microsoft, from Windows XP to Windows 10.
Surely everyone has old, unnecessary components from laptops or computers that you saved according to the proverb “Everything is useful on the farm.” Personally, I have a whole box in my closet containing a bunch of outdated computer parts. Today we have made a special selection for you that will really make your “old stuff” work in your favor! Well, you've undoubtedly wondered, is it possible to create a portable one from an old hard drive? Thanks to modern technology, you can now connect hard drive via USB independently and without much effort.
Adapter for connecting a hard drive via USB
Let's start with the cheapest and most accessible method for each - buying an adapter. Depending on the form factor of your hard drive (2.5 or 3.5), you may need to purchase different adapters. For example, for a hard drive from a laptop (2.5), power from one USB cable will be sufficient, therefore, you just need to buy and connect the appropriate connectors.
The computer hard drive (3.5) may require additional power. In this case, you need a special adapter that has two USB outputs that can support the required voltage. To do this, you need to turn on both connectors at the same time.
Well, connecting a hard drive via USB using an adapter turned out to be as easy as shelling pears, but it all doesn’t look entirely aesthetically pleasing. But such an adapter costs about 500 rubles. This is a definite plus.
Adapter for connecting HDD to USB
Connecting a hard drive using a container
This method will be most attractive to most people. Connecting using a special adapter into which the hard drive is inserted is the best option, as it gives your new hardware portability, beauty and stable operation.

Container for HDD drive
Again, when you try to connect a hard drive via USB using a USB container, the question arises about its size and form factor. However, the modern world is replete with various developments and you can certainly find a suitable option. There are a great variety of adapters that vary in price, quality, color, size, speed and maximum volume. This is precisely the main advantage of this method – variability. By the way, the cost of such a box ranges from approximately 500 to 1000 rubles.
Connecting a hard drive to a laptop using a docking station
The most expensive and highly targeted connection method. Most often, docking stations cost 2-3 times more than the same container, but they also have a number of advantages. By connecting a hard drive via USB using such a device, you can create a small file server for your home or office, because there are many more than one slots for hard drives in the docking station. Some devices even support laptop and computer hard drives at the same time, which will allow you to make full use of the accumulated old stuff. If you have a lot of drives that you want to turn into your own small server, then a docking station is definitely for you! By the way, if you want to save a little money, then try to look for adapters for
Hello.
Sometimes it happens that a laptop or computer does not turn on, but the information from its disk is needed for work. Well, or you have an old hard drive lying “idle” and which would be quite nice to turn into a portable external drive.
In this short article I want to focus on special “adapters” that allow you to connect SATA drives to a regular USB port on a computer or laptop.
1) This article will only consider modern drives. They all support the SATA interface.
2) “Adapter” for connecting a disk to a USB port - correctly called BOX (that’s what it will be called further in the article).
How to connect a laptop's SATA HDD/SSD drive to USB (2.5-inch drive)
Disks from laptops are smaller than those from PCs (2.5 inches, on PCs 3.5 inches). As a rule, the BOX (translated as “box”) for them comes without an external power source with 2 ports for connecting to USB (the so-called “pigtail”. It is advisable to connect the drive to two USB ports, despite the fact that it works it will if you connect it to only one).
What to look for when purchasing:
1) The BOX itself can have a plastic or metal case (you can choose either one, because in the event of a fall, even if the case itself is not damaged, the disk will be damaged. This means that the case will not save you in all cases...);
2) In addition, when choosing, pay attention to the connection interface: USB 2.0 and USB 3.0 can provide completely different speeds. By the way, for example, a BOX with USB 2.0 support when copying (or reading) information will allow you to work at a speed of no more than ~30 MB/s;
3) And one more important point is the thickness for which the BOX is designed. The fact is that 2.5 disks for laptops can have different thicknesses: 9.5 mm, 7 mm, etc. If you buy a BOX for the slim version, then you probably won’t be able to install a 9.5 mm thick disk into it!
BOX is usually disassembled quite quickly and easily. As a rule, it is held in place by 1-2 latches or screws. A typical BOX for connecting SATA drives to USB 2.0 is shown in Fig. 1.
Rice. 1. Installing the disc in the BOX
When assembled, such a BOX is no different from a regular external hard drive. It is also convenient to carry and use for quick information exchange. By the way, it is also convenient to store backup copies on such disks, which are usually not needed, but if something happens they can save a lot of nerve cells :)
Rice. 2. When assembled, the HDD is no different from a regular external drive
Connecting 3.5 disks (from a computer) to a USB port
These wheels are slightly larger than 2.5 inches. USB power is not enough to connect them, so they come with an additional adapter. The principle of choosing a BOX and its operation is similar to the first type (see above).
By the way, it is worth noting that a 2.5-inch drive can usually be connected to such a BOX (i.e., many of these models are universal).
Also, one more point: often manufacturers do not make any box for such drives at all - that is, you simply connect the drive to the cables, and it works (which is logical in principle - such drives can hardly be called portable, which means the box itself is usually not required).
Good day everyone.
A fairly typical task: transfer a large number of files from a computer’s hard drive to a laptop’s hard drive (or, in general, you just have an old drive from a PC and you want to use it to store various files, so that HDDs on a laptop are usually smaller in size) .
In both cases, you will need to connect the hard drive to the laptop. This article is just about this; let’s look at one of the simplest and most universal options.
Question No. 1: how to remove a hard drive from a computer (IDE and SATA)
It is logical that before connecting the disk to another device, it must be removed from the PC system unit ( The fact is that depending on the interface for connecting your drive (IDE or SATA), the boxes that will be required for connection will differ. More on this later in the article...).
Rice. 1. Hard drive 2.0 TB, WD Green.
Therefore, in order not to guess what kind of disk you have, it is best to first remove it from the system unit and look at its interface.
As a rule, there are no problems with extracting large ones:
- First, turn off the computer completely, including unplugging the plug;
- open the side cover of the system unit;
- remove from the hard drive all the plugs that are connected to it;
- unscrew the fastening screws and remove the disk (as a rule, it goes on a slide).
The process itself is quite easy and fast. Then take a close look at the connection interface (see Figure 2). Nowadays, most modern drives are connected via SATA (a modern interface that provides high data transfer speeds). If your drive is old, it is quite possible that it will have an IDE interface.
Another important point...
Computers usually have “large” 3.5-inch disks (see Fig. 2.1), but laptops have smaller disks - 2.5 inches (1 inch is 2.54 cm). The numbers 2.5 and 3.5 are used to denote form factors and indicate the width of the HDD case in inches.
The height of all modern 3.5 hard drives is 25 mm; this is called "half-height" compared to much older drives. Manufacturers use this height to accommodate between one and five wafers. In 2.5 hard drives, everything is different: the original height of 12.5 mm has been replaced by 9.5 mm, which includes up to three plates (thinner drives are also now available). The 9.5mm height has actually become the standard for most laptops, however, some companies sometimes still produce 12.5mm hard drives based on three platters.
Rice. 2.1. Form factor. 2.5-inch drive - top (laptops, netbooks); 3.5 inches - bottom (PC).
Connecting the drive to the laptop
For direct connection you will need a special BOX (box, or translated from English as “box”). These boxes can be varied:
- 3.5 IDE -> USB 2.0 - means that this box is for a 3.5-inch disk (and these are the ones found in PCs) with an IDE interface, for connecting to a USB 2.0 port (transfer speed (actual) no more than 20-35 MB/s );
- 3.5 IDE -> USB 3.0 - the same, only the transfer speed will be higher;
- 3.5 SATA -> USB 2.0 (similar, the difference is in the interface);
- 3.5 SATA -> USB 3.0, etc.
This box is a rectangular box, slightly larger than the size of the disc itself. This box usually opens from the back and the HDD is inserted directly into it (see Fig. 3).
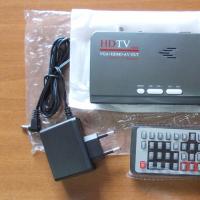
Actually, after this you need to connect power (adapter) to this box and connect it via USB cable to your laptop (or to a TV, for example, see Fig. 4).
If the disk and box are working, then in “ my computer"you will have another disk that you can work with like a regular hard drive (format, copy, delete, etc.)
If suddenly the disk is not visible in my computer...
In this case, 2 steps may be required.
1) Check if there are drivers for your box. As a rule, Windows installs them itself, but if the box is not standard, then there may be problems...
To get started, run device Manager and see if there are drivers for your device, if there are any yellow exclamation marks anywhere ( as in fig. 5). I also recommend that you check your computer with one of the utilities for auto-updating drivers: .
Rice. 5. Problem with the driver... (To open the device manager, go to the Windows control panel and use the search).
2) Go to disk management on Windows ( to go there, in Windows 10 just right-click on START) and check if there is a connected HDD there. If it is, then most likely for it to become visible - it needs to change the letter and format it. By the way, I have a separate article on this subject: (I recommend reading it).
Rice. 6. Disk management. Even those drives that are not visible in Explorer and “My Computer” are visible here.