How to clone an SSD. Cloning hard drives using Clonezilla live - a way to easily transfer your system to an SSD Cloning to a smaller drive
Cloning a hard drive is an operation that eliminates the hassle of Windows installation and software when transferring data to new disk(SSD drive or regular hard drive). As part of this operation, the entire partition structure of the first hard drive, all the data on them, as well as a working activated Windows system with all settings and installed software are transferred to a second hard drive connected to the computer.
Cloning function hard drives offer, in particular, programs for backup Acronis True Image data and disk manager Paragon Hard Disk Manager. All of them provide separate processes for transferring only Windows itself to another disk while maintaining its functionality, cloning individual non-system partitions, as well as cloning the entire disk with the ability to make changes to the partition structure of the clone hard disk.
A distinctive feature of Acronis True Image is the hard drive cloning function with the ability to exclude individual unnecessary files. We will look at this process in detail below - we will clone the hard drive using the Acronis True Image program, and during the cloning process we will exclude some data for transfer.
1. About Acronis True Image
True Image is a product from the master of the software market, Acronis, which offers, in particular, various solutions for disaster data recovery at a professional level. True Image is not only a panacea for all problems with Windows in the form of restoring it to the state from a once saved backup copy. The software package also contains a lot of other useful functions something like this:
- bootable media and a utility implemented in system preboot mode for cases when Windows does not start;
- Windows recovery on a computer with other components;
- storing backups in Acronis cloud storage;
- system cleaning tool;
- trial mode Windows operation with the ability to cancel changes made;
- other useful utilities.
The current version of Acronis True Image 2016 can be purchased on the developer’s official website.
The program has a free 30-day trial version designed to familiarize users with most of the functionality of True Image. However, the hard drive cloning function is blocked in the trial version. For these purposes, you need a fully activated Acronis True Image 2016. This is exactly what will be used in our case.
2. Source and destination hard drive
To define hard drives, we will use the terminology of Acronis True Image itself. The hard drive from which the data and partition structure will be copied is the source hard drive. The disk that will become a clone of the original one is the target hard disk. In our case, the disk management utility will help you to clearly see the initial picture of the disks. standard tool Windows. Quick access in system versions 8.1 and 10 it is implemented in the context menu on the “Start” button. The universal way to launch it is to call the “Run” function (keys + R), enter the command diskmgmt.msc and press Enter.

In our case, two hard drives are connected to the computer. The original hard drive is marked by the system as Disk 0. This is a working hard drive with Windows and data on non-system partitions. The newly connected hard drive is displayed as Disk 1 in the utility; it will be the target, that is, it will become a clone of Disk 0.

Target Disk 1, as we see, has a partition structure and some stored data. When a hard drive is cloned, all information on the target drive, as well as its original partition structure, are destroyed. Therefore, if there is any important information, it must be transferred to the original hard drive or external media.
As a rule, the cloning process does not require even an approximate matching of disks in volume. The target hard drive can be of any size and any size smaller than the source one, as long as there is enough space to accommodate the data that actually takes up space on the source disk. And in the case of Acronis True Image, this is not even necessary due to the possibility of exclusion separate folders and files.
3. Cloning process
After launching True Image 2016 you will be prompted to log in. account cloud storage Acronis. We can close the login window.

Directly in the program interface, in the side menu ribbon on the left, select the “Tools” tab section, and in it, select the “Clone disk” item.

And follow the step-by-step disk cloning wizard. We need a pre-installed one automatic mode cloning. Click “Next”.

Window for selecting the source hard drive: here we click with the mouse, respectively, on the drive from which the data will be transferred. The numbering of disks in True Image differs from the numbering of the standard Windows utility, therefore it is better to navigate the designation of disks by their size or model. Click “Next”.

Window for selecting the target hard drive: here we click on the drive to which we want to transfer the partition structure, Windows and other data. Click “Next”.

Since in our case the target hard drive is not a new disk with unallocated space, but a disk with structure and stored data, Acronis True Image promptly warns us about the danger of losing information. Everything you need has been saved, so we can safely press “Ok”.

Window for selecting a recovery method: here you need to leave the preset option for copying partitions unchanged. Click “Next”.

Summary window: here you can start starting the hard drive cloning process by clicking the “Proceed” button at the bottom if there is enough space on the target disk and there is no need to exclude individual files. Or, perhaps, there is plenty of space on the target disk, but you simply don’t want to transfer unnecessary data from the source disk to it, thereby increasing the duration of this process in time. To clone a hard drive not in full, in the data summary window, click the “Exclude files” button.

In the file exclusion menu we will see a tree structure of the contents of the source hard drive. You cannot exclude files and folders from the system partition C; we will only work with non-system ones. For example, in our case, we will exclude several video files on the second partition of drive E. The process of excluding files requires the completion of data processing, this will be indicated in the information line at the bottom of the window.

We will exclude the third partition of the source drive F from the cloning process entirely. After cloning as a partition, it will not cease to exist, but will be empty. Upon completion of all operations to exclude folders and files from the hard drive cloning process, we can begin to launch it. Click “Proceed.”

After the preparatory steps, Acronis True Image will ask you to reboot the system. The program will carry out the cloning process in pre mode. Windows boot.

In preboot mode, in the Acronis True Image window you will see a preset option to turn off the computer after the cloning operation is completed. You can leave it on to get distracted by your own business, and then, when you turn on the computer, go straight to the BIOS and set the boot priority from the target hard drive.

Cloning is complete, we can boot from the target hard drive.

4. Working with target hard drive space after cloning
After booting from the target hard drive and getting into Windows system, first of all, let's look at the partition structure. Launch the standard disk management utility. Since the target disk now comes first in the computer's boot priority, Windows identifies it as Disk 0. The latter has become a clone of Disk 1, once the original, with the same partition structure and proportionally allocated space, according to the structure of the original hard drive.

When excluding files, we completely removed all data from the third partition of the original hard drive. This partition now appears as partition I on the source disk and still contains data. Its clone on the target disk - now partition F - is, as expected, empty.

You can use it either to store data or attach its space to any other partition. There are software disk managers for these purposes. Disk Director the same company Acronis, no less effective Paragon Hard Disk Manager, free or their analogues. You can resort to them if you already have experience working with this kind of software. Moreover, True Image 2016 provides the ability to simultaneously redistribute the target disk space during the cloning process. To do this, at the first stage of the cloning wizard, you must select not the automatic mode, but the manual one.

Naturally, such a move will complicate the operation and increase the chances of beginners making mistakes. In our case, the operation was already burdened with the work of excluding individual files, so we will entrust some simple operations to form the partition structure of the clone hard drive to the lite version of the disk manager - the standard Windows utility.
The disk management utility has a minimum of functionality and does not provide for overwriting hard disk sectors in order to combine partitions or borrow part of their volume from some for others. However, operations to expand partitions by free space adjacent partitions on the right without overwriting data can be done.
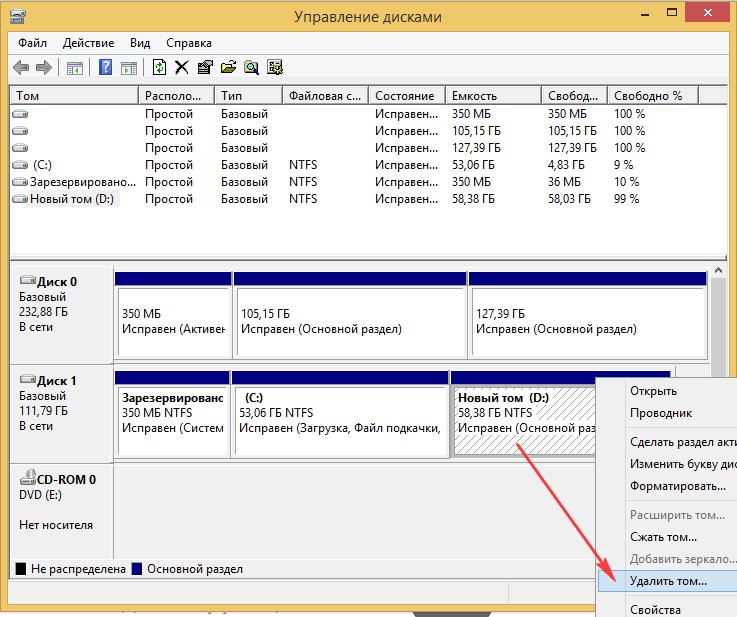
Let's add, for example, the space of the empty third partition of the target hard drive to its neighbor - the second non-system partition. To do this, the third section F must be deleted. In the utility window, click on it and call context menu and select “Delete Volume”. We confirm the action.

The third partition now appears as unallocated space.

Call the context menu on the adjacent partition E and select “Extend volume...”.

We follow the volume expansion wizard and give the second partition all the available space.


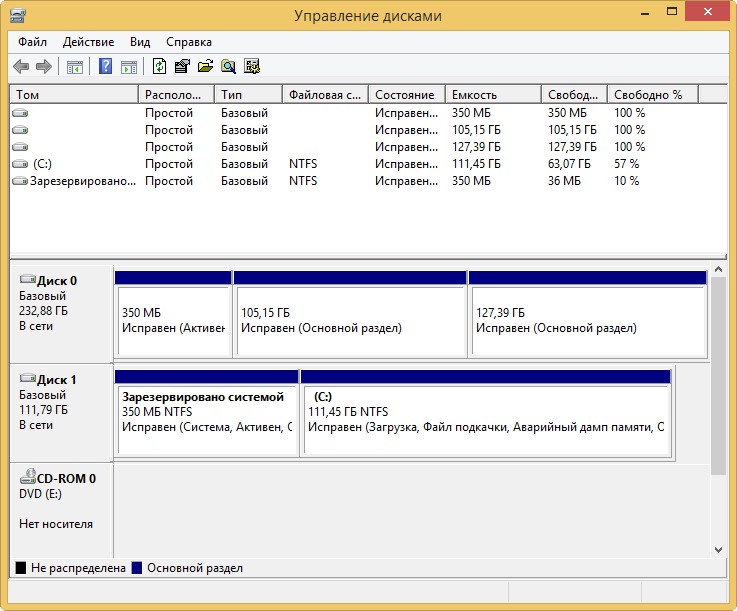
Now there are only two partitions on the target hard drive - the system partition and the enlarged non-system partition.

Using the same scheme, you can do it differently, leaving a third partition for storing data. Needs to be transferred to it necessary files from the second section, and delete the second section. Using its unallocated space, you can then expand the system partition C.
Have a great day!
Disk cloning, also known as disk imaging, is the practice of copying everything hard content disk or partition, including file structure and system files, to move or restore data located on the drive. Cloned disks are often written to a single file, a disk image, that represents the entire disk. This disk image can be used for many purposes, including transferring data to a larger hard drive or restoring an unstable system with a blank disk image.
Libraries, schools and cyber cafes often restore their computers using a cloned disk image to easily manage and protect large numbers of machines. The practice of creating a disk image can create some problems, but many programs provide features to compensate for this.
When operating systems and backups copy the contents of a disk from one location to another, they often ignore some files, change the data in some way, or do not preserve all attributes of the files on the disk. In many cases this is actually useful for the user. When backing up a folder to external hard disk, e.g. date and time last change files may reflect the time of the last backup, rather than when the original file was modified. When it is necessary to create an exact copy of a disk, many users may turn to disk cloning software.
Disk cloning software creates bit by bits to copy onto the disk, meaning every last piece of data is saved. The data can be written to a second disk or saved as a disk image file. The disk image file can be used to transfer data to one or more new hard drives, or to reinstall it onto the original drive. For example, an unstable system can be rolled back to the point where it is still functional using a cloned disk image.
Organizations with large numbers of computers can use disk cloning to deploy a standardized set of applications and data across different computers. They can also use this technique to simultaneous use updates and security patches for all your computers. For example, in libraries, schools and institutes, computers are often restored from a cloned disk image to destroy any viruses or other unwanted software, which scanners can download. Disk cloning can also be used in combination with disk wiping, the practice of securely wiping the disk, removing any personal data, and returning the machine to its original state.
Creating exact duplicates hard drive may have disadvantages. Computers running Microsoft® Windows® are assigned a unique security identifier (SID) when they first install the operating system. Disk cloning will copy the computer's unique SID; if this cloned image is used on multiple computers on a network, security may be compromised. When cloning a disk, drivers for a specific set of hardware are also copied, which can cause problems when the target system has different settings. Some disk cloning applications provide features to overcome these problems, so potential customers should be sure to evaluate their own needs before purchasing such software.
Hello admin. I want to clone the Windows 8.1 operating system from a regular hard drive to a solid state using Acronis True Image 2015 SSD drive, I think this method is much simpler than all others, first I specified the Source disk, then the Destination disk and that’s it. The capacity of a 500 GB hard drive is naturally larger than the capacity of a 120 GB solid state drive, but in the cloning settings you can exclude unnecessary disks, folders and even just files?
Of course, I can do everything myself, but I’m afraid, since I have little experience working with the Acronis True Image program, and I can see that you’re just messing around with it!
How to clone the Windows 7, 8, 8.1 operating system from a regular hard drive to an SSD solid-state drive (drive sizes vary) using Acronis True Image 2015
Hello friends! If you often work with Acronis True Image, you probably noticed that in the program settings there is an option called Cloning, and as our reader correctly noted, this option is very finely configurable.
As an example, I suggest you clone my Windows 8.1 from a regular 250 GB hard drive to a 120 GB SSD. A simple 250 GB hard drive is almost filled with files and naturally all the information from it will not physically fit on the SSD, but when cloning we can exclude unnecessary folders, files and even entire disks, as a result of the cloned information there will be exactly 120 GB of information, that is, as much as SSD capacity. But we need to do everything correctly, because the Windows 8.1 operating system cloned onto another hard drive should start for us!
First, let's connect the SSD solid-state drive to the system unit as a second device.
For the success of this serious operation, you must be well versed in Disk Management; pay attention to this window on my computer and you will immediately understand what’s what.
Disk 0
Simple hard SATA drive volume 250 GB.
1 . First hidden section(we will clone) System Reserved, has a capacity of 350 MB. The main purpose of the hidden partition is to store Windows 8.1 download files. If you have Windows 7 installed, then this partition will be 100 MB in size.
2 . The second partition has the letter (C:) (we will clone) Volume 105 GB, Windows 8.1 operating system installed.
3 . The third section under the letter (E:) volume 127 GB, with data files: music, movies, etc., occupied by 100 GB. We can clone this section not completely, we’ll just exclude large files when cloning. Or we can completely exclude this partition from the cloning operation and instead, at the end of the process, an empty partition is formed on the SSD.

Disc 1. Solid state drive SSD, when cloning all information on it will be deleted
Acronis True Image 2015
For cloning, it is better to use the Acronis True Image 2015 boot disk, since this version works without errors with SSD solid-state drives and has UEFI support. It is better not to install Acronis True Image in Windows and work with the boot disk of this program, this way you will avoid many errors.
A bootable USB flash drive with Acronis True Image 2015 can be made in the program itself or using this article of ours .
So, we boot from a disk or flash drive with the Acronis True Image program. Who doesn’t know how to boot from a disk or flash drive, read our article - .
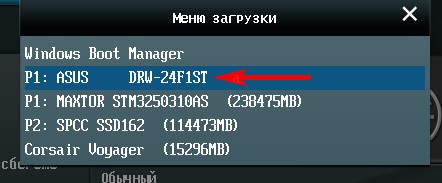
For example, I enter boot menu your computer from the motherboard ASUS board Often pressing the Delete key when turning it on, then selecting the “Boot Menu” and in it selecting the drive or flash drive.
In the main window of Acronis True Image 15, select
Tools and Utilities

Disk cloning


With the left mouse, select the Source disk (the disk from which you want to clone the Win 8.1 operating system), in our case a simple hard disk 3 MAXTOR STM 3250310AS and click Next.

Select with the left mouse the Target disk (the disk to which you want to clone the Win 8.1 operating system), in our case a solid-state drive SSD Silicon Power and Beyond

Acronis displays a warning "The selected target hard drive contains partitions on which data can be stored. Click OK to confirm deleting all partitions on the target hard drive." Click OK and Next.

Window Exclude by files and folders.
In this window, Acronis True Image 15 tells us that in order to clone information from the Source disk to the Target disk, we need to exclude 23.72 GB of files on the Source disk. You cannot exclude files from the first section (System Reserved) because it contains Windows 8.1 download files. It is also undesirable to excludefiles from disk with installed Windows 8.1. The drive with the Windows 8.1 operating system installed is assigned a letter (D:); if you click on it with the left mouse, the operating system files will open.


This means we will exclude files from disk (E:).
Attention : Friends, you can simply exclude this entire drive (E:) from cloning, as a result Disk C: will be cloned onto the solid-state drive.(System Reserved) containing download filesoperating systemand another disk (D:) containing Windows files 8.1, but you can choose a more complicated option. Let's open the disk(E:) and select on it unnecessary file or folder. For example, on this disk the virtual hard disk NewVirtualDisk1.vdi has been an eyesore for me for a long time, I haven’t needed it for a long time and its capacity is about 50 GB, let’s exclude it from cloning and mark this virtual disk with a tick. Program

As you can see, after excluding the file, we still have 30 GB of free space left. Click Next

If you click Proceed now, the cloning process will begin exactly as shown in this window.
Before - what is on the solid-state drive now and all of this will be deleted.
After - what will be on the SSD after cloning, that is, two small partitions.
I want to say that I personally do not need this state of affairs. I need on SSD drive a hidden partition (Reserved by the system) containing the operating system boot files and another drive (D:) containing the files of Windows 8.1 itself

So I'll go back to the window Excluding files and mark the entire disk with a tick
(E:). Acronis True Image 15 starts recalculating the space for cloning.

Friends, pay attention to the disk (E:), it will be created early, since this is a drive cloning operation, but the disk (E:) will be completely empty. After cloning, we will simply delete it in Disk Management, and the resulting unallocated space will be attached to the C: drive, that’s all.
Get started. The cloning process begins.


The Disk Cloning operation has completed successfully.

We restart the computer and enter the boot menu, select the SSD solid-state drive to boot and boot from it.

Cloned Windows 8.1 boots perfectly. Activation from Windows did not work. We go to Disk Management and see this picture.
The drive letters have disappeared from partitions on a simple hard drive, but you can simply assign them and that’s it.
As intended during cloning, the SSD has three partitions. The first one contains the operating system boot files. Second drive C: with cloned Windows 8.1. Third disk D: completely empty.


We remove the D: drive and attach the unallocated space to the C: drive.

I would be glad if I could help.
Hello, I read your articles about the program which is direct and free analogue data backup leader and they interested me.
Using the program AOMEI Backupper Standard made backup copy operating system, after a couple of days it was successfully restored from a previously created backup. It turns out that the AOMEI Backupper Standard program works well, but a question has arisen.
Is it possible to transfer or clone Windows 8.1 to another hard drive with the AOMEI Backupper Standard program? Will the cloned Windows run on another hard drive? And can the same program transfer Windows 7, 8.1 from a simple hard drive to an SSD?
And the last question. I am not as professional as you, so I ask you to do everything in a running operating system. I see you are working with boot disk AOMEI Backupper Standard program, but I don’t like it that way, because I have to tinker with the BIOS, change the boot priority, and so on.
Hi all! Friends, this is very easy to do, let's clone the Windows 8.1 operating system from one smaller hard drive (250 GB) to a larger hard drive (500 GB) using the AOMEI Backupper Standard program. And in the next article we’ll do the opposite, transfer Windows 8.1 from a simple hard drive to a smaller SSD.
A friend of mine recently bought a 500 GB hard drive and wanted to transfer Windows 8.1 to it from an old 250 GB hard drive. He asked me to help him in this matter, and I decided not to use the one already familiar to you and use the AOMEI Backupper Standard program, and everything worked out in the end.
In this article I will do the same thing, only on my computer.
Clone hard drives We'll be right in running Windows 8.1. No reboots or scary BIOS!
For those who are not familiar with the AOMEI Backupper Standard program, I strongly recommend reading, otherwise you will have a difficult time today.
From the first article you will learn:
1. How to download and install AOMEI Backupper Standard and then Russified.
2. How to create the first backup Windows image 7, 8, 8.1, 10 using this program.
3. How to restore Windows using AOMEI Backupper Standard directly on a running operating system.
In today's article we will use a tool in the AOMEI Backupper Standard program called Cloning!
Before you begin, take a look at My Computer's Disk Management.
We will transfer, or you can say “clone”, all the information from Disk 0, volume 250 GB (drive (C:) with Windows 8.1 installed and drive (D:) with personal files) on Disc 1, volume 500 GB.
On Disc 1 All information will be deleted during cloning.

Launch the AOMEI Backupper Standard program and select Disk cloning

Window Source disk. Mark with the left mouse the disk that we want to clone and click OK.

Window Destination drive. Select with the left mouse the disk on which the transferred (cloned) information.

Read everything carefully and click Yes.

Window Operation Summary. Click on the button Change partitions on the target disk.

If you check the box Copy without resizing partitions and click OK, then after cloning to Disk destination(500 GB) there will be unallocated space since it is larger Source disk(250 GB).

If you press Fit all partitions on the entire disk, then the excess space will be evenly distributed among the remaining partitions. But pay attention - the first hidden partition with a volume of 350 MB (with Windows 8.1 download files) will also be changed, and this is not desirable and it is better to immediately select the third option

Change disk partitions, then select the section (H:) located in front of the unallocated space with the left mouse and drag the delimiter all the way to the right.

This way we will attach all the unallocated space to the disk (H:). Click OK.

Click Launch


Observing the progress of disk cloning

If you now enter Disk Management, you can see that the first partition has already been cloned


The second section is also ready.


We reboot and enter the computer boot menu, select the hard drive (500 GB) onto which Windows 8.1 was cloned.

The operating system loaded perfectly. Activation failed. Let's go to Disk Management.
On the source disk from which cloning was performed, the drive letter has disappeared and can be


Windows 8.1 successfully transferred to Disk 1. Both operating systems on both hard drives loads perfectly when in system unit one by one or together.
Articles that may be useful to you
18.02.2011, 02:17
Comrades, the next question. We all know the software and how to use it when we clone dying hard drives, for example, either the same size or a larger size than the one that exists. But I have the following situation - I have 1 TB of HDD, in which 102 GB are allocated for drive C, where the system, software and others like it are located. And the hard drive began to slowly fail, well, I decided to buy a 120 GB SSD for the system, but I was too lazy to rearrange the system. Attention question: How to make a clone of an old hard drive to a new one, by also selecting a hidden partition, a bootloader to clone, and everything you need to start Win7 x64?
18.02.2011, 06:07
you can try to make a disk image with acronis from hirens boot cd
and then unscrew it onto the new screw
18.02.2011, 09:49
The bootloader won't transfer...
create the main partition with acronis director, and then throw the image
18.02.2011, 10:02
This will only be a disk image. The bootloader won't transfer...
I don’t know about the seven, but when you restore from an image of a system boot disk from XP to a zero blank screw, everything is transferred, including the bootloader. Just for 7, if there is a small hidden boot partition at the beginning of the disk, then you must first create/unfold its image, and then the partition with Windows itself.
18.02.2011, 12:09
boot disk acronis true image server to help you. you create an image and then transfer it to the ssd. You can also make an image. You can take the image from the forum.
You can also try cloning.
choose manual and go ahead.
18.02.2011, 13:08
Comrades, the next question. We all know the software and how to use it when we clone dying hard drives, for example, either the same size or a larger size than the one that exists. But I have the following situation - I have 1 TB of HDD, in which 102 GB are allocated for drive C, where the system, software and others like it are located. And the hard drive began to slowly fail, well, I decided to buy a 120 GB SSD for the system, but I was too lazy to rearrange the system. Attention question: How to make a clone of an old hard drive to a new one, also selecting a hidden partition, a bootloader to be cloned, and everything that is needed to start Win7 x64? Firstly, cloning does not imply any changes from the original! That is, 1 TB HDD, even if it is completely “empty”, cannot be cloned to 120 GB!
Secondly, please tell me about your computer model?
18.02.2011, 13:40
Yes, just create an image of these two partitions and restore it to a new one.
18.02.2011, 13:41
I'm too lazy to rearrange the system.
Installing the system takes a maximum of 30 minutes, installation of firewood, software, configuration - another 1-1.5.
You will spend less time than on all the questions, downloading and trial and error...
18.02.2011, 13:48
You will spend less time than on all the questions, downloading and trial and error...
No less! Plus you will learn how to backup/deploy from an image...
cloning does not imply any changes from the original!
Well, yes, the term “clone” is not applicable in this case. Partition image creation/recovery only
18.02.2011, 13:51
creating an image (two partitions) max. 25 min (depending on size), recovery 10-15 min.
no need to re-adjust the system, no need to save data and then upload it again, no need to download updates, especially with low-fat Internet. and you don’t need much else.
and the hidden recovery section and editing the MBR (so that it works), also 30 minutes?
18.02.2011, 18:06
That is, 1 TB HDD, even if it is completely “empty”, cannot be cloned to 120 GB!
topstarter said:
in which 102 GB are allocated to drive C
and as far as I understand, Wise Old Wol is going to put 120g for the system and leave 1TB for all sorts of crap
You won’t be able to install Windows with a new one in 20 minutes.
but returning the image may be faster
Sincerely, S.A.
18.02.2011, 18:18
topstarter said:
and why does he need the image of the second section?
Here's why:
Attention question: How to make a clone of an old hard drive to a new one, by also selecting a hidden partition, a bootloader to clone, and everything you need to start Win7 x64?
18.02.2011, 19:12
Secondly, please tell me about your computer model?
Asus P5QE, q9550, 4 Gb Ram (by the way, it's time to upgrade to 8 :-)), hd5870, 3xhdd - 2x1Tb 1x500Gb + SSD 120 Gb. But why do you need it?
In order not to quota previous messages, I will answer immediately and quickly... A clone of the system will be faster, because... Too much specific software installed. Some software will take more than 1 day to reactivate... And I may need any program at any time. They wrote correctly that it will take much longer to reinstall the system and configure it... Regarding Acronis Boot Director Disk. I have it. But! I'm cloning an MBR, trying to clone the boot partition - and it tells me that the 2.8 MB in front of it will be empty... I did everything else, but the system won't boot from this disk... I've never bothered with disk cloning, True Image Server Something seemed odd to me... First, make an image, then fill it up... But you need a computer, but a laptop without a computer connected to the grid turns out semi-castrated... These are the pies...
Now I'm thinking about this option. Disconnect the rest of the hard drives so as not to interfere, load the system onto the SSD - it will take about 10 minutes, 15 at most (I'm limited by the speed of the DVD), and then stupidly clone the C drive to bootable Windows... Do you think it will work?
18.02.2011, 19:28
Wise Old Wol, the easiest thing is to remove the image with Acronis and deploy it to a new disk. I don’t know how Windows transfers data and I don’t want to know, because I’m sure it’s crooked, like everything in it. This is not MacOS, where you pressed a button and everything from contacts and programs to user data was transferred.
What kind of Windows is it, by the way?
Seven needs to start its installation from under the installed Windows, then it will install and absorb the old config parameters.
No need to fool your head:
Delete from system disk anything unnecessary, so that the file size is less than 150 gigabytes, use the disk director to reduce the size of the system partition to 150 gigabytes, apply the settings, then use TrueMedge to remove the image and deploy it to a new 160 gigabyte disk. Then you connect the new disk with the disk director and increase the partition to the size of an SSD. (there will be a couple of gigs left unoccupied at the end of the disk)
In 20 hours from the moment the question arose, the procedure could have been completed 25 times))))))
I just transferred the system from 160 to 320 gigs, everything went without a hitch.
18.02.2011, 19:32
Sharer, From 160 to 320 there is no need to transfer. Read the first post. The system partition is already smaller than the new disk. Read my last post - there is no time to experiment... It’s a complete emergency... Read the previous post again. I didn’t transfer it to Windows, but from the bootable Acronis disk of the director...
18.02.2011, 19:51
Wise Old Wol, well, bring everything into line with the “don’t do anything” situation. This is done with one movement of the disk director slider + 7 minutes of processing time + you will need a guaranteed absence of power failures. But to work with images you need a “true image”, and not a disk director.
After you reduce the system partition to a size that fits on the new disk, everything will work out according to the “do nothing” scheme.
What system (again)
In the seven, you need to remove the image from two disks (check the boxes): from the hidden one (100 megabytes approximately) and from the one where the system and programs are located + don’t forget to check the MBR box.
In XP, you can simply try to copy everything from one disk to another, then put the system with installation disk: should pick up all the settings, but if there’s an emergency, it will take significantly longer.
19.02.2011, 02:39
In the seven you need to remove the image from two disks (check the boxes): from the hidden one (100 megabytes approximately) and from the one where the system and programs are located + put a tick on the MBR and don’t forget the hidden partition Win 7
[Only registered users can see links]
Sharer! On the MBR, there is no need to check the box, since the MBR contains information about the partition sizes for a terabyte (MBR - only when cloning the entire disk)
P.S. How can I make a clone of an old hard drive onto a new one, by also selecting a hidden partition, a bootloader to be cloned, and everything you need to start Win7 x64? But why do you need it? I thought that a laptop - indicating a “hidden partition” would confuse everything.
Wise Old Wol! Forget about cloning (especially MBR) and make an image of the system partition, as tuhran described.
I’ve never bothered with cloning disks, True Image Server seemed like a bit of a waste to me... First, make an image, then upload it... But you need a computer, but a laptop without a computer connected to the network turns out to be semi-castrated... These are the pies... Maybe I should ask a computer geek friend for help!?
19.02.2011, 05:04
Sharer! On the MBR, there is no need to check the box, since the MBR contains information about the partition sizes for a terabyte (MBR - only when cloning the entire disk)
Don't confuse people, mbr and mft are different things.
mbr - master boot record, stores information about where to boot from... there are no sizes there.
mft - master file table - partition table, with sizes, etc.


