How to restore the windows operating system on an asus laptop. How to restore the system on an Asus laptop How to restore the system on Windows 7 asus
Greetings, readers.
Often laptop users encounter a problem when the operating system fails. And if previously the device could only be “brought back to life” by reinstalling Windows, now there are several options. The first is to use the built-in solution located on the installation disk. The second is a system recovery for an Asus laptop - the function will reset the equipment to factory settings. Of course, such methods are not only available on the above-mentioned devices. Today I will talk about them and the standard ones.
All laptops from Asus have a tool that allows you to restore the functionality of the equipment. It is located on the hard drive and takes up about 20-30 GB. In this case, the section is hidden. It cannot be simply removed, but there are tools that allow you to say goodbye to it. But it’s still better not to restore Windows 7 to factory settings.
It is immediately worth noting that this solution returns the laptop to the state in which it was purchased in the store. And therefore with system disk All personal data and programs will be deleted. If you have it on your desktop or in the folder " My documents"there are important documents, it is better to save them in another place
This application is convenient because it does not remove previously installed drivers, and therefore there will be no need to waste time on this procedure again.
It is worth remembering that this solution is perfect if the computer does not see the image on the installation disk.
Be sure to connect the device to a constant power supply before starting.
To start restoring from the recovery partition, you need to perform several steps:
No need to worry again - just leave the laptop for a while. The main thing is to wait for the desktop to appear. Process on various devices lasts from half an hour to one and a half.


You only need to enter any data when choosing a username.


After completing the procedure, you can begin to personalize the device, because now it will be the same as you purchased it in the store.
Windows Disk( )
Another frequently used tool is System Restore, which is offered on the installation Windows disk 8 or others latest versions. In this case, it is best to do this from a flash drive. The main thing is to prepare the appropriate portable memory in advance. To do this, you need an image of the system that is currently installed on the computer, and special program. Let's say WinToFlash perfect for this. Just insert the device, launch the application and, using the prompts, create the desired element.
To recover, we perform several movements:

Well, as usual, there are several ways to get your system back up and running. However, some of them relate to built-in capabilities.
Restoring a laptop to its factory settings may be necessary in many situations, the most common of which are some kind of Windows malfunction that interferes with operation, the system being “cluttered” with unnecessary programs and components, as a result of which the laptop slows down; the same method can solve a lot of other problems or prepare the laptop for sale - relatively quickly and easily.
In this article, we will take a closer look at how to restore factory settings on a laptop, how this usually happens, and when it may fail. Separate detailed instructions for Dell laptops: , for Lenovo laptops: .

In order to restore Asus laptops to factory settings, computers of this brand have a convenient, fast and simple recovery utility. Here step by step instructions on its use:
- Disable fast boot (Boot Booster) in BIOS - this function speeds up computer boot time and is enabled by default on Asus laptops. To do this, turn on your laptop and immediately after the boot starts, press F2, as a result of which you will have to get into BIOS settings, where this function is disabled. Using the arrows, go to the "Boot" tab, select "Boot Booster", press Enter and select "Disabled". Go to last tab, select “Save changes and exit”. The laptop will automatically reboot. Turn it off after that.
- To restore your Asus laptop to factory settings, turn it on and press the F9 key, you should see the boot screen.
- The recovery program will prepare the files necessary for the operation, after which you will be asked whether you really want to perform it. All your data will be deleted.
- After this, the process of restoring and reinstalling Windows occurs automatically, without user intervention.
- During the recovery process, your computer will restart several times.
HP laptop factory settings

To restore factory settings on an HP laptop, turn it off and disconnect all flash drives from it, remove memory cards, etc.
- Turn on the laptop and press the F11 key until the HP laptop recovery program - Recovery Manager appears. (You can also run this utility in Windows by finding it in the list of installed programs).
- Select System Recovery
- You will be prompted to save the necessary data, you can do this.
- After this, the process of restoring factory settings will proceed in automatic mode, the computer may restart several times.
Upon completion of the recovery program, you will receive an HP laptop with Windows installed, all drivers and proprietary HP programs.
Acer laptop factory settings

To restore factory settings on Acer laptops, turn off the computer. Then turn it back on by holding Alt and pressing the F10 key about once every half second. The system will ask for a password. If you have never done a factory reset on this laptop before, the standard password is 000000 (six zeros). Select Factory reset from the menu that appears.
In addition, you can perform a factory reset to Acer laptop and from the Windows operating system - find the eRecovery Management utility in Acer programs and use the “Recovery” tab in this utility.
Samsung laptop factory settings

In order to reset a Samsung laptop to factory settings, run the Samsung Recovery Solution utility in Windows, or, if it was deleted or Windows does not boot, when you turn on the computer, press the F4 key, the recovery utility will launch Samsung laptop to factory settings. Next, follow these steps:
- Select "Restore"
- Select " Full recovery» (Complete Restore)
- Select the Computer Initial Status restore point
- When prompted to restart your computer, answer “Yes”; after rebooting, follow all system instructions.
Once the laptop is fully restored to its factory state and you are logged into Windows, you will need to perform another reboot to activate all the settings made by the recovery program.
Resetting your Toshiba laptop to factory settings
In order to run the factory reset utility on Toshiba laptops, turn off the computer, then:
- Press and hold the 0 (zero) button on your keyboard (not the number pad on the right)
- Turn on your laptop
- Release the 0 key when the computer starts beeping.
After this, the program will launch to restore the laptop to factory settings, follow its instructions.
Making changes to BIOS and installationWindows
The reason for reinstalling Windows may be: frequent laptop freezes, deterioration of its performance and long loading times. Reinstalling the system is not at all difficult. You just need to carefully follow the instructions and not confuse anything.
Procedure
- First of all, you need to take care of the safety of the files that are most important to you. It is best to copy them to removable media or move them to a computer drive that will not be affected by the reinstallation (on which the OS is not installed).
- After that, download Windows from the official Microsoft website (or from other resources) and write it to a disk (flash drive), making the device bootable. The boot device will help you create a simple and free program USB/DVD Download Tool.
- We also recommend downloading the driver to the USB flash drive. network card your laptop so that immediately after installing the OS you can download the remaining drivers from the Internet. Or download the so-called driver pack in advance, and you will be able to avoid problems with installing drivers.

- Now you will have to slightly adjust the BIOS settings. If you are not sure that you can do this, then the best service center for repairing ASUS equipment will always help you. To do this, restart the laptop and, before loading the operating system, press the F2 key. After which the BIOS will open. Go to the “Security” section, and in the “Secure boot” line, select the “Disabled” value.

- Before exiting the BIOS, you need to check that opposite “Boot mode” in the “Advanced” - “System configuration” section is set to “UEFI boot”.

- Save the changes (“Save changes and Exit”) and restart the laptop. Immediately after this, insert the disk or USB flash drive with Windows.
- Follow the directions in the instructions. In the menu for working with partitions, we recommend completely formatting hard drive, on which the previous OS was installed.

- After this, install Windows on the formatted partition. Follow the instructions in Russian and no problems will arise.
If you encounter any difficulties during the installation process, watch the video tutorial at the top of this page.
The concept of restoring the Windows 7 operating system (vista and windows 8 are similar) can be viewed in different ways.
You can restore up to a certain point (do a rollback), and get back to factory settings exactly the same as you bought, using the hidden section - recovery.
Restoring Windows 7 by rolling back the system of an asus laptop
Most often among users to restore Windows 7 Asus (others also) use a rollback to the previous state.
To do this, save points must be created on your computer/laptop. By default this feature is enabled.
I will not describe this method here, because detailed description This procedure is already in the article.
How to restore an Asus laptop to factory settings
Restoring the operating system to the factory settings of a laptop is also described on this site.
For information. Only there is a general description.
Below is purely for asus. To do this, turn it on and click on the F9 button - you will see the download window.
The program will prepare the files necessary for recovery, after which you will see a request.
The system will ask you whether to really perform this operation, and that after this all your files (data) will be completely deleted.
During the process, the computer will reboot several times - you will be warned about this.
Only such an operation is possible only if you bought your asus laptop with a pre-installed operating system Windows system 7 or any other.
Then there may be a hidden “recovery” partition on the hard drive for recovery.
Another way to restore an asus laptop system from a hidden partition
Open " " in your Windows 7, go to the "system and security" section, click "administration" and click on the line "manage disk partitions".
A window will open for you. There will be a list of sections hard drive. In it, right-click on “RECOVERY” and select “make partition active”.
After this, your asus laptop will reboot and the process will begin from the hidden partition Windows recovery 7.
The only problem is that not everyone has a “RECOVERY” system recovery disk - many buy asus laptops - clean, and install the operating systems themselves (friends, specialized centers or even sellers).
In such cases, it is advisable to immediately buy an external hard drive and save the image of your operating system on it.
Then you can quickly restore the laptop system to its original state at any time. working condition. Good luck.
Despite all the efforts of the developers software At Microsoft, they have not yet been able to come up with something better than the simple and functional Windows 7. Yes, we can say with a clear conscience that those who have at least once managed to work on a laptop with this operating system are unlikely to want to return to their old Windows XP or even the brand new Windows 8. But what to do if you couldn’t get such an OS as a reward for your ASUS laptop? What? Yes, install it on your PC and forget about the problem; installing OS Windows 7 on an ASUS laptop is not a difficult task!
Step No. 1: Prepare the PC for OS installation
Where does one begin to reinstall any operating system on a laptop? Right! With appropriate preparation for it. Note that in order to reinstall Windows, you should initially take care of performing two extremely important actions:
- prepare drivers for an ASUS laptop;
- copy valuable data from your hard drive.
In principle, each task is clear as daylight. In particular, in order to prepare drivers for an ASUS laptop, just download them from the official website (www.asus.com/ru/) of the manufacturer and write them to a disk or flash drive:

At the same time, no matter how wonderful the Windows 7 system is, it would be stupid to sacrifice your thesis / annual report / family archive and other valuable documents stored on the C drive in your laptop for the sake of it. In this case, going to reinstall operating system, you should first copy data from your hard drive to a flash drive or DVD. To do this it is enough to use Windows Explorer and the notorious combination of the Ctrl + C and Ctrl + V buttons on the keyboard.
However, if you don’t want to part with, for example, the licensed Windows 8 operating system, you can even install it on an SSD. You can read about this “difficult” process in detail.
Step No. 2: Burn a bootable USB flash drive
Note that you can install, as in principle reinstall, Windows 7 on an Asus laptop not only from a flash drive, but also from a disk. There will be virtually no difference in installation (reinstallation) from this. However, based on the fact that many modern ASUS laptop models do not have drives, even if you have a licensed disk with Windows 7, it will not be easy to use it directly. At the same time, a USB connector is available on absolutely all PCs. So, as you can see, the option with a flash drive will be universal.
What are we doing? First, download the original one Windows image 7 from the Internet or copy it from installation disk to the computer. Then install the UltraISO program and run it in testing mode (“Trial period”). In it, through the menu “File” - “Open ...” we add a virtual one for recording Windows image 7:

Now we insert the USB flash drive into the computer on which the Windows 7 image will be installed, open the “Boot” section in the UltraISO program and click the “Burn image...” item. Next, select USB-HDD as the recording method in the new window and click “Format”:

The next step is to give permission to the program to format the flash drive, and then select “Burn” in the new window:

Did you encounter any difficulties with this? Do you want more? Then we move on to the next step of installing our beloved Windows 7 on an Asus laptop.
Step No. 3: Perform BIOS settings
In order to install Windows 7 on an ASUS laptop without any problems, you will need to make a number of settings in the BIOS. First, of course, you need to enter it. How to do this? When the computer boots, press Del / F2 / Tab+F2 / Shift+F2 on the keyboard.
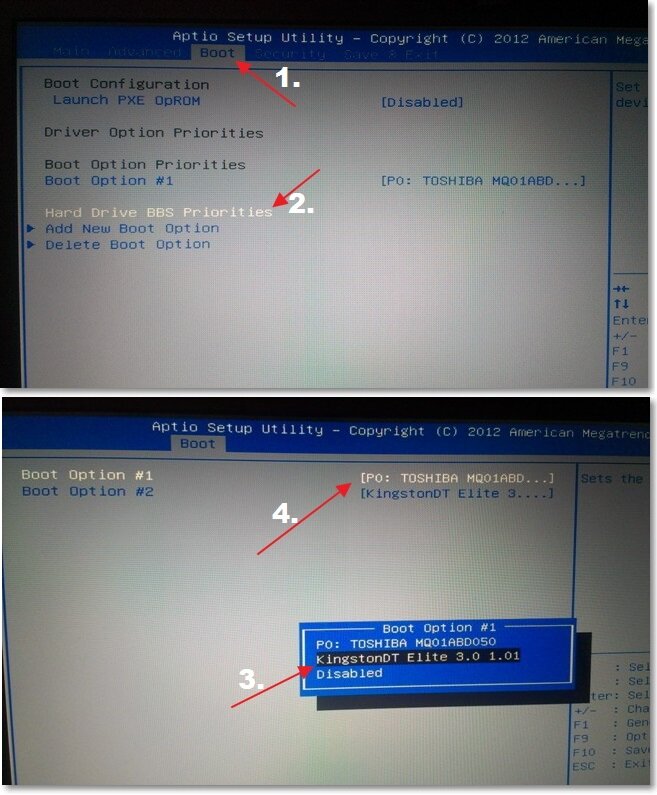
In the same tab, find the Launch CSM item and select the Enabled option instead of Disabled for this option. Next we go to the one next to Boot Security section and deactivate the option Secure Boot Control using the Disabled parameter. Press F10, save the settings (YES) and exit the BIOS. Now all that remains is to directly install (reinstall) the OS on the ASUS laptop.
Step No. 4: Install the operating system
So, after all the preparatory steps have been completed, all that remains is to install the prepared Windows 7 image on the laptop. In principle, this process will begin the very minute the computer exits the BIOS. A window will appear on the screen, which will notify you that you need to press any key to load the flash drive. What are we doing? Click, of course, and immediately go to Windows setup. First of all, select the language, click “Next”, and then “Install”:

After this, we read and agree to the license terms, and then select “Full installation” as an option for installing (reinstalling) Windows 7 on a laptop in a new window:

Now we decide on the disk on which we want to reinstall Windows 7, click on it with the mouse, click “Disk Setup”, and then “Format”:


Note that at this stage Windows 7 may ask you to install drivers. No problem? Of course not, we worried about them at the very beginning. Now we just download them ourselves, using the prompts on the screen:

Step #5: Select custom settings and complete the installation
In principle, in order to reinstall Windows 7 on an Asus laptop, there is only a little work left to do. What will you need? Just select the parameters we need to work on the laptop. You will have to act in this order:

In principle, with the last step the process of installing (reinstalling) Windows 7 on a laptop from ASUS will be completed. Just? What did you think? In principle, there is nothing complicated about reinstalling Windows on a computer! Enjoy your work with Windows 7!


