Create a Windows 8.1 system recovery disc. Windows System Restore
Although everyone understands that for stable operation of a PC it is simply necessary to keep its OS in working and healthy condition, sometimes the only way out is to restore Windows 8.1.
The recovery disk is a USB flash drive containing all the tools necessary to repair the system. It typically includes: Startup Repair, Updates, Reset, and System Restore.
To create a recovery disk, open the control panel and click on the “Recovery” section (the control panel is in the large or small icons view, this section is not in the category view). The top parameter of the window that opens is responsible for creating the recovery disk we need. Click on it and go directly to creating the disc.
Clue. If you have a factory-preconfigured recovery partition on your computer, you can check the box to copy the recovery partition. True, this significantly increases the size of the recovery disk, and is only suitable for USB flash drives with a capacity of at least 32 GB, but it provides valuable additional parameter for emergency rescue of Windows 8.1.
Once the disk is created, you can start your computer from it and access recovery options. However, do not forget that USB boot must be enabled in your motherboard's UEFI firmware.
Attention. If you're using Windows RT on a tablet, such as a Microsoft Surface, you should definitely create a recovery disk containing a system backup image. There is no other way to reinstall Windows RT except from a recovery disk, so if an accident occurs, you have only one option - to return the computer to the manufacturer to re-image it, which in our reality is unrealistic. To create a recovery disk with a full image Windows systems RT you will need a USB flash drive of only 4 GB.
Backup and restore Windows 8.1.
Since the days of Windows XP, when problems arise with the OS, it has been considered common practice to completely reinstall the operating system and all software. There are now several other ways to ensure the safety of your installed copy of Windows and recover it in the event of a crisis.
Note. Windows 8 includes a tool for backup complete system image, Windows 7 has options for restoring files. This functionality has been removed in Windows 8.1. An alternative to these functions in Windows 8.1 was its own recovery option.
Repair Windows 8.1 using the Quick Repair option.
In Windows 8.1, Microsoft introduced new way creating a backup image that is so simple that any user can use it. This new option recovery creates backup copy operating system, which can easily be launched from the computer settings or, by inserting a recovery disc, from the OS startup options.
There is one important difference between the old system backup image and the new restore option. Even if you create your own custom recovery image, which, if anything happens, will restore all installed desktop programs, you will not be able to save their settings. This means that the software, e.g. Microsoft Outlook will be restored, but accounts his email will have to be configured again. Same with all other desktop applications.
However, most users don’t have to worry, Windows 8.1 synchronizes most of its settings, including for desktop applications, and the same Microsoft Office 2013 can synchronize its settings between different computers.
The easiest way to access the recovery option is in the PC settings by selecting update and recovery there, and then in the left navigation bar pressing recovery.
The recovery option is the first option at the top of the screen, by the way, there is an explanation of what will be done. When you are ready to restore your computer, click the GET START button. The process is fully automated.
Windows 8.1 will explain to you what will be done during the recovery process and ask you to confirm this operation. Clicking on the OK button will begin the action itself, which can take from 15 to 60 minutes, which directly depends on your created custom recovery image.
You can restore your computer during Windows startup 8.1. There are several ways to do this:
- If your computer fails to start three times, the repair process starts when you boot it up. If the computer cannot be repaired, it offers additional options, including recovery.
- Starting the computer with a recovery disk; Please note that you may need to access boot options. You need to boot from a USB flash drive.
- Starting a computer with a Windows 8.1 installation DVD. On the settings screen, instead of system repair options, click the computer repair link.
Create a custom recovery image in Windows 8.1.
As mentioned above, you can create a custom recovery image. You may need to do this because by default, this function will update your copy of Windows 8.1, keeping files and applications intact, but will destroy all desktop applications.
Creating a custom recovery image will take a snapshot of your computer complete with all desktop software.
Note. Remember that when you restore from a custom recovery image, all desktop program settings are reset, so you will have to configure them again, however, if their settings are not automatically synchronized between computers.
To create a custom recovery image, you need to follow these steps:
- Click Win + X by opening the administration menu.
- Select and run Command Prompt (Administrator).
- Enter recimg -CreateImage C:\Folder, where C:\Folder is the location where you want to save the backup. This place may also be on another section hard drive or on another drive. You can add additional fault tolerance to your recovery image creation.
Hello dear readers.
Despite all the positive aspects of Microsoft operating systems, they still sometimes fail. And if there is an option to get into the shell, you can solve the problem using built-in methods. But what should you do if an error appears in the OS that prevents you from reaching the desktop? Today I will talk about creating a Windows 8 recovery disk. It is this tool that makes it possible to restore the functionality of your computer in the event of serious problems at the software level.
Today, in most cases, users use USB drives to create related solutions. True, for some reason there are those who still write the necessary data to DVD. The procedure is as simple as possible:
USB( )
As mentioned above, today in most cases users use flash drives. And this is not just like that, because they are smaller, more convenient to use, and fail less often. In addition, they are perfect for HP laptops, because some models may not have optical drive. But USB is available almost everywhere.
To write the desired instrument to a flash drive, follow a few steps:

This method is also great for Asus laptops. The main thing is to have a drive that is suitable in terms of memory capacity.
Problems( )
Sometimes there are cases when the above tool simply does not see your flash drive. How to create the solution we need? Don't get upset right away - there is a way out.
First, create a disk on a virtual drive. Next we make an image out of it *.iso with the help Total Mounter, which can download online:

Then, using a program that writes Windows to a flash drive, we place the tool on the appropriate device. It could be Win To USB/DVD or something similar.
So it turns out that the desired solution appeared using an iso image.
How to use?( )
Typically, such tools are not used often. If any problems appear in Win 8, the system independently tries to solve them. And this can be in both the 64 bit and 32 bit versions.
And only when the operating system cannot do anything, the solution that we created earlier will help. To do this we do the following:

Due to viruses, driver inconsistencies, or software, the OS may malfunction. If your Windows crashes, don’t rush to panic. The situation can be corrected by returning the state of files and programs to the moment when the PC was working properly.
While running OS Windows 7, 10 or 8, certain errors and problems may occur. As a result of such failures, starting the operating system again in operating mode becomes impossible. In this case, it is not at all necessary to do a time-consuming reinstallation of the OS. All you need to do is perform a system restore.
Recovering the OS using the recovery environment
When working we use the following scheme of actions:
- Reboot the computer, press the F8 key while loading;
- Troubleshooting;
- System restore, selecting an OS restore point;
- Click "Next" and again "Next";
- Press the button "Ready", we reboot the system (in the Menu, select boot with the last successful configuration).
Windows 7 System Restore
There are several methods you can use to get your OS running again. Some of them rely on rolling back to saved settings. Others simply clear the data.
You can “reanimate” the OS in one of the following ways:
- by selecting restore points;
- using the command line;
- through safe mode;
- using a recovery environment;
- using an image/boot disk.
Restoring the operating system using system “resuscitation” checkpoints is one of the most affordable, effective and popular options. To apply it, you need to make a series of clicks:
- Panel "Start";
- "System Restore";
- "Next";
- "Select a restore point";
- "Ready".
With such an operation, problems with the computer will be corrected, changes will be canceled and the system will be returned to the operating state that allowed the PC to boot normally. There is no loss of data, files and documents with this type of recovery. All data is saved. The operation is reversible. You can roll back the system to a previous computer state and use a different restore point.
Many people wonder how to make a recovery point on their own (manually) in order to choose it in the future? To do this in the same menu "Start" - "System Restore" You can create such a point yourself at any time convenient and suitable for you. It will be saved indicating the current date, which you just have to remember.
From restore point
In computer engineering there is such a thing as a recovery point. These are saved PC settings. As a rule, saving occurs automatically with each successful OS boot. The easiest way to restore Windows 7 is to use this data.
Press F8 when your computer boots. This command will bring up a menu of system startup options. Next, you need to select the Last Known Good Configuration option.
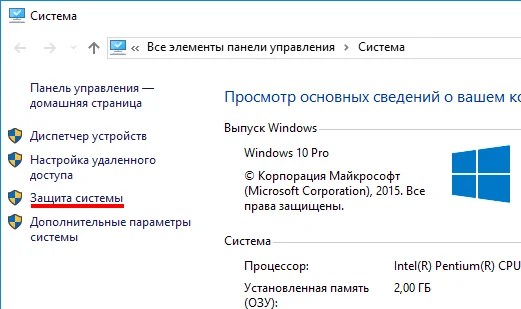
Another method can be used. Go to the properties of the My Computer folder. Find the System Protection line, clicking on it will open the dialog box of the same name. Click Recovery – Next. We set a target date, indicate the disks that need to be fixed, and confirm the actions. After rebooting, the PC should work normally.
No restore points
You can fix problems with the OS even without restore points. To do this you will need to resort to the LiveCD program. You need to download it and burn it to a flash drive with the .iso extension.
Further all actions will take place in the BIOS. You need to configure booting from a flash drive. To do this, in the Boot section, select USB-HDD in the First boot device line.
Before proceeding directly with the recovery, copy everything necessary files to a removable disk. The LiveCD program provides a special menu for these purposes.
We'll fix it system error using an archived copy. Connect the USB flash drive, open the Windows\System32\config\ folder. Files with the names default, sam, security, software, system must be moved to any other folder. In their place, transfer similar files from the RegBack folder and restart the computer.

The described method will only help if the problem is related to the registry.
Command line
You can resort to “reanimating” Windows 7 from the command line if the PC begins to freeze or works slowly, however, the system still boots. Enter the menu "Start" and using the right mouse button, launch the command prompt as administrator. Run the rstrui.exe command, which will open the system restore program. Click "Next". In the next window, select the desired rollback point and click again "Next". Once the process is complete, the PC should work normally.
There is another way to access the utility. Let's go to "Start". To open the command line, click "Run" and enter the CMD command. We click on the found CMD.exe file and wait for it to launch. Next we enter in command line rstrui.exe and confirm the action with the Enter key on the keyboard.
It is not always possible to play it safe and create OS restore points in advance. Problems may arise that block the option of such “reanimation” of the PC. Then you can use another, no less effective and easy option - restoring the Windows system using the system itself.
We rely on the diagram:
- Icon "My computer"- right mouse button "Properties";
- "System protection";
- In the new window click "System protection", recovery button;
- "Next";
- Select a restore point according to the date;
- Specify the system disks to be restored;
- We confirm the operations and reboot the system.
Restoring Windows 7 using Safe Mode
This method is preferred if the usual system boot is impossible. Then after pressing the PC power button on system unit hold down the F8 key to call "Start Menu". One of the "Menu" options is « Safe Mode» . Select it and press Enter on the keyboard. As soon as Windows boots, we carry out the algorithm of actions that we described earlier.

System recovery Windows 8/8.1
If you managed to start the OS, you can resume Windows 8 via "Options". Hover over the top right corner and enter them. Click on "Change computer settings" – . Chapter "Recovery" will offer several options:
- “Regular recovery with information preservation”.
- “Deleting data and reinstalling the OS”.
- "Special option".
Decide what exactly needs to be done. Next, follow the menu prompts.
If you choose last method, in the window that opens, click on the diagnostics item. You will be offered the following options:
- "Restore";
- "Return to original state";
- "Advanced options". This item includes the ability to roll back to the desired resume point.

To resume Windows 8.1, press Win+R and call sysdm.cpl. In the system properties window in the tab "Protection" specify the required system drive. Click "Restore". Clicking "Next", you will be able to see a list of rollback points. Select the one you want and click "Search for affected programs". Changes that have been made to the PC since the selected moment will be deleted. Complete the process by clicking "Ready".
If you work with Windows 8, problems may occur, incorrect operation Internet, etc. To fix this you can use in the classic way recovery via restore points.
Another option is a system rollback. To do this, open the menu "Start" - "Control Panel" - "Center Windows updates» . Select an item "Removing updates". The same can be done using the command line.
So, in the list of updates that opens, we delete those from the moment of installation of which (we look by date) problems and malfunctions began. Delete unnecessary files and do a reboot.
You can perform a factory reset on Windows 8.1. Important files will not be affected during such an operation. The method is effective, but to implement it, the OS needs to boot without problems. We use the algorithm:
- Right side of the monitor - "Options";
- "Changing settings";
- "Update and Recovery" - "Recovery";
- "Recovery without deleting files".
If you log in in the usual way You can’t, you need to use the disk with the system. Loading installation disk, select "System Restore". Press the button "Diagnostics", And "Restore".
Windows 10 System Restore
If you have problems with Windows 10, press Windows + Pause. Go to "System protection" and press "Restore" – "Next". Select the desired indicator and click again "Next". When finished, click "Ready". The computer will automatically restart and the changes will take effect.
One of the advantages of the “ten” is the ability to return the settings to factory settings. This helps avoid having to install the system all over again. To reset your data go to "Computer Settings" – "Update and Security" – "Recovery" – "Return the computer to its original state". Click "Begin".
You can take care of the possibility of a rollback in case of failure in advance. You can create resume points yourself or configure their automatic creation at the desired frequency. To do this, in the settings, in the Update and security item, select Backup service. Specify where to save copies, click Add disk. After selecting the device, the function will be activated.
You can restore your Windows 10 system again by using restore points. In this case, the system will be rolled back to the moment when it loaded smoothly and worked without failures. This method recovery is described at the beginning of the article.
If the OS does not boot, a warning table with a key appears on the screen "Additional recovery options". Click it and select "Diagnostics" - "System Restore". We select a Windows restore point, wait for the system to roll back and reboot.
If such operations do not help and the computer continues to work incorrectly, you can roll back to the basic settings. Some programs and utilities, personal PC settings will be reset, and personal data will be deleted.
This technique is used extremely rarely if the other options described above do not help. The algorithm of actions is as follows:
- "Start" - "Selecting parameters"- tab "Updates and Security";
- Paragraph "Recovery"- button "Begin";
- We choose to delete all files or keep some of them.
Recovering the system after this will take 40-90 minutes.
Resuming using the installation disc
One of the radical methods of fixing the error involves using an installation disk. After launching it in BIOS, click System Restore. In the Troubleshooting section, specify the desired action. Next, follow the system prompts to complete the process.
Related Posts
There is ongoing debate about what better than Windows 10 or Windows 7. This phenomenon is not accidental. Developers from Microsoft claim that there is nothing better than Windows 10, but experienced users say the opposite, they say the system is more reliable than Windows 7 now...
Computer freezing is a rather annoying problem. This can happen both at the stage of system startup and in the middle of its operation. Let's figure out why this can happen and what to do about it? Why does my computer freeze...
Sometimes, when installing programs or applications, a message appears on the computer screen stating that Windows 10 error 5 has occurred. This means that the user is denied access. This happens if there are several accounts in the system...
This article discusses steps that can be used to restore Windows 8.1 without deleting user data.
If computer malfunctions cannot be resolved using conventional methods, there is only one radical solution left - reinstalling the operating system. Many users are frightened by the prospect of reinstalling the system.
In Windows 8.1, the problem of reinstalling the operating system is almost solved. Of course, the operating system will not do everything for you, but many users who previously called specialists or experienced friends to reinstall the operating system will now be able to do it themselves. The fact is that in Windows 8, Windows 8.1 appeared new feature reset, which allows you to quickly, in just a few clicks, restore the operating system or return it to its original state.
If serious system failures occur that cannot be resolved using conventional methods, you can restore the operating system to functionality while preserving your personal files, accounts, and contacts. To do this, you need to reset the operating system. We will need an installation Windows disk 8.1 or bootable USB flash drive with Windows 8.1
Press the key combination + I in the panel that opens Options click Change computer settings

A window will open Computer settings, select Update and recovery

In the window Update and recovery press Recovery


We wait a bit

If your computer does not have an active Windows 8.1 recovery partition, the system will display a warning. You will need a Windows 8.1 installation disc or a bootable USB flash drive with Windows 8.1

Insert the Windows 8.1 installation disc or bootable USB flash drive with Windows 8.1. An update wizard window will open, which lists the consequences of the update, namely:
● Your files and personalization settings will not change.
● Your computer settings will be restored to their default values.
● Applications from Windows Store will be saved.
● Applications you installed from drives or websites will be removed.
● A list of deleted applications will be saved on your desktop.
If you accept the terms listed above, click the button Next


The computer will restart, after which the system recovery process will begin.
System recovery may take some time. The recovery time can range from several minutes to several tens of minutes (depending on the speed of the computer).
Recovery is complete in automatic mode. Your presence at the computer is not required. Once the recovery process is complete and rebooted, your computer is ready to use. All you have to do is install programs that were removed as a result of system recovery. All your accounts and passwords will remain intact, so use your old password to log in.


