How to connect a router to wired Internet. Router is not difficult
Installing WiFi will make your life better!
Do you use the Internet every day and cannot imagine your life without it? Get used to using it to search necessary information, communication, shopping? Our company is pleased to offer you such a service as installing a wifi router at home or in an apartment in Moscow. The prices for our services will pleasantly surprise you! In addition, we offer to connect interactive (digital) television and enjoy your favorite TV channels in high quality HD.
Prices for popular services:
| Type of work | Cost, rub. |
| Visit of a specialist to your home or office (within the Moscow Ring Road) | 0 |
| Installing Wi-Fi Internet or TV in the apartment | For free |
| Wi-Fi Internet 100 Mbit/s | from 300 RUR/month |
| Wi-Fi Internet 200 Mbit/s | 500 RUR/month |
| Wi-Fi Internet 500 Mbit/s | 850 RUR/month |
| Wi-Fi Internet 100 Mbit/s + TV 124 channels | 550 RUR/month |
| Wi-Fi Internet 200 Mbit/s + TV 124 channels | 600 RUR/month |
| Wi-Fi Internet 500 Mbit/s + TV 124 channels | 1050 RUR/month |
| Digital TV 124 channels | 320 RUR/month |
| Digital TV 170 channels | 580 RUR/month |
| Rent Wi-Fi router A | 10 RUR/month |
| Rent a TV set-top box | 10 RUR/month |
| Router installation and configuration (without internet connection) | 400 - 1.100 |
| Update network driver(if necessary) | 300 |
| Types of work (cost) |
| Visit of a specialist to your home or office (within the Moscow Ring Road) - 0 rub. |
| Installation of Wi-Fi Internet or TV in the apartment - Free |
| Wi-Fi Internet 100 Mbit/s - from 300 RUB/month |
| Wi-Fi Internet 200 Mbit/s - 500 RUR/month |
| Wi-Fi Internet 500 Mbit/s - 850 RUR/month |
| Wi-Fi Internet 100 Mbit/s + TV 124 channels - 550 RUR/month |
| Wi-Fi Internet 200 Mbit/s + TV 124 channels - 600 RUR/month |
| Wi-Fi Internet 500 Mbit/s + TV 124 channels - 1050 RUR/month |
| Digital TV 124 channels - 320 RUR/month |
| Digital TV 170 channels - 580 RUR/month |
| Rent a Wi-Fi router - 10 RUR/month |
| Rent of a TV set-top box - 10 RUR/month |
| Router installation and configuration (without Internet connection) - 400 - 1100 rubles. |
| Network driver update (if necessary) - 300 rub. |
Call a specialist
Call our company and we will help you choose the necessary equipment and install Wi-Fi routers of any model and manufacturer. As a result, you will be able to connect each of your devices to the Internet. And you won’t have to lay a lot of wires, entangling them all around.
Internet access anywhere in the apartment!
It is enough to simply install wifi at home, and this will allow you to work on a computer or laptop not only in one place, but wherever it is convenient. In addition, installing a Wi-Fi router will allow you to combine all devices into a single network. For example, it will give you the opportunity to print documents from any computer on one printer. And you can exchange files between devices without the tedious use of flash drives.
Our guarantees
Was the specialist 30 minutes late?
You get a 20% discount
Was the specialist 1 hour late?
50% discount is yours!
Did something happen again?
You have a guarantee of up to 2 years
We couldn't
solve the problem?
So, we'll give you your money back!
Don't know how much it costs to install a router and which model to choose?
Not sure which manufacturer you can trust? Call us and we will help you choose the best one best option from such trusted brands as D Link, Asus, Zyxel, Trendnet, TP Link, etc. Leave a request to call a router installation specialist, and our specialist will bring a new modern wireless router to your home or office in Moscow and install it.
order any services and receive
free antivirus for a year!
order any services and receive
antivirus for a year
as a gift!
Call a specialist
Why do they turn to us?
- We are recommended best friends
- Helping people since 2005
- Adequate cost of services
- We will provide further consultations for free
- We solve your problem, not rip you off
- All company specialists have passed mandatory certification
Reviews from our clients
- No extra wires.
- High data transfer speed (up to 900 Mb/s).
- Quickly add new devices to the network.
- Ability to connect to the Internet all devices with a Wi-Fi module.
- The ability to use the Internet anywhere in your apartment or office.
overall rating:
I give a low rating because... your master was almost an hour and a half late! Yes, he got caught in a traffic jam, but that’s not my problem - he should have timed it more accurately! There are no complaints about the quality of services - everything was done well, the laptop finally worked normally. There was also a 50% discount for being late, as promised on your website. That's why I give it 3 points, not 2.
Alexander
overall rating:
Lately the computer has started acting up. That blue screen throws out death, then quietly goes into reboot. I researched the question on the Internet - everywhere they definitely recommend starting with cleaning the insides from dust. I myself decided not to go in, and based on a competent article with recommendations, I decided to stop on this site. I thought that since they were able to write an article competently, then they probably work with better hands than I do and at least know what they are doing. I called a specialist. The order was accepted the next day without any problems, despite the fact that it was a weekend. Having arrived without delay, Vitaly literally cleaned my animal in an hour and replaced the thermal paste on the radiator. The result is obvious. Aida, which showed a CPU temperature of 80 degrees under load (and up to 90 degrees on cores), now says that the processor does not even heat up to 60 degrees under 100% load. Plus the cooler stopped squealing. Very pleased. Respect to the service, my rating is 5 points. Thanks to Vitaly.
overall rating:
Installing a wifi router - one for everyone and everything for one!
Modern age information technology dictates its terms: the number of computers per capita is constantly growing. More and more people prefer computer technologies: This is convenient and sometimes necessary. Many families in Moscow have several computers at once. It can be stationary personal computer, and a laptop or netbook, and a tablet, and a communicator or mobile phone with great functionality.

So, there are several computers in the family and everyone needs access to the Internet. But, as a rule, in one apartment or private house There is only one channel to the Internet from the provider.
In order for several computers to connect to it at once, you need to install a wifi router. This is many times more convenient than using one channel, one by one connecting the modem or network cable to different computers. In addition, not all providers allow the use of their channel with different computers.
Installing a router at home, what is the benefit?
Our service experts computer help They will install a router at home for any Internet provider in Moscow and the Moscow region: Beeline, Akado, Rostelecom (Onlime), NetByNet and other Internet providers.
Installing a wifi router is the solution to many problems!

Correctly installing a Wi-Fi router is not an easy task. There are many factors to consider. These are the features network protocols your Internet provider, and the type of communication channel and its frequency, and the types of devices connected to the network. It is very important to correctly select and configure network encryption, protection against unauthorized access, and much more.
The site’s engineers will be able to help you with any questions related to installing wifi at home or in an apartment. Believe me, the price of the service will not shock you. The most popular router installation services are d link dir 300, d link dir 615, routers asus rt g32, asus rt n10 and n12, zyxel keenetic giga.
Installing wifi at home, in an apartment or office is our job!
Today, people who want to gain freedom of action and experience convenient and wire-independent work at a computer are increasingly interested in how to properly install and connect a wireless Wi-Fi router. I think you will agree with me that running your own online business or just walking around the Internet is very convenient if you have freedom from wires and the ability to move around your home and office. I think you, like me, are in favor of a comfortable and convenient organization of your workplace.
It doesn’t matter whether you earn income from an Internet resource or provide consulting services, run an online store, create various kinds of services, or maybe just spend time on the Internet in order to accumulate useful information, in any case, comfort creates a platform for fruitful work in any field of activity. The data transmission speed of a router in a Wi-Fi wireless network directly depends on the quality of the signal, the power of the antennas and the number of connected devices.
In order for the signal on a Wi-Fi wireless network to be stable and strong, you need it in a building (apartment, house, office). It should be said that in this publication we will look at connecting the hardware of a Wi-Fi router, and how to set up Internet access on the router and configure a wireless network on it.
I would like to draw your attention to the fact that very often uninformed users buy a wired router instead of a wireless one. What are their differences? The fact is that a Wi-Fi router (also known as wireless) makes it possible to create a local (LAN) and wireless network (Wi-Fi).
That is, it can transmit the Internet signal to client devices (tablet, laptop, Smart TV, phone...) both over wires and over a Wi-Fi radio channel. But with a wired router, only the same network of the same name awaits you. That is, with the help of such a network device you can only create a wired local network. However, there are fewer and fewer such network devices and almost all routers have a wireless network function.
So, let's get to the point. Typically, a router comes with a power adapter, an Ethernet cable, an installation CD, and a user manual. quick installation. First of all, find a suitable location for your Wi-Fi router so that its signal is not affected by various external factors. If you need to diagnose your wireless network, find and switch to a less congested channel, then I wrote about this in this article.
Connecting the router hardware.
First, disconnect your computer and router from the network, if you have them connected. Next, you need to install the router in the optimal place so that all participants in the wireless network receive good wifi signal. In most cases, it is appropriate to centrally place the network device in the area where there will be wireless clients connected by a Wi-Fi connection.
Now connect all client devices (computer, laptop, switch/hub...) to the LAN ports of the router. If you will carry out wireless connection client devices to the router - then skip this step. That is, you don’t need any wired connection.
In the image below, I schematically show how to connect the router to devices and to the Internet.


At Wi-Fi connection router to the computer and subsequent configuration of the network device, usually use the included patch cord. To do this, you just need to plug one end of the patch cord into one of the LAN ports (1, 2, 3, 4) of the router, and the other into the network card of your computer (Ethernet port). If for some reason you don’t have it, you can do it yourself.
After connecting and making all the necessary settings wireless communication, this computer can already be connected to the router not using a cable, but via Wi-Fi.
All that remains is to connect the cable from the Internet provider to the WAN port of the router, connect the power adapter to it and plug it into a power outlet. The router will automatically begin its download.
Now turn on your computer and check the physical connection of your devices to the router using the indicators. In the manual for your router or on installation disk The status and meaning of the indicators must be described. In my case, the description of the indicators looks like this:


If the router is physically connected correctly and everything works as expected, then you can proceed to setting up the computer (determine the type and connection to the provider) and the router. Read more about this in the second part of the article (link at the end of this post).
Some digital ones can be connected using the WINCE 2001 universal wireless adapter, which automatically connects to the Wi-Fi router using WPS technology. This video will tell you in detail about what WINCE 2001 is.
In conclusion of the article, I would like to draw your attention to the fact that in some cases, a router, like a computer, in order to avoid failure as a result of a landing and a voltage surge, it is better to connect to the power supply through a source uninterruptible power supply. In addition, a UPS will give you the opportunity to finish your work on the computer without losing data.
Now you know how best to install and connect a wireless router. Bye!
2014-08-31T15:27:44+00:00
Alexey: You can also configure it via a tablet, via a wireless Wi-Fi network. Although I am a supporter of setting up a router using a patch cord, via a computer.
2014-08-30T23:20:07+00:00
Rustem: You can use it, but you will still need a PC to configure the router.
2014-08-30T23:18:09+00:00
AntonK: Connecting a router via a UPS is relevant when connected to the router hard drive. This will avoid errors on the screw.
In this article I will tell you how to set up wi-fi from scratch. First you need to set up a wireless network on your router, and then on your laptop. With the help of simple step-by-step instructions, even a beginner can set up the Internet on TP-Link and D-Link routers, which are the most common in the CIS.
Setting up a wi-fi router
Step 1. We connect the router to the network using a power supply. Turn on the power with the ON button, if the router has such a button.
Step 2. We connect the router to a laptop or computer using an ethernet cable (patch cord), which comes with the router. You need to connect the cable to the port network card computer and into the LAN1 port of the router. (In no case to the WAN port - you won’t be able to configure it through it)
Step 3. We check that on the computer in the properties of the network card we have selected automatic acquisition of an IP address. To do this, go here: “Start” -> “ Control Panel» -> « Network Control Center and shared access » -> «» -> « Connection via local network »
Attention! In the section " Changing adapter settings» You may have multiple connections displayed. For example, “Local Area Connection”, “Local Area Connection 2”, “Wireless network connection" , "Network bluetooth connection 2" etc. How to find the right one among these connections?
Firstly, By default, a wired connection in Windows 7 and 8 is called "Local Area Connection". If no one managed to rename it manually, then it will be called that way. Unless there may be a number at the end - most often “2”. This is the case if the computer has several network cards installed (relevant for desktop computers, because in 99% of cases a laptop comes from the factory with only one wired network adapter)
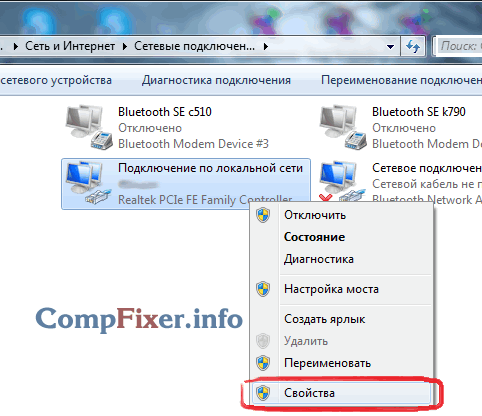
Secondly, the connection we need should be active, since you connected the computer and the switched-on router using a cable: the connection icon should glow bright (usually blue if your Windows uses a standard icon pack), i.e. the icon should not be grayed out. See picture:

Here, we have found the desired active wired network connection.
Step 3.1. Right-click on the active wired connection we need and select “Properties”:
Step 3.2. In the window that opens, click the “Properties” button:

Step 3.3. Select with the left mouse button “ Internet Protocol Version 4 (TCP/IPv4) « and click the next “Properties” button at the bottom:

Step 3.4. We set both switches to the upper positions so that it is “ … … … automatically»:

Step 3.5. Click the “OK” button to save the settings.
Step 4. Open the connection window again:
Step 4.1. Click the “Details” button:

Step 4.2. In the window that opens, we find out the IP address of the default gateway:

In most cases it is 192.168.1.1
Step 5. Open the browser to go to the router’s web interface.
Step 5.1. In the address bar, enter the gateway address and press Enter:
Step 5.2. Enter your login and password:

Attention! You can find out the login details in the instructions for your device. The router may include instructions on paper or in PDF document format on the included disk.
If the instructions are lost, you can try to download it from the manufacturer’s website. For example, http://dlink.ru, http://asus.com, http://tplink.com.
Often in a new device the default login = admin and password = admin. It also happens that login = admin and the password is empty.
Step 5.3. After you have logged into the router’s web interface, open the wireless network (wi-fi) settings:
(illustrated using the example of TP-Link TL-WR841ND and D-Link DIR-300 NRU)

Step 6. The actual setup of the wireless connection.
Step 6.1. We disable WI-FI protected setup, because This feature is a serious security hole and could allow an attacker to hack your Wi-Fi network and gain access to your information.
Step 6.2. We check that the Wi-Fi network is enabled: the “Enable wireless” checkbox is checked if it is D-Link.
Step 6.3. Let's set a name for our wireless network.
If the default is dlink or home, then it is recommended to specify some original name to avoid confusion with neighboring networks of the same name.
Step 6.4. Set security parameters. We strongly recommend using the following options:
- security mode WPA2 ;
- encryption type AES;
- key type PSK(aka Personal Key).
After specifying all the parameters, do not forget to click the save settings button!
On a TP-Link router:
 in D-Link:

Setting up Wi-Fi on a computer (laptop)
In this section we will show you how to set up Wi-Fi on a laptop with Windows 7.
Step 1. Find it on the taskbar near the clock network connections icon and click on it with the left mouse button once. A list of available wireless networks will open:

Step 2. Find your wireless network in the list (it will have the name you specified in the previous paragraph) and left-click on this network.
Step 3. Leave the “Connect automatically” checkbox checked and click the “Connect" button:

Step 4. Enter your security key Wi-Fi networks. This is the character set that you specified in the “Network Key” field. After entering the key, click "OK":

After clicking “OK”, the connection to your wireless network occurs.

After a few seconds, the previous window will disappear, and the network connections icon near the clock will change its appearance.
Now, when you click on the network connections icon, you will see that the computer is connected to your wi-fi network, but at the top you can see the inscription “ Without Internet access", because We have not yet configured the Internet on the router:

Setting up the Internet on the router
We set up a wi-fi network on the router and connected to it from a computer. All we have to do is help the router see the Internet so that the router can distribute the Internet to any devices that connect to it via wi-fi or cable.
Step 1. In order for the Internet to appear on computers, you need to set up a connection with the provider on the router. We show the example of the same D-Link
Step 1.1. Type the IP address of the router in the address bar
Step 1.2. Enter your login and password and click “Log in”:
Step 2. Go to the Internet settings section. Different router manufacturers may call it differently: WAN Setup, Internet settings, etc. In our D-Link this section is called “Internet Setup”:

Step 3. We get to the WAN port settings section.
Step 3.1. Uncheck “Enable Access Point Mode”.
Attention! For other manufacturers, this option may be called “Disable NAT”. The bottom line is that the “Access Point” mode disables NAT and turns the router into an access point. This option will be useful if this router is connected not to the provider, but to another of your routers.

Step 3.2. Select the type of connection with the provider.
To find out what settings you need to select to connect specifically to your provider, you can:
- in the contract;
- on the provider's website;
- by calling hotline provider
The most commonly used type these days is Dynamic IP.
Step 3.3. If your provider allows connections only from a registered MAC address, you have 2 ways to resolve the issue.
- Go to the provider’s office with your passport and register a new MAC address;
- Enter in the MAC address field the MAC address of the network card of the device from which you successfully accessed the Internet before purchasing the router. Typically, this is the MAC address of the computer's wired network card.
Step 3.4. We specify the DNS server if the instructions from the provider require it.
Step 3.5. Select the MTU value. If the provider does not require you to change this value, we recommend leaving it as it is: 1500.
Step 3.6. Saving the settings
Attention! If you have lost the agreement document with the provider, which contains the details, then as a last resort You can always go to your provider’s office with your passport and find out all the comprehensive information: connection type, MAC address, login, password, MTU, etc.
With the development of the level and prevalence of the Internet, the number of devices that use World Wide Web. Smartphones, tablets, laptops and even TVs all require an Internet connection for comfortable work. When there are more than two such devices at home, the question arises of how to connect them simultaneously. In this case, on help will come useful device- a router whose purpose is to distribute the Internet connection between various devices. There are several types of routers, so before purchasing, you need to determine which one is right for you.
By type of connection
The most common type is a router with an Ethernet connection. This refers to a standard network cable (called " twisted pair"), which can be connected directly to a computer. But if you want to connect several gadgets, then you must immediately connect a router (more on this below). The connection speed can reach 1 Gbps, it depends on the capabilities of your network card and provider.
The second type of connection is called ADSL. It is used to obtain an Internet connection through telephone networks and is more common in the private sector where it is not possible to connect via Ethernet. If you have a telephone at home, then there is no need to run additional wires. True, you won’t see speeds of more than 24 Mbit/s (this is the maximum speed, provided there is a high-quality modern telephone line).
LTE connection is the third type of router. With this connection, you get wireless Internet via 3G or 4G networks. This is currently the most expensive and least common connection method.
If you have decided on the type of router, then you can proceed directly to the question of how to install the router. And you should start by choosing a location.
Choosing a place
Routers come in both wired and wireless varieties. If you need to connect both your phone and tablet to the network at the same time, then you should ask how to install a WiFi router at home. Moreover, a wireless router does not exclude connections using wires.
Before connecting, it is advisable to choose the optimal location of the router. Avoid placing on concrete lintels or in remote corners of the apartment, as this will reduce the usable coverage area. The ideal place is in the center of the room. Most often, the connection location is limited by the location of the incoming Internet cable. It makes sense to immediately connect and configure the router. And only if the signal level does not suit you, then start worrying about the location.
Let's start connecting

The cable must be connected to de-energized devices. For an Ethernet connection, simply plug the incoming network cable into the special jack on the back of the router (labeled WAN). If you have an ADSL connection, then you should use a so-called splitter (included) to separate the telephone and Internet signals.
For initial setup, you will also need to connect a network cable (also included) to your laptop or desktop computer. This is necessary to log into the administrative panel of the router. We will consider the connection process using the example of a router manufactured by TP-Link. If you know how to install a TP-Link router, then there will be no problems connecting devices from other manufacturers, since the principle is the same everywhere.
We go to the administrative part
In order to log into the device interface, you need to have the following data: IP address, login and password. This information is printed on a label at the bottom of the router. For most models, universal login information will work. Address: 192.168.1.1, which must be entered into the address bar of the browser. After entering the address and pressing the Enter key, a window for entering your login and password will appear (by default, the login is admin and the password is admin). But there may be options, as in the photo below, where the settings page address is different. Therefore, check the label or instructions for the device.

After entering your login and password, you will be taken to the administrative part, where you first need to open the DHCP Server tab. There you need to activate this server, that is, check Enable or “Enable” (depending on the interface language), and click the “Save” button.

The next step in the process of how to install a Wi-Fi router is to determine the type of connection.
Connection type
If you do not have information about the type of connection, you should check with your Internet provider. Without the correct settings, the Internet will not work. The simplest option is a type called “dynamic IP address.” All you need to do is select this option and click the save button. In rare cases, you will also have to fill in the “Hostname” field.
A rarer type - with a static IP address - requires additional filling in the fields with the IP address, default gateway, subnet mask and DNS server (provided by the provider). And when PPPoE connection(from the English Point-to-point protocol over Ethernet), you must fill in the fields with username, password and password confirmation.
After setting up the Internet connection, you can move on to the question of how to set the TP-Link router to wireless transmission mode?
Wi-Fi setup
To do this, you need to find a tab called “Wireless Mode” (options are possible). Then you need to enter the SSID name of the network and select mode mode. If you are not sure that all your devices support the latest n-mode, then it is better to choose a mixed bgn option.

Next, you should save the settings and reboot the router. Then let's move on to the question of how to install WiFi router into protected mode. For these purposes, the settings provide a “Network Security” section. Here you should select the WPA-PSK/WPA2-PSK encryption mode and enter a 12-digit password. In the future, this password will need to be entered one-time on each new device that you want to connect to the network.

After this step, the question of how to install a Wi-Fi router can be considered closed.
Possible problems
If you can’t log into the administrative panel, try changing your browser. Some devices from different manufacturers have poor compatibility with Google browser Chrome.
Be careful when entering the router's IP address. If the firmware was updated, it may become 192.168.0.1 instead of 192.168.1.1 (or vice versa).
If after setting up the router you have a weak wireless network signal, then consider installing the WiFi router in another, more open location. Sometimes in administrative settings you can select the signal strength level. Some router models have detachable antennas. If you change them to more powerful ones, you will be able to significantly expand the coverage area without changing the router (which is much cheaper).
Conclusion
The instructions described above are universal. It will help you decide how to install a D Link, ASUS, Netgear, Linksys, etc. router. Differences may only be in the administrative panel interface or minor nuances. Provided that you did everything correctly, all that remains is to connect your gadgets and enjoy the convenience of using the Internet wirelessly.
Currently, there is a huge range of different routers on the market from a variety of manufacturers. We spend a lot of time looking through all sorts of notes on the Internet about certain brands and models of routers in order to maximize the benefits of our purchase.
When the time comes to prepare the purchased router for operation, i.e. connecting it to the network, device and its subsequent configuration, then our eyes begin to run wild and our thoughts become confused. The thing is that setting up a router for the first time is not the easiest task, which is due to multiple factors: an alarming number of different connectors on the case, correct installation, device configuration, etc.
In this article we will outline detailed instructions on installing and configuring a router, which you can use with any model from any manufacturer. In the end, they are not that different from each other. So let's begin.
First, let's go over some points that will be useful to know for anyone who is going to connect a router for the first time. Firstly, the connection principle is the same for all routers, i.e. it doesn’t matter which model and from which manufacturer you purchased - it doesn’t matter at all. Secondly, it also doesn’t matter which provider you use.
The only thing you should worry about is the type of Internet connection you will be working with when setting up the router, but more on that later in the instructions. So, let's roughly draw up your plan for the first installation of a router for your use:
- Your first obstacle to using the router will be its packaging, which we hope you won’t have any problems with. Having gotten rid of the packaging, next you need to connect the device to the computer you need, and then connect cables to both of them, i.e. power adapter, ISP cable, network cable between router and computer.
- Once you can run all this bunch of wires between the computer and the router, and then power it, you will next need to go into its settings. This is done in all cases the same way using a special IP address and a browser. We enter the IP address indicated on the router box into the address bar of the browser and a page with its settings will open. Everything is quite simple here.
- After going to the router settings, you will need to set the necessary parameters in it. Looking ahead a little, you will set the type of your Internet connection in the settings, as well as personal data from it, if required, but more on this later in the instructions.
- And the last thing left is to set a preferred name and password for your already configured Wi-Fi network. You can use the factory values, but it would still be better to set your own.
As you can see, everything is not so complicated...relatively. Most users still experience certain difficulties while performing the above steps. Let's go through them in more detail.
Installing a router for work
First, you need to decide on the location where the router will be located. But, you don’t have to choose much, since this place will be the location of your Internet provider cable. In general, start from the circumstances. However, it is still recommended to install the router higher.
Next, you need to connect the router to power using an adapter. You will immediately understand that it has started working by the lights on it. If they are not lit, then you probably have a power button on your router - press it.
Now you need to lay out the necessary cables for the router. If you are connecting the router to your computer, you will first need to connect the cable from your Internet provider to the WAN port (usually highlighted in one color on the device, usually blue or black). Then take the standard network cable that should have been in the box with the router, connect one end to the LAN port of your computer, and the other end to one of the four LAN ports of the router.

If you do not want to connect the router to your computer or you do not have such an opportunity, then you just need to connect it to the power supply and connect the cable from the Internet provider.
If you have done everything according to the above steps, then your router should have already created wireless point Wi-Fi access. However, this connection will act under a standard name and password, which should be indicated on the box or body of the device itself.
To connect to the created network from any device that has a Wi-Fi module on board, you need to activate this module and enter the password and login specified by the manufacturer.
Logging into the web interface of the installed router
To configure the installed router, you need to log into its web interface, which will contain all kinds of settings for this device. All you need to do is enter the IP address indicated on the router box or its case into the address field of your browser, for example, 192.168.1.1 , and follow it.
I would also like to point out that you do not need to already have a network connection in order to go to this address, i.e. setup can be done without connecting to the network.

The only thing you really need for setup is a computer or device connected to the router via a cable and logged into the Wi-Fi network created by the router.
So, you have found the address you need to log into the router’s web interface. You should see a screen asking you to enter your login and password. As mentioned earlier, it will not be difficult to find this data on the router box or on the router itself. It is also worth pointing out that in some cases the user will not even have to enter anything, i.e. the router will not be protected and you will have to immediately set up your username and password.
Configuring the router via the web interface
Now you are inside the settings of your router. To be honest, when you first get there, you will probably be confused due to the presence of a huge number of tabs in the web interface and the many settings that are located in these tabs.
However, there is no need to worry, since almost any router from any manufacturer has a special option - quick setup. It may look different, but its meaning is the same - to configure the device as quickly and easily as possible for the user.
You can find this item at home page web interface or in one of the tabs. For example, in a router from the manufacturer Netis (yes, not the most popular brand of routers, but it will do) quick setup can be done immediately on the start page. Here is a screenshot of the Netis web interface:

As you can see, you just need to check the box next to one of the types of Internet connection and enter some data (if necessary) into the required fields. If you need more detailed settings, then click on the section Advance, and if simplified again - Quick Setup. On the quick setup page you will have the opportunity to change the login and password for the network distributed by the router.
You should immediately point out that the web interface of each router model will be different, but this should not be a problem, since the principle of setting up these devices is the same. To get started, use the quick setup, and then, when necessary, use the advanced one.
Setting up a network connection
Well, we come to one of the most difficult parts of this topic - setting up network connection for the router. If for the majority up to this point everything was normal and clear, then at this moment many users are really lost.
In most cases, a quick setup can automatically set everything as needed, but sometimes you may need to do everything manual settings. So, first you need to find out what type of connection you are using: DHCP, Static IP, PPPoE or other. This information you can find out by contacting your provider or you can find it out from the contract that you should have.
In most cases, providers prefer to use DHCP or Dynamic IP. If you also use this type of connection, then your router should already work fine, since it is pre-configured to work with a DHCP connection.
If you do not have access to the network, then in your case a different type of connection is used. Describing the steps for setting up other types of connections is not the easiest task due to the difference in the web interfaces of routers from different manufacturers. But let's still look at an example of setting up a PPPoE connection in a router from the same Netis:

As you can see, you just need to go to the Network tab, then select the WAN tab. In these settings, click on the connection type drop-down menu and select PPPoE. Then enter the login and password for your Internet connection and everything will be ready.
Everything is intuitive and understandable if you have knowledge about the type of connection and the data to configure it. So, in the end you should get the following: connect the router, select desired type connection and configured this connection, i.e. entered the required login and password (if required), etc. If you did everything correctly, your router will start distributing Wi-Fi and you can easily join it.
Changing your Wi-Fi name, password, and region
Everything works, you have access to the network and everything is literally great. But, the last step in setting up your router is changing the standard name of the Wi-Fi network, changing the password for it (saving the factory password is not the best solution) and setting the desired region.

Again, web interfaces vary, but you should find all the above settings under Wireless network. However, you need to clarify something about the name of the network - it can be set in the SSID field. The password, accordingly, is set in the line of the same name. Set the region according to your location, for example, if you live in Russia, then select the EU region.
Finally
Setting up a router may seem like a complicated series of steps, but in reality everything is incredibly simple. So let's take a quick look at what you need to do again:
- Install the router in a convenient place for you with a cable from the Internet connection.
- Connect the provider's cable to the WAN port, then connect one end of the network cable to one of the four LAN ports on the router, and the other to the LAN port of your computer's network card. If you do not connect the cable, only to the WAN port.
- Log into the router’s web interface through a computer browser or using another device via Wi-Fi.
- Configure according to your connection type.

That's all, actually. If you were unable to configure your router correctly on the first try, then it doesn’t matter, since you can always reset it and try to configure it again.
Found a typo? Select the text and press Ctrl + Enter


