What you need to connect the router. Turning on and setting up Wi-Fi on your computer
TP-LINK is one of the leading manufacturers of network equipment. We will provide detailed information on how to connect or reconfigure a TP-Link router. The procedure for connecting the device, setting up a wired and wireless network, changing the password and updating the firmware will be discussed. The information obtained will allow you to configure without problems home network in TP-Link routers.
What data is needed to connect the router?
To change the parameters of the router itself, you will need two things: a browser and a password with an access login. The latest data can be found on the label attached to the device body. As a rule, the standard login and password are the English word admin.
To use the Internet you will also need authorization data, which you must obtain from your provider. However, they must be specified in the service agreement. They must be entered in the router or a specialized program, if provided by the provider. Be sure to find out the connection type (PPPoE, L2TP, PPTP and others) for correct settings. When using a dynamic IP, you need to know your IP address, subnet mask and the like. If all these parameters are already in hand, you can connect to TP-Link.
How to connect a device to a network, PC or laptop
The procedure does not cause any great difficulties, and is performed for 5-10 minutes. Follow the steps in the following instructions one by one:

Models with Wi-Fi can be configured over the air. This is relevant if you are not able to connect the router to your computer via LAN. This completes the manipulation of the wires. The process then continues in the web interface.
Login to the web interface
Manipulations with the modem are performed only in the web interface. You can access it from a computer with a network cable connected or via Wi-Fi on a wireless model. Attention! You can use the interface at any time, even when the Internet is down. To log in, follow the instructions below:
Router settings
Let's move on to the most interesting part - changing the router parameters. The main window contains more than 10 different sections. Most of them are not needed by the average user. Internet activation occurs in a maximum of two sections. Next, we will tell you in detail how to set up a TP-Link router, about creating a wired connection, setting up Wi-Fi, changing the login password and other useful things.
Connecting to a wired network

The router has a quick setup feature. Beginners are recommended to use this section. Click "Next" and follow the installer prompts:

When setting up other types of connections, fields for entering your login and password will appear. Here you need to enter the data provided by the provider. The user can change the settings in the “Network” section. In some TP Link models, next to the choice of connection type there is a “Define” button, which will help you find out your type. Based on the WAN, the corresponding characteristics are already configured. 
For example, to use PPPoE, fields for login/password and parameters specific to PPPoE already appear in the window.

Connect via wireless network
For devices with a Wi-Fi module, you will also have to configure wireless connection. This can be done with quick setup (the penultimate point involves entering all the important parameters).

Let's figure out which Wi-Fi settings on the TP-Link router should be changed. Broadcasting should be set to “on”. The SSID or network name is what will appear on other devices when searching. Specify your region, mixed mode. Leave the channel and its width automatically. Advanced users can choose it themselves, taking into account occupied channels by neighboring routers. If you want to set a password for the access point, select the WPA2-PSK security type. Finally, all that remains is to enter the password for wireless point networks. Click the “Next” button and complete the process.
Similar settings are found in the “Wireless Mode” section. To change the SSID or channel parameters, select the “Wireless Settings” sub-item. You can change the password in the “Wireless Security” section. When making any changes, do not forget to click the “Save” button. If the selected settings have not changed, reboot the device.

Through these menu items, routers from the manufacturer TP-Link are configured.
Changing the password for logging into the web interface
All owners are recommended to change the standard password and login for the router. This is due to the fact that an attacker, if the Wi-Fi password is missing or has been hacked, will be able to enter the modem settings and “have fun”. Eliminating the problems created will not be difficult, but it is better to avoid this. The interface allows you to quickly and conveniently change input data:

If you have forgotten your login information, perform a factory reset.
Advanced Settings
The router has a lot of additional functions that expand its capabilities. Consider some of the advanced settings:
- Guest network. Allows you to configure a public guest network, limit incoming/outgoing traffic or operating time.
- Changing addressing. It allows you to set static IP addresses or use DHCP.
- Forwarding – setting up virtual addresses, web telephony, conferences and the like.
- Parental control features. Limiting Internet access time or specific resources.
- Manually setting a routing table (for specialists).
- Binding MAC addresses to specific IPs.
Find out more about how to set it up specific functions TP-Link router, you can refer to the instruction manual.
VPN
This technology allows you to hide information from prying eyes. Encryption is performed, so even your provider will not be able to track your visits. However, only those models that have a pre-installed VPN server can use VPN. You can perform the setup using the following steps (for English firmware).
When you connect to a new Internet provider, you are unlikely to rush to immediately connect the single end of the Ethernet cable to your computer. It will be much more convenient (and not much more expensive) to use a router. With it, you can simultaneously connect many devices to the Internet - from desktop computers and laptops to smartphones, tablets, TVs, even cameras and doorbells.

Router: pros and cons
What are the advantages of a router over other connection methods (for example, Ethernet modems?)
- Several devices are connected simultaneously (computers, smartphones, tablets, TVs, cameras, etc.)
- Multiple communication methods (Ethernet, Wi-Fi)
- Fine network configuration, in particular security
- Routers have additional features(for example, working with a built-in or USB-connected drive)
We will look at the most common option today: how to install a Wi-Fi router without additional hardware functions (server, etc.) and configure it to work with wired and wireless equipment.
Best place
Where is it better to install a router in an apartment or in a house? The answer to this question depends on several factors:
- Provider cable. If the experts didn’t leave such a long “tail,” you simply won’t be able to install the router somewhere in the kitchen.
- Jobs. Of course, it would be nice to have optimal reception throughout the entire house or apartment, but if this is not possible, then you will have to install the router closer to the place where you usually work, be it an office, a balcony, or even a toilet.
Try to think about the location of the router so that there are as few concrete barriers as possible between it and your workplace. For a wired connection, this can be solved by simply laying the cable.
In some cases (for example, if you have a large house) you will need Wi-Fi repeaters. These are small, inexpensive Wi-Fi boosters that can be a lifesaver in hard-to-reach places. However, for a relatively small living space (2-4 rooms) correct installation A router in an apartment solves all problems without the help of repeaters.
Connecting the incoming cable
Before installing the router yourself, make sure that the incoming Ethernet cable is correctly crimped, that is, it has an RJ45 type plug installed. For ADSL type communication using telephone line, you need an additional splitter adapter that splits the signal into Internet and telephone communications. In any case, the splitter will have the same Ethernet socket (RJ45), to which you need to connect the corresponding cable. It is easy to distinguish RJ45 from a telephone plug/connector: RJ45 is larger. 
Find a port on the router signed as WAN (Wide Area Network - external network). It is to this that you need to connect the provider’s cable, although the router probably has other similar ports. Usually the WAN port is also highlighted in color.
Now you can connect your computer, TV, and other devices that require a wired connection to the remaining output ports.
Software Internet setup
Although you have already connected the router and computer using a cable, you will not immediately have access to the Internet. First, find the instructions that you received from your provider: you will need the data from it before setting up a Wi-Fi router (TP Link or any other manufacturer).
Then you need to log into the router interface from your computer. To do this, in the address bar of your browser, instead of the usual address, you must type the IP address of the router. As a rule, this is 192.168.1.1 (if this is not the case with a particular router, you can check this on the sticker on its bottom or in the instructions). 

A page will open in your browser where you need to enter your username and password to log in. As a rule, manufacturers do not hesitate and set the default login to “admin” and the same password. Enter your login information, click “Login”, and you will be taken to the router control panel.
First of all, you need the “DHCP Server” tab. 
Enter this section and find the Enable button there. After that, click "Save" or "OK". If there is no such button in the section, it means that the settings are saved automatically upon exit.
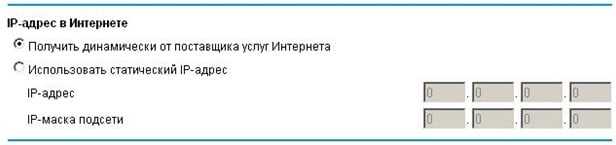
Check with your provider's instructions to determine what type of connection you are using - dynamic or static IP address. Dynamic in our case is simpler. All you need is to choose this type connections in settings and save them. Sometimes you may need to enter a Hostname.
Providers rarely offer a static IP address. As a rule, it is needed when you need remote access to your workplace or store some publicly accessible materials on it. But it happens that providers simply offer only this type of connection. In the case of a static IP address, you will have to manually enter a whole set of data: your IP itself, the default gateway, subnet mask and DNS server. All this data should be in the instructions from the provider or in an appendix to the contract.
There is another type of connection: PPPoE. If for some reason your provider chose it, then you will also have to enter your login and password (twice).
In the web interfaces of routers from different manufacturers, sections may be organized differently, but there is a search system through which you can find keywords, or a list of sections where you can find the necessary tabs.
An important point: even if your computer is a laptop with a Wi-Fi module, for the initial setup you will still have to connect it to the router using a cable. The fact is that wireless communication is inactive by default in routers. And the next step will be to turn it on.
Setting up Wi-Fi on the router
As a rule, in the router’s web interface (we hope you haven’t logged out of it yet?) there is a tab called “Wireless.” Here you no longer need any data from the provider: how to install a router For Wi-Fi devices- at your discretion.
Enter in the “SSID” line the name under which your network will be recognized by devices. The main thing is that you can then recognize it from dozens of others, which today abound in every home in a major city. So come up with some catchy name.
Then create a password. Of course, it doesn't have to be "12345" or your first and last name. However, it should be simple enough that (if necessary) you can easily tell it to your guests, and they will understand it unmistakably.
Some routers support the “guest access” function (an additional SSID is used for this). Through the guest network, the user can access the Internet, but the administrative panel of the router remains inaccessible to him. If your router has such a function, then the SSID with full access It’s better to name it something unclear and come up with the maximum for it complex password, but for guest access it’s easier to choose a name and password.
Select your network standard. The “later” letter of the alphabet it is designated, the higher its speed: for example, “b/g/n” will provide faster Internet than just “b/g”. It would seem that nothing could be simpler: select the most advanced mode, and that’s it! However, can you guarantee that all your devices support it? Not to mention your guests' gadgets. Therefore, it is better to leave the move to ensure compatibility with older standards.
Select a security standard. The most popular option today is WPA-PSK/WPA2-PSK mixed. This type of encryption reliably protects data and does not slow down work with it.
If your router is equipped with a built-in hard drive or a USB port for connecting it, then, of course, you would like to provide access to it from several devices. For example, you work on documents in your office, from a desktop computer, but later you want to go to the balcony with a laptop and work in greater comfort, in the fresh air. Or you want to open downloaded movies directly on your TV. Then you will need to find a list of trusted devices and add there all the devices (laptop, TV) to which you give access to memory.
You can limit the number of simultaneous connections to your router. If you do not want to do this, leave the number 0 in the “Connection limit” line - this means no limits.
When choosing a place for the router in the apartment, do not forget: sometimes you will need to reboot it manually, so you should not hide it very high. Although if you have children or playful animals, then it's probably better to play it safe.
Wireless networks are very handy tool for solving everyday problems related to accessing the Internet. Today it is quite difficult to find a person who does not have a router at home. Installing a Wi-Fi router yourself is not a difficult task, and now we will look in detail at how to do it.
Device selection
Before moving on to the question of how to install a router, you should select it. Nowadays you can find a great variety of different models of Wi-Fi routers in stores. However, not all of them will suit your requirements. There are several parameters to consider in this matter:
- the presence of a powerful external antenna - the description should indicate the power, for example, 5;
- convenient and intuitive interface - this will allow you to easily and quickly understand the settings. Today, routers from the company have the simplest and most intuitive interface;
- supported standards – there are several standards that are most common:
- 802.11 is an old standard operating at 2.4 GHz;
- 802.11 – is also considered obsolete and operates at a frequency of 2.4 GHz;
- 802.11 is a new standard that operates at 5 GHz and is characterized by higher data transfer rates over wireless networks (up to 300 Mbps). It is worth noting that routers that support the 802.11 type can work with all types of devices, even with outdated models operating at a frequency of 2.4 GHz. In this matter, it is best to give preference to routers that support operation on all these standards (make sure that the box bears the designation “N” - 300 Mbits);
- the presence of the required ports for connecting an Internet cable, modems, computers, and so on. Here you should proceed from your preferences and requirements.
When choosing equipment, we advise you to avoid cheap Chinese devices. Such gadgets work with constant glitches. Now let's move on to the main question - how to install a router at home. It's probably best to start by determining where the access point will be located.
Determining the location
It is preferable to place the router in the central part of the room (or as close to the center as possible) somewhere under the ceiling or on a cabinet.
The higher the access point is, the fewer obstacles there are in the signal path and the larger the coverage area.
When deciding how to install a Wi-Fi router at home, you should avoid mirrors, as they reflect the signal and radio waves simply will not pass through; household appliances, especially those with strong radiation of electromagnetic waves, such as microwave ovens (microwave ovens), refrigerators, radios, home phones, and so on.
If the room is quite large and one router is not able to cover the entire territory, then you can significantly increase the coverage area. It is worth noting that each router has wall mounts. So, now you know where and how to install the router yourself. Now you can proceed to configuration.
Equipment setup
Typically, when you turn on the router for the first time, Wi-Fi is already working. All you have to do is change the network name and assign a password for security.
First, we need to go to the access point parameters. To do this, you need to find out the IP address of the router. It is indicated on the factory sticker that is on each router (carefully inspect the gadget from all sides).
You can find it out in command line. Just connect to the network, open the command line, enter the ipconfig command and press . Next, we need to find the line “Main gateway” - the address we need will be there.
Now you need to enter this IP address into the address bar of any browser and click. Typically, the IP address looks like this: 192.168.0.1 or 192.168.1.1. There may be other meanings - this has already been clarified by the methods described above.
So, Wi-Fi installation The home router requires two setup steps:
- setting local network and Wi-Fi;
- setting up an Internet connection.
Let's take a closer look at both points.
Setting up a local network
When asking how to install a new router, the first thing you should look at is setting up the local network and Wi-Fi connection. We will look at further steps using the example of setting up a TP-Link router. If you have a different model, then don’t worry: all routers are configured according to the standard scheme. Differences may only be in the names of some sections and in appearance interface.
So, follow these steps:
This completes the local network setup. But installing a router doesn't end there. Now we need to configure Internet access.
WAN setup
In order to set up an Internet connection (WAN), you need to know what type of connection your ISP uses. There are several options:
- PPPoE – in this case you need to enter the login and password that your provider gave you;
- binding by MAC address - in this case, as a rule, there is no need to manually enter network parameters;
- static IP - this means that you are assigned a specific IP address and other parameters that must be entered manually.
In any case, you will have to call your provider and find out exactly how the router is configured (what type of connection is used).
There are options when you don’t need to configure anything at all. That is, you connect the router to the provider’s cable, connect your computer to your network and load any website. On the first attempt, the system will display a window in which you will need to enter the login and password assigned by your provider. After entering the data, the router will automatically bind to the system and the network will be configured.
This article will help answer the following questions: how to set up an access point, how to set up a router and will bring clarity. According to Wi-Fi equipment manufacturers, setting up a wireless network (WLAN - Wireless Local Area Network) is a matter of minutes. Press the button and the device connects. In reality, Wi-Fi routers confuse even experienced PC users. Most are glad that the signal occurs at all - they usually forget about reliability. In this article, you will learn how to set up a Wi-Fi access point, how to set up a Wi-Fi router, and how to make your wireless connection reliable to protect your network from unwanted guests.
I want to say right away that new detailed material has appeared on setting up the router:. I recommend using it first for setup wi-fi router A.
Which Wi-Fi router or access point to choose?
Choosing a Wi-Fi router. The stumbling block for multimedia transmission is always the Wi-Fi standard. You can quickly transfer large files or watch HD videos over a wireless network only if it complies with the 802.11n standard, which supports speeds of up to 300 Mbps. I also advise you to read about the new wireless network standard - in order to buy a device with a reserve for the future. If this is not necessary, then choose any router from a well-known manufacturer ( D-Link, TP-Link, Asus or Netgear), which comply with the 802.11n standard - this is more than enough for any high-speed Internet connection.
Wi-Fi adapters. Users who use modern laptops or PCs with an integrated wireless network adapter do not need additional equipment, but owners of old laptops need to take care of Wi-Fi modules on the USB bus or Wi-Fi Card-Bus adapters.
How to locate a Wi-Fi access point or Wi-Fi router
All three network standard Wi-Fi usually operates at 2.4 GHz. In this regard, several problems arise at once. One of them comes down to the fact that not only Wi-Fi equipment operates in this frequency range. For example, microwave ovens, cordless phones, and wireless extenders also use this frequency, which increases interference levels. Another problem is related to the signal transmission environment: the human body and reinforced concrete structures degrade the quality of the signal if they are located along its path. In order for the signal to be available throughout the entire room, it is important to choose the right location. The connection works best if the router is mounted as high on the wall as possible. In addition, the router should not be located directly next to a computer or other device that has strong radiation or interferes with radio waves due to the metal casing. Proper placement of the router's antennas is also critical. In most cases, you can get more coverage if you aim them vertically.
Connecting and setting up a Wi-Fi router (access point) for a local (internal) network
Connect the computer and the router with a network cable (use sockets for the external network; there are usually 3-5 of them, they are located nearby and labeled. Make sure that you have established a connection between the computer and your wi-fi router (the connection icon in the taskbar tray lights up) .
- IP address: 192.168.0.2
- Subnet mask: 255.255.255.0
- Default Gateway: 192.168.0.1
- DNS: 192.168.0.1
If you find other parameters in the manual, set them. Open command prompt ( Start - Run- in the window that opens, write “cmd” for Windows XP or click Start and enter “cmd” in the search bar). Next, in the command line that opens, write: ping 192.168.0.1 . If packets arrive from 192.168.0.1, then you did everything correctly. If there is no response and we see messages about exceeding the waiting limit, it is worth trying to change IP 192.168.0.1 and 192.168.0.2 to 192.168.1.1 and 192.168.1.2, respectively, and then try to “ping” the address – 192.168.1.1 If you If you still fail, then consult the manual to understand what IP address the router accepts on the internal interface.
I also recommend checking again whether the socket is plugged in network cable on the router, is it using a crossover cable? IN manual for wi-fi connection router it should be written how to get into the web interface to manage the router; if you cannot find this section or the manual itself is missing, you should check the addresses http://192.168.1.1 or 192.168.0.1 , depending on which address we were able to ping. in your computer's browser. If you have already tried to connect the router, then you need to first reset the settings with the button "Reset" on the back panel. It’s also worth checking the same addresses but with a secure protocol https://, instead of http://
On the page that opens, you will be asked to enter your login and password. If nothing is indicated in the instructions for connecting a wi-fi router, then you should try the admin/admin or admin/password pair - these are the most common pairs and they are found in almost all popular router models. After entering the administration mode, select the Russian language in the interface settings section so that everything becomes intuitive if it is present.
Most often, Wi-Fi routers allow packet forwarding in the internal network interface, so you can already turn on additional PCs and connect them through other sockets for the internal network, and start using the internal network.
How to set up a Wi-Fi router
We will look at how to enter data to access an Internet connection below, using the example of one of the Wi-Fi routers, but for now let’s go to the “Wireless Settings” settings section ( setting up a wireless network) or to the section “Wi Fi”, “Wireless”, etc.
Now give your home a name Wi-Fi networks in "Name (SSID)". Under this name wireless network will appear in the list of available networks on the other device. Select your region (Europe - the American installation has a longer range, which, however, is prohibited here). In the “Channel” column, set the value to “Auto” - then the Wi-Fi router will analyze the air and use the channel with the least amount of interference. Confirm the settings by clicking on “Apply”.
Wireless Security
The network is installed, now it’s a matter of choosing protection. Without a strong password, anyone can access the Internet through your connection. There are three main encryption methods for protecting a Wi-Fi network: WEP, WPA and WPA2. All of them are vulnerable to one degree or another, but with my help your network will be quite reliably protected from hackers. Encryption using WEP is extremely unreliable - we recommend not using it. WPA (Wi-Fi Protected Access) encryption, which is based on the AES encryption method, is quite secure and difficult to crack. To select the keys, a hacker will need many years or a computer that is orders of magnitude faster than current PCs in speed.
More better protection offers WPA2. True, hackers were able to find a loophole here, but the costs of hacking are too high. However, all these security methods require a dedicated authorization server (RADIUS), which is not applicable in a home or small office network. They are encrypted using WPA and WPA2 with predefined keys. To use them, on the “Wireless Settings” tab, activate “WPA-PSK (TKIP)” or “WPA2-PSK (AES)”. When prompted for “Security Encryption”, specify a password - it is not recommended to use less than 15 characters for it. Confirm your entry by clicking “Apply”.
Optional Wi-Fi router setup
Each network device has its own MAC (Media Access Control) network address. In the router you should register the addresses of only devices known to you - others should not have access to the router. To do this, click in the “Advanced” menu item on the “Wireless Settings” tab and select “Setup Access List”. After this you will receive a list of connected devices. Find out MAC wifi address module on a laptop or wifi network card on a PC it’s simple - in the command line type “ ipconfig /all” Select the computers for which you want to open access and click on “Add”. Now check the box next to “Turn Access Control On”, click “Apply” - and the network protected from hackers is ready. Don't forget that it's best to do all this after you've set up a wireless connection on your client computers.
Restart the Wi-Fi router via the web interface and try setting up a network on your device using the following settings:
IP– from the range of free addresses
Mask – 255.255.255.0
Getway – 192.168.(0-1).1
Setting up the Internet on a Wi-Fi router or setting up an external network

If we need to distribute the Internet via the internal network, we need to connect the network cable with the “Internet” to the external interface on the wi-fi router (the external interface is usually located slightly away from the others and is signed accordingly WAN)
Then in the router settings you need to specify the settings for the external interface of your provider: usually they are in the contract, or call technical support. You should also not forget about DNS - the router probably has a caching DNS server or as a last resort DNS tunnel, configure it. It is also worth checking whether the exchange of packets between interfaces is allowed; if so, then the Internet most likely already exists on your internal network.
By the way, I would like to note that the latest models of wi-fi routers and some of the previous ones (Asus, for example) have the ability to work with the PPPoE protocol - which has recently become more and more common among providers, so at the end of the article you will find a step-by-step instructions for setting up a Wi-Fi router with a connection via the PPPoE protocol . If your Internet is like this, then make sure that you have a router that supports PPPoE. Here I have described the main types of Internet connections so that you can determine yours.
Gh34EwF-MB4
P.S. Let me remind you once again about the “cherished button” that answers the question “ How to reset a password on a router, if I forgot the old one.” Each router has a “Reset” button - after clicking on it while the router is running, it reboots and all settings are set to their original settings.
Setting up a wi-fi router. Troubleshooting Wi-Fi Networks
Why doesn't Wi-Fi want to transfer data? You connect to Wi-Fi, but the browser cannot display the site. Let's find ways to solve this WLAN problem:
Weak wifi signal connections. Sometimes WLAN transmits data one and a half, two times slower and the signal is always bad, regardless of the location of the antenna. Reason: Your network is overlapped by another WLAN that operates on the same frequency. To allow multiple radio networks to exist side by side without overlapping each other, the 802.11b/g standard provides 13 channels at 2.4 GHz. Many routers are configured for channels eleven or six. WITH free application NetStumbler you can find and recognize neighboring WLANs and find out which channels they operate on. Download the app from the official website and start searching. After this, you will see the channels of the networks around you. Now, through the router's web configuration, set your WLAN to one of the channels that is not used on this network and check if the signal has improved.
How to increase the range of a Wi-Fi network. If the range of the Wi-Fi router is insufficient, WDS (Wireless Distribution System) technology is usually used. It allows Wi-Fi access points to establish connections not only with clients, but also with each other. Each of them receives the signal from the other and transmits it further. However, this increase in range comes at the cost of another set of hardware for the access point. The next drawback: the access point must provide simultaneous connection to both the network and the client - this reduces efficiency by half. Another, less expensive, but often quite effective way to deal with the problem is to replace the router's included antenna with one with a higher gain or even with directed.
Wi-Fi Router or Wi-Fi access point loses connection. The network is functioning normally, but the connection is constantly being lost. The problem is most likely in the poor quality of the electrical network. Even a small voltage drop is enough for the router to lose connection. Solution: Buy a small source uninterruptible power supply and connect the router through it. If this happens rarely, most users turn the device off/on, but this is not the solution.
Breaks wi-fi connection connections. When the wi-fi router and computer adapter are made by different manufacturers, this can cause some problems. As a rule, updating helps here software. Find a supplier on the website latest version and install it through the configuration menu. Especially often this problem can be solved by updating the firmware on D-Link access points and routers.
Common mistakes and setting up a Wi-Fi router

Incorrect IP configuration. In order for two network communication components to exchange files, each needs its own IP address. This network data is distributed by the DHCP (Dynamic Host Configuration Protocol) server in the router (don’t forget to check in the router’s web interface that the DHCP server is enabled). Open Control Panel and select Internet Connection. Select “Settings” from the WLAN connection menu. Next, double-click on “Internet Protocol” (TCP/IP) and activate the “Obtain an IP address automatically” option. Confirm by double-clicking “OK”. If you have several devices that can be DHCP servers, a conflict may arise between them. This leads to real chaos. To track which device is causing problems, use the DHCP Find app. It reports the MAC addresses of the DHCP server. MAC addresses are usually written on the bottom of devices. This way, you can quickly identify the troublemaker and disable their DHCP server. If communication is still not working, your browser's proxy settings may be to blame. Set up your browser: in Internet Explorer click on “Service | Internet Options" and go to "Connections". In the “LAN Settings” section, uncheck all the boxes, including “ Automatic detection parameters". In other browsers, such as Firefox, Chrome or Opera, these functions have similar names.
Programs for setting up and optimizing Wi-Fi networks (WLAN)
DHCPFind — looking for WLAN troublemakers
PuTTY — configures WLAN routers
EasyWi— FiRadar — displays all WLAN connections in the area
Wireshark — finds unprotected data
NetworkShareBrowser — shows all free networks
Wlandscape — creates a WLAN coverage map
Wi fi router Netgear WNR3500L. Easy setup

Using the Chekhov.NET provider as an example
- We connect the cable from the provider to the router (the WAN port is yellow).
- We take another cable (twisted pair crimped on both sides). We connect one end of the cable to the router (LAN port - orange) and the other to the computer.
- We connect the router to an outlet. Let's turn it on.
- Insert the disk from the kit into the drive (Russian interface). Set up step by step. Everything is very clear.
- Next, watch the video (below) and set up a PPPoE connection: go to the web interface - www.routerlogin.net with the admin | password, select the connection type - PPPoE, set the login and password from the contract, IP automatically, change the password to access the router. Apply the settings, reboot - done!
9HQhe6H92iU
How to set up a NETGEAR JWNR2000 Wi-Fi router with a PPPoE connection
Go to Internet browser Explorer, Mozilla, Opera, Safari and type 192.168.0.1 in the address bar. In the window that appears, enter admin in the “Username” field, enter password in the “Password” field and click the “Ok” button.
After this procedure, the router menu will appear:

Setting up a PPPoE connection
Click the "Ok" button in Fig. higher. “Basic settings” will appear (in the menu on the left it is: Installation - Basic settings).
To the question “Do I need to enter connection information when connecting to the Internet?” We answer “Yes”:

In “Internet Service Provider” select “Others” (which corresponds to the PPPoE connection type):
Connection mode – connection setup mode. "Always on" for permanent connection. “Connection on demand” - establishing a connection when necessary - that is, when traffic directed to the Internet appears, the device will establish a connection, and if there is no activity for more than the time specified in “Inactivity time before disconnecting (in minutes)”, it will disconnect. If you select “Connect manually”, the connection is established and terminated manually

“Internet IP address” leave “Obtain dynamically from Internet service provider” , if the IP is not issued to you by your provider (static) , as well as other parameters (everything must be in the contract):
DNS server addresses can be specified manually, if available from your provider, or you can receive them automatically:
Main DNS: xxx.xxx.xx.x
Additional DNS: xxx.xxx.xx.x

Leave the “router MAC address” as default:

Setting up Wi-Fi and security using an encryption key

Setting up Wi-Fi network security using MAC address filtering

Setting up a Netgear WG602 access point

Settings wi-fi points Netgear WG602 access is quite simple . Before starting the connection, hold down the “Reset” button, which is located on the back wall of the access point for 20 seconds to reset all settings to standard. Remember that if you are using an Internet connection via a login-password pair, then you need an access point that supports the PPPoE protocol, the connection of which is described above; the Netgear WG602 access point cannot be used with this type of Internet connection.
We connect the Netgear wg602 access point to the computer’s network card using twisted pair cable. In connection settings network adapter(cards) of the computer we register IP 192.168.0.2, mask 255.255.255.0, deleting previous settings, if they were there, but you can also use a second network card on motherboard to configure the access point.
Open a browser to connect to the web interface of the access point, write 192.168.0.227 in the address bar, a dialog box should appear where you need to enter login: admin password: password (these settings are written on the bottom cover of your access point)
Go to the Wireless Settings menu, enter an arbitrary network name - Wireless Network Name (SSID) and region (Country/Region), click "Apply".


Now we need to go to IP settings and “drive in” the provider’s settings from the contract, unchecking DHCP. This checkbox will not need to be unchecked only for those whose provider assigns an IP automatically or you use a wired router (switch) with an IP assigned to it. Such routers are necessary to connect several devices in an apartment. Leave all other settings as default.

Reboot the access point (go to the Reboot AP menu section), remove the cable from the computer’s network card:
1) If you have an Internet cable connected to the above-mentioned switch with an assigned IP provider, then insert the end of the cable that you pulled out of the computer into the switch and connect to the newly created Wi-Fi network using any device that supports this technology wireless connection by entering only a password (for example, a smartphone). Skip this paragraph if you are not using such a router.
2) If in your apartment (house, office) you only have a cable from the provider, then remove the end of the cable taken from the computer from the access point and connect the Internet provider cable to it. Check network functionality.


