How to make a bootable USB flash drive with different programs. Multiboot flash drive in WinSetupFromUSB
Multiboot usb full version
- this is the image on the basis of which everyone will have a multiboot windows flash drive or will be able to create a multi-boot disk, thanks to which it will be possible to prepare the computer before installing the operating system. It is possible to deploy or create an image to restore data and the system after failures or viruses. Testing devices working in conjunction with a computer. In general, this is an indispensable multi-boot torrent for those who work with systems or those who solve their problems themselves and do not call a computer technician for every little thing.
Additional information:
Version: MultiBoot 2k10 7.2 Unofficial
Year of release: 2016 still valid for 2017
Interface language: Russian and English
Treatment: everything you need is already activated.
ISO size: 4.36 Gb
Multiboot flash drive/disk torrent download multiboot usb full version 2017
System requirementsEnough:
- Computer or laptop with 128Mb RAM random access memory and higher
- DVD drive or USB input interface.
What does a multiboot flash drive look like when booted into the system?


We recommend burning the image to a multiboot usb flash using the Rufus program. We recommend creating a multiboot disk using the UltraISO program.
USB driver PLOP v.5.0.11
C9PE Plus Pack (@conty9) 2k10
WinPE 7x86 Live program (@Xemom1) Special Edition 2k10
WinPE 7x64 Live (@Xemom1) Special Edition 2k10
WinPE 8x86 Live (@Xemom1) Special Edition 2k10
WinPE 8x64 Live (@Xemom1) Special Edition 2k10
Program WinPE 10x64 Live (@Xemom1) Multilingual Edition 2k10
Program Parted Magic 2016.07.12 /Linux Live-CD/
Linux version of Acronis DDH v.12.0.3270 (rus)
Linux version of Acronis TIES v.9.7.8398 (rus)
Program Linux version of Acronis TI Premium 2014 v.17.0.6673 (rus)
Linux version of Acronis Universal Restore v.11.5.38938 (rus)
Linux version of Acronis B&R Advanced v.11.5.39029 (rus)
Linux version of Acronis Snap Deploy v.5.0.1416 (rus)
Linux version of Acronis Align Tool for WD/Hitachi v.2.0.154 (eng)
Program Linux version Paragon HDM 12 v.10.1.21.471 (rus)
Program Linux version Paragon HDM 15 v.10.1.25.813 (rus)
Program Linux version of MiniTool Partition Wizard Server Edition v.9.1 (eng)
Program Linux version of R-Studio Emergency v.7.1.555 (eng/rus)
Program Linux version R-Drive Image v.6.0.6003 (eng/rus)
Program Linux version TeraByte Image for Linux v.3.05 (eng)
Program DOS version Acronis TIES v.9.7.8398 (rus)
Program DOS version Paragon HDM 15 v.10.1.25.813 (rus)
Program DOS version of Hiren's Boot CD 15.2 (rus)
I recently wrote an article on how to create a multiboot flash drive. I think there is no point in writing about this a second time, just follow the link and you will see an effective method, believe me.
Now I’ll tell you how to make a multiboot drive with several systems and completely different programs, most likely the article will turn out to be long, but this doesn’t matter, because all the effective options will be in one place.
How to create a multiboot flash drive using WinToHDD
An interesting program that, in addition to creating bootable flash drives, also has functions for copying the system and installing a new one. So that users understand how to use it, I will try to describe everything in simple and understandable language.
Before the process you should move important files from the drive to another location, for example, on HDD.
You can download WinToHDD from here. Launch the utility and click on the “Multi-Installation USB” section.
A window will open where you need to select the flash drive from the drop-down menu. A message about formatting the flash drive will pop up, be sure to transfer important data. Next, select the system and boot partitions, although there is only one flash drive, so they will be the same. Click on the “Next” button.

The writing of files related to the bootloader to the flash drive begins, an important operation in which it is better not to touch anything, but just wait.

What do you think needs to be done now? I hope you have already prepared operating system images. They need to be moved to a USB drive. That's it, we made a multiboot flash drive.

What to do with a flash drive made in WinToHDD
We created a bootable USB flash drive with multiple operating systems, which is very exciting. You should now boot from it. This can be done through the BIOS or Boot Menu, whatever is convenient for you.
The download manager appears, where you select one of the presented items - 64-bit system or 32-bit.

The WinToHDD utility window will appear with the name of the system image. Let's get started new installation and select the desired system from the list. Now click Next.
Next, we are asked to select or create the following partitions - boot and system. Here you must be a more experienced user and not mess anything up. If necessary, convert partitions to MBR or GPT.

If your BIOS is not UEFI, but the Legacy boot type, then you should convert the partitions to MBR and also format them to NTFS.
If you use BIOS UEFI, then convert the partition to GPT. All this is done on the command line.
Once you have specified the required partitions, you can click “Next” and wait for the system to install. You can experiment on a PC with this program if these instructions seemed a little complicated to you, but we managed to create a multiboot flash drive.
Creating a multiboot flash drive using Easy2Boot
First, you need to download several files; we will need them during our work:
RMPrepUSB– download from here: http://www.rmprepusb.com/documents/rmprepusb-beta-versions
Easy2Boot– download from here: http://www.easy2boot.com/download/
We launch the RMPrepUSB utility and look at the interface. Lots of functions and nothing is clear. It follows from this that the method will be a little complicated for novice users, but you should not give up this option. Don't forget to connect the flash drive.

Let's first look at those interface items that will be useful to us.
- We mark the option “Do not ask questions” - that is, no notifications with requests will appear;
- In the “Size” fields - enter MAX, “Volume Label” - enter any;
- In the boot sector, select the first option related to Windows;
- In the File system section, check the “NTFS” and “Boot as HDD” items. You can also choose FAT32, but the option is slower and only supports a maximum of 4 GB file sizes.
- In the fifth section you need to select the path to Easy2Boot. Attention! There is no need to unpack the archive; we leave it as is.
- Press the button "Prepare disk". You should have a drive inserted and displayed in the very top field; if there are several disks there, then make no mistake and select the desired flash drive.
- After completing the operation of preparing the flash drive (it was formatting), you need to click "Install Grub4Dos". If a warning window appears, select “NO”.
It is advisable not to close the utility, because it will be useful to us later. When we open the flash drive, we will see several folders there. There is an “ISO” folder, and in it there are supposed folders for operating systems and some utilities.

What do we do next? You need to take the necessary images and transfer them to the WINDOWS directory; you can also move anti-virus utilities, programs for creating backup copies, working with disks, and checking for RAM errors to the appropriate folders.
Images do not have to be thrown only at WINDOWS folder. You can drop them into the root or ISO folder. When loading from a flash drive, they will still be displayed.
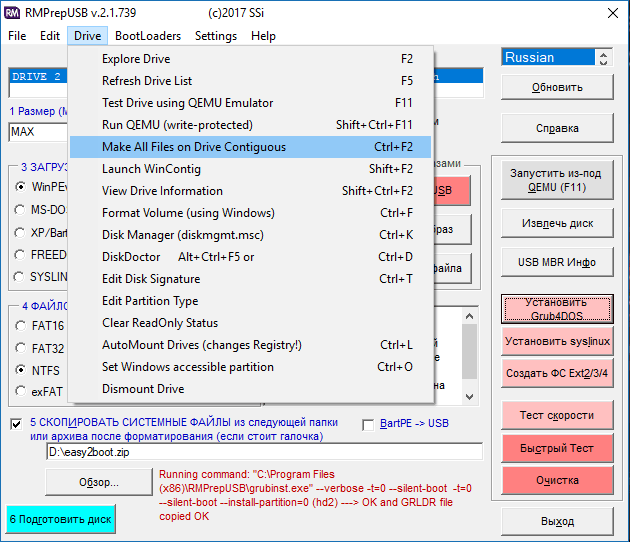
Now that you have copied the necessary files to the drive, you need to return to the main RMPrepUSB window. Open the “Drive” tab and click on the option "Make All Files on Drive Contiguous", or press Ctrl+F2.

Create a multiboot flash drive using WinInstall4Grub4DOS
From this link you can download the WinInstall4Grub4DOS tool. Unzip it and run the file. A welcome window will appear, where we click on the “Next” button.

It’s very good if you have prepared the necessary images. You can select them by clicking on the “Select folder” button; the OS images must be located in some folder, the name must not have Russian letters.
Having specified the path to the system images, click “Next”.


After the next click on the “Next” button, you will see operations for copying, driver integration, and other things. The process can be lengthy and we are even offered to go have tea, thanks for that.

To add data to system images, the FiraDisk script will run. In the window that appears, click OK.


Now let's see what's in the folder with all the images. Copies of them appeared there with the note “FiraDisk”.

Let's go to the WinInstall4Grub4DOS utility and select the “Save files” option. In Explorer, create additional folder and name it, for example, “Utilities”, since that’s where they will be written. You need to create it in the folder where the folder with the images is located.

If you are interested in what these utilities are, then click on the “Why are these files needed?” button.
Finally, we connect the flash drive to the PC, run HPUSBFW, located in the folder with the utilities, as administrator. A window will appear with a choice of flash drive, file system, preferably NTFS, and tick quick formatting. Start the formatting process. When finished, close the window.

In the utilities folder we find the archive with the GRUB4DOS_GUI tool. Let's run this file.
Move the checkbox to the “Disk” position and select the flash drive next to it. If nothing happens, then run the utility with elevated privileges. Click “Install”.

A command line will open, press the “Enter” button.

In the utilities folder, copy the MENU.LST and GRLDR files to the USB flash drive. If they are not there, then download them from the Internet, they are easy to find. Here's the link so you don't have to search.
Let's create a folder on the flash drive with some name and move the images there with the FiraDisk annotation. We haven't been able to create a multiboot flash drive yet because there are a couple of steps that need to be completed. Go!

Using the Wincontig program
One more thing. It is necessary to defragment the copied images. This can be done using WinContig, located in the utilities folder. Launch it and select images using the “Add files” button.

Click on the “Action” section and select “Defragmentation”. We are waiting for the process to finish.
The status should not be fragmented, this means something is wrong with the files, or you need to take a larger flash drive.

In the WinInstall4Grud4DOS window, click “Next”, so we will find ourselves in the section where we will do something.

In the “Menu generator for Grub4DOS” field, you need to indicate the path to the disk where you have Windows images. detailed instructions written in a file that opens by clicking the “What to do?” button.
After that, click “Make”.

After waiting a little, we will see the code that needs to be copied, for which there is a corresponding button.

Open the file menu.lst and copy this code there. Let's save. You should do this for each image.

We have created a multi-boot media with multiple operating systems. This process turned out to be long and hardly anyone will use it, but for general development it will do.
When booting from a flash drive, the GRUB4DOS bootloader will appear, with a black background and a list of operating systems. You can work on the design of the bootloader using ZXBFM__2.1b, but this is optional.

RESULTS
So, friends. I have created such a voluminous article for you. Now you know how to create a multiboot flash drive that has not only operating systems, but also various kinds of utilities. Some methods turned out to be simple, while others were complex or took a long time to implement. In any case, they are all effective if done correctly. Beginners may have problems, as there are a lot of pitfalls here. If you have a problem, be sure to write in the comments, I will try to help.
What is a multiboot flash drive used for?
A multiboot flash drive is a tool that any experienced user would want to have on hand. It can help out in situations when the computer, for example, does not boot from hard drive, and you need to access the data when you need to install operating system to a computer without a CDDVD drive, as well as to run some service and diagnostic utilities. A multiboot flash drive can be used as a carrier for several distributions of operating systems, for example Windows XP, Windows 7, Linux, etc. From it you can load various LiveCDs - “live disks” with systems that do not require installation, work with programs that serve computer devices, conduct anti-virus scans and much more. In a word, it is an extremely necessary and useful thing.
On the Internet you can find many ready-made assemblies for creating multiboot media, but it is best to learn how to make them yourself. Then your flash drive will contain the set of software that you choose yourself. Programs may be different (naturally, in the format boot images), but it is very advisable, among other things, to keep at least one Windows distribution on a flash drive. We will consider the option with Windows XP.
Preparation
Before you start creating a multiboot flash drive, you need to prepare the following:
- flash drive, with a capacity of 2 GB or more - if you are going to place only the Windows XP distribution and programs on it, and if you want it to have several operating systems, take a larger volume - from 4 GB;
- software that you will place on the flash drive: Windows XP distribution in the form of an ISO image or on a DVD and everything else in ISO, IMA, IMG formats, etc.;
- a computer running OS Windows, where all work will be carried out;
- utilities and files for working with a flash drive: CDDVD drive emulator (UltraISO, Daemon Tools etc.), WinSetupFromUSB - a free tool for transferring Windows XP to a USB drive and a bootloader installer, the bootloader itself - grldr and a configuration file menu.lst (you can create an empty one using notepad text file with lst extension).
Making a flash drive multiboot
Formatting
First of all, the future multiboot flash drive must be formatted in NTFS or FAT32. The option with NTFS is preferable - loading will be faster. For these purposes, you can use different tools, including those built into Windows, but we will use WinSetupFromUSB.
Attention! Before you start formatting, make sure that there is nothing valuable on the media, as all files on it will be deleted.
- Run WinSetupFromUSB and click the “BootICE” button to launch the utility of the same name.

- Click on the “Parts Manage” button to create an active boot partition on the flash drive.

- In the next window you will see a list of sections. In our example, there is only one section. To make it active (the active section is marked with the letter “A” in the Act column), click the “Activate” button.
- To start the formatting process, click on the “”ReFormat USB disc” button, then “Next” and “OK”, without changing anything in the settings. Mark the drive type as “USB-HDD”.

After these steps, the flash drive will be clean and prepared for further work.
Creating a boot sector and copying boot files
We continue to work in BootICE. Our next task is to create on a USB stick boot sector and copy the files necessary for downloading to it. These are, as stated, grldr and menu.lst.
- While in the main BootICE window, click on the “Process MBR” button.

- After this, the “Master Boot Record” window will open, where you need to check the box next to “Grub4DOS” - bootloader type, and then click “Install / Config”. There is no need to change anything in the next configuration settings window, just click “Save to Disc” and close it.
- Close BootICE, copy the grldr and menu.lst files to the root directory of the flash drive and proceed to the next step.
Transferring Windows XP distribution and programs to a USB flash drive
- Prepare a Windows XP distribution on disk or as an ISO file. Install the disc into the CDDVD drive, and mount the image into a virtual drive, which will be created by an emulator program, for example, UltraISO.

- Run WinSetupFromUSB. In the “Add to USB disc” section of the window, check the box next to “Windows 2000/XP2003 Setup”. A small button on the right will open Explorer so you can specify the path to the Windows XP distribution disk. Next, click on the “GO” button, and the process of copying files will begin. In a similar way, distributions of other operating systems are transferred to a flash drive.

- Copy boot images of other programs that your multiboot flash drive will contain to separate folder. Place it in the root of the drive and give it a clear name using Latin letters. In our example, the folder will be called PROG. We will take as an example MHDD, a utility for working with hard drives, and Memtest86+ – a computer RAM diagnostic tool. Images of these programs can be downloaded for free from their official websites.
Configuring the Multiboot Menu
Now the most difficult and interesting part: we have to configure boot menu. We hope you can imagine what it is. This is what you will see after the computer boots from your flash drive. Since it is multi-boot, it should have a list of contents, or rather a menu, with the help of which you could launch necessary programs. This list is contained in the menu.lst file.
Grub4DOS menu.lst is already included in the installation package. You can use it as a basis for creating your own menu, but you can also clear it of its contents and fill it out yourself. In our case, there is no task of studying the syntax of Grub4DOS commands in detail, so we will clear the file (or create it ourselves) and insert into it the ready-made code fragments necessary for the menu to work.
I must say that the possibilities for customizing the multiboot menu are quite large. You can add a picture as a background, you can use different fonts, enable support for the Russian language, etc. But in order to solve the problem, we will limit ourselves to simple and understandable things.
So, let the first point be offered to us Windows installation XP on computer. Next, let’s say, install Windows 7 or 8, then launch MHDD, followed by Memtest86+. The last points Let's add booting from the hard drive (start Windows), rebooting (reboot) and shutting down the computer (shutdown). Our menu will look like this:
Install Microsoft Windows XP
Install Microsoft Windows 7/8
Installing Windows XP
IN top part document, copy the following code:
title Install Microsoft Windows XP
root(hd0,0)
map –mem /WINSETUP/XPpSP3.ISO (0xff)
map (hd0) (hd1)
map (hd1) (hd0)
map –hook
root (0xff)
chainloader /I386/SETUPLDR.BIN
- Line title contains text that will be displayed as a menu item. It must be written in Latin characters (there is no support for Cyrillic fonts in Grub4DOS by default).
- In line root the disk partition where the bootloader should look must be specified required file. (hd0.0) in this case it is a flash drive.
- map –mem /WINSETUP/XPpSP3.ISO (0xff)– this entry points to the path to the file that will be launched. In our case, this is XPpSP3.ISO in the WINSETUP folder, which is located in the root of the flash drive.
- Team chainloader makes a call Windows boot loader XP – SETUPLDR.BIN. There is no need to change its parameters.
Of all the above, the user can only change the value of title and map –mem. Everything else should remain as is.
Installing Windows 7 or 8
Indent one line from the previous part of the code and insert the following fragment:
title Install Microsoft Windows 7/8
map –unmap=0:0xff
map –unhook
root(hd0,0)
chainloader/bootmgr
Since the Windows 7 and 8 boot loader is copied to the root of the flash drive, you do not need to specify the path to it. Apart from the title value, everything should remain as is.
Running MHDD and Memtest86+
Below, insert the following code in a line:
title MHDD
find –set-root /PROG/MHDD.IMA
map –mem /PROG/MHDD.IMA (fd0)
map –hook
rootnoverify(fd0)
chainloader(fd0)+1title Memtest86+
map /PROG/memtest86+.iso (0xFF) || map –mem /IMG/memtest86+.iso (0xFF)
map –hook
chainloader (0xFF)
The command syntax is different, since the boot files of these programs have different formats in our example (IMA and ISO). Here it is important to correctly specify the path to the files on the flash drive: /PROG/MHDD.IMA and /PROG/memtest86+.iso, as well as enter the title.
Booting Windows from your hard drive
The following code fragment will be responsible for it:
title Start Windows
find –set-root –ignore-floppies –ignore-cd /bootmgr || find –set-root –ignore-floppies –ignore-cd /ntldr
map (hd0) (hd1)
map (hd1) (hd0)
map –hook
rootoverify (hd0)
chainloader(hd0)+1
On hard drives The computer will be searched for the Windows XP bootloader - ntldr or Windows 7/8 - bootmgr.
Reboot and shutdown
The last two fragments, the first of which is responsible for rebooting, and the second for turning off the computer.
title Reboot
reboottitle Shutdown
halt
After that, save the menu.lst file and close it.
Testing
To check how our multiboot flash drive works, run WinSetupFromUSB again. In the main window, find the “Test in QEMU” item and check it. The QEMU virtual machine will launch, where you can see the boot menu you just created.

If everything is displayed the same as you see in the picture, and each of the points works as expected, your flash drive is ready.
To create a multiboot USB drive using the WinSetupFromUSB utility you need:
- computer with Microsoft operating system installed
- iso images operating systems that are required for multiboot USB storage eg MS Windows XP, 7, 10, Acronis Disk Director 11, Kaspersky Rescue Disk 10.
- WinSetupFromUSB utility
- a blank USB drive with a capacity of at least 8 GB for the above ISO images
Program WinSetupFromUSB designed to create a bootable or multiboot USB drive. Download this program you can from our website:
Supported systems:
- operating rooms Microsoft systems Windows XP/2000/2003/7/8/8.1/2008/2012/10
- operating systems Linux / *BSD / *nix
- Ubuntu – 13.04 (32 and 64 bits) / 13.10 Server / 12.04.03 Server LTS
- Debian 7.1 Netinst i386, AMD64/7.2/7.6
- Linux Mint – 15 cinnamon dvd 32bit
- Mageia – 3 Dual CD
- CentOS – 6.4 LiveCD i386
- Fedora – Live Desktop 19 x86_64
- OpenSuse – 12.3 GNOME Live i686
- PCLinuxOS – KDE MiNime 2013.10
- SlackWare – 14.0 x86 DVD ISO
- OpenBSD – 5.3 Minimal, 5.3 Full
- m0n0wall – 1.34 CD-ROM
- ArchLinux – 2013.10.01-Dual
- Beini – 1.2.1, 1.2.5
- CloneZilla – 2.1.2-43-i686-pae
- DamnSmallLinux (DSL) – 4.4.10, 4.11.rc2
- Elementary OS – stable-amd64.20130810
- Gentoo – x86-minimal-20131022 , amd64-minimal-20140313
- GParted – gparted-live-0.18.0-2-i486
- Inquisitor – v3.1-beta2 Live CD (x86), 3.1-beta2 Live CD (x86_64)
- Knoppix – 7.2.0 CD EN, Adriane 7.2.0F EN
- Manjaro – openbox-0.8.7.1-i686
- Ophcrack – xp-livecd-3.6.0
- Antivirus systems:
- Avast Rescue Disk
- Sophos Bootable Anti-Virus
- Other:
- Acronis True Image
- Acronis Disk Director
- HDD Regenerator 2011
- Memtest86+ – v5.01
- MS-DOS – 7.1
- Paragon Hard Disk/Partition Manager
- UltimateBootCD – 5.20, 5.26
1. Download the utility WinSetupFromUSB
2. Download iso images of operating systems that are required for a multiboot USB drive
3. Unpack the archive with the utility WinSetupFromUSB
4. Launch the program WinSetupFromUSB
5. In the window that opens WinSetupFromUSB Select the desired USB drive from the drop-down list
Fig.2 Selecting a USB drive in the program WinSetupFromUSB
6. Check the checkbox AutoFormat it with FBinst to automatically format a USB drive.

Fig.3 Setting up automatic formatting of a USB drive in the program WinSetupFromUSB
If you have previously used this program to create a multiboot flash drive for this drive and there is a need to add several more operating system images, check the box AutoFormat it with FBinst no need to install.
7. Select the required file system.
8. To add an operating system Microsoft Windows XP, you must first unpack the ISO image of the system or mount it into a virtual drive, check the checkbox Windows 2000/ XP/2003 Setup and indicate the path to the folder or drive in which the folder is located I386 .
9. To add an operating system Microsoft Windows 7 (or others) you need to check the checkbox Windows Vista/7/8/ Server 2008/2012 based ISO and specify the path to the iso image of the desired operating system.

10. To add an operating system Ubuntu(or other Linux operating system) you need to check the checkbox Linux ISO / Other Grub4 dos compatible ISO and indicate the path to iso image of the required operating system.
11. After completing the process of adding the required distributions, you must click the button Go.
12. Upon completion of creating a multiboot USB drive, in the Done pop-up window, click the button OK.
13. To exit the program, press the button EXIT.
14. To add distributions to the created multiboot drive the next time you start the program WinSetupFromUSB you must specify the required drive, do not check the checkbox AutoFormat it with FBinst and indicate the path to them.
Found a typo? Highlight and press Ctrl + Enter
There are now more than a billion computers in the world. Each computer runs on a specific OS, be it a system Linux or system Windows. Many system administrators and advanced users are faced with replacing the OS with a large number of computers. Therefore, each system administrator has at hand several disks and bootable flash drives with different operating systems.
In this material we will try to simplify the life of a system administrator or an experienced user. We will describe the installation process multiple OS images on one bootable USB flash drive. That is, after reading the article you will be able to do bootable USB flash drive with different operating systems.
The first way to create a multiboot drive
For the first method we will need two utilities RMPrepUSB And Easy2Boot. You can find them on their official websites www.rmprepusb.com and www.easy2boot.com. Immediately after downloading, install the utility RMPrepUSB. To do this, run the installer.

Now click the main button Install, after which the program will install and immediately notify you about this in the final installation window.
Close the installer window and paste USB drive. Then launch the utility from a shortcut on the Desktop.
Before creating a bootable USB flash drive, we will need ISO system images for example. Window 7, Windows 10 And Windows XP. You can make them from licensed disks using utilities Alcohol 120% or CloneCD. If the iso images are ready, you can immediately begin directly preparing the multiboot drive. To do this, check all the radio buttons as shown in the figure and specify the path to the archive with Easy2Boot.

Having placed all the switches correctly, feel free to press the button Prepare disk. The process of writing the necessary data to the drive should begin.

Now let’s go to the USB drive in the “_ISO\WINDOWS” folder and write iso images of our systems to the appropriate folders:
- Windows XP in "_ISO\WINDOWS\XP";
- Window 10 in "_ISO\WINDOWS\WIN10";
- Window 7 in "_ISO\WINDOWS\WIN7".
After the images are written to USB drive, you need to do the last operation by pressing the key combination Ctrl + F2. In a couple of minutes, your multiboot drive will be ready. You can check its performance in the built-in emulator RMPrepUSB. To launch it, press the F11 key. After pressing the button, the emulator will start loading with your drive and after a few minutes you will see the bootloader menu.

As you can see from the example, this method of creating a multiboot USB drive may seem a little complicated. But if you follow the instructions, then after just a few tests of this method it will be very simple for you, like any other. In addition, with its help you can make a boot menu with different pictures. For example, like in the picture below.

You can also find ready-made pictures on the website www.rmprepusb.com.
The second way to create a multiboot drive
For this method we need the utility WinSetupFromUSB. You can download it from the official website www.winsetupfromusb.com. The utility is distributed as a self-extracting archive. Therefore, you just need to download it and unpack it to a place convenient for you. If we compare this method with the previous example, this one will be much simpler and especially suitable for beginners. Before creating, also prepare two OS images of Window 7 and Ubuntu 14. Install the formatted flash drive into your computer and run the utility.
Now select the OS ISO images as shown in the image below.

At this point, all the settings for creating a bootable drive are ready and you can press the GO button, after which the recording of a multiboot USB drive will begin.
If you want the created multiboot USB flash drive to boot into virtual machine, then before pressing the GO button, check the box “ Test in QEMU».
The example shows that any user can handle this application. But in WinSetupFromUSB There are also options for advanced users. To use them, check the box " Advanced options».
If you want to burn another similar operating system onto the media, for example, Windows 7, then do the same operation with the image Windows 7 in the considered example on the same flash drive. After completing these steps when booting from a drive, you will receive two versions of the system Windows 7.
An example of launching a multiboot flash drive in a laptop
For example, we will use the disk we just created using the utility WinSetupFromUSB and laptop Lenovo IdeaPad Z570. In order for our laptop to see the bootable USB flash drive, we need to boot from it. To do this, before booting the laptop, press the F11 key, which will launch the bootable media selection utility.

Select our media and press Enter. This will launch our drive menu.

For example, let's choose to install Ubuntu 14 and press Enter. The installation process will begin Ubuntu 14.

The seven installation process is similar Ubuntu 14.
As you can see, launching the media on a laptop is quite simple and even a novice user can handle it. The process of launching the drive on other laptops and desktop computers may be a little different. You can find out how to load the boot media selection menu in the manual that came with your laptop or motherboard.
Summarize
In our material, we looked at the most popular utilities for creating multiboot drives. In addition to the two programs RMPrepUSB and WinSetupFromUSB, there are also such utilities as:
- SARDU;
- YUMI;
- XBoot.
Each of these utilities has both pros and cons. These utilities are not as popular as RMPrepUSB and WinSetupFromUSB, so we did not include them in the review. If you have a desire, you can always familiarize yourself with them, since there are a lot of materials on the Internet with reviews of these programs. Another advantage of these utilities is the ability to install images boot antiviruses or program images backup. Therefore, using a multiboot flash drive, you can always scan your hard drive for viruses and make backups before installing the OS.
I would also like to note that we have described only part of the functionality. RMPrepUSB And WinSetupFromUSB. Therefore, if you want to gain advanced skills in the functionality of these utilities, we recommend visiting their official websites. Here you will find all the necessary manuals that will help you create a multiboot flash drive that meets your requirements.
We hope that this article has helped resolve any issues that have arisen.
Video on the topic