Virtual system for windows 7. The best virtual machines for Windows: install if you really want to look at other operating systems
Network and server administrators are often faced with the need to test hardware, software, and certain parameters and settings on real servers. But testing something on a running server is extremely dangerous, as it can lead to data loss and operational failures.
Specialized software comes to the rescue in this situation. Capable of emulating a real computer and performing all the necessary actions with it. The most popular program in this case is VirtualBox from Oracle.
How to use virtualbox?
virtualbox 32/64 bit for windows 7 and 8 must be installed on a work computer running the Windows operating system. In the future, VirtualBox allows you to create any number of virtual machines with selected parameters, and install any operating systems on them for testing. In this case, the real physical computer will be the host computer, and the operating system on it will be the host computer.
When installing an operating system on a virtual machine, you should pay attention to the fact that it must be configured properly and comply with minimum requirements. In this case, the operating system installed on the virtual computer is called a guest operating system.

Thanks to the use of virtual machines, testing of hardware, software and necessary settings is greatly simplified. With all this, the virtual and physical machines communicate with each other via network connection. In addition, a virtual machine can seize control of any equipment installed on a physical computer.
The program is also available for such operating systems like MacOS and Linux (popular for Ubuntu and Mint).
Virtualization is an umbrella term that covers the abstraction of resources for many aspects of computing. Some of the most typical examples of virtualization are given below. In turn, a virtual machine is an environment that appears to the “guest” operating system as hardware. However, in reality it is a software environment that is simulated by the host system software. This simulation must be robust enough to allow the guest drivers to operate reliably. When using paravirtualization, the virtual machine does not simulate hardware, but instead suggests using a special API.
Terms used:
- Host system (host)- a computer running the virtualization platform
- Guest operating system- operating system running inside a virtual machine
- Virtual machine, virtual environment- virtualized computer hardware that can run a guest operating system and applications. Several virtual machines can be running at the same time
- Virtual application- a virtual machine with a pre-installed guest operating system and fully configured applications, aimed at solving a specific task
In this guide, I will talk about the new virtualization features of the Windows 7 operating system. Virtual PC Windows is a new optional system component that can be used to deploy and migrate compatibility support for applications in Windows 7 that can be managed on legacy operating systems. This component is available when you download the update package.
Virtual PC Windows provides an easy way to Windows management XP and support for compatibility of applications that must be managed on this operating system. Can be used to access virtual Windows image XP, which is ready to provide compatibility settings for the applications the user needs. You can even use Windows XP Mode and Windows 7 to run applications directly from Windows 7 when the applications are, in principle, installed in the Windows XP virtual machine. Windows mode XP Mode is available in Windows 7 Professional, Windows 7 Enterprise, and Windows 7 Ultimate.
Under the Windows 7 operating system, other 32-bit operating systems can also be used in Windows Virtual PC. Namely:
- Windows XP - only Windows XP Service Pack 3 (SP3) Professional is supported;
- Windows Vista- only Windows Vista Enterprise and Windows Vista Ultimate are supported;
- Windows 7 - only Windows 7 Enterprise and Windows 7 Ultimate are supported;
In this guide, I will describe several options for using Virtual PC - installing Windows XP Mode, as well as installing another operating system. In both cases, virtual machines are used to provide management of the operating system. Windows XP Mode is more in a fast way, because it involves fewer steps and effort. Once the test operating system environment is installed, we will look at a few key Windows features Virtual PC - such as sharing physical resources: USB devices, printers, and hard drives.
Pre-installation steps
For Windows installations Virtual PC needs to download and install a specific system update. Before you install Windows Virtual PC, you need to review the requirements to determine whether your computer can run Windows Virtual PC. Windows Virtual PC requires Windows 7 hardware support for virtualization. Virtualization support is available for processors that include a virtualization option—namely, processors with Intel Virtualization Technology (Intel VT) and AMD Virtualization Technology (AMD-V), as well as some VIA processors. You can enable hardware support for virtualization using the BIOS. For more detailed information regarding hardware support for a specific virtualization processor, it is best to consult the hardware manufacturer's Web site.
In order to find out whether hardware virtualization is supported in Intel processors, you need to do the following:
- Download, install and run Intel Processor Identification Utility;
- Go to the “CPU Technologies” tab and read the value in the “Intel Virtualization Technology” field
To find out whether hardware virtualization is supported in AMD processors required to download, install and run AMD Virtualization Compatibility Check Utility
The following list shows some models Intel processors, which have hardware support for virtualization:
- Pentium 4 662 and 672
- Pentium Extreme Edition 955 and 965 (not Pentium 4 Extreme Edition with HT) Pentium D 920-960 except 945, 935, 925, 915
- Core Duo T2300, T2400, T2500, T2600, T2700 (Yonah)
- Core 2 Duo E6300, E6400, E6320, E6420, E6540, E6550, E6600, E6700, E6750, E6850 (Conroe)
- Core 2 Duo E7600, E8200, E8300, E8400, E8500, E8600 and some versions of the E7400 and E7500 (Wolfdale)
- Mobile Core 2 Duo T5500, T5600, T7100, T7200, T7250, T7300, T7400, T7500, T7600, T7600G, T7700, T7800 (Merom)
- Mobile Core 2 Duo SU9300, SU9400, SU9600, P7370, P8400, P8600, P8700, P8800, P9500, P9600, P9700, T8100, T8300, T9300, T9400, T9500, T9600, T9800, T9900 n)
- Core 2 Quad Q6600, Q6700 (Kentsfield)
- Core 2 Quad Q8400, Q8400S, Q9300, Q9400, Q9400S, Q9450, Q9550, Q9550S, Q9650 and some versions of the Q8300 (Yorkfield)
- Core 2 Extreme X6800 (Conroe_XE)
- Core 2 Extreme QX6700, QX6800, QX6850 (Kentsfield_XE) Core 2 Extreme QX9650, QX9770, QX9775 (Yorkfield_XE) Xeon 3000, 5000, 7000 series
Atom Z520, Z530, Z540, Z550, Z515 (Silverthorne) - all Intel Core i7 processors
- Pentium Dual-Core E6300, E6500 and some versions of the E5300 and E5400*
- Celeron E3000 series
This section of the guide describes the process of installing Windows Virtual PC, as well as installing the virtual machine itself. Additional configuration and technical information in examples.
Installing Windows Virtual PC

After installing Windows Virtual PC, you need to install a virtual machine. You can use Windows XP Mode or create your own virtual machine. If you plan to use Windows XP, you can download it using the Windows XP Mode installation package discussed in the "Before You Begin" section.
A little about integration components
Integration components make a virtual machine easier to use by improving the interaction between physical resources and the virtual machine environment. They are installed automatically along with Windows XP Mode. For other operating systems, they must be installed manually after installing the operating system itself. Integration components are included with Windows Virtual PC and provide access to the following resources:

Installing Windows XP Mode
Installation process:

Attention
- You should not uninstall a package if you will no longer use it. If you remove it, then the package Windows component XP Mode will no longer be available and you may lose important data. Uninstalling the package removes the virtual machine and also stops access to the data that was stored in the virtual machine;
- Microsoft recommends keeping an archived copy Windows package XP Mode (WindowsXPMode_xx-XX.exe, where xx-XX is the system language) as a backup, in case you have to restore the Windows XP Mode environment. For example, you can burn the .exe file to a CD or DVD disc. It is highly recommended to have a backup copy because the Windows XP Mode environment has 2 virtual hard drives- parent virtual hard drive and differential disc. A differential disk cannot be used without a parent disk. If the parent disk is deleted or damaged, you must update the existing Windows XP Mode environment. In this case, you need to use the same parent hard drive that was used previously if you will be installing Windows XP Mode again
The installation process is as follows:


After installing Windows XP Mode, you may want to create new accounts for this component. If you create accounts, you will need to add them to the Remote Desktop User and Administrators groups. Accounts can be either domain or local.
Installing a virtual machine manually
This method can be used if you do not want your guest system to be Windows XP. In this section, I'll walk you through how you can create a virtual machine and install the guest operating system that you plan to manage in Virtual PC. You can use the Create Virtual Machine Wizard to create a virtual machine. The wizard will walk you through configuring the virtual machine with basic settings that you can customize to suit your needs for using the virtual machine. For example, you can specify a certain amount of memory that the virtual machine will use. Amount allocated RAM should be what you would allocate to a physical computer. It is advisable to provide the virtual machine with enough memory so that you can easily manage the operating system and applications installed on it. You should also pay attention to how you will install the guest operating system. For example, to install an operating system you can use network server for installation or physical CD or DVD drive, in which simply place the installation disk with the system. If you are installing a Virtual PC-supported guest operating system, you will need to install the Integration Component Pack after installation.
- You need to open the virtual machine folder. To do this, go to the menu “ Start", select " Windows Virtual PC" If this item is not immediately available in the menu, you need to click on the menu “ Start" to " All programs", left-click on the folder " Windows Virtual PC", and then select " Windows Virtual PC»

- The folder " Virtual machines
" From the menu area, click on “”.

Folder " Virtual machines" provides detailed information about all virtual machines created by the current user, and can also be opened from this folder general access, create and modify virtual machines and virtual disks.
- The Create Virtual Machine Wizard will open. After going through the wizard dialogs, you will select the required settings for installing the guest operating system.

The first step is to name the new virtual machine and specify its location.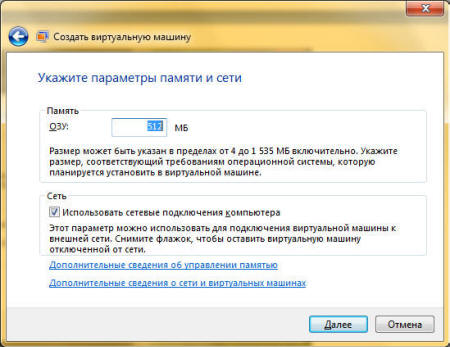
In the second step, the virtual machine creation wizard prompts us to specify memory parameters for the virtual machine.

The third step requires you to specify the virtual machine disk settings.
- At the end of the wizard, the virtual machine will be displayed in the list of files in the “ Virtual machines».

- Installing a guest operating system. If you are using a network installation server, you can safely skip this step. If you are using a CD or DVD, insert it into the drive carriage and proceed to the next installation step. To use the .iso image you need to do the following:
a) Right-click on the created virtual machine and select " Options»;
B) In the left pane, select the drive where the image is located. In the right pane, select " Open ISO image" Click the button OK.

- Start the virtual machine. In the list of files, select the virtual machine and click " Open" Windows Virtual PC will open the system installer for the virtual machine. The virtual machine will look for the installation disk. The installation will begin once the boot disk is found.

- After the installation is completed, you need to install the integration components. Click on the menu " Service" in the virtual machine window and select the item "". If the installation does not start after a few seconds, go to the desktop of the virtual machine and open the CD in it. After this, you need to double-click on the file with the left mouse button IntegrationComponents.msi.


- Complete the installation using the Integration Components Installation Wizard.

- Reboot the virtual machine. From the menu " Action" in the virtual machine window, select " Reboot»

Closing a virtual machine
Before you start performing some actions in the virtual machine, you may want to know how to log out of the virtual machine. When you close a virtual machine, it may hibernate, shut down, or shut down. When a virtual machine wakes up from hibernation mode, it does not boot the system sequentially, so this option is much faster than shutting down and shutting down.
Attention
When you open a virtual machine, Windows Virtual PC provides it with memory and processing resources. The length of time it takes to open a virtual machine depends on how you closed it during your last session. The amount of memory you allocated when creating the virtual machine also matters. By default, when you click the “Close” button in the virtual machine window, the Windows XP Mode virtual machine goes into hibernation mode and prompts you to select the same action for other virtual machines. You can change this option yourself.
Changes to the default action to close a virtual machine

Shutting down a virtual machine
- In the virtual machine window, click on Ctrl+Alt+Del. Or you can press the key combination CTRL+ALT+END.
- In the guest operating system window that appears, click on “ Shut Down».
- The operating system will be turned off, the resources consumed by it will be returned to the host system.
Attention! If you want the installed software to appear on the desktop of the host operating system, you need to log out of your account before closing the virtual machine.
If you are using certain Windows versions XP, Windows Vista or Windows 7 on a virtual machine, then you have the ability to access the application directly from the desktop on the host computer when the application is installed in the virtual machine. Thanks to this feature, you can run Windows 7 on the host machine existing applications, avoiding problems that may arise if they are not compatible with the host operating system.

Business applications running on the Windows XP operating system are great for testing this feature. However, Windows Virtual PC does not support applications that require stereo sound or 3D graphics. This means that user applications, such as games, cannot be launched in this case.

Using USB devices in a virtual machine.
Windows Virtual PC supports USB devices version 2.0, and it is also possible to share a device or record from a device to a virtual machine. The method you use depends on the type of USB device you are using. If integration components are installed and enabled by the guest operating system, storage devices and smart card readers are automatically shared between virtual machines and physical computer. No additional steps are required for these types of storage devices. For other types, their use is possible by attaching them to a virtual machine. For example, you can attach the following USB types devices:
- Digital cameras;
- USB CD drive;
- MP3 players;
- Phone/PDA/mobile device;
- Webcams/video cameras;
- Wireless network adapters.

Printing from a virtual machine
There are several ways to make a printer available on a virtual machine. Some factors that influence the methods you can use include whether a printer driver is available on Windows 7 and whether the printer is connected locally or over a network. You can also use XPS format if your computer supports this printing method.
Using a Local USB Printer
Attention! This method is suitable if drivers are available for both systems - the Windows 7 host system and the guest operating system. You only need to go through a few steps to install the printer on a virtual machine. The following steps assume that you have already printed to the printer using the host operating system.
Make sure the printer is turned on and available for driver installation. For example, you can install drivers on it using a CD.
- Connect the printer to the virtual machine. To do this, in the virtual machine window, click on “ USB" and then to " DeviceName Sharing».
- Install the printer driver on the guest operating system. You can install the driver via the Internet or use a CD.
- Disconnect the printer from the virtual machine. To do this, from the virtual machine window, click on “ USB" and then to " Device_name Release».
- Reboot the virtual machine. To do this, from the virtual machine window, click on “ Action" and then to " Reboot».
- The printer will be available on both systems, both the host and the guest.

If you are using a Windows XP guest system, you must manually install the driver for the printer that will be used.

Printing from a virtual machine
- Go to the virtual machine and go to account, if necessary (you will be logged in automatically if the option to save your password is set).
- Do the following:
a) On the desktop in the virtual machine, right-click on the file and select from context menu option " Seal»
b) Open an application that has a print option available and use the print command. - All printers that are available in the virtual machine are in the list of printers. Select the desired printer and click on the OK button
You can also use Print to XPS Document from your virtual application or virtual session to save the file you are printing to the host, and then you can print the file using a printer installed on the host computer. This option is useful when drivers are not available for the guest operating system or you do not want to install a printer on it. This method requires the following configuration:
- Microsoft XPS Essentials Pack installed on the guest operating system. Microsoft XPS Essentials
The Pack can be downloaded from the following link: Windows Hardware Developer Central site. - The virtual machine is configured and has access to disks and partitions on the host computer, so you can simply save the file (By default, when Windows XP Mode is installed, the system is configured to have access to disks and partitions on the host system. For other virtual machines, you need to install components integration).
- A working printer must be installed on the host operating system.

Since we all love to experiment, tinker with system settings, and run something of our own making, we need to think about a safe place to experiment. Such a place for us will be the VirtualBox virtual machine with installed Windows 7.
When starting the VirtualBox virtual machine (hereinafter referred to as VB), the user sees a window with a completely Russian-language interface.
Let us remind you that when you install the application, the shortcut is automatically placed on the desktop. If this is your first time creating a virtual machine, in this article you will find detailed instructions, which may be useful at this stage.
So, in the new window, click "Create", after which you can select the OS name and other attributes. You can choose from all available operating systems.

Proceed to the next step by clicking "Next". Now you need to specify how much RAM should be allocated for the VM. For its normal functioning, 512 MB is enough, but you can choose more.

After this, we create a virtual hard disk. If you have previously created disks, you can use them. However, in this article we will focus on how they are created.
Mark the item "Create new hard disk" and move on to further stages.


In a new window you need to indicate where it should be located new image disk and what size it is. If you are creating a boot disk containing Windows 7, then 25 GB will be enough (this figure is set by default).

As for placement, then the best solution will place the disk outside the system partition. Failure to do so may result in overload boot disk.
If everything suits you, click "Create".
When the disk is created, the parameters of the created VM will be displayed in a new window.

Now you need to configure the virtual machine hardware.

In the General section, the 1st tab displays key information about the created machine.
Let's open the tab "Additionally". Here we will see the option "Folder for pictures". It is recommended to place the specified folder outside the system partition, since the pictures are large.
"Shared clipboard" involves the operation of the clipboard when your host OS and VM interact. The buffer can operate in 4 modes. In the first mode, the exchange is carried out only from the guest operating system to the main one, in the second - in the reverse order; the third option allows both directions, and the fourth disables communication. We choose the bidirectional option as the most convenient.
"Mini toolbar" is a small panel that allows you to manage the VM. We recommend activating this console in full screen mode, since it is entirely the same as the main menu of the VM working window. The best place for her is upper part window, since this way there is no risk of accidentally pressing one of its buttons.

Let's move on to the section "System". The first tab offers you to make certain settings, which we will discuss below.
1. If necessary, you should adjust the amount of RAM in the VM. At the same time, only after its launch will it become completely clear whether the volume has been selected correctly.
When choosing, you should proceed from the size of physical memory installed on the computer. If it is 4 GB, then it is recommended to allocate 1 GB for the VM - it will function without any “brakes”.
2. Let's determine the loading order. The floppy disk (floppy) player is not needed, disable it. The CD/DVD drive should be assigned first in the list in order to be able to install the OS from the disk. Note that this can be either a physical disk or a virtual image.
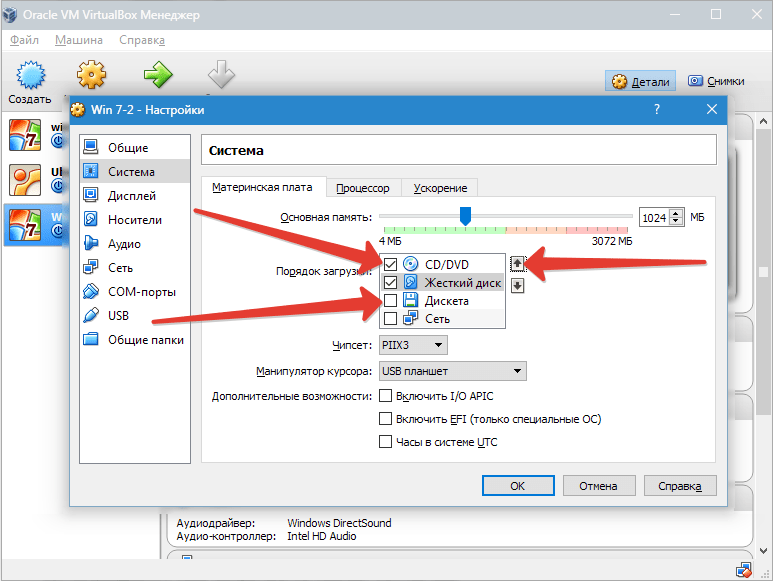
Other settings are given in the help section. They are closely related to the hardware configuration of your computer. If you set settings that do not comply with it, the VM will not be able to start.
On the bookmark "CPU" the user specifies how many cores are on the virtual motherboard. This option will be available if hardware virtualization is supported AMD-V or VT-x.
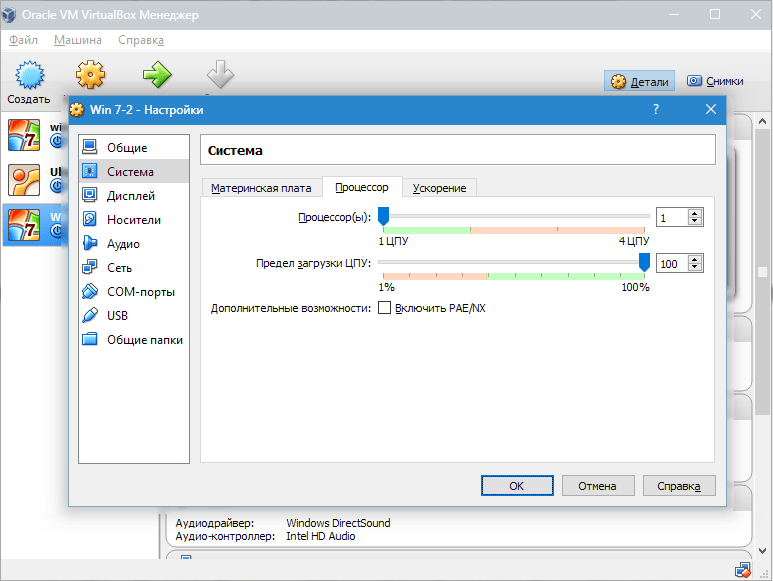
Regarding hardware virtualization options AMD-V or VT-x, then before activating them you need to find out whether these functions are supported by the processor and whether they are included initially BIOS– it often happens that they are disabled.

Now let's look at the section "Display". On the bookmark "Video" The amount of memory of the virtual video card is indicated. Activation of two-dimensional and three-dimensional acceleration is also available here. It is advisable to enable the first of them, but the second parameter is optional.

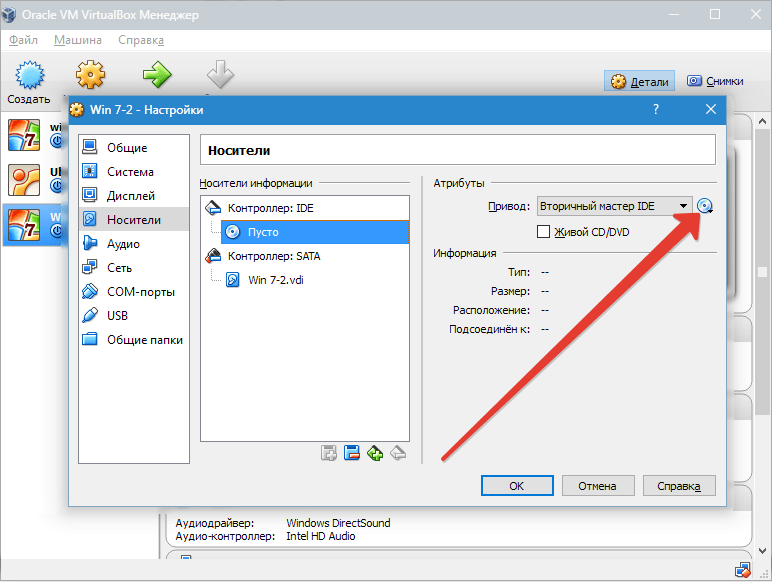
In the section "Carriers" all disks of the new virtual machine are displayed. Also here you can see a virtual drive with the inscription "Empty". We will mount the installation image into it. Windows disk 7.

The virtual drive is configured as follows: click on the icon located on the right. A menu opens in which we click "Select optical disk image". Next, you should add an image of the operating system boot disk.

We will not cover issues related to the network here. Note that network adapter initially active, which is a prerequisite for the VM to access the Internet.
On the section COM There is no point in going into detail, since nothing is connected to such ports today.
In the section USB check both available options.
Let's go to "Shared Folders" and select those directories to which the VM plans to provide access.
The entire setup process is now complete. Now you can start installing the OS.
Select the created machine in the list and click "Run". The actual installation of Windows 7 on VirtualBox is very similar to a regular Windows installation.
After downloading installation files A window will open asking you to select a language.


We accept the license terms.

Then select "Full installation".
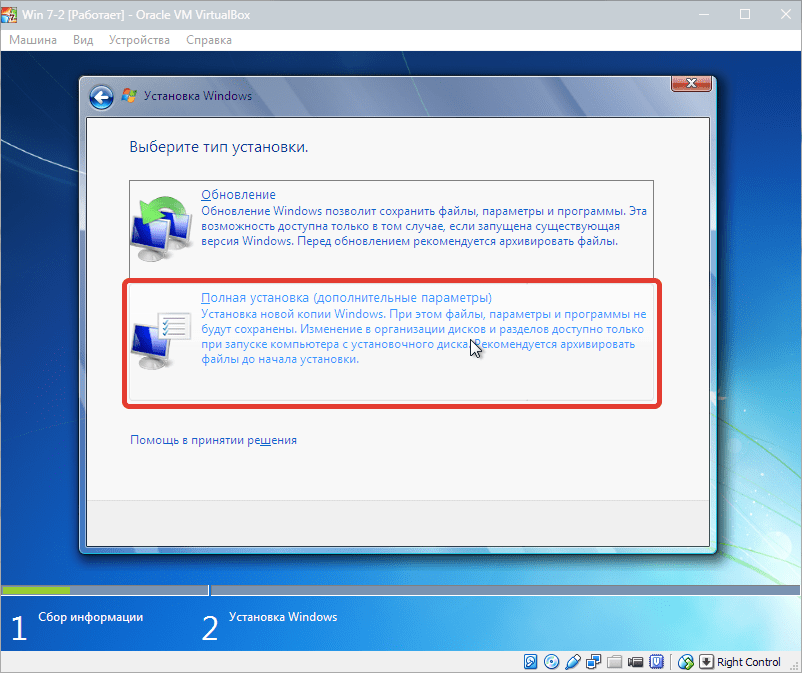
In the next window you need to select a disk partition to install the operating system. We have the only section, so we select it.


During installation, the machine will automatically reboot several times. After all reboots, enter the desired user and computer name.


Here we enter the product key, if available. If not, then just click "Next".

Set the time zone and date.

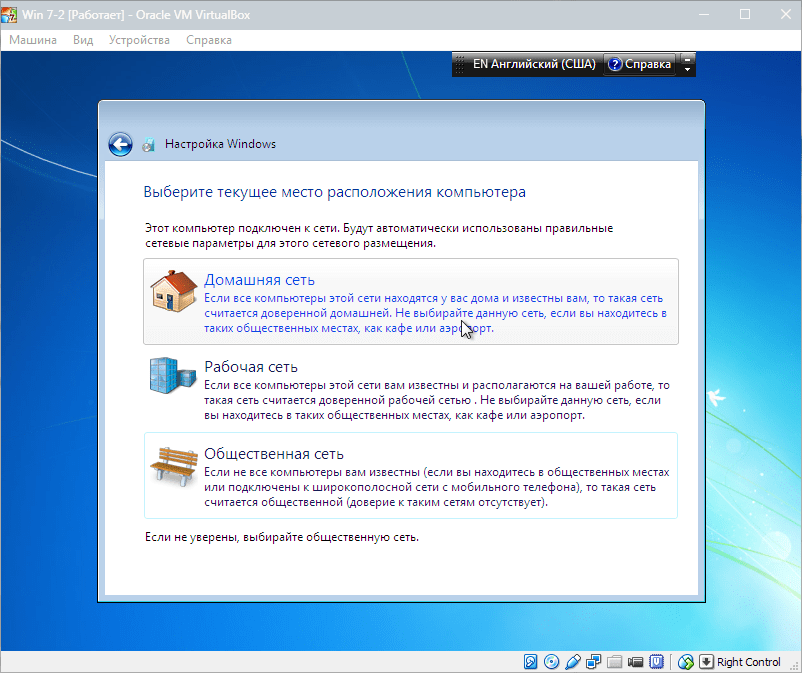
Then we choose which network to assign our new virtual machine to. Click "Home".
After these steps, the virtual machine will automatically reboot and we will be taken to the desktop of a freshly installed Windows 7.
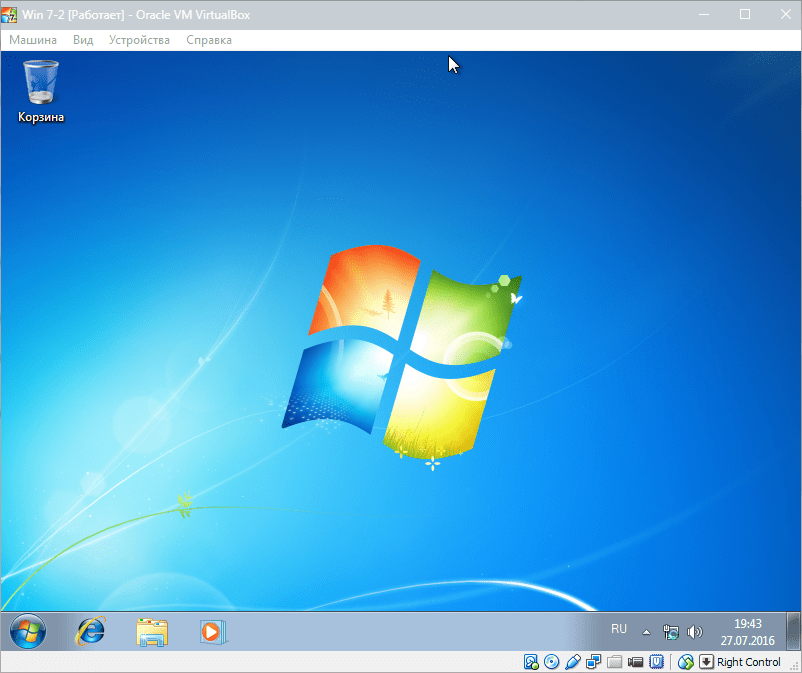
Thus, we installed Windows 7 on the VirtualBox virtual machine. Next, you will need to activate it, but this is a topic for another article...
Sometimes it happens that you need to install a program or test some product (another OS or program), but either it is not suitable for the operating system, or it simply seems dangerous and it is better not to install it so as not to lose personal data. And to prevent this from happening, you can install a virtual machine on your computer and install the desired operating system there. Nothing will happen on your real computer because... everything can be done on a virtual operating system.
Today I will explain how to install Windows 7 in a virtual machine. I’ll say right away that following my instructions, any user can handle the installation.
I chose ORACLE VIRTUALBOX as the virtual machine because... This is a very simple, powerful and free virtualization tool, developed thanks to the support of the famous ORACLE corporation. It allows you to install almost any modern operating system as a “guest”, be it Windows, MacOS or Linux. You can download the virtual machine on the official website.
After downloading and installing the virtual machine, we will proceed to installing Windows 7. And don’t forget to download the distribution kit of the OS you need in ISO format.
Open the VirtualBox program and click the “Create” button, a window will open. We name our operating system in the “Name” field. In the “Type” field, select OS Microsoft Windows or if you want to install something else, you can choose another one. In the “Version” field, select the OS version. I chose the 32 bit version because... I need it at the moment. You choose the version you downloaded. (32 bit or 64 bit) After setting, click Next.
In the next window, select the amount of RAM you want to allocate for this operating system (default 512 MB). After choosing, we move on.

In window 3 we create a virtual hard disk for our OS, by default we select “Create a virtual hard disk” and click create.

In the next window, select the type hard drive(leave the default option and move on).

In the next window, select the storage format (leave “Dynamic virtual hard disk” by default).

Next, we indicate the size of the hard drive (I recommend leaving the default at 25 GB), but if you need more, then do more. Do not forget that your hard drive memory is shared between both the virtual OS and the main one. After making your selection, click Create.

Now we have completed the setup for installing the OS. After everything, click the “Run” button

The disk loader will open. Select the OS you downloaded. For its setting. Let's move on.

After selecting the OS, if you did everything correctly, the downloading of files will begin.

Next, the OS installation will begin. So that I don’t repeat myself on how to install Windows 7, if you don’t know how, please go to my previous article “” where I described everything in detail. Installation is the same as on a PC.
Using the instructions, you can easily install Windows 7. If everything worked out for you, then I congratulate you, you are an experienced user. After installation, we will make a shared folder between the virtual OS and your real OS to transfer necessary files to a virtual operating system and vice versa.
When the desktop opens after installing Windows 7, let's start setting up the shared folder.
On a real computer, in the hard drive (C or D), create a “shared folder” and call it, for example, “Distr” (the name should be in English only).


“Autorun” will open, click “Run”.

Next, you need to install drivers for the “Shared Folder”, we agree with all the settings (everything remains at default). And of course, when the request for installation comes up “ Software“Click install. After installation, you will be prompted to restart the OS. Agree and wait a couple of minutes.

Then click on the button at the bottom right that looks like “folder” -> “Set up a shared folder”.
The “Add a shared folder” window will open. Click on the plus button on the side. In the “file path”, select the folder that we created at the beginning (Distr).

Check the boxes for “Auto-connect” and “Create a permanent folder”.

After all the settings, click “Ok”.

Go to the computer and go to the “Network” tab. In this tab there will be a folder “VBOXSVR” go into it.

In it you will see your created “ Shared folder" Congratulations, everything turned out to be a pleasant experience. If you have any questions, write in the comments and I will help you.
VirtualBox (Russian: Virtual Box) is a virtual machine from Oracle Corporation. Free program, designed for virtualization of operating systems Windows, macOS, Linux, FreeBSD, Solaris/OpenSolaris, other platforms are supported.

Benefits of a virtual machine
Using a virtual machine (VM) on a home PC, first of all, will allow you to simultaneously run several operating systems (guest OS).
For example, one of the operating releases is currently installed on your computer or laptop. Microsoft systems Windows (host OS). Installing a virtual machine, in this case VirtualBox, allows you to use any other systems (guests) in the host OS environment, including macOS, Linux, Android, Windows, and so on; there can be a lot of options here.
Some features and capabilities of VirtualBox
- Image support hard drives VMDK () and VHD (Microsoft Virtual PC);
- Audio device virtualization (optional AC97 / SoundBlaster 16 / Intel HD Audio emulation);
- Creating, deleting, restoring VM snapshots;
- Shared Folders - creation shared directories exchanging files between host and guest systems;
- OVF/OVA format support;
- Creating secure environments for accessing the Internet;
- Supports various connection options: NAT, network bridge, virtual host adapter, etc.;
- Experimental support for hardware 3D acceleration;
- Cross-platform (Virtual Box, );
- Convenient navigation and user-friendly interface;
- Multilingual localization – Russian, Ukrainian and other languages;
- The program is distributed under the GNU GPL 2 license - free software (no restrictions on use).
Download VirtualBox for Windows
Available for download on our website latest version Oracle VM VirtualBox for Windows 7, 8.x, 10 (starting from version 5, Virtual Box does not support Windows XP).
Download VirtualBox for free, without registration.
Spoiler (Oracle VM VirtualBox Extension Pack)
Oracle VM VirtualBox Extension Pack – components that expand the capabilities of the virtual machine (RDP server, USB support, NVMe, PXE and other capabilities).
Download and install Extension Pack only of the same version as VirtualBox.
[collapse]
VirtualBox is a virtual machine from Oracle Corporation. A free program designed for virtualizing operating systems Windows, macOS, Linux, FreeBSD, etc.
Version: VirtualBox 6.1.2
Size: 107 MB
Operating system: Windows 10, 8.1, 8, 7
Language: Russian
Program status: Free
Developer: Oracle
Official website:
What's new in version: list of changes


