How to use daemon tools. Learning to use Daemon Tools
Daemon Tools– multifunctional utility for CD emulation and DVD discs. The operating principle of the program is based on the installation of virtual disks that are not functionally different from physical devices. To work with it you must either already have finished image disk, or files suitable for its creation. It is especially important to use an emulator on netbooks, where the usual disk drive is absent altogether. Among those I would especially like to mention are the packages and, perhaps, the .
Our review will cover the . Its functionality differs from the series in the following positions:
- The ability to independently create images and convert existing ones;
- Hotkey support;
- Supports Blu-ray and HD discs;
- The maximum number of virtual media is 32, versus 4 for the Lite version.
How to create a disk image in Daemon Tools
Using images solves several problems at once. Firstly, there is no need to store and care for disks. Secondly, wear on the drive and its individual parts is reduced. Thirdly, the financial costs of purchasing disks are reduced (a license purchased via the Internet costs much less).
To do it yourself in Daemon Tools, you need to click the “Create disk image” button. In the window that appears, select the active drive from which recording will be made; assign a suitable name for the image file, the destination folder, and the format of the final file.

MDS/MDF is most often used, the rest are used in special cases. Depending on the speed, creation time does not exceed 10 minutes. If you are creating a game image, you can safely choose the highest speed if an image is required boot disk- usually choose lowest speed to avoid reading errors.
When creating an image from a protected source, Daemon Tools should also not have any special problems. It confidently bypasses the protection systems SafeDisk, SecureROM, StarForce, etc. There are, of course, more advanced “locks” on disks, but they are usually done by professionals; most media do not have this level of protection.

Daemon Tools and the image mounting process
Daemon Tools supports all known formats, including mdf/mds, iso, flac, ape, nrg, cue/bin, etc.
When you have the finished image on hand, you need to transfer it to virtual media, which must be created before that. To do this, select the tab “Actions” -> “Add virtual DT drive”(IDE or SCSI if necessary). Further program in automatic mode will create a virtual disk and give it a name. Attention, you may need to restart your computer.

To set the number of drives and their settings, use the “Manage virtual drives” icon.

The next step: mounting the image directly onto the virtual disk. Activate the button "Add images", select the required image file (file type: all image files (*mds,*mdf,...). The image should appear in the right column of the program. Right-click on it and select "Mount image". We wait 30 seconds. That's it, you can use the virtual disk just like a regular drive.

The image is deleted using the right mouse button -> delete.
Burning a disc
Burning an image to disk is a great way to protect your data in case of system failure. This function, for example, is most often used when creating bootable disks.
Fortunately for us, DT Soft has equipped its products with this feature. Many people remember that Daemon Tools was absent in the fourth generation this function, so most users preferred to use other programs. Unlike many competitors, DT's functionality is on the surface, and therefore difficulties should arise extremely rarely. Before you start recording, prepare a disc of suitable capacity. Then in the program window select "Burn image"- a window with recording settings will appear. Install desired speed and specify the path to the image file. The process will begin after clicking the "Start" button.

What's the result?
Overall, the latest version of DT Pro Advanced leaves a pleasant impression. The program, despite its small size, works stably, without crashes. However, some operations seemed to take a significant amount of time. It’s nice to be able to “reach” any function directly from the main window of the utility, split the image into several convenient parts and put a password on it, integrate into Windows, and also search for images on local disks computer. Using the proprietary editor, you can change the original image format to one of three available: ISO, MDS and MDX. In addition, an information window about gaming industry news, ratings of games and images used is integrated into the interface. Among the supported systems, not only those used in Windows review 7 64bit, but also its 32-bit counterpart, XP, Vista and the latest G8.
is a special program that helps mount a disk image and create virtual drives on your computer. This kind of program is becoming more and more in demand, because today more and more information is transmitted on the Internet in the form of virtual disks. And of course, these disks must be installed correctly on your computer. Daemon Tools helps you cope with this task.
You can download such a program for free on our website.
The program menu is quite simple and easy to use. The image directories are displayed at the top of the window, and the virtual drives at the bottom. These two fields are separated by a toolbar.
In order to get started and mount the disk image, you must first add it to the directories. To do this, click on the disk image with a plus sign.
A window will open in which you need to select the virtual disk file in required extension. For your convenience, select “All images” in the “File type” field. Select the file and click Open. This image will be added to the program and displayed in the “Image directory” field. To remove an image from the catalog, click the disk image with a red cross.

Now the image needs to be mounted. Select the virtual disk (1) and click the green triangle (2). The image is mounted and will appear in the top field " Latest looks"(3), and below, the drive that is occupied by this disk will be displayed (4).

After this, you can start using the virtual disk.

To unmount the image, click the gray square. And if you need to remove several drives, then the image of the arrow to the right of the square

Daemon Tools allows you to create additional DT and SCSI drives on which disks are mounted. A total of four drives can be created. That is, using this program, you can simultaneously use four virtual disk images!
In order to create an additional drive, just click on the corresponding image of the drive with a cross (1). After a few seconds it will appear in the lower field. To remove it, press the drive button with a red cross (2).

The next two buttons will help you create disk images and burn it using the Astroburn program. But for this you need to additionally download it.
Daemon Tools is a true veteran in its class. The program has a long history and many fans around the world. Its main purpose is to record, create and edit images. It is very easy to use, but its main drawback is its not very user-friendly interface, which can scare away novice users. In this article we will describe in detail how to work with the Daemon Tools program.
Daemon Tools is completely free, but its installer contains some advertising content. The good news is that it is not installed directly into the program itself. You can simply delete it later. To install the program, just download the installation package, run it and follow the installation wizard.

Upon completion of installation, the program will automatically be placed in the system tray.
Let's take a look at the possibilities it offers software. You can left-click or right-click on the tray icon, depending on what actions you want to perform. For example, when you click the left mouse button, two options appear: unmount all disks or mount the image on the selected virtual drive.

When you right-click the mouse, the following options will appear

Let's take a closer look:

- Manufacturer - select the device name (you can enter any value).
- Model - select the device model (you can also enter any value).
- Software version – setting the firmware version of the virtual drive (also does not play any role, you can enter any value or leave it as default).
- Drive letter - select a letter for this device.
- DVD region - select the DVD region.
- Auto-start notification - automatic start function.

General menu:
- Installing the program into autorun and displaying the agent in the system tray.
- Automatic mounting – the program automounts the last used image into a virtual drive every time Windows starts.
- Checking for updates.
- Language selection.

Menu "Hot Keys"
Assigns hotkeys to unmount all drives, as well as mount the first one in the list.

Integration menu
Associates the program with known image files.

Network menu
Here you can configure the proxy server settings as well as identification.

Confirmations menu
Enable or disable warning messages about deleting an image from a directory, deleting a virtual drive, and unmounting a using drive.

Advanced menu
Allows you to configure the emulation parameters of various storage media. It's best to leave them disabled by default.

Media menu
Allows you to enable the display of media information, as well as clear the multimedia cache.

Main program window
To open the program's working window, double-click on the shortcut on the desktop or the icon in the system tray.

The program window displays a catalog of images, as well as some control buttons:

In this article we will understand in detail, in pictures, step by step, how to use . We will learn how to mount an image we already have, we will be able to create and burn images to disk. All this can be done just by downloading an excellent program for free - an emulator. Let’s not delay for too long, but consider the most important points. The first is installing the emulator.
To install the Russian language for Daemon Tools Lite, you should select “Russian (Russian)” at the very beginning of the installation. 
After agreeing to the terms of use, you will be asked to choose a license type: paid or free. Since we are considering the work process free version, then we will install it. It is just suitable for personal, non-commercial use. Therefore, we choose “ Free license" and click "Next". 
After this, a window will appear asking you to set the file association and whether or not to show shortcuts on the desktop and in the program menu. You can safely leave everything by default, especially if you do not have another disk emulator installed. Click “Next” again. 
In the next window you will be asked to send mount statistics and will be assured that everything will happen anonymously. Information will be sent about all images that you mount in Daemon Tools Lite. You can send it or not, it's at your discretion. In this example, we will prevent the use of our statistics by clicking on “Do not allow Mount Space to use my statistics.” 
Select the location where the installation will be performed. 
During the installation process, you will be prompted to install Yandex.Bar. You can agree, or uncheck all the boxes and click “Next”, as shown in the picture. 
After installation, you should return to the main question - how to use Daemon Tools Lite? Even easier than installing!
So, to create an image in Daemon Tools Lite you need to click on “Create a disk image”. 
Afterwards, you should select the location where the disk image will be saved and the drive from which the recording will be made. 
Writing a disc to a computer happens quite quickly, especially if you leave the reading speed at maximum. 
Your image is located in the folder that you specified before creating the disk image. But you probably don’t have any virtual drives, and in order to run the disk on your computer, we will need to create at least one such drive. To do this, click on “Add virtual SCSI drive”. 
Literally a moment, and at the bottom of the program an icon of a virtual drive will appear on which we will mount our virtual images. You can create and emulate several disks at the same time, but for now one is enough for us.
Now let's look at how to mount an image in Daemon Tools Lite and simply add it to the list. To add an image to the list, simply drag it into the main window, or use the “Add image” button and specify the path to it. 
Next 
To mount the Daemon Tools Lite image to a virtual drive, select the newly added image and click on “Mount”. You can also right-click on any image and click “Mount”. 
Next 
As you can see in the picture above, our image has been successfully mounted. Your disk should automatically start, just like in autorun. Also, at any time you can access the disk by going to “My Computer”.
If you want to unmount a disk, that is, remove it temporarily or permanently, then call context menu(right mouse button) on your virtual disk and select "Unmount". 
Thanks to Daemon Tools Lite, you can not only mount, but also burn discs. Or rather, the obligation to record the image on DVD disc or the CD is taken over by the Astroburn program, which is built into the Daemon Tools menu. 
After a short installation, you will be able to do absolutely everything, not only images, but also regular files and folders. It is very simple to use, you just need to select the path to the image or drop the files and folders to be recorded into the main window, and then click on “Start recording”. 
As you can see, the sequence of actions is not complicated, and after just a few uses you will “automatically” perform these simple actions.
We work with the Daemon Tools program - details.
If you have been using a computer for more than six months, on your user journey you have probably come across files with incomprehensible extensions like .mds, .iso, .nrg... What are these files? These are disk images created by one or another special program as a result of the image creation process. Creating an image is making an exact copy of a CD\DVD\Blue-Ray disc on hard drive. In order for these files to be opened on a computer, you will have to use one of many special emulating programs. Let's look at how to use one of these programs, namely Daemon Tools.
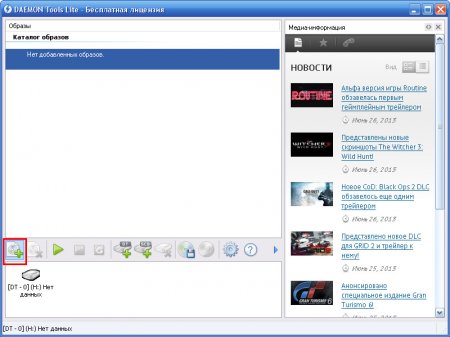
When the image disappears, you can launch Daemon Tools itself. We wait for the program to check the license and see the main window.

The image catalog is empty because no images have been added. On the icon bar we see:
Button to add an image to the catalog.
Button for removing an image from the directory (not from the disk!).
Starting the drive.
Stopping and unmounting the drive.
Stopping and unmounting all drives.
Button to add a virtual DT drive. I'll tell you more about this. The fact is that a large number of licensed discs have copy protection. And when disk emulation occurs, the protection of the licensed disk automatically detects the virtual drive and blocks reading data from it. This protection can be bypassed by a DT drive, which can be installed by pressing this button.
Installing a new SCSI drive. With this button you can add a regular virtual drive.
Removing a dedicated drive.
Additional features (can be accessed either by clicking a button or by expanding the window). These are the buttons Create a disk image, Burn (burn) a disk from an image, Settings and Help.
All functions of the main window were discussed above. Let’s configure the program by clicking on the “Settings” button. We see the following window:

In the "General" tab everything is clear, set it up and go to the next tab. There is nothing complicated here - if you need to assign hot keys, click the cursor on the desired field and press the required keys.
Integration tab– we don’t change anything, and the files – images can be opened by this program.
Connection Tab– if necessary, enter the required data there.
"Confirmations"– if you check the required actions, the program will ask you to confirm your action (for example, when deleting a drive, the program will ask “Are you sure you want to delete this drive?”)
"Additionally" - fine settings program, you can read more on the Internet.
"Media - information"- at your request.
So, the program is configured. Now let's move on to the most important thing - mounting the image. Select the desired drive and click the button to add the image to the catalog.

In this case, the file is called NFS_Carbon. Select it and click “Open”.

The file appeared in the images directory. To mount the image, double-click on the image in the directory. That's it, the disk is mounted.

In order to stop emulating the image in the drive, click “Stop”.


