View basic information about your Windows computer. View basic information about your Windows computer Tweak Windows 10 for your laptop
The interface changes from version to version in Windows operating systems. The user has to get used to the new interface, which sometimes leads to difficulties in setting up the system. However, at a fundamental level, all Microsoft operating systems are no different. And all settings can be easily found in any version of Windows. Let's look at this using the example of opening the system properties window in Windows 10.
Hotkeys for calling the window with system properties
Win+Pause/Break- calls up the system properties in any version Windows from XP to Windows 10. The simplest and fastest way.

There are only two keys on the keyboard. In some laptop models you will have to additionally hold down a key Fn, because the Pause there it is moved to an additional function on the key Break.
Text command to launch basic system properties of Windows 10
Perhaps someone will find it much more difficult than the previous method. It may seem useless. However, there are situations when you cannot press a key combination. For example, when connecting to a computer remotely, using hot keys may not be available.
Via the Run applet
In this case, you can start viewing basic information about your computer using the command line or. The latter can be opened through the Start menu, or by pressing the Win+R key combination.
Type the command:
control /name microsoft.system

It is not difficult to remember and in extreme situations it will work in any version of Windows, with the exception of XP. It works in the 10th version of the system, and will probably work in many more subsequent ones. This can be much faster than searching for where the developers removed access to system properties this time. This command can be further simplified and simply typed

Via command line
The same command is entered through the Windows 10 command line. It, in turn, can also be called through the “run” applet by typing cmd

Via the Start menu
Through you can open system properties in Windows 10 in several ways. I find them all inconvenient, but they are there and our guide would be incomplete if we missed them.
Computer settings
This option appeared only in Windows 10. Something similar is also available in Windows 8, but there the parameters are launched from a different place.

So, click Start > Settings > System > About System > System Information
Through Windows utilities
In this case, the sequence of clicks will be different
Start > All Applications > Windows System > This PC > in the right-click Properties dialog box

My Computer icon in Windows 10
Surely many remember that in previous versions there was a “My Computer” icon on the desktop. And in the context menu of this icon there was a “Properties” item. So in this method we use the same icon. We can simply drag it onto the desktop with Drag-n-Drop and open the computer properties through its context menu.

This icon is of course different from the same “My Computer”, since in Windows 7 and earlier versions it was not a shortcut, but a special icon. Now we can only create a shortcut to it, which is why you can see two “Properties” items in the context menu. The second is just the properties of the shortcut, so the first is needed.
Via control panel
System properties can also be opened through the control panel. Which can also be launched in two ways.
Quickly access the Control Panel in Windows from the keyboard
My favorite way is using the command through the “Run…” applet. You can also type this command in the console.

This method of opening Control Panel works on Windows 10, but it works on any version of Windows.
Launching the Windows 10 Control Panel from the Start menu
Click on the following menu items:

Start > All Programs > Windows Tools > Control Panel
Open System Properties via Windows 10 Control Panel
In the Control Panel, you need to open “System and Security”, then click the main item “System” or the sub-item “View the amount of RAM and processor speed”

Opening Windows 10 System Properties via Control Panel
Windows 10 features a new menu that contains many operating system settings. Here you can fine-tune most of the key options of Windows 10, which, even compared to the previous version, are much more numerous here.
Today we’ll take a brief excursion into the new “Options” menu and look at how to configure only the installed “ten”.
How to launch Settings
The parameters dialog is called by several methods, thereby giving the user the opportunity to choose the most convenient one. You can open the window where Windows 10 is configured as follows:
- through the Start menu using the icon of the same name;
- using the search bar;

- through the notification panel, which allows you to perform “quick actions”;
- via a tile in the taskbar;

- using the key combination “Win+I”.
Settings Menu Overview
Most Windows 10 settings are configured in a window that opens in any way. All options here are sorted into categories for ease of configuration and finding the required parameter.

This section allows you to configure the most important system parameters:
- resolution, brightness, screen position;
- fine-tuning the new notification application - you can specify which programs are allowed to display alerts, disable them and display shortcuts for several so-called quick actions (rotate the display, connect to a network, create a note);
- setting up virtual desktops and organizing multiple windows for multitasking;
- tablet mode configuration;
- the “Storage” subsection allows you to distribute downloaded files, assigning each category (audio, video, documents, programs) its own download directory;
- here, as in the control panel, files are associated with applications that will open them in Windows 10 by default.

The section contains a list of peripheral devices connected to the PC, where you can change their parameters. So, here you can add a new device, configure input devices, a printer, and automatically launch portable storage devices.

Networks, Internet
It is analogous to the Network Control Center and contains all the parameters necessary to configure any network supported by your edition of Windows 10. In the window, you can create a new VPN connection and configure the network adapter in accordance with the requirements of the created connection. Oddly enough, the developers also included a firewall in the section, which, as practice shows, is used by an insignificant number of users.
A separate point, in addition to creating a VPN, in Windows 10 is the creation of an Ethernet connection and its subsequent configuration.

Perhaps the most interesting point among all the “ten” parameters. It’s not for nothing that the developers prohibited editing the appearance of an unlicensed operating system.
By the way, after turning off the network and restarting the computer, this opportunity appears .
As in the "seven", you can change the background image or color, theme and Start menu. For the latter, a wider range of settings is available. Also in Windows 10, you can change the background image of the lock screen and display the status of applications that support this function.

Confidentiality
The second, after personalization, is the settings section that users love. It allows you to change numerous privacy settings, and if configured correctly, even on Microsoft servers.
By disabling as many functions as possible, you can better protect yourself from surveillance. But even here there are reasonable limits that should be observed. For beginners, there are a lot of instructions on how to get rid of surveillance in the “top ten”.

The last difference in Windows 10 settings is the ability to pin a graphic element (shortcut to a directory or program, settings, control panel applets) to the Start screen.

(Visited 5,295 times, 1 visits today)
When installing Windows 10, the user may think that this OS is the ideal operating system. But there is no limit to perfection. For personal use in Windows 10, you can and should disable a good part of the components in order to free up more PC resources.
Why manual tuning is better and higher quality than automatic tuning
Obviously, you need to set up your computer after installing a new system with your own hands, and not with one or two one-button programs. All applications are created according to a template and work according to one scenario with possible small branches.
No program will do what you need specifically. For example, only the user can choose the design to his liking, disable unnecessary services, and defragment individual sections of the hard drive.
In addition, not a single program can configure the entire system: the work of some is aimed at cleaning the disk and registry, others at optimizing services, connecting to the Internet, freeing yourself from “surveillance” and data collection, and so on.
I often help reinstall systems and regularly do this on my computer. I have long noticed that programs that perform one-click optimization miss a lot of really important things. Very few applications disable services; I have not seen one that disables the system’s visual effects, and so on.
Settings to make after installing Windows 10
Windows Store restrictions on downloading updates
The Windows Store is a platform through which you can purchase and install paid and free applications for Windows.
- In addition, the “Store” constantly updates installed applications, since when you purchase a program or game you receive lifetime service. But in some cases, these updates can disrupt the operation of the system and take up some hard drive and RAM resources, so it is better to disable auto-update:
- In the search, enter Store and select the best match. In the search, enter Store and select the best match
 In the “Store” window, click on the ellipsis button. Select “Settings”.
 - In the “Store” window, click on the ellipsis button and select “Settings”
 In “Settings”, move the toggle switch in the “Application Update” column to “Off”, and then restart the computer.
In “Settings”, move the toggle switch in the “Application Update” column to “Off.”
Stopping unnecessary services

Services are background processes that ensure the operation of devices and act as intermediaries between devices and the operating system. However, some services may work even if the device they communicate with is not present.
- For example, fax or Bluetooth, which most computers do not have. There is a whole list of services that can be safely disabled:
- List of services that can be safely disabled on Windows 10:
- "Fax machine";
- NVIDIA Stereoscopic 3D Driver Service (for NVidia graphics cards if you are not using 3D stereo imaging);
- “Net.Tcp Port Sharing Service”;
- "Working folders";
- "AllJoyn Router Service";
- "Application Identity";
- "BitLocker Drive Encryption Service";
- "Bluetooth Help" (if you don't use Bluetooth);
- “Client License Service” (ClipSVC, after disabling, Windows 10 Store applications may not work properly);
- "Computer Browser";
- Dmwappushservice;
- Geographic Location Service;
- "Guest Shutdown Service (Hyper-V)";
- "Pulse Service (Hyper-V)";
- "Hyper-V Virtual Machine Session Service";
- "Hyper-V Time Synchronization Service";
- "Data Exchange Service (Hyper-V)";
- “Hyper-V Remote Desktop Virtualization Service”;
- "Sensor Monitoring Service";
- "Sensor Data Service";
- “Internet Sharing (ICS)” (provided that you do not use Internet sharing functions, for example, to distribute Wi-Fi from a laptop);
- "Xbox Live Network Service";
- Superfetch (assuming you are using an SSD);
- "Print Manager" (if you don't use printing features, including Windows 10's built-in printing to PDF files);
- "Windows Biometric Service";
- "Remote registry";
- "Telephony";
- "Telephone communications";
- "Secondary login" (assuming you are not using it).
Video: how to disable unnecessary services in Windows 10
Checking and installing missing drivers
During Windows installation, standard applications are installed that open only the basic capabilities of the device. For maximum PC performance, it is necessary to have the latest drivers installed on the system.
- Press the Win + X key combination and select “Device Manager” from the drop-down menu.
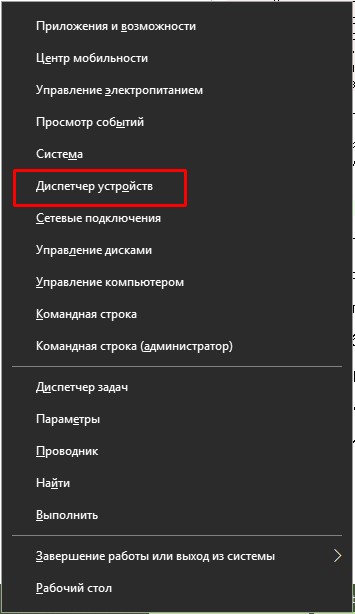 Press the Win + X key combination and select “Device Manager” from the drop-down menu
 - Open the tab with the device, right-click and select “Update driver”.
 Open the tab with the device, right-click and select “Update driver”
 - Select “Automatically search for driver updates” and wait for the wizard to finish its work. Then we restart the computer.
 Select the item “Automatically search for driver updates” and wait until the wizard finishes its work
 - We update drivers for the following devices:
- "System devices";
- "IDE Controllers";
- “Video adapters (video cards, video controllers).”
- Reboot the computer.
Video: how to update the driver through Device Manager
Checking and installing system updates
The user must keep the operating system up to date. To do this, you need to download updates as often as possible. Update components contain important files for the system, virus databases for Defender, and much more.

Disabling auto-update
If for some reason, for example, a small hard drive is installed in your computer, you do not want Windows to consistently update its components, auto-update can be disabled. However, you should remember that this is not recommended.

Disabling spyware
With the release of Windows 10, some users began to sound the alarm about how much data was being transferred to Windows for analysis. It’s worth noting right away that no one keeps track of personal passwords and credit card numbers. The system simply collects some metadata to improve its performance. Disabling the collection and sending of data is quite simple, you just need to dig a little into the Settings and Defender settings:
- Open “Options” and go to the “Privacy” applet.
 Open “Options” and go to the “Privacy” applet
 - In the “General” tab, move all toggle switches to the “Off” position.
 In the “General” tab, move all toggle switches to the “Off” position.
 - In the Speech, Handwriting and Text Input tab, click on Turn off speech services and input suggestions.
 In the Speech, Handwriting and Text Input tab, click on Turn off speech services and input suggestions.
 - In the “Diagnostics and Feedback” tab, we also set all toggle switches to the “Off” state.
 In the “Action Log” tab, uncheck the “Allow Windows...” checkbox.
 - Reboot the computer.
As a rule of thumb, different versions and builds of operating systems track different data, so the Privacy applet may contain more or less tracking settings. System updates for a specific period also play a role. The location of the toggle switches in the tabs may differ. It is recommended that you review the “Confidentiality” section more carefully.
Removing garbage
After installing the operating system, there is usually no garbage in it. But if the new OS was installed without overwriting the old one, a Windows.old folder may well appear on the system disk, which cannot be deleted in simple ways. The Disk Cleanup utility will help with this.

Minimizing the set of effects
Visual effects (animating the taskbar, casting shadows from windows, etc.) are certainly beautiful and pleasing to the eye, but they have too much impact on the RAM and video memory. It's better to disable them:

Video: How to turn off visual effects
Preventing background applications from running
Windows 10 has many standard applications that, like services, run in the background. They cannot be accused of excessive resource use, but it is better to disable these programs:

Optimizing and making the newly installed operating system work is very important and quite simple. It is enough to disable everything unnecessary, and Windows will be configured for maximum performance.
Introductory: the article was originally written about how to speed up your computer directly based on 10 and tags about 7/8 were added later, so some nuances and points within Windows 7/8 may be missing (this is normal) and should be skipped and/or performed through the appropriate tools for Win 7/8 (for example, control panel).
Good day everyone and all that stuff.
With the release of a new operating system, traditionally, I receive tons of messages of a very different nature. Most of them, of course, concern solving various kinds of problems, but they also write relatively many questions about configuration, optimization, etc.
Today I would like to tell you in one article about the basic setup and optimization of what is necessary, which I always do first on a new system after installation (or on a user’s already “dirty” operating system). Of course, not everything will be told, but a lot, and this is what will allow you to understand how to speed up a Windows-based computer.
In general, I was going to write this material back with the release of 7, but somehow I never got around to a big article, and therefore there was a large series of small notes, each of which talked about some small aspect. Now it has been decided to correct this misunderstanding.
By the way, over several systems, in general, from the point of view of configuration and optimization, not much has changed, and therefore you can safely apply the following to Windows 7 and Windows 8, and use some principles on older systems.
Let's get started.
How to speed up your computer on Windows 10 and 7/8 - interface
I will show and tell using the example of the interface and system of Windows 10, but those who wish can easily apply all this to 7 or 8, since everything is identical with rare exceptions and the problem can only be minor differences in the interface and the lack of what needs to be optimized .
Disabling background programs and services
Open Windows settings (mainly for 10) using the Start method and clicking the corresponding icon or settings (they are also parameters, i.e. not the control panel):

There, poke into " Confidentiality -Background applications", where either completely disable all background applications, or most of those that you do not need. Usually their work in the background is not required, but sometimes they eat up a lot of resources:

Internet connection and ping can be optimized.
And look for the rest by tag.
In a nutshell, perhaps something like this.
Let's move on to the afterword.
Afterword
As I said, in fact, these are not all the settings, but they are a certain necessary basis that will make your communication with the system faster, more convenient and even stable in some places, i.e. the question of how to speed up your computer will no longer arise.
As always, if you have any questions, thoughts, additions, etc., please feel free to comment on this post.
The ability to switch to a dark theme has been one of the most anticipated features of Windows. After all, when there is a lack of light, such a color scheme tires the eyes less. Previously, it was possible to set a black interface background to the tenth version of the OS. But the developers listened to users and finally added a simple official method in the Windows 10 Anniversary Update.
When you open Settings → Personalization → Colors, you will see an option at the bottom that says “Choose your default app mode.” If you activate dark mode here, the background of the Windows interface will partially switch to black. The same applies to some standard and third-party programs from the Windows Store.
You can separately enable dark theme in the Edge browser. To do this, click on the three dots in the upper right corner of the program window, then click “Options” and under “Select a theme” select “Dark”.
By the way, if you prefer Google Chrome, you can download the dark theme from the Google store and even install .

Sitting at the computer in the dark, you may have noticed how quickly your eyes get tired. This is because at night the display becomes too bright for a room without sunlight.
Microsoft took care of this problem and added a special monitor color mode “ ” in the Windows 10 Creators Update. It can be configured in Settings → System → Display.
When this mode is active, the system changes the temperature of the colors so that they do not tire the eyes in a dark room.

As you use Windows, residual files and other junk accumulate, which clog your hard drive and slow down the operating system. There are many third-party utilities that solve these problems. But until recently there was no standard solution.
After updating to Windows 10 Creators Update, a message appears in the system, which clears the device memory. You can activate and configure it in the “Settings” → “System” → “Storage” section under the “Storage Control” item.

Windows 10 has a set of standard applications with which you can work with music, videos, web pages and other files without third-party software. For each file type, the system defaults to one of these preinstalled programs (or warns that it is not supported). That's why when you click on a downloaded music track, for example, Windows immediately plays it in the Groove player.
But if you want to replace the standard player, browser and other programs with third-party ones, this is most conveniently done in a special settings section. Go to Settings → Apps → Default apps and here select the programs you have installed that Windows should use by default for various tasks.

The password assigned to the Windows account protects the user’s personal data and settings. This function will be relevant for you if unauthorized persons have physical access to your computer. Of course, if you try hard, you can bypass such protection. But in most life situations it will be quite enough.
You can install it, remove it, or reset it if you suddenly forget, in the “Settings” → “Accounts” → “Login Options” section.

By default, when you launch Explorer in Windows 10, a quick access window opens to your frequently visited folders and recently viewed files. Perhaps this option suits you completely. But in previous versions of OS, Explorer immediately opened the “This PC” section, and there are users who are used to this.
If you are one of them, or you just find it more convenient to immediately see your local drives in Explorer, you can return the old view. To do this, open File Explorer, click View → Options, and under Open File Explorer for, select This PC.

Windows has long allowed you to hide files and folders, making them invisible. This makes it convenient to hide directories with important content so that you don’t accidentally delete anything you need. You can make an object visible or hidden through the context menu: just right-click on the folder or file, click “Properties” and check or uncheck the “Hidden” option.
In addition, for convenience, at the end of the name of each file, the system can display its extension: .exe, .png, .docx or the letter designation of any other format.
By default, Windows 10 does not show items that have been hidden by developers or the user, as well as file extensions. But you may need to display them. For example, to get into a hidden folder or see the format of a photo.
To enable the display of hidden objects or file extensions, open Explorer, click View and check the boxes: Hidden Items or File Name Extensions.

Windows 10 displays notifications like a typical mobile OS. To ensure that you are not distracted by anything unnecessary, you can configure them in the “Settings” → “System” → “Notifications and actions” section. Here you can choose what type of messages will appear on the screen, and set notification settings separately for each application.
In this section, you can also select the buttons for quick actions that will appear on the notification panel. They allow you, for example, to instantly activate the night mode of the display, adjust its brightness, or add notes in OneNote.

Errors in the system or third-party software, as well as incorrect user actions, can cause Windows to malfunction.
Fortunately, there is a mechanism that returns the OS to its normal state. We are talking about a recovery service. It creates a copy of important system components every time you update Windows, update a driver, or install a new program, and saves it to your hard drive. In most cases, you will be able to restore normal system operation from such backups (restore points).
To go to the service settings, enter “Recovery” in the Windows search, click on the result and click “System recovery settings” in the window that opens.
Once on the “System Protection” tab, select your system drive (usually drive C), then click on the “Configure” button and turn on system protection. After this, specify the amount of disk space that will be allocated for storing backups. The more space, the more recovery points you will have at your disposal. When it ends, new points will replace the old ones. After everything click OK.
Now, if the need arises, you can by returning to the “System Protection” tab. To do this, there is a “Restore” button here.
But keep in mind that backups do not contain a full image of Windows, but only important system files.
10. Screen calibration

Windows has a built-in display calibrator that can help you improve color quality. The program will display simple step-by-step instructions. Having done everything as she tells you, you will do it in the optimal way. No special knowledge is required for this.
To launch the calibrator, enter the word “calibration” in the system search and click on the found element. After this, follow the system prompts.
11. Action log settings
The Windows 10 April 2018 Update added the Activity Log feature to the system. With its help, you can see at any time what documents and web pages you interacted with in recent days, and return to working on them. Moreover, the log can display actions not only from the current computer, but also from all other devices connected to your Microsoft account.

To set up your activity history, go to Start → Settings → Privacy → Activity History. Check "Allow Windows to collect activities from this computer" if it was not enabled by default. Then check the box next to “Let Windows sync my activities from this PC to the cloud” if you want data about your current PC to appear on other devices connected to it.

When you're done, click on the icon near the Start icon on your taskbar. A timeline will appear where you can see previously opened documents.
12. System update options
Windows can be annoying with offers to update at the most inopportune times. And sometimes it reboots your computer when you least expect it. To insure yourself against such cases, set up the so-called “Activity Period”. This is the time of day during which you usually work on your computer. Windows will not update during these hours.
To configure the “Activity period”, open the “Start” section → “Settings” → “Windows Update” and click “Change activity period”. Specify your computer work schedule and save changes.