How to recover files on a Windows 7 PC. How to recover deleted files
- Hello admin, answer the question, how to restore deleted files and preferably free program? It so happened that I accidentally deleted a folder with files that I really needed from my computer (from my desktop), and I emptied the recycle bin and now I can’t restore my files in any way. I tried several free data recovery programs, but they recovered almost nothing for me! All this looks like a simple deception, but I just lost time. They also write a lot on the Internet about the DMDE program, although they say that it is one of the best for recovering deleted files and is easy to use, but unfortunately I could not figure it out without your help; when restoring, an error always appears: Free Edition restores up to 4000 files from the current panel only. It would be great if you could give examples of file recovery using this program and help me understand it.
- Hi all. I accidentally formatted an entire partition of my hard drive with all the files and then only realized that the partition I had formatted was not the one I needed, naturally all the files were gone. Is it possible recover deleted files and what program should I use? I tried to use free data recovery utilities on my own, but nothing worked. I want to try to use a paid program, but I just don’t know which one to choose and again I doubt whether it will help, most likely they will scam me out of money and that’s it. I read your article and now I’m thinking about stopping at it.
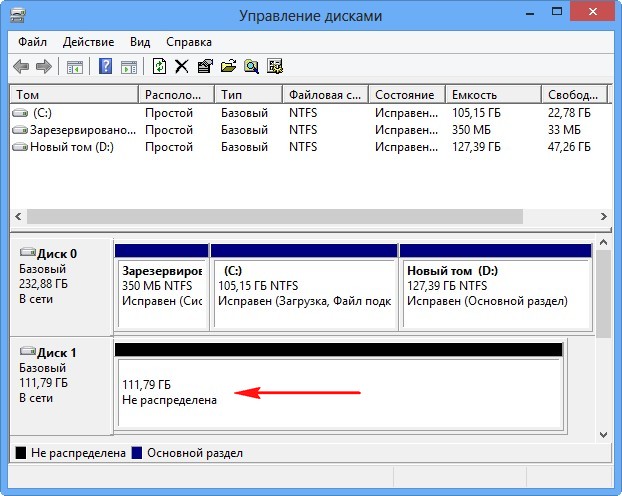
- Please advise, the computer froze and I had to turn it off emergencyly. After turning it on, I discovered that all the partitions (F:), (H:), (J:) on the second terabyte hard drive were gone. In Disk Management all hard drive is defined as unallocated space. What should I do now, restore the entire partition or restore only the necessary folders with files? Please recommend some programs.
How to recover deleted files
Hello friends, in this article we will recover deleted files using the free DMDE program, but it is not the only one of its kind, there are also (separate articles have been published) paid ones, R-Studio, .I will answer the third letter as follows: (read a separate article), but please note, the site has very detailed articles on the topic of restoring deleted partitions, for example - “How to recover a deleted hard drive partition” or “Recovering a lost partition using a program”, and also programs.
The work we have ahead of us will be long and interesting, but before that I want to cheer you up and tell you one funny incident that happened at our work. A computer was brought to our organization on which a folder called “Project” was accidentally deleted from the desktop and urgently needed to be restored. Certainly important files You should always copy it to at least a flash drive, but this was not done. The computer belonged to an engineer from a friendly organization and in this folder there were important documents that he had been working on for a month, the basket was empty. The worst thing is that the employee did not remember when the folder was deleted, maybe it even happened yesterday, but today from the morning until lunchtime he worked in operating system, copied various files and could have completely overwritten remote folder.
Tried to look for the missing folder special program several specialists before us and it was found, but the files in it could not be opened. In short, everything was tried and while people were trying to work magic on unreadable files in the Hex editor, I noticed that in the operating room Windows system 7 had system restore enabled and worked great. Going to the C:\Users\Gocha folder, I right-clicked on the "Desktop" folder and selected "Properties"
and selected “Previous versions of files”, naturally several “Desktop” folders appeared to choose from, one version of the folder was created today by going to this folder

I discovered that it was missing - the “Project” folder, all I had to do was copy it to a flash drive and take it to my neighbors’ system administrators so they wouldn’t have to worry about it.

This is how friends also happen, and even very experienced people can forget about the basics. So if you come across a similar case, first remember about simple file recovery tools and the first thing you pay attention to is " " and " ", do not forget about them.
In the life of any person there are situations when the necessary files are deleted from the hard drive and he naturally urgently needs to restore them. My advice to you is that if the files are extremely important, for example, a sensible (and not as before) plan for the economic development of Russia for the next 15 years, then turn off the computer (preferably emergency), grab the system unit and go to a data recovery service. It will be much easier for a professional to recover your files if no recovery attempts have been made by a non-professional before.
If you decide to recover deleted files yourself, then the first rule is not to restore them to the same hard drive where they were located. The ideal option is to connect your hard drive to another system unit and with another operating system on which data recovery programs are installed and restore files to another hard drive. If there is no other computer, restore deleted files to a portable hard drive or flash drive, or you can use these.
What programs can I use to recover deleted files?
The overwhelming number of users believe that there are a lot of such programs and all of them can really help you get back files accidentally deleted by the recycle bin or restore data on your hard drive after formatting it.
So, friends, I want to express to you my opinion, based on a little experience. There are so many programs that can really help in trouble that you can count them on the fingers of one hand, and if these programs don’t help you, then you definitely can’t do without specialists.
We will recover files for free using the following programs: DMDE, Recuva and the relatively recently introduced R.saver, and we will also recover files paid programs EasyRecovery, GetDataBack for NTFS and R-Studio. How to recover deleted files using DMDE DMDE is a free program for searching and recovering deleted files on hard drives x and flash drives, it can also restore deleted partitions on a hard drive, it works without installation, you can carry it with you on a flash drive. The program has paid and free versions, but I can say that for home needs there are quite enough possibilities free version, now you will see everything for yourself.
And here is the official website of the DMDE program. Download the program, click GUI for Windows,

DMDE works without installation and is downloaded in an archive, unzip it and run the dmde.exe file. The DMDE program has detailed help on working with the program, be sure to read it. Attention! We work and don’t miss anything, I’ll give three examples of recovering deleted files, the first is very simple, so to speak, for warming up, the second is more complicated, and the third is quite difficult, but we can handle it!
Example of recovering deleted files No. 1
My system has two hard drives, the first is a 250 GB Maxtor with my operating system and the second is a 120 GB Samsung hard drive that belongs to my friend. this disk contains two partitions, the first is (F:) with the installed operating system and the second partition under the letter (G:),

There were folders with files on it, and most importantly a folder called “Collection”, it contained films, photographs, documents. So, all the folders were accidentally deleted past the trash can. All this needs to be restored, especially the "Collection" folder

Immediately after launch, the DMDE program asks on which hard drive to restore the files. Select the second Samsung hard drive with the left mouse, then Logical Disks/Volumes on the right, a window appears in which we must select a drive letter. The drive we need is under the letter (G:), select it and click OK.


The DMDE program uses a special algorithm to search for deleted files and, in simple cases, is able to recover such files on the fly without an in-depth search. In this program window, double-click the left mouse on the section (G:) and go into it.

Double-click the left mouse to go to the section (All found + reconstruction),

A virtual reconstruction of the file system is in progress, or in simple words quick search deleted files.

That's all, our files along with the "Collection" folder were found and we did without an in-depth search (which we will use in the next more complex case).

The program found the folders, but now you also need to restore them, check the box for the desired folder and right-click on it, in the menu that appears click “Restore object”

We select in Explorer which folder we will restore deleted files into. I advise you not to save files to the drive from which you are restoring files, in our case (G:), it is better to save the data to a portable USB hard drive, having first created a folder on it. In my case there are not many files and I will save them directly to the desktop. OK.

And the error appears: "Free Edition recovers up to 4000 files from the current panel only"

All this is due to the fact that we are using the free version of the program and we will not be able to restore a folder or several folders with files at once, but it will be possible to restore all files in a folder. To restore, we need to enter any folder and check all the files. We enter the “Collection” folder and check all the files needed for recovery, right-click and select Recover files

In the Explorer window, select a location to save the recovered files, for example, directly to the desktop.
File recovery process


All files were perfectly restored, movies are played, photos are opened, documents are read.


Now let's look at the second example, a more complex method of recovering files.
Example of recovering deleted files No. 2
To check the program's capabilities again. On the familiar Samsung hard drive, I myself deleted all the files from the drive (G:) and then formatted it, copied a large group of files onto it and formatted it again.

We will search for the same folders with videos, photos and the “Collection” folder. Let's launch our DMDE program. The program asks us which hard drive to restore files on. Select the second Samsung hard drive with the left mouse, then Logical Disks/Volumes on the right, a window appears in which we must select a drive letter. The drive we need is under the letter (G:), select it and click OK.
We try a quick search, click on the new volume (G:) twice with the left mouse.

Virtual file system reconstruction.

A quick search yielded nothing; no files reminiscent of the installed operating system were found. Therefore, we return to the “Disk Partitions” window,

highlight our " New volume(G:) and click the "NTFS Search" button
Attention: If your storage media is formatted in file system FAT32, then select the "Search FAT" button

The search for deleted files begins, lasting 20 minutes. In difficult cases, you need to wait until 100 percent of the scan is completed. Pay attention to the "Matches" column; it can be used to assess the quality of file recovery on the found volume. Double-click with the left mouse on the first section,


Click on the section (All found + reconstruction).


MFT reading error - ignore it.


As you can see, the advanced search has borne fruit, but the files found by the program are absolutely not the same. These files were located on this hard drive several years ago and at the moment we do not need them at all. I try to repeat the scan again, but the result is the same.

Friends, I have been using this program for a long time and in one case out of five you will be able to recover files after formatting, we were just unlucky today.
And finally, the third example, very difficult to restore, and the program partially coped with it.
Example of recovering deleted files No. 3
From our Samsung hard drive I deleted all files, then deleted all partitions, this is (F:) with the installed operating system and the second partition under the letter (G:). Then I formatted the hard drive and created one large new volume on it (H:) and copied a large group of files to it, then deleted them, and finally deleted the created new volume (H:). Of course, after this, it will be difficult for any program specializing in data recovery to recover files.
Note: under such circumstances, we can try to recover the deleted partitions entirely along with the files, but we will describe this process in the next article.
We need to restore a folder called “Collection” located on the disk (G:) before formatting. And I also want to restore a folder called “Archive” that was on the desktop, on the drive F:\Users\users\Desktop. Let me remind you that now, instead of our sections (F:) and (G:), there is simply unallocated space.
We launch the DMDE program, there are currently no partitions on the Samsung hard drive, so check the “Physical devices” item, select our Samsung hard drive and click OK.

There is a quick search for deleted partitions,

As you can see, the last found partition fits the size of the disk (F:) with the operating system, let's first try to look for the remote "Archive" folder on it. Double-click on it with the left mouse.

Click on the section (All found + reconstruction).

Virtual file system reconstruction.

The program did not find any files on the fly, go back, click on the “Disk Partitions” button,

select our found “New Volume” and launch a full search for deleted files, click the “NTFS Search” button


As I already said, the "Matches" column can be used to assess the quality of file recovery on the found volume. Let's wait for 100 percent scanning. The full scan took 30 minutes. Let's go to the first section

(All found + reconstruction)


And we see all the operating system files,

Go to the desktop C:\Users\users\Desktop


And we restore our “Archive” folder with all the files in it.

One inconvenient thing about the free version is that it is impossible to restore the entire folder at once; you have to go into the folders and select all the files, then restore them as a group.
Then I scanned all the found volumes and found many interesting files that ever existed on this hard drive, but unfortunately I could not find the “Collection” folder.
As you can see, our program has almost coped with the rather difficult case of recovering deleted files, and even after full formatting. So, in my opinion, the program deserves to be in your service.
If interested, read our next article “How to recover deleted files using the free program “Recuva” and “R.saver”
System recovery Windows files 7 or Windows 8/8.1 is a very interesting topic. Especially if the operating system starts to fail, but we don’t have a recovery image and we forgot to turn on system protection so that recovery points can be created. In this case, we will not be able to restore the system from the image, we will not be able to roll back Windows to the created restore point, and we are also too lazy to reinstall the system, since this will take the whole day. And right here we have another chance to return Windows to normal - try to restore system files. In this article I will try to fully cover the topic so that we can revive our computer in any situation.
1. Recovering system files on a busy system
If our computer somehow turns on, then we do the following. (if it does not turn on, see section 2 of this article)
Open the Start menu. In the search field we write “Com”. On the element " Command line"Right-click and select " Run as administrator»

In the opened command line we write
sfc /scannow
We wait a little
If your system is ok, you will see the following image

If your Windows was broken, you will see the following

System files were successfully restored. We reboot and immediately turn on system protection to create restore points so that next time we can simply roll back the state of the computer to a couple of days ago and that’s it.
It happens that when scanning the system, the sfc.exe utility found damaged files, but could not fix them. In this case, I would restore system files in Safe Mode. If in safe mode read the same last point 4 of this article.
If your computer does not boot at all, as discussed at the very beginning of the article, then read the next paragraph.
If our computer does not want to boot at all, then we use the recovery environment. You can load into it:
- Pressed when turning on the computer F8 several times
- Booting from a boot (installation) disk or flash drive
The first option will work if we have a boot partition that the system created when partitioning the disk when we installed the system. Boot partition size:
- Windows 7 - 100 MB.
- Windows 8 - 350 MB.
In any case, try pressing F8 several times during boot. A window should appear with additional download options. Choose Troubleshoot your computer.
In the next window, select the keyboard input method. Select the language in which you have set the administrator password (if there is no password, you can immediately click Next >).
Select a user with administrative rights and enter a password if you have one. If there is no password, just click OK.
Select the command line.
If you are unable to enter the recovery environment using the F8 key, you will need to boot from the installation (bootable) flash drive or disk. You can boot from disk in the same way. Only in this case you need a DVD-RW (drive for reading optical disks) set the download priority to first place.
I like to boot from removable media using boot menu. IN motherboards ASUS it is usually also called by the key F8.
After booting from a flash drive or disk, I saw the following picture. I choose Windows Setup- Windows installation.
We wait until all installed Windows are found.
We choose the one that does not turn on for us. And here CAREFULLY! We remember the letter that the recovery environment assigned to your system (in the Folder column). I have this D.
Select Command Line.
Enter the command
sfc /scannow /offbootdir=D:\ /offwindir=D:\windows
Instead of D, you substitute your letter. Press Enter and wait for the scan to complete
On the virtual machine where the above screenshot was taken, there was blue screen, so I was not surprised that system files were found and restored.
3. How to find out the drive letter with Windows installed
If you succeed using the key F8 call up the “Advanced boot options” window and select “Troubleshoot computer problems”, then we need to find out the drive letter where Windows is installed that was assigned by the recovery environment. This can be done in two ways
1. Call the notepad with the command
Open menu in notepad File and choose Open…
Left click Computer and in front of you there will be disks with letters.
You can go to the disk and make sure what and where.
2. Use the utility DISKPART
On the command line enter:
diskpart- call the utility for working with disks.
list disk- look through the list of disks.
select disk- I select the hard drive I need.
detail disk- I call up information about this disk.
4. For Windows 8/8.1
If the sfc utility was unable to restore damaged system files, then you need to try to restore the storage of these system files. The place where copies of working system files should be located. As I understand it, it is located at C:\Windows\WinSxS. That is, we must first fix the file storage, and then use the “SFC / Scannow” command to restore Windows system files.
4.1. Recovering storage using Windows Update
1. Launch Windows PowerShell with administrator rights. To do this, open the Start menu or home screen and click on the “Search” icon. In the search box we write “PowerShell”. Right-click on “Windows PowerShell” and select “Run as administrator” or “Run as administrator”.
2. In the window that opens, write
Dism /Online /Cleanup-Image /RestoreHealth
and wait. If the storage is intact or it was possible to restore it using Windows Update, then you will see the following picture.

If Image Health State: Healthy - everything is fine. Reboot the computer and try SFC /SCANNOW again.
4.2. Restoring storage using an image
If we have problems with Windows Update, then this method will do.
1. Download the original Windows image 8/8.1 is the same bit size as your system. How to find out the bit depth installed system - .
2. Connect or mount the downloaded image. Right-click on the image and select “Connect” or “Mount”.

3. In the command line with administrator rights, we look at what editions there are in the image with the command
Dism /Get-WimInfo /WimFile:F:\sources\install.wim
I have 2 editions in my image. It’s hard to understand which one I need based on these distinctive signs. Let's use the first one. If it doesn’t work, the second one.
4. Launch Windows PowerShell with administrator rights and set the command
Repair-WindowsImage -Online -RestoreHealth -Source F:\sources\install.wim:1
where F is the drive letter to which we connected the image, 1 is the Windows edition number in the image.
5. Recovering system files manually
If using the sfc utility it was not possible to recover damaged files, you need to try to do it manually. In this case, you need to additionally run the command
findstr /c:"" %windir%\Logs\CBS\CBS.log >"%userprofile%\Desktop\sfcdetails.txt"
Findstr/c: ""%Windir%\Logs\CBS\cbs.log>sfcdetails.txt
and carefully study the file sfcdetails.txt on your desktop or %windir%\Logs\CBS\.
It should be something similar to the picture below.
After the name damaged file known (Accessibility.dll), look for it on another computer with the same system as yours. If this is not an option, then I would download the original Windows image and install it on the virtual machine. I found the file I needed and copied it to a bootable or installation flash drive. Then, from this installation flash drive, I booted into the recovery environment and launched the command line. From the command line I would open notepad. I opened the menu File > Open - and now I have an almost full-fledged explorer. We copy and replace the working file from the flash drive, reboot and everything should work.
If you have the option of installing virtual machine does not fit, then you can include the install.wim file in the folder. Then go to this folder and copy the necessary files.
1. Create a folder. For example, “Win8.1Pro” in the root of drive D.
2. Copy the install.wim file to the root of drive D.
3. Mount the install.wim file into the created folder.
Dism /Mount-Wim /Index:1 /WimFile:D:\install.wim /MountDir:D:\Win8.1Pro
Go to the created folder and copy the necessary files.

Disable the image
Dism /Unmount-Wim /MountDir:D:\Win8.1Pro /Discard
Important: This article is intended for the case when the computer is configured with standard backup in Windows 7.
Recovering files from Windows shadow copies
Have you ever discovered that a file you needed has been deleted? That some time has passed and the file has disappeared somewhere? Of course, there can be many reasons for this. But, usually at such moments, the first thing that worries us is another question than the reason - “How to restore it now?” If you are a regular reader of the site, then you probably have backup programs installed and configured that will allow you to restore the missing file.
But what to do if you don’t have such programs, or it’s too late to restore, since the program synchronized the copy with the original and erased this file. What then? Of course, you still have the opportunity to use programs to recover deleted files, but usually this is a rather lengthy procedure that should only be used when there are no other options left. So where should you start?
If you have set up a standard Windows backup via the Backup and Restore interface (see link), or you have created restore points, then you still have the opportunity to relatively quickly restore a deleted file. The fact is that Windows 7 creates so-called “shadow copies” of files that are accessible from the “previous versions” interface. These shadow copies store not just one copy of a file, but several previous versions of it. It is this fact that allows you to use the following two methods.
Recovering a deleted file from a shadow copy of the parent directory in Windows
- Follow the procedure described in the previous article (at this link) to open a list of previous versions for the folder that contained the deleted file
- Select the previous version of the directory so that you are sure that the file was exactly in the directory at that moment. Otherwise you will have to iterate through versions until the first successful one
- You can click the "Copy" button to save an entire copy of the folder and restore the deleted file from it. If you click the button, a dialog box will appear in which you need to specify a location to save. But, you must understand, such an operation may take time if the directory takes up a lot of space
- You can also click the "Restore" button so that all files in the folder are rolled back to the selected version. But keep in mind that this may change other files
- If you are not satisfied with both of the previous options, then you can click on the “Open” button, and the entire list of files of the selected backup will open to you. You can drag or copy the remote file wherever you need it
- After you restore the file using one of the methods, close the dialog box
Recovering a deleted file from a shadow copy by its name in Windows
- Create an empty file with the same name and extension as the remote file and place it in the source directory. File contents don't matter
- Right click on an empty file
- In the context menu, select "Properties"
- Go to the "Previous Versions" tab
- If you're lucky, the entire list of backup copies of the deleted file will appear in front of you. In this case, it all depends on the circumstances
- Select the one you need backup copy(probably the most recent one) and click the "Restore" button
- Close the dialog box
Both of these methods can be used. The only thing you must understand is that the restored file will not necessarily be the latest version, since backups do not occur constantly, but at certain points in time.
- Windows updates (hotfixes) are not installed? The .Net framework cleanup and repair utility can help
Technical Tips
After a file has been deleted and placed in the trash, sometimes there is a need to restore it. Fortunately, Windows developers They almost always anticipate the user’s wishes and try to equip the system with everything necessary to be able to independently solve most of the system’s problems. Thus, Windows 7 provides a number of options for data recovery.
Recovering deleted files from the Recycle Bin
If required file accidentally went to the trash (we just deleted it - either from the context menu, or by pressing the Del key), it’s too early to start panicking. In this case, everything is simple: open the Trash on your desktop Windows desktop 7, look for the required document in it, right-click and select “Restore”. Now we can see this file in the same place from which it was deleted. Select the “Recover” item from the context menu of the desired file
Everything becomes more complicated if after easy removal data, we emptied the trash out of habit (so as not to take up disk space). In this case, the file will be available for some time in a so-called “shadow copy”.
 We are interested in the item “Restore previous version”
 Windows 7 offers several versions of the folder
Attention! Restoring from the “shadow version” is only possible if you have not manually disabled Windows protection and the “System Restore” function is running on it. “Shadow versions” are created automatically by the system itself when any changes are made to it. To create “shadow” copies, the user himself does not require additional actions.
This algorithm works for any type of information - be it photos, documents, videos, music and others.
Folders are also retrieved from the Recycle Bin in the same way, only when restoring from a “shadow” copy we access the versions of the “parent” folder - the one in which the restored folder is located.
And one more method from the “Seven” operating system.
 Browse by category and select the desired item
 We need the item “Recover files from archive”
Important! This method will only work if you have archiving configured and the archive itself is available (from where you will restore the file).
What to do if standard methods don't work
Unfortunately, standard means not always enough to return information. Here they come to the rescue third party utilities. To the user's delight, worldwide network there are more than enough of them.
The most common:
Among the features: Recycle Bin recovery, return of “permanently” deleted files and folders, and the most interesting thing - previewing files/folders before recovery to make sure that it is exactly what you need.
The application is nothing special, still the same functionality. Only the interface is of interest - it reminds everyone of the well-known Total Commander and intuitive.
Using this program already requires certain skills. So, for example, it is advisable to disconnect the hard drive of your computer and search for the necessary documents from another computer. For an example of working with this program, see the link at the end of this article.
Detailed information on each program and its installation file you can find it using an internet search.
How to recover a deleted program on Windows 7
Let's make a reservation right away - a miracle will not happen. That is, if you “demolished” the program, it’s easier for you to simply reinstall it. This is not difficult, especially if the installation file is saved or your “victim” is freely available on the network. Seriously. Just reinstall. Don't want to? Okay, then let's talk about the nuances.
There is no means for a simple return. What we will be describing is correctly called “restoring Windows 7 to a checkpoint.” If, after deleting the program you need, you managed to install some other utilities on your computer, then when you restore the deleted one, you will lose them. Simply put, we will try to return the operating system to the state it was in before removal.
Another nuance - the method may work, or it may not. This is determined by the system itself, and here we are powerless. I repeat: if there are no serious reasons (such as failures in Windows work), then just reinstall the program. If restoration is still necessary, then we work on the points:
 Select the first item on the right and click Next
 On the left we see dates, on the right - details of points
 We carefully read the information presented in the window and if we are satisfied with everything, click “Next”
How to restore a deleted user
Mostly deleted user necessary due to the remaining data in the profile. All the necessary data can be found on drive C, namely along the path: C:\Users\<Имя удалённого профиля>. Here you will find folders with photos, videos and documents, as well as the Desktop and everything that was on it.
If you still want to restore not only the data, but also the account, use universal remedy“restoration” of the system described above - “restoring Windows to a checkpoint.” Among other features, this operation also restores lost accounts.
How to restore the service
Everything here is simple and at the same time sad - a deleted service cannot be restored by anything other than reinstalling the entire system. Moreover, if you remove a service, it may cause several services associated with it to fail and cause Windows to crash.
Removal system services- guaranteed “kill” of the system.
Don't even think about deleting a service unless you are absolutely sure that you know what exactly it does!
Recovering system files
First of all, restoring system files is possible using the same procedure as restoring a deleted program. If this does not help (for example, you have manually turned off Windows protection 7 and rollback is impossible), then we try other means.
The method described below is suitable if your system starts. If not, we say right away, contact a specialist.
Go to the Start menu. In the search bar, type in “Command Prompt”, which you can right-click to open as administrator. At the command line itself, you need to enter sfc /scannow and wait.
Now we have two options for the development of events. In the first case, the following will be displayed on the computer screen:  The image on the screen indicates that system files Everything is fine
This means that everything is fine with you, there is no need to restore anything in the system itself.
The second option is Windows 7, which actually has problems.  In this Windows case 7 found all the errors and corrected them
However, your intervention is not required - the system itself detects errors and corrects them itself. After this, as we see on the screen, the operating system asks to reboot. Let's reboot. Done - the data is restored.
Video: how to recover deleted programs on Windows 7
Any changes made to system files, services and Windows users, you do at your own peril and risk - remember this. You should not get involved in the work of a stable functioning system without extreme necessity and appropriate skills. If a failure still occurs, please refer to the article. Remember - everything that you cannot do yourself will be done by a specialist. I wish you stable work in Windows!
Hello dear readers. Today we will talk to you about how to recover deleted files in the Windows 7 and 8 operating system. We will recover information using the completely free Recuva program, which you can download by following the link and clicking the button "Download". This program is widely known to users because it scans disks and removable media very well, thereby most likely finding lost data. In this article we will tell you how to work with Recuva program. The main thing that is required of you is patience. In the matter of file recovery, the main thing is not to rush and do everything correctly, as we tell you.

One of the main advantages is that this program is completely free and has a very convenient, intuitive interface. As for free analogues, Recuva copes very well with the tasks assigned to it.
Let's figure out together how to use it. But first you need to install it, and it is advisable to do this immediately after you installed Windows, and not after data loss. Since during the installation process this program may replace the lost file, and its recovery will be impossible in the future.
There are several features to the installation process. Let's look at them. After you have downloaded the program, launch the inhaler and select the Russian language. Click "Next".

This will be followed by the standard installation step. At one of the installation stages, you will need to select the type of files to be recovered “All files” so that the program can perform the search as efficiently as possible.

Then you need to indicate the location from which you want to recover the files, if, of course, you remember where from. If not, then you just need to select the “Not known for sure” option and click “Next”. One distinctive feature of this program is that it can recover files from optical media (even with very poor coverage).

Then it is advisable to enable in-depth search for better scanning and search for deleted information. This item is especially useful if the media has been formatted several times. Click “Start”. After which the scanning process begins. If you know exactly where the deleted files are located, then immediately click “Cancel” during the scanning process. We will search for files with an exact indication of their location.

After you click “Cancel”, the main program window will open in front of you. In order for you to have access to the selection menu, you need to go to the “Advanced Mode” tab.

Now let's figure out how the program itself works.
Working with the program
In order to demonstrate to you how the program works, I will create a folder with the Coursework file on an empty flash drive.

Now let's format the flash drive. Let's assume that we formatted it by accident, and we have to submit the coursework tomorrow. We desperately need to restore this file. To do this, go to the main program window and select the media from which to recover information. In our case, this is a flash drive. Then click the “Analyze” button.

If nothing is found, you will be prompted to conduct an in-depth analysis. We agree. An in-depth analysis may take you from several minutes to several hours.
After the scan is completed, you will have access to a list of all the files that were ever on the flash drive. Including our course work. Then you find the file you need, check the box next to it and click “Restore”.
Important Note: Never restore a file to the location from which it was deleted: this may lead to it being lost again (especially when it comes to poorly performing or faulty hard drives).

If this program does not find your deleted file, you can use other analogues, which you can read in more detail. As our long-term practice shows, for free analogue The program does a very good job. When scanning some media, Recuva found files that had been deleted more than a year and a half ago. Yes, let her scan for a long time, but if it concerns important documents, then we agree to wait. By the way, if you don’t mind 27 dollars, then you can purchase the paid version, which copes with the tasks assigned to it much better and is also much faster than the free version.
Finally, we invite you to watch a video on the topic of file recovery using the Recuva program.
Let's summarize:
Today, dear readers, you learned how to recover deleted files in Windows and got acquainted with the very useful and free Recuva program. which will become yours an indispensable assistant in the matter of information recovery.
| Authors of the article: Gvindzhiliya Grigory and Pashchenko Sergey |


