How to recover deleted folders from a flash drive. How to recover files on a flash drive? How to recover information on a flash drive
Hello friends, in this article we will look at how to recover deleted files from a flash drive or how to recover files after formatting a flash drive. I often have to deal with this problem and I want to tell you how it can be solved. The article is long and detailed, since I sincerely want to help users recover deleted files.
It is important to know that files on a flash drive may be inaccessible for two reasons:
1) Infection of the contents of the flash drive with a virus. In this case, your files on the flash drive are intact, but they have been modified by a virus program, and the virus has assigned them the “Hidden” attribute. In this case, we check the flash drive with an antivirus and remove the malicious program, then remove the “Hidden” attribute from the files. We do everything quickly and clearly (details later in the article).
2) Second reason. In fact, your files were deleted from the flash drive for some reason. Usually, users themselves delete files on a flash drive, for example, format the flash drive, but then remember that it contained the necessary information. In this case, you need to resort to free or paid program on recovering deleted files, in this article we will recover files deleted on a flash drive using several very good similar programs. Now about everything in detail, but at the beginning of the article there is a letter from our reader Sergei.
How to recover deleted files from a flash drive, disappeared in a rather strange way. My story goes like this: I inserted a flash drive into a friend’s laptop and copied necessary information, then I came home and connected the flash drive to my computer and was very surprised, my antivirus was alarmed and immediately removed ten viruses from the flash drive. Then I went to the flash drive and did not find a single file there. I read on the Internet that you need to restore deleted files carefully, using some special program and in no case to the damaged flash drive. And I also read that it is quite possible that the files were not deleted, but simply due to an error or virus infection, they were assigned the “Hidden” attribute, this attribute needs to be removed by running some kind of “batch file”. Tell the admin, what should I do and where to start? I myself tried to use two programs to recover deleted information on flash drives, but unfortunately I didn’t find anything other than garbage on the flash drive.
How to recover deleted files from a flash drive
This information will be useful to all people who, even if not often, deal with a computer and flash drives.
How to recover deleted files from a flash drive using the free DMDE program
How to recover deleted files from a flash drive for free using R.saver
How to recover deleted files from a flash drive using the free Recuva program
How to recover deleted files from a flash drive using the program Ontrack EasyRecovery Professional
If you have lost all the files from your flash drive, then it is quite possible that the flash drive is infected with a virus, the first thing you need to do is check it with an antivirus, even if your flash drive is cleared of viruses, the files will not appear immediately, first you need to enable the display of protected system files in your operating system settings files and hidden files and folders.
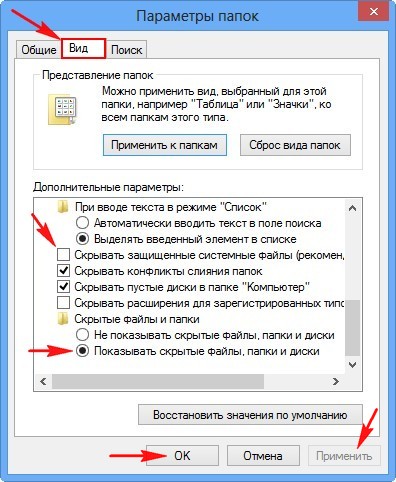
Enter the "Computer" window, then select "View" - "Options" "Change folder and search options"

uncheck the box "Hide protected files" system files" and vice versa, check the item "Show hidden files and folders", then click "Apply" and "OK".
Now we go to our flash drive and see that all the files and folders are there, but have a translucent appearance, which means the virus has assigned them the “Hidden” attribute and needs to be removed; this can be done using a hacker method.

We will do some simple programming, create a “batch file”, then copy it to the root of the flash drive and launch it there. Many people think that this is very difficult, but it is not. "Batch file" is a bat file - the simplest type executable file containing a sequence of commands, now you will see everything for yourself.
Open notepad

and copy the following information into it attrib -s -h -r -a /s /d then save the file with the extension .bat.
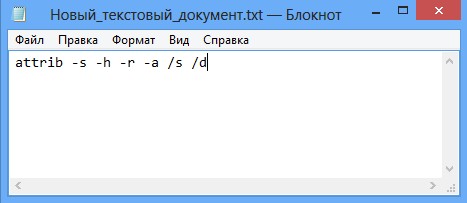

We ended up with a file like this. Now we copy it to the root of our flash drive and double-click the left mouse to launch it. After a few seconds, we go into our flash drive again and see that all our files are in place and without the unnecessary “Hidden” attribute.

It’s another matter if, after all the above manipulations, your files were not found on the flash drive, then the files were really deleted and need to be restored. How to do this?
What to do if the files from the flash drive were actually deleted?
Note: please do not restore deleted files to the same flash drive where they were located, the deleted files will be overwritten and if the result of the recovery is not satisfactory, then restoring the deleted files on the flash drive again will be much worse than the first. Recover files to free section your hard drive or a portable USB hard drive.
Friends, there are a great many programs for recovering deleted files from a flash drive, but only a few of them can actually help you, here are some of them.
For example, I will delete all the files on my flash drive and then format it. That's it, there are no files.


The flash drive contained media files, photos, text files, software installers and ISO image With operating system. After this, I will try to recover deleted files using programs: DMDE, R.saver, Recuva, Ontrack EasyRecovery Professional, R-Studio.
How to restore deleted files from a flash drive with DMDE program
The very first program that we will use to recover deleted files from a flash drive is DMDE.
A fairly serious and reliable program from a domestic developer called DMDE is capable of recovering deleted information from various storage devices, including flash drives. In addition, the program can !
Go to the official DMDE website http://dmde.ru/download.html

and download the program in the archive and unzip it. DMDE works without installation. Let's launch it. In the initial Select device/disk (physical devices) window, select our Corsair flash drive and click OK.

Happening quick search deleted files on a flash drive, it is often possible to find files on a flash drive and restore them. Select the space of our flash drive with the left mouse and click on the Open volume button.

In this window, click (All found + reconstruction).

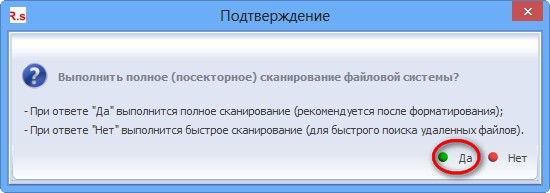
We agree to virtual reconstruction file system.

The right side of the program window displays the files found by the program. If nothing is displayed, expand the $Root folder located on the left side of the window. If you have found the file you want to restore, right-click on it and select Restore Object from the menu. Then select in the Explorer window where exactly you want to save the recoverable file, for example on your desktop. That's it, your file has been restored. Unfortunately, the free version of the program will not allow you to recover an entire folder of files; you will receive the following error. So that life does not seem like honey, you will have to restore files one by one or buy a program. But we can restore one at a time, as long as the program finds the deleted files.
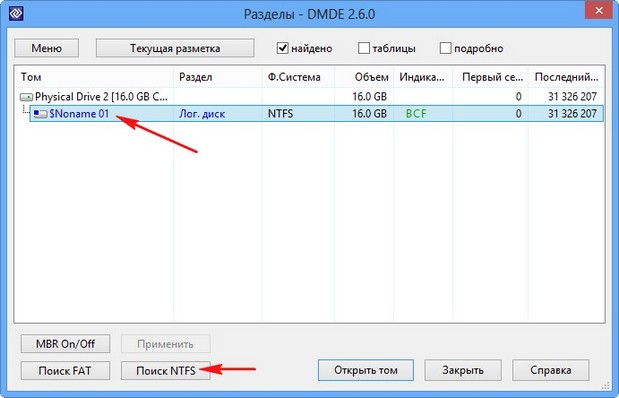
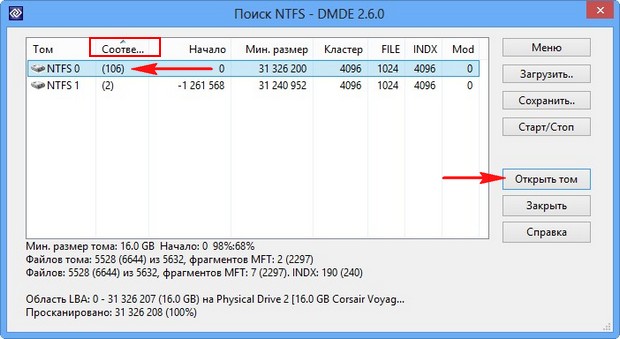
In our case, a quick search did not bring any results, so we use a detailed search. Click on the "Disk Partitions" button

Select our flash drive with the left mouse and click the “Search NTFS” button.
Search.
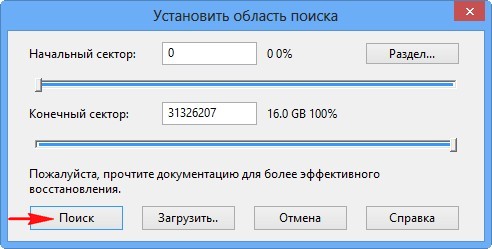
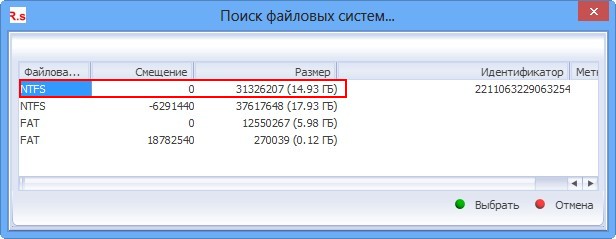
A detailed search will begin, which may take a little longer than a quick search, but the result will naturally be much better. The search reached 100 percent and lasted 20 minutes on a 16 GB flash drive. We look at the “Matches” column, it is used to assess the quality of file recovery on the found volume. Double-click with the left mouse on the first section.
Let's save the search log just in case.

Click again (All files + reconstruction).
Virtual file system reconstruction. OK.
Friends, DMDE found all the deleted files on the flash drive. As you can see, all found folders are marked with different icons: red dots, crosses, and so on. What does this all mean?

For example, a red dot on a yellow folder tells us that the folder contains deleted files that can be recovered. More full description shown in this diagram or the developer’s website http://dmde.ru/manual/filepanel.html

But finding deleted files is not enough; the program still needs to restore them, so that they are in working order. Let's try to restore them, as I already noticed, it will not be possible to restore the entire folder at once, we will get the following error:

This means we go to the desired folder and restore all the files one by one. Right-click on the required file and select "Restore object".

We choose where exactly we want to restore the files, for example, directly to the desktop.


The result is that 90 percent of the files on the flash drive have been recovered, and almost all of them are in working order. I'm happy. But one thing is inconvenient, free version You cannot restore files in groups. How to recover deleted files from a flash drive using R.saver
Good too free program from a serious developer of similar programs, UFS Explorer, is capable of recovering deleted files from various media and flash drives, among others. Go to the official website of the R.saver program and download the program in the archive.
http://rlab.ru/files/Download/logicheskoe_vosstanovlenie_dannyh/R.saver/

R.saver, like the previously discussed DMDE program, works without installation, unzip the archive and run the program.
A quick scan of all drives occurs. We see that the program has found one partition on our Corsair flash drive (volume 14.93 GB), right-click on it and select “Search for lost data” or “Recover after formatting”.

We answer “Yes”, since we want to perform a full scan of our flash drive for the presence of deleted files.
The file system is being reconstructed.

Then the file system is reconstructed based on signatures using the IntelliRAW algorithm.

If you selected “Recover after formatting”, then this window will appear in which you must select a partition that is suitable for your flash drive, usually this is the very first partition.
And here is the result, in the left window of the program you can see all the folders found by the program, and in the right their contents. I can say that the program worked just as well as DMDE. Almost all the information of interest was found.
Unlike DMDE, the R.saver program saves files much more conveniently, select the desired folder, right-click on it and select "Copy to..."

Explorer opens, choose where to copy, for example directly to the desktop, click Select.

The recovered files are copied to the desktop.

All files that were restored to working order. Draw your own conclusions, friends. How to recover deleted files from a flash drive with Recuva Not our program, the bourgeoisie came up with it, but it was translated into Russian. Recuva pretty simple program With a minimum number of settings, a novice user can easily cope. Go to the program website http://www.piriform.com/recuva/download/standard
Download and install.


If you want to recover different files, select "All files".
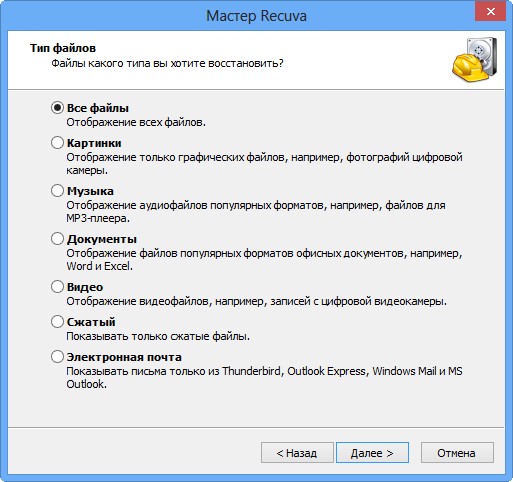
Check the box "In the specified location" and click Browse, select our flash drive.
There are situations in life when, after deleting several files from a portable USB drive, you remember that they were needed. Data may disappear from the flash drive for another reason, but this is not that important. About necessity backup storage People often forget their documents. What to do in such a situation? Deleted documents can be very necessary for work, and even a person’s fate may depend on their disappearance. Don't despair, you can try to recover the data. In this article we will analyze three utilities and other methods for returning files deleted from a flash drive.
Important points before starting file recovery
- At the moment when you discover that you have deleted the documents you need, do not touch the flash drive until you begin to take actions to restore it. Do not remove the flash drive from the computer and do not write new data to it.
- You should know that deleted documents do not disappear immediately and irrevocably. In the file system, these are marked as “writable.” This is done for the convenience of the user, so that if after deletion you decide to record the same document again, you do not have to wait too much time. Such melons can be easily restored from memory using any resuscitator software.
- The more information you managed to write to the flash drive after deleting the necessary data, the less likely it is that you will be able to get the required documents back. This is because documents marked as "overwriteable" have lower priority than those you write. Gradually, old, already deleted data will be replaced by new ones.
- Under no circumstances should you install recovery software on the same media from which you want to start “pulling out” erased documents. Make all installations on hard drive computer or some other removable device.
Reasons why files may disappear from the media
- Deleting a file by the user. One of the most common reasons. A user may inadvertently delete the wrong files or delete the necessary ones along with others. In order to return files that have disappeared due to the user’s fault, you need to use a special utility. How to do this is described below.
- Flash drive infected with virus. The most common reason. An antivirus will help you deal with this problem. With its help, you can scan a flash drive, remove viruses, and the data will return to its place.
- Formatting a flash drive. It’s quite a difficult situation, but it can be dealt with with the help of resuscitators.
- Damage to USB flash drive. The most difficult situation is if your device is broken. Only specialists in the field will help you recover from such a flash drive. service center. It is almost impossible to repair a flash drive on your own at home.
Reason 1. Deleting documents by the user himself
Unformat program.
Using a utility like Unformat, you can recover documents that you deleted yourself.
Download this software can be found in the search, just write Unformat.
- Open the application
- Open the "Physical devices" menu.
- In the drop-down list of devices connected to the computer, find and select your USB device.
- Click on the "Next" button.

- The search process will begin. Wait for it to complete.
- Click on the “Show deleted data” item.

- The documents you deleted will be displayed in the bottom menu.
- Select the ones you need using the left mouse button, and then click on the “Recover to...” button.

- In the new window, select the location where the recovered data will be located. Do not choose a flash drive from which to recover data!
- In the same way, you can extract from memory all the other files that were discovered.
In the process of recovering deleted data, you do not need to rely only on software from one developer. This utility has enough capabilities to restore documents quite effectively, but after returning them they may be partially damaged. What does this mean? Data may not open properly, images may be partly displayed, or video files may be delayed or interrupted in playback. Some of the documents may not be found. Therefore, we will tell you about another recovery solution that is worth trying if this option does not help. Its name is Recuva.
Recuva – powerful software for data recovery. It has a paid version with extended functionality. But you can download it from the Internet for free.
After starting, you need to follow the instructions:
- Launch Recuva.
- A window will open:

- Select the types of documents you want to return, then click Next.
- Select the first item and click “Next”.

- Click “In a specified location”, open the file system overview and find your device in the drop-down list, confirming your choice by pressing the “OK” key.

- Click Next.
- A new window will ask you to enable in-depth directory analysis. First, perform a data check without enabling this option. And only if the required documents are not found, repeat steps 1-8 using this function.
- Click "Get Started."
- Unlike the previous solution reviewed, this software searches for files much faster. Once the search process is complete, it will display the files as follows:

- Check the box next to the files you want to recover.
- Select "Restore".
- Select the folder where you want to place the newly discovered files. Under no circumstances should you choose the flash drive you are currently working with!
- After the file recovery process, the software will provide you with a report on the work it has done in the following form:

- This completes the file recovery process.
Option 2. The flash drive was infected with a virus
There are types of viruses that hide your files. They are not deleted, but you cannot see or use them. To remove these malware We recommend using free software for non-commercial use from Dr.Web called CureIt!.
You can download it here: https://free.drweb.ru/download+cureit+free/?lng=ru
After downloading and installing the program, follow these steps for treatment:
- Launch the program.
- A window will open asking you to participate in the Dr.web CureIt improvement program. In the free version, further use of the program is impossible without consent. Agree and click the “Continue” button.
- In the next window, select your flash drive to scan.
- Click "Start Scan".
- After the scan is completed, the program itself will cure the data that was affected and restore previously hidden data for your use.
Reason 3. The flash drive was formatted
This reason is perhaps the most difficult to solve. To recover data from a completely erased flash drive, we recommend using the RD utility Partition Recovery. This is one of the few programs that can cope with such a broad problem.
Download: https://recovery-software.ru/downloads
To work with it, follow these steps:
- Open the program.
- Select your flash drive from the list provided.

- In the next window we will be asked to select the scan type. Since we are dealing with a complete wipe of the flash drive, we will need a deep scan. Select the full analysis option and check all three boxes:

- Select the drive and folder where you want to save the found data. Under no circumstances should you choose the flash drive from which you are currently restoring files! Click Next.
There are many ways to recover files different ways, many programs have been developed for this. Which one to choose is up to you. Each of them can be handled by anyone, even a novice PC user. We are confident that you will be able to recover your lost data!
Files on USB flash drive may be damaged for various reasons, for example, due to viruses or improper removal of the flash drive from the computer port. In this article, we will share three ways to recover files from a damaged USB flash drive.
Nowadays, people use USB flash drives instead of CD/DVD drives. This is a fast and convenient way to transfer files between different devices. However, due to viruses or improper removal of the USB flash drive from the computer, the data on it may be damaged. Some of them may not work properly, while others may not be available at all.
1. Assign a new letter to the USB flash drive
If the computer cannot recognize the USB flash drive, you can try assigning a new letter to it. This method helps many people. Plus, you don't need third-party programs to recover files.
1. Insert the USB flash drive into your computer. Then right-click on the My Computer shortcut and select the Manage option.

2. From the menu on the left, select the option called Disk Management.
3. Here you will see all available hard drives, as well as a connected USB flash drive. Right-click on the flash drive and select the “Change drive letters or drive path” option.


That's it! You have assigned a new letter to the USB flash drive on your computer. Now you can try to open it and check the files. If this method does not help, read on to see how you can recover files on a damaged USB flash drive.
2. Recover files on a USB flash drive using CMD
1. First of all, insert the USB flash drive into your computer. Then click Start (or Windows key on your keyboard) and enter "CMD". Now right click on the program " Command line", and select "Run as administrator".

2. Now type the following command “Chkdsk h: /f” (without quotes), where “H” is the letter of your USB flash drive. This command will start checking files and folders on the flash drive.

3. After the process is completed, you will see the verification result as in the image below.

4. The screenshot above says that my USB flash drive is working fine and no damaged files were found.
By the way, if you don't see the files on the USB flash drive, you can try entering "." (dot without quotes) in the search field in the upper right corner, and press Enter.
3. Recover files on a USB flash drive using EaseUS Data Recovery
EASEUS Data Recovery Wizard Free Edition is a free program for recovering data on digital camera memory cards. You can also use it to recover deleted, damaged or formatted files on any kind of memory cards, including USB flash drives.
1. Download and install the EaseUS Data Recovery program on your computer under Windows control. Launch the program.
2. Now you need to select the file types you want to recover, such as photos, documents, etc. Click the "Next" button.

3. Select the drive on which you want to recover files (in our case, it is a USB flash drive), and click the “Scan” button.

4. Once the scan is complete, you will see all the files that can be recovered. Click the "Recover" button to get your lost or damaged files back.

That's it! Using one of these methods, you can recover files on a damaged USB flash drive. I hope you liked our article. If you have any questions, write in the comments below.
When connecting a flash drive to a computer and during further work, a nuisance may arise such as complete or partial deletion of data from the flash drive. A number of aspects can contribute to this outcome: a possible virus or Trojan that destroyed the data, or incorrect actions of the user himself. We will not delve into all sorts of reasons, but will move directly to recovering deleted files from a flash drive.
After deleting data, it is important to know that it is highly not recommended to perform any manipulations with the flash drive. This means that you do not need to copy new files there, delete old ones, or create folders on the media. The fact is that after performing the above actions (especially after downloading new files), the likelihood of recovering lost files is significantly reduced. If some operations have nevertheless been performed, you can try to revive the files using the methods described below. But the chance of positive success, as mentioned above, will be much lower. File recovery can only be done using third party programs, in regular Windows tools there is no such possibility. One of the programs that can recover lost files is the Recuva utility. It is free, and thanks to it you can return files of any format. After launching it, select the “All Files” item and click on “Next”.


After the recovery procedure has been completed, you can, of course, make changes to the flash drive. In some cases, it is recommended to use several programs at once to increase the efficiency of searching and resuscitating the desired file.
More and more people prefer to store photos from family holidays, work documents and other important data on flash drives. The owners of these USB drives are confident that this way the information will be safe and will definitely not be lost anywhere. Unfortunately, modern viruses can harm not only your computer, but also any removable media. If you encounter this problem, the good news is that the information can be saved. From this text you will learn how to recover deleted files from a flash drive in the PHOENIX program.
1 step. Install the program
First, you need to install it on your computer. The download will take literally a couple of seconds, since the size of the distribution is only 10 megabytes. Double-click to launch the installer and follow the instructions that appear on your computer screen. Select the folder to install the software, study the license agreement and, for convenience, immediately send the program shortcut to your desktop.
Step 2. Select drive
Launch PHOENIX. In the program's start menu you will see information about which devices it supports. Click “Next” to proceed directly to data recovery. Select the flash drive from the list of drives. If the list shows only local disks, then make sure you connect the USB drive to your PC, and then click on the “Update disk list” button. After this, the flash drive should appear in the list, and you can proceed to the third step.

Step 3. Specify operating mode
The program provides two scanning modes - quick and advanced searches. Both of them are suitable even for inexperienced user, who accidentally deleted a file from a flash drive. You won’t have to think long about how to recover data, because the program will do almost everything for you. Just follow the prompts that appear on the screen.
 Operating mode selection
Step 4 Set up your scan
To speed up the search process, indicate exactly what types of files are missing from the flash drive. PHOENIX can restore any images, text documents and tables, video and audio files, archives, HTML, PHP and other information. It will also be good if you remember the approximate file sizes. Select the appropriate option from the drop-down list or enter the required values manually. Ready? Start the scan and wait until it finishes.
 Scan Settings
Step 5 Recover files
After a couple of minutes, the test results will appear on the screen. You will be able to familiarize yourself with all the data found that PHOENIX considered suitable for recovery. If necessary, you can change the report type: customize the sorting of files, as well as their display. If you want to get more detailed information about an object, select it and click “View”. This way you can find out the file size, the likelihood of its recovery and other data.
 Table of deleted files
 View file information
Check the boxes next to all the items you want to return. Click "Restore" and select your preferred saving method. You can save the information on your computer's hard drive, burn it to disk, or upload the recovered data to the Internet via FTP. Just click on the desired item and follow the prompts on the screen.
 Selecting a file recovery method
PHOENIX is universal program to recover deleted or damaged data. With our application you can quickly, flash drives, hard drive and any other storage medium in just a couple of minutes. Download the software and save valuable data right now!


