How to install windows 8 from hard drive. How to install Windows directly from a hard drive using different methods? Installing Windows on this disk is not possible GPT: Video
Greetings, friends.
Probably every computer or laptop user has encountered a situation when he realizes that it is time to reinstall the operating system. This is due to difficulties in work, frequent mistakes and other unpleasant moments. But what if you don’t have a USB flash drive, a plastic disc to burn the image on, or the drive refuses to work? No need to worry. Today I will tell you how to hard drive install Windows. Many people don’t even suspect that such tools even exist.
It must be said right away that this option is only suitable for operating systems that are in working condition, since many movements will need to be made using the shell. That is, if you suddenly have blue screen– this method will not help.
Additionally, it is worth noting that this guide should only be applied to future installations of Windows 7 and newer versions. Moreover, it does not matter at all on what device the operation is performed. Therefore, it will not be possible to place Windows XP on a computer or laptop in this way. Because other mechanisms are used there.
For the procedure itself we need several tools:
A program for working with images - usually this DAEMON Tools . Personally, I generally use the built-in capabilities of Win.
Utility EasyBSD.
The very image of the operating system.
Step by step instructions( )
Important! It is advisable that before this moment your hard drive has already been divided into at least two partitions - for the system and files.
So, to install Windows 8 from an HDD, you need to perform a number of steps. First, create a separate section for installation files:

Now, to install Windows 10 or an earlier version, you need to properly prepare the files themselves:


Now you need to do this, the computer understands where it needs to boot from. This is exactly what the app is for. EasyBCD. The order of actions is as follows:

If in some situation you don’t understand something, you can just watch the video:
If you select "", you will see whether the entry appeared or not. In your case it should already be in place.

After the work has been done, close the application and restart the computer. As a result, a menu should appear from which users can select the desired system. Then specify the installation disk "". As a result, the standard operating system installation procedure should start.
Bootice( )
The last chain of actions can be performed via Bootice. The program allows you not to create an additional disk, but installs everything from the existing one.
We do the following:

It is worth noting that there is no need to indicate exactly where the file responsible for the correct loading of the system is located, since the application will find it itself.
Installation( )
This method does not require setting boot parameters through the BIOS, as is the case with using a plastic disk or USB drive. This approach is useful if suddenly the buttons on your keyboard do not work, allowing you to get to the right place.
In general, regardless of the version of the future OS, the process is almost the same.
It is important to remember that it is best to have one hard drive connected before starting the process. This will simplify the partition selection process. In addition, the equipment will consume less resources, which will generally have a positive effect on performance. Therefore, you should not install the OS on another hard drive this way. The same can be said about placement on an SSD. Of course, if each action is performed correctly, no problems should arise. But even with the slightest mistake, there is a possibility of losing all the data on any of the partitions.
It is also worth noting that a similar procedure is possible with external hard disk. True, for this you will still need to run Win to set all the parameters. However, again, such procedures are not recommended, since by mistake you can simply delete data.

If you are using a connected device, you can set the boot setting from it in the BIOS and simply place a new shell on your laptop or computer. True, for this it is necessary to correctly record the OS on the external component. More details are available.
In any case, regardless of the chosen method, anyone can place a new one if they already have Windows on their computer.
Well, I hope this article will help you deal with problems on your device.
In general, I would like to recommend finding a compact portable USB device in advance (today they cost minimal money) and recording the correct system. Personally, I have three of these - for each latest version OS from Microsoft Corporation. Thus, I can insert a flash drive into the port at any second, and within two hours completely restore the computer’s functionality, while having a brand new shell.
I wish you good luck in your difficult work! Subscribe and tell others about the blog.
How to install Windows 8-8.1 yourself?
It is assumed that you already have an installation DVD or USB flash drive with Windows 8. Boot from installation disk. Lyrical digression: All modern computers have a Boot Menu (menu for selecting the device from which to boot). To call it, there are hot keys: F8, ESC, F12 or others (see the motherboard manual) immediately after switching on during BIOS initialization. Select the language and keyboard layout. Next:
Then we begin the installation process:

We accept the license agreement:

At this step, you must select the installation type: update or full installation. You must select Upgrade if you are upgrading from previous versions of Windows to Windows 8. Full installation- if Windows 8 is installed for the first time. It is this type that I consider next:

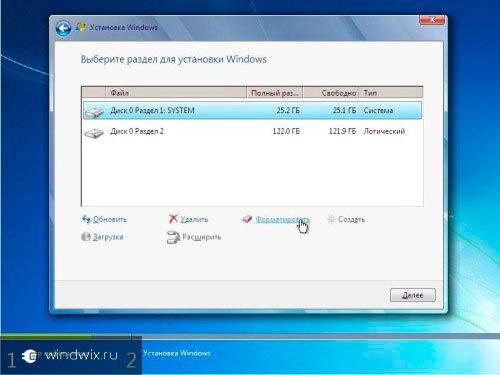
In our case, we install the system on a new clean (new) hard drive without file system. Let's create 2 partitions on it. The first is for the system, and the second is for other data. Click on Disk Setup:


Let's allocate 64GB for drive C:

The Partition Wizard will ask you to create additional partitions for system files. We agree, since this 350MB partition is necessary to accommodate Windows boot loader 8:

In the same way, we create a second partition from all the remaining space on the hard drive for games, movies, music, etc. Do not pay attention to the sizes allocated for these partitions in this article, they are given only as an example. In fact, choose “according to your taste and color”

Congratulations! Your hard drive is split into 2 parts (not counting the bootloader). Let's select the partition on which we will install Windows 8:

The installation of Windows 8 begins, which will take place in automatic mode. You might even have time to make yourself a cup of coffee. The installation will reboot.


Installation is almost complete! Remained finishing touches— personalization and initial settings. Select the design color and name of the computer on the network:

Configure basic system settings. You can use the standard settings and configure them later, or configure them right away. I recommend doing the setup right away, especially since it only involves a few steps.

The last step of the installation is to configure the login method. We are asked to use a Microsoft account or without it. What to choose - decide for yourself. I chose to enter without account Microsoft to create a local account, as was the case in previous versions of Windows


Perhaps it's time to write about that how to install Windows 8. In general, this version of the OS turns out to be quite versatile: it can work both on regular PCs or laptops, and on tablets. In this article we will figure out how to install Windows 8 on a computer or laptop. About the details of purchasing Windows 8 Pro at a discount.
New version Windows gives the user even greater security, modern design and technology. The removal of the Start button is perhaps the most important visual innovation in desktop versions of Windows 8.
So, there are four known editions of Windows 8:
- Windows RT
- Windows 8
- Windows 8 Pro
- Windows 8 Enterprise
Desktop PC owners should only be interested in the "8" versions, since Windows RT is designed for mobile devices.
Preparing to install Windows 8 correctly
Before installing a new operating system, it is necessary to perform a number of preparatory measures - create a DVD disk, or a flash loader, or boot from a hard drive with unpacked OS installation files. You can buy the disc in a store, or you can buy digital Windows version 8 and write to disk or create a bootable USB flash drive.
Before installing Windows 8, you need to save data and program settings from drive C.
If your hard drive is new, then there is nothing to copy.
Insert the disk/flash drive with Windows 8 into the drive/usb and restart the computer.
To boot from disk and install, you need to go into the BIOS of your computer, to do this you need to reboot and almost immediately press the DEL button; on some motherboards it is replaced by the F2 button.
After the BIOS has opened, you need to set it to boot from your media on which the OS is written ( DVD disc or flash - depending on what media you use to install Windows 8). This section can be located in different places - it depends on the manufacturer of the motherboard and BIOS, but it always contains the word BOOT: look for FIRST BOOT DEVICE, BOOT or BOOT DEVICE. As soon as you find it, install your media there first - either DVD or flash.
Windows 8 installation steps
If you did everything correctly, the message “Press any key..” will appear on the black screen, which means press any button. Press any button (except the shutdown or restart button) to move on. The updated Windows 8 logo will appear, followed by the first installer window.
At this stage, you need to select the language to install, time format and input method. Select or leave the default and click the “Next” button.

Click the “Install” button. After this, you can breathe easy - you have already done almost everything important in order to correctly install Windows 8. In the next window you need to enter the key for Windows activation 8. This key is located on the disc box or as a sticker on your computer. On laptops, a sticker with a key is placed on the bottom of the case. After entering the key, click the “Next” button.

We accept the terms of the license agreement by checking the box next to “I accept the license terms.” Click “Next”.

In the next window, the installer asks how we will install Windows 8.

There are two options available: “Update” and “Custom Installation”. The first is designed to update a previous version of the operating system. We recommend selecting “Custom Installation”. We will talk about the possibilities of updating from other versions of Windows in the following articles. Keep in mind that the information contained on yours will be deleted, so take care to save important information to removable media.
In the next window, select the drive on which you plan to install the operating system. If the computer is new and has never installed Windows on it, most likely there will be only one item “Unallocated disk space”.

In this case, you need to go to “Disk Settings” and create two partitions: the first for the system, the second for data. For Windows 8, it is better to allocate at least 35 GB, plus don’t forget about space for programs. To avoid running out of space in the future, leave the system partition at 70-90 GB, since hard disk space is cheap now. Leave the remaining space for the second and subsequent sections. If there is little space on your hard drive, there is no point in partitioning it, so it is better to allocate everything free space under one section. This could happen, for example, if you install Windows 8 on an SSD drive.

If any system has already been installed, then the window will look something like this:

You can repartition the hard drive into the number of partitions you need, or leave it as is and simply select the partition on which another system was previously installed. Typically, this drive is called "Local Drive C:". Here the partition letters are not displayed, but required disk Easily calculated using the specified dimensions. In this case it is “Disk 0 Partition 2”.

When copying is complete, the computer will reboot. The black screen will again display “Press any key..”. The computer will restart and as it boots, the computer screen may flicker and go completely black. That's how it should be. We are waiting for the “Personalization” inscription to appear.

The installation of Windows 8 on your computer is almost complete. All that remains is to complete the initial setup and you can get to work. On the first setup screen, you must select the color scheme that will be used for the Metro interface and specify the computer name. Click “Next”.
The next screen prompts you to go to settings or use standard settings.

You can configure the settings later and go straight to work by clicking the “Use standard settings” button. On this installation Windows systems 8 will be completed.
Now you do you know how to install Windows 8 on your computer?, all that remains is to follow the installation guide steps above and install new system in practice.
Installing Windows 8 is no different from installing other Microsoft operating systems. You will need an image with the operating system, a program to create bootable media, and the drive itself (disk or flash drive). Download Windows 8 in finished image can be done in two ways:
- through the official utility from Microsoft;
- through third party sites/torrents.
Let's consider both options for installing the OS on a computer.
Before you begin installation, familiarize yourself with all the steps you will need to complete:
- preparing bootable media;
- setting BIOS or UEFI parameters;
- preparing the hard drive and selecting OS characteristics;
- account setup.
System Requirements
To install G8 on a PC or laptop, you need the following configuration (or more powerful):
- processor with a frequency of 1 GHz;
- minimum 1GB RAM for 32-bit and 2GB for 64-bit version;
- 16 and 20GB hard drive for 32 and 64 bits respectively.
If you meet the requirements, you will be able to use your Win8 computer without lags or slowdowns.
Media Creation Tool
Let's start with the official Microsoft applications, which allows you to download the original operating system image for free and burn it to a flash drive or disk in a few steps. In this case, bootable media is created automatically, so you do not have to use third-party software. To create a flash drive, follow these steps:
- Open your browser and follow the link to download the Windows boot utility from the official website

- The program does not require installation - just run the downloaded file.

- Interface Media Creation Tool is in Russian, so users without knowledge of English do not have to worry. On the first screen, select your language, OS edition, and architecture. Then click "Next".

- Select the installation method - from a flash drive or disk. Check the appropriate box and proceed to the next step.

- From the list of connected devices, select the prepared drive. Remember that when writing OS files, all data from it will be destroyed.

- A warning about deleting files on the flash drive will appear. Click "OK".

- Then the procedure for loading operating system files will begin. The download time depends on your Internet speed. Once the process is complete, close the window with the “Finish” button.

In this way, you can get a full version of Windows 8 and reinstall it on your laptop or PC. Let's consider the second option for creating a bootable drive.
Download the image manually
You can also find the OS image on a third-party site or torrent tracker. For example, use the download link via uTorrent.
After downloading the image to your PC, you need to find a recording program. Let's look at simple and well-known utilities: Windows USB/DVD Download Tool and Rufus.
Windows USB/DVD Download Tool
Download the utility from the link and install it. Then you need to:
- On the first screen, click “Browse” to proceed to selecting an ISO image.

- Find the installer on your hard drive and click the “Open” button.

- To continue, click “Next”.

- Select USB device or DVD depending on whether you are writing the image to a flash drive or disk.

- Select the drive (1) and click on “Begin Copying”.

- Now you need to wait for the recording to finish.

Rufus
Download the program to your computer from the Internet using the link. No installation required. Then:
- Select the recording device (1), set the MBR parameter for computers with BIOS or UEFI (2), file NTFS system(3) and enter the name (4).

- To select an image, click on the marked button.

- Locate the Windows image on your hard drive

- To start recording, click on the “Start” button.

Ready! Now you can create bootable media any Windows up to 10. Before installation, all that remains is to configure the BIOS.
BIOS/UEFI Settings
You can configure the BIOS before starting the operating system. It is necessary to set loading from the prepared flash drive as priority.
The BIOS interface is launched by pressing the F12 / F2 / Del / F9 key, etc. - for each manufacturer motherboards your own button. It is indicated on the initial loading screen:

Clicking on it will take you to the menu. It requires:
- Go to the “Boot” section (1) and select the “Boot Device Priority” line (2).

- In the “1 st Boot Device” line, select the port to which the boot device is connected (Removable Dev.), and save the changes with the F10 key.

Now the computer/laptop will reboot and you will see the Windows 8 installation menu.
Modern PCs use UEFI - an improved version of the BIOS with convenient graphical interface, which supports mouse control and speeds up computer booting. Launching the settings is carried out in the same way as in the case of a regular BIOS. In the menu you need to do the following:
- Press the F8 key to go to the “Boot Menu”.

- Click on USB device, on which the Windows distribution is written.

All that remains is to restart the PC and proceed with the step-by-step installation.
OS installation
After selecting a priority and restarting your computer, you will see the installer window. Now you need to follow the instructions:
- Select your installation language.

- Click on “Next”.

- To start the process, click the “Install” button.

- Select the desired version (if you downloaded full distribution OS).

- Check the box and click “Next”.

- Click on the second item.

- Now create a system partition of your hard drive by clicking on the “Create” button.

- Specify the size and create the disk using the “Apply” button. Remember that installing Windows 8 requires at least 16GB of free space.

- Now the copying and installation of files will begin. Wait until the procedure is completed.

At the end of the procedure, the computer will reboot. The first start of a PC with a new operating system will take longer than usual. Then you will have to carry out the initial settings - create an account, enter license key, set a password if necessary, set up the Internet, etc.
Conclusion
Now you know how to install Windows 8 for free on your laptop or PC. The entire process, except for downloading the distribution, takes no more than 40 minutes. After this, you will be able to fully use the computer.
Video instructions
Watch the video with a step-by-step description of all the steps in this article if you still have questions about the installation.
In today's article we will install Windows 8.1 portable hard drive USB disk in a tricky way and after that the operating system will boot for everyone computer devices, regardless of whether they have a regular BIOS or UEFI.
So, I will work in Windows 8.1, but if you have Windows 10 installed, then you need to do the same.
In Disk Management you can see three disks connected to the computer.
Disk 2 is a WD portable hard drive with a capacity of 1 TB (931.51 GB) with data files; we will install Windows 8.1 on it (nothing will happen to personal files).
I would like to specifically note that the external USB drive has a main boot entry MBR.

Let's compress the space on the HDD and create two partitions for installing the OS. Right-click on the drive and select "Shrink Volume".

150 GB will be enough for me, but you can choose a different size. Click on the “Compress” button.

As a result, unallocated space is created. Right-click on it and select “Create simple volume”.


We indicate the size as 100 MB.


Select the file system FAT32.


As a result, a 100 MB partition is created with file system FAT32 (drive letter I:), where we will later place the OS boot files. To boot into UEFI mode, the bootloader must be located on a partition with the FAT32 file system.

Right-click on the unallocated space and select “Create simple volume.”

Select the file system NTFS and click “Next” all the time.

Created New volume(J:). It is on this that we will install Win 8.1. I note that the partition for installing the OS must be the main one, since to boot in UEFI mode, the efi bootloader will not see the logical partition.

Double-click the downloaded ISO image with the left mouse button and connect it to the virtual drive (in our case, the letter of the virtual drive (P:)). In the sources folder there is a file install.esd with compressed files OS.

WinNTSetup.

In the main program window, first of all, you need to specify the path to the installation Win files 8.1.
Click "Select".

In the explorer that opens, go to the virtual drive (P:) (in your case the letter may be different), open the sources folder and select the install.esd file with the left mouse, then click “Open”. Path to installation files systems we have indicated.

We indicate the disk on which the Win 8.1 bootloader will be installed.
Click "Select".

Select the 100 MB partition we created on the external USB drive (drive letter I:) and click on “Select folder”.

Now select the partition on which the system will be installed.

In the window that opens, select the section we created (J:) and click on “Select folder”.

Click "Install".

In the "Use BootSect for bootloader" item, select ALL (for uefi and legacy).

The process of installing the operating system on the partition (J:) begins.

If you click “Reboot”, the computer will reboot and the system installation process will continue, but before that we need to make sure to make the 100 MB FAT32 partition (drive letter I:) active, otherwise the Win 8.1 we installed will boot only in UEFI mode.
Click "Cancel".

Download and run the BOOTICE program.
On the first tab “Physical Disk”, select our external WD drive and click on the “Manage Partitions” button.

Select the 100 MB partition (drive letter I:) and click on the “Activate” button.

Now the 100 MB partition (drive letter I:) is active. This is a prerequisite for booting the system on a computer with a regular BIOS.
"Close".

Now we can restart our computer or laptop.
My BIOS has UEFI enabled,

but despite this in boot menu an external USB hard drive with an MBR master boot record is visible. I am booting my computer from an external drive.

Preparing devices.

The computer restarts. I'm booting from an external drive again.


Skip.

I accept.


Use standard settings.

Create a new account.

Sign in without a Microsoft account.

Enter your username and, if you need it, a password. Ready.

A UEFI-enabled computer boots into Windows 8.1 from an external USB drive that has an MBR master boot record.


Eight will also boot on a computer with a regular BIOS.
Why does Win 8.1 boot on computers with a regular BIOS and on laptops with UEFI?
We are booting from external media. UEFI works with external media using a FAT32 partition (which we created on external drive), witch bootable flash drive we boot into both UEFI and legacy without any problems.
We install from a flash drive operating system on RAMDisk in both UEFI and legacy, since the Windows distribution contains 2 bootloaders (one for mbr in the boot folder, and the second for UEFI in the EFI folder).
We have created 2 partitions on an external USB drive, an active partition formatted in FAT32 and a partition with OS. On the first partition, as in the distribution kit, we have 2 bootloaders and the installed OS is not on a RAMDisk, but on a physical one.