Bootable flash drive bios firmware. How to enable booting the system from a flash drive in BIOS? Detailed guide with photos
Today we will look at:
BIOS is not an operating system like Windows, which every user who has a laptop or computer encounters. Despite this, you should know and understand how to flash the BIOS if you want to run a modern one on an old “machine”. software or have more “levers” to control the PC system.
In this topic you will learn how to create bootable flash drive BIOS for further firmware. We will not talk about the firmware itself, since this is a topic for another material. Today we’ll only talk about bootable flash drives and recording BIOS firmware on them.
Establishing the motherboard model
Before creating a bootable BIOS flash drives, you need to check your mother card model.
Finding out this information is quite easy:

Copy or write down the information from the fields as in the screenshot, since we will use it later when downloading the firmware.
Firmware installation
When the motherboard model becomes known, open your browser and enter the name of the model of the board you are using in any search engine.
On the manufacturer’s website you will need to find the “BIOS” tab and download current version firmware. When you do this, you can continue creating a bootable USB flash drive for flashing the BIOS.
Prepare an empty flash drive with the FAT32 file system. Check current type file system Flash drives can be found in its properties. You can change the file system to another by selecting format with the right mouse button and specifying the required file system type.
When the flash drive is ready, unpack the previously downloaded firmware onto it.
Bottom line
As you can see, for all this you don’t need any to create a bootable flash drive for the BIOS - everything is very easy to do manually. To run a BIOS update using installed firmware, you need to insert the USB flash drive into the computer and enter the BIOS for further settings. We will tell you how this is done later.
At this time, you can prepare everything you need and practice creating a bootable BIOS flash drive. If you encounter any difficulties during the process, please let us know in the comments below so that we can help you.
To solve many computer maintenance problems, it becomes necessary to create a bootable USB flash drive. This may be needed, for example, to flash an updated BIOS version or install operating system.
There are many methods and different utilities for creating a bootable USB flash drive. But often these methods are complex and not user-friendly for a novice user (or require several different utilities).
But nevertheless there is also very simple ways. One of them is to use the rufus utility to create a bootable USB flash drive.
Rufus is a miniature but very fast and functional program. With its help, you can very quickly make a bootable USB flash drive with the desired operating system for installation or maintenance.
Creating a bootable DOS flash drive using the RUFUS program
Let's consider the option of creating a bootable flash drive with a DOS system - to flash the latest BIOS version onto the computer's motherboard.
To do this you need to download the program itself
and insert the USB drive (flash drive) that needs to be made bootable. It is advisable to disconnect all other USB media for the duration of the firmware.Then run it with Administrator rights (since the utility will perform formatting, it requires advanced rights)
The program settings should be set as follows:
- On the "Device" tab, you need to select the desired USB drive from the drop-down list.
- "Partition scheme and system interface type" must be set to "MBR for computers with BIOS and UEFI"
- "File system" must be set to "FAT32"
- on the "New volume label" tab, you can set your own name for the bootable flash drive (to make it easier to recognize it among other media in the future)
- The checkboxes opposite the values must be checked " Quick formatting" and "Create a boot disk"
- next to the item “Create a boot disk”, select FreeDOS from the drop-down list
To complete formatting, click the "Start" button
Nowadays, manufacturers of laptops, nettops, all-in-one PCs and desktop PCs have increasingly begun to produce them as part of systems that do not have optical drive. This is not surprising, since the digital industry has practically replaced the distribution of various content on optical storage devices.
Due to the fact that the computer does not have an optical drive, users began to have difficulty installing the operating system on it. Often when installing an OS via DVD drive the user did not make any settings in the BIOS, since the first boot device in it by default is DVD-ROM. The only option for systems that do not have a DVD-ROM is to install from a flash drive.
To install the OS from a flash drive or from portable usb HDD required set options for bootloaders USB devices in BIOS. In order for our readers to be able to independently download from USB storage, we have prepared material in which we will use examples to describe the process of setting up the BIOS for booting from a flash drive for various systems.
Let's prepare our USB drive
First of all, to boot the flash drive from using BIOS, it needs to be made bootable. For example, let's take a licensed disk with Windows 7 OS and make an iso image from it. The image can be made using the DAEMON Tools or Alcohol 120% programs. Also, the original disk image with the licensed seven can be downloaded from the official Microsoft website, provided you have a license key.
Having received the image file, let's proceed to the second step. This step involves creating a bootable USB flash drive using the utility Rufus. This utility was chosen for a reason. A distinctive feature of the utility Rufus is that it can write bootable USB flash drives, both for regular BIOS and for UEFI BIOS. Download the utility Rufus with her official page and launch it immediately, since it does not require installation.
In the program window that opens, you can see that in the first combo box “ Devices» a 16 GB flash drive is displayed. After selecting a USB device, you must indicate to the program Rufus path to iso image Windows 7. To do this, click the button with the laser disk icon and select the image. After this, click the Start button and wait for the creation of our bootable USB drive to complete.
In the same way, bootable flash drives are created for Windows 8, 10 and XP, as well as for other operating systems. It is especially convenient to create using Rufus Bootable USB flash drive with Windows XP. This is because most methods for creating a bootable flash drive with Windows XP are very difficult for the average PC user. WITH Rufus On the contrary, creating a drive with Windows XP is simple and quick.
After the bootable USB flash drive has been created, you can begin installing or reinstalling the seven using it. Therefore, in the following example we will describe the process of loading the flash drive we created on a computer with UEFI BIOS.
Booting from a USB drive on a computer with UEFI BIOS
Computers with UEFI BIOS support can use Windows OS, both with and without support for the new BIOS. For example, let's take a computer that does not have an optical drive and is assembled on the basis of a motherboard MSI A58M-E33 with support UEFI BIOS. Now we need to install the flash drive we created earlier into this computer. To quickly boot from a specific drive in motherboards running UEFI BIOS, there is a special Boot Menu . This menu allows you to select a specific drive without loading the main BIOS menu. On different computers Boot Menu can be called via F12 and F11 . In our case, on motherboard MSI A58M-E33 Boot Menu called via the F11 key.

From this menu you can see the item “ UEFI: KingstonDataTraveler 2.0PMAM" And " KingstonDataTraveler 2.0PMAM" If we select the first item, then the Windows 7 operating system will be installed with support UEFI BIOS, and if the second one, then with the support of a regular BIOS. After selecting the first or second item, the installation files will begin downloading.
Note that if we created a bootable USB drive using a proprietary program from Microsoft Windows USB/DVD Download Tool, then we would not be able to supply an OS that supports UEFI BIOS, since it creates a bootable USB flash drive that does not have UEFI support.
Let's move on. Now let's try to configure booting from USB devices from the motherboard BIOS MSI boards A58M-E33. To do this, when starting the computer, press the Del key. This action will load the motherboard BIOS.
In the main BIOS window, go to the “ Settings", after which the settings menu will open. In this menu we need to select the “”. After selecting it, the download settings will open.

In these settings, you can see that the first boot device is the hard drive.
 In order for our flash drive to load when the system starts, we will set the item “ UEFI USB Hard Disk
" first on the list.
In order for our flash drive to load when the system starts, we will set the item “ UEFI USB Hard Disk
" first on the list.

After these steps, you need to save the BIOS configuration and restart the computer. Now, when the system starts, a USB drive with UEFI BIOS support will be loaded first. To select a flash drive with an OS without UEFI BIOS support, you need to select the “ USB Hard Disk» to the very top of the list in the BIOS boot settings.
The example shows how easy it is to configure Boot Menu and boot BIOS configuration of the MSI A58M-E33 motherboard. Setting up the BIOS on new motherboards from other manufacturers looks similar.
Setting up booting from a USB drive on an old computer with Phoenix BIOS
Phoenix BIOS created by Phoenix Technologies. This BIOS was quite popular on already outdated computers. By using Phoenix BIOS You can also boot from a flash drive. For example, let's take laptop SAMSUNG R60, which has support Phoenix BIOS. Just like on most computers, press the Del button and go to settings Phoenix BIOS.
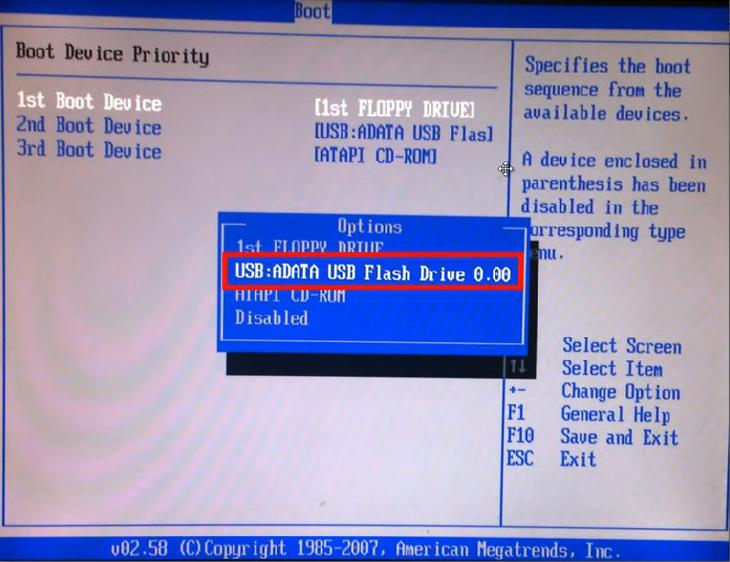
For our task, we need to go to the “ Boot" On this tab, select the item “ Boot Device Priority", after which we will be taken to the boot device settings menu.
 In these settings, we need to select the flash drive first in the list, as shown below.

Having completed these steps, our bootable flash drive will be loaded first when the system starts. In the same way, you can install and run a flash drive on most PCs running Phoenix BIOS.
Setting up booting from a USB drive on an old AMIBIOS computer
Let's consider launching a flash drive on a PC running AMI BIOS. developed by the American company American Megatrends Incorporated, hence the abbreviation in its name AMI. This BIOS is known to many PC users because of the start logo when the system starts.

Turn on the computer and go to the settings using the Del key. In the BIOS window we need to go to the settings item "".

 After these steps, settings will open that allow you to set the priority of drives at system startup, including flash drives.

In the same way, you can install and run a flash drive on most computers running AMIBIOS.
Problems when solving the task on AMIBIOS and Phoenix BIOS
Users of very old laptops and desktop computers may encounter problems starting a bootable USB device.
This problem is due to the fact that on very old computers running AMIBIOS and Phoenix BIOS there is no support for launching USB devices at system startup. Therefore, the only boot device in this case will be the optical drive.
Another nuance in solving our problem may be different versions of AMIBIOS and Phoenix BIOS, which differ from those discussed above. The main difference may be the interface and a different location of the settings. In this case, you should not be upset, since the developers do not hide the boot configuration settings and they can always be found and configured by analogy with the examples described above.
Setting up booting from a USB drive to a mini PC
New mini PC Compute Stick from Intel quickly gained popularity among users, as it is a computer with Windows OS on board, which is only several times larger in size than a regular flash drive. Due to its size, it does not have most of the interfaces found in desktop PCs and laptops. For example, there is no RJ45 interface and no interface for DisplayPort digital monitors.

Since Intel Compute Stick comes with pre-installed operating system Windows system 8 or 10, then most users do not have problems installing the OS on it. But what about the situation when the OS is damaged as a result of viruses or deletion of system files.
In this situation, a bootable USB flash drive will help and Boot Menu BIOS. For example, let's take the Intel analogue Compute Stick called Meegopad T02. To reinstall on this Windows computer, you need to download the OS image from the official website of the Meegopad T02 manufacturer www.x86pad.com. After downloading and creating a bootable USB flash drive, install it in Meegopad T02. Then turn on Meegopad T02, having first booted into Boot Menu BIOS using the F10 key.

IN Boot Menu You can select a flash drive and install Windows OS using it. To constantly load the flash drive when the system starts, you can open the BIOS and configure the boot priority in it different USB drives.
Let's sum it up
After reading the examples described above, the average PC user can easily set the priority of bootable flash drives in systems with different BIOS versions. By learning to place the flash drive first when booting, you will understand how quickly and conveniently you can install various operating systems on your PC.
We hope our article will help you boot from a flash drive and install the operating system, and also help you install it on computers that do not have an optical drive.
Video on the topic
There are many types of BIOS: Ami, Award, Phoenix Award, UEFI. Let's figure out which buttons to press when booting a computer or laptop so that go to BIOS and boot from a flash drive to install windows. I would like to note that the traditional key delete, F2 to enter the BIOS. Below are button combinations on how to enter the BIOS to boot from a flash drive.
Buttons for entering bios from laptop and computer manufacturers.
Buttons from BIOS manufacturers

How to set the BIOS to boot from a flash drive to install Windows
Let me start with the fact that you don’t always need to go into the BIOS to swap the bootloader to install windows. For this there is a so-called start menu. To go there, you need to turn on the computer, sometimes a key is written. In this case F12. Press the key that is written in the word Boot Menu.

How will we start the computer: USB flash drive or other devices. Next will be the installation of the Windows system.

How to boot from a flash drive in Ami Bios
- Click Device Priority.

In line 1st Devise set priority from the flash drive. This is usually all, but many people have come across why I did everything correctly, but the computer does not start from the flash drive. Sometimes you just need to specify, in addition to the priority, forced loading in the line Hard Disk Drives.
- IN Hard Disk Drives we ask forced start from a flash drive.
- IN 1st drive select the media.
- Press F10 to save.
It turned out that in the settings of 1st Devise and Hard Disk Drives there is a bootloader with USB Flash i.e. We set the priority option, tried it and it didn’t work. Then we set a forced launch and everything worked out. And so on in all BIOS versions, if priority loading fails.

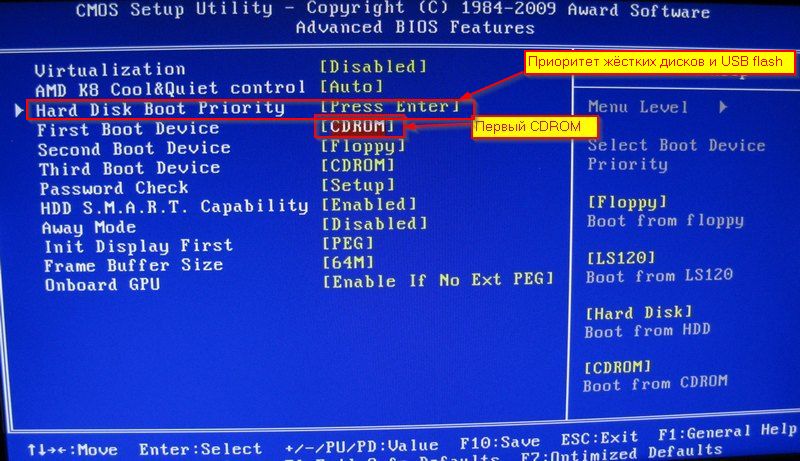
How to set Award Bios to boot from a flash drive
- Let's go to Advanced Features.

- Click First Device, V context menu We set which bootloader we will start the computer from. We have chosen the primary device to launch.
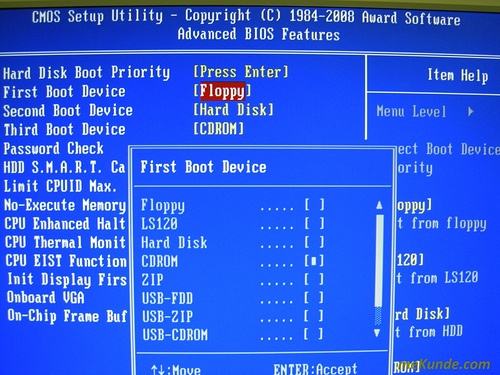
- Hard Disk Priority put the flash drive in 1st place. (If in First Device If you choose to start from a drive, then you need to install a flash drive in Hard Disk Priority).
- Award is ready, press F10 to save.
How to boot from a flash drive in Phoenix Award Bios
- Settings Advanced, in line First Boot Device install a flash drive or other device.
- Click F10 to save.

New UEFI BIOS in which you can control the mouse.
- Line Boot Priority, change places by dragging with the mouse. Can be done through advanced settings > Exit/Advanced mode and choose Advanced mode.

- Presses Boot and select in Boot Option #1 loader.

Go to BIOS and set to boot from a flash drive for Windows installations It turned out to be quite simple, you just need to change the type of loading. And remember about the priority and forced bootloader.
Users often need to boot their PC from third-party media. So, for example, in the case of reinstalling Windows, you need to set the boot from a flash drive in the BIOS. The same need may arise if you need to roll back the system to a restore point.
In order to boot from a system flash drive, you need to prepare the drive itself. The drive should be selected based on the capacity of the operating system. So, Windows 7 OS weighs 2.5 GB, and version 8 weighs 4 GB. Naturally, it’s worth buying a larger drive. If you already have an old flash drive on hand, then you need to format it. Simply deleting data will not solve the problem. The flash drive may contain viruses and system errors. Then you won’t be able to record the OS image.
How to format a flash drive? We connect the device to the PC, open “My Computer”. Right-click on the icon and select “Format”.
Specify the file system parameters (if you select any of the parameters, the flash drive will be compatible with Windows OS, but the maximum file size will be limited):
- 1. FAT32. It will not be possible to write files larger than 4 GB onto such a drive.
- 2. exFAT. On such a drive you can store files of any size.
- 3. NTFS. Many devices will not see the drive.
IN " Volume Label» indicate the name of the drive. Select the item “ Quick cleaning" and click " Begin" Next, you need to download the licensed OS image from the Microsoft website. Before downloading, you need to enter the serial key and select the system language.

To boot a PC from a USB flash drive, you need to create a system image. Let's look at how to do this using the USB/DVD Download Tool.
- Download and launch the application.
- The first step is to specify the path to the OS image.

- Next, select the drive.

- And press the "" button.

After copying the image, you can begin installation and change the BIOS settings.
How to run a flash drive through BIOS - step-by-step instructions
Most often, to boot from a flash drive, you do not need to change the BIOS settings. Just call up the boot menu when you turn on the computer and select the flash drive.
The problem for most users is getting into the BIOS system. Regardless of how the version is installed, to boot from a flash drive you must:
- Insert the drive into the USB connector of the computer. It is advisable to use the port located on the motherboard, i.e. from the back of the block.
- Check. Is the USB controller enabled?
- Start the PC by holding down certain keys. A prompt will be displayed on the screen when the system starts. For example, in the screenshot below you need to hold DEL to open the BIOS.

- Go to the downloads section and select the USB flash drive in the list of devices.
- Save your changes.
You can only use the arrow buttons to navigate through menu items, and to confirm your selection - Enter.
Running from a flash drive in Award Bios
Here's what the Award Bios loading screen looks like:

Let's go to the "" section. We go down to the point “ USB Controller" Click " Enter" In the new window select “ Enable" In a similar way we change “ USB Controller 2.0».

Click " Esc» to exit to the main menu. Go to the "" section. We go down to the point “ Hard Disk Boot Priority" The screen below shows that loading is carried out from the hard drive.

How can I set the BIOS to boot from a flash drive? Go to the line with the name of the flash drive (Patriot Memory) and drag it to the very top using the " + " Exit the menu by pressing " Esc».

In the line "" click " Enter" In the drop-down menu, select “” (or “ USB-FDD"). The second device must be " Hard Disk».

In order for booting from the flash drive to take place after a restart, you need to save the changes. To do this, click " Esc" and in the message "" select " Y».

Installing boot from flash drive in AMI Bios

We check the USB controller on the “ tab Advanced» – «».

Opposite "" and " USB 2.0 Controller"should be" Enabled».

Enter" From the list select " Enabled" Exit the menu by pressing " Esc».
How to set boot from a flash drive in BIOS? On the " Boot" instead of "" you need to select "".

To do this, stand on the line and click “ Enter" and in the window that appears, select our flash drive.

We exit the section through “ Esc" Go to the "" section. Here the first device should be a flash drive.

Close the BIOS and save the changes.

How to boot from a flash drive in Phoenix-Award Bios

Checking the operation of the controller is carried out on the “” tab. Against " USB Controller" And " USB 2.0 Controller"should be" Enabled».

To change the parameter values, go to the line and click “ Enter" From the list select " Enabled" Exit the menu by pressing " Esc».
How to enable boot from a flash drive in BIOS? On the " Advanced"opposite "" set "".

Exit the OS, saving the changes.

After restarting, the PC will boot from the USB flash drive.
How to boot Windows from a flash drive to EFI (UEFI) Bios
On laptops with UEFI, you won't be able to quickly change settings. To run a flash drive through BIOS, you need to disable this protocol Secure Boot. It blocks the system from booting from any third-party drive. Next you will need to enable " compatibility mode for other operating systems" It is called differently: " CSM Boot», « UEFI», « Legacy BIOS », « CSM OS».
To get into the BIOS you need to press the following keys immediately after turning on: Fn+F2.

Immediately after launch, use the arrows to go to “ Security" Paragraph " Secure Boot" set to " Disabled


