Winsetupfromusb 1.6 instructions multiboot flash drive. WinSetupFromUSB instructions for use
M multiboot flash drive, equipped with a distribution kit of several operating systems, antivirus Live-disc, the necessary programs, working autonomously from bootable media, is a universal tool for solving various computer problems and tasks that ordinary users have to deal with every now and then. What can we say about IT-specialists, most of whose professional life is restoring the functionality of computer equipment.
Flash drive, which brings together various self-booting software solutions, will replace a bunch of different optical boot disks. A single multiboot flash drive can be used to neutralize viruses that block the computer from starting, and to reinstall operating system, and to restore it from backup copy, and for allocating space on the hard drive, and for solving other problems. Available for download on the Internet ready-made images Live-disks with a selection of various software for solving computer problems. But, naturally, it is better to prepare a universal rescue tool yourself by selecting the contents bootable flash drive to suit your individual needs and preferences.
The program can create flash drives with various bootable software WinSetupFromUSB for Windows. It can complete a selection of bootable media based on the bootloader Grub4dos . This is what we will use to create a multiboot flash drive. And, accordingly, we will consider this entire process in detail below.
1. Contents of a multiboot flash drive
The first step is to prepare a distribution kit for a multiboot flash drive. In our case, we have a flash drive with a small volume by modern standards - just 8 GB. Therefore, it will be equipped only with the necessary tools. And this is the distribution Windows versions 8.1 , 10 and old XP , antivirus Live-disk from Avira, disk space allocation manager and free backup. Prepare for recording to a flash drive ISO-images of bootable media of the selected software and installation disks of operating systems.
2. Download WinSetupFromUSB
WinSetupFromUSB- free program. On the official website you need to download its latest version. At the time of writing this article, the current version is 1.6 . WinSetupFromUSB works portablely, without installation into the system. All you need to do is unpack the downloaded archive and launch the program shortcut in accordance with the bitness of the current Windows.
Download the WinSetupFromUSB program from the official website:
http://www.winsetupfromusb.com/downloads/
3. Formatting a flash drive
The next stage is formatting a flash drive. This process can be done as regular means Windows (team "Format" in the context menu called up on the flash drive in Explorer) , and inside WinSetupFromUSB. Let's consider the last option.
In the program window at the top, select the desired flash drive if there are several of them connected to the computer. Activate the option checkbox "Auto format it with FBinst". After which its additional options will open. Of these, you only need to decide on the future file system of the flash drive - NTFS or FAT32. If the distribution kit prepared for writing to a flash drive contains files whose weight exceeds 4 GB, you must select file system NTFS. If not, leave it FAT32 default.
The FAT32 file system must also be left if the multiboot flash drive is also intended to work with computers based on BIOS UEFI. In this case, you will not need to disable the function Secure Boot , and the distribution contained on the flash drive 64 -bit Windows 8.1 And 10 will be installed on GPT-disk partition.
WinSetupFromUSB prepares a universal bootable USB flash drive - and for computers with a regular BIOS, and for devices based on BIOS UEFI. But the interface UEFI sees only bootable flash drives formatted in FAT32. Some programs can bypass such restrictions and create bootable UEFI-flash drives with file system NTFS, but WinSetupFromUSB, alas, is not one of them.
So, decide on the file system and click the button below "Go".
In the warning window about erasing data on the flash drive, click "Yes".

And we press again "Yes" in another warning window.

In a few seconds we will see the inscription "Job done"- the job is done. Click "OK".

Now you can start adding the contents of the multiboot flash drive. The order in which you add images of installation disks of operating systems and bootable media for programs is not important. It is only important to adhere to the corresponding column in the central part of the window WinSetupFromUSB.
4. Adding a Windows distribution
Adding a Windows distribution kit is possible in two forms of the program window. One of the forms is intended for adding installation images Windows drives, starting from version Vista , the other is for installation files Windows XP and older versions of the system. In our case, we first add an image to the corresponding form Windows 8.1. We put a tick on this form and use the browse button to indicate the path to ISO-image. The set of a multiboot flash drive is formed in stages: each distribution is added and written in a separate order. Press the button "Go".

We wait for the process to complete and click "OK".

Now we activate the same form with a checkmark and use the browse button to add another Windows distribution. In our case, this is the installation disk Windows 10. For the same version of Windows, you can add its different editions one by one - 32 - And 64 -bit. Add, click "Go", wait for the process to complete.

5. Nuances with Windows XP
Presence on a flash drive installation disk Windows XP It may be necessary in rare cases to reinstall the operating system on very old PC builds. But the process of creating a bootable USB flash drive with this version of the system using WinSetupFromUSB there are some nuances. In the program interface, the top form is intended for adding a distribution kit of Windows XP and earlier versions of the system.

This form's review button does not add the usual ISO-distribution image. Before contents ISO-The image must be opened in a virtual drive. In systems Windows 8.1 And 10 this is done using standard means - on ISO-file is called context menu and a team is selected.

IN Windows 7 and earlier versions of the system mount ISO-images are possible through third party programs type Alcohol 120% or Daemon Tools . Contents of the connected ISO-the image is transferred to a separately created folder.

And this folder is already added to the program window during the process of creating a bootable flash drive WinSetupFromUSB.

The next step is to accept the license agreement.

And only then start recording.

Another nuance is the need to integrate drivers for SATA-controller in the distribution kit Windows XP, if it does not initially contain them.
6. Adding bootable media for programs
ISO- operating system distribution images Linux , Live -disks based Linux And WinPE, bootable media of various programs using the browse button are added to the active form "Linux ISO/Other Grub4dos compatible ISO". After adding ISO-a small window will appear in the image « Boot menu name", in which you can set the name of how the bootable media will be displayed in the bootloader menu Grub4dos. In our case, we indicate the path to the antivirus image Live-Avira disk. Press the button "Go" and wait for the recording to complete.


And then the image.

7. Testing the flash drive
One of the advantages of the program WinSetupFromUSB is built-in BY for emulation hardware computer - QEMU. By using QEMU You can immediately, without leaving your current operating system, test a flash drive - either a regular bootable one or a multiboot one. At the bottom of the WinSetupFromUSB window, check the options box and click "Go".

A QEMU window will open, in which everything the same will happen as on the monitor screen after booting from the flash drive. The first thing we will see is the bootloader menu Grub4dos. Using the navigation keys or numbers according to serial numbers The software is in the list, we can choose one or another bootable media, Live-disk or operating system installation process.

The Windows installation disks will be combined into two partitions. One will contain distributions Windows XP and older versions of the system, in the other – versions of Windows starting from Vista. Each section leads to an additional menu window for loading the corresponding versions and editions of Windows.

Good day... Free program WinSetupFromUSB designed to create a bootable USB flash drive. After you have recorded the image of the operating room Windows systems Vista/XP/7/8.1/10 using this program. You can later use it to install the operating system.
Program Works on all versions of the Windows operating system. It has an English interface. But figuring it out won’t be too difficult. DownloadWinSetupFromUSB can be found on the developer's website. this link. No program installation required. Unpack the archive and launch the program.
Creating a bootable USB flash drive using WinSetupFromUSB
Insert the flash drive into USB port Your computer or laptop. Then run the program. In the main window, select your flash drive. On which the operating system image will be written. Then check the “AutoFormat it with Finest” checkbox. The flash drive will automatically be formatted and will be ready to burn the image. Then select the file system in which you want to format the USB drive.
Now you need to specify the path to the Windows operating system image. For example, I will create a bootable USB flash drive for Windows 10. To the left of the “Windows Vista/7/8/10/Server 2000/2012 based ISO” checkbox. Then select the operating system image. To do this, click the button with the ellipsis to the right of the field. Click “GO”.
In the next window, click on the “Yes” button. Then click "Yes" again. The flash drive will be automatically formatted. Then you need to click on the “Ok” button. The process of creating a bootable USB flash drive has started.
After the process is completed, click on the “Exit” button. At this stage, the creation of a bootable USB flash drive is completed. By using free program WinSetupFromUSB You can create a bootable USB flash drive of any operating system for further installation on your computer.
I will post here the method for preparing a USB flash drive and then installing Windows XP from it.
Let's get started. First, we need to download the program itself.
We will need:
- USB flash drive (minimum 1 GB);
- original CD Windows disk XP;
It is desirable that the Windows XP disk is not genetically modified. It is also recommended to use Windows XP with SP3 installed.
1. Preparatory actions.
Download and extract WinSetupFromUSB somewhere. Let's create a folder into which we will copy the contents of our Windows XP CD - let's say. As a result, this folder should look something like this:
2. Run WinSetupFromUSB.
Connect the USB flash drive to the computer and run WinSetupFromUSB:

In the “Add to” field USB disk:" in advance check the box for "Windows 2000/XP/2003 Setup" and point to our folder with the copied Windows XP distribution -
3. Format the USB flash drive.
Now we need to format our USB drive. In WinSetupFromUSB, click the “RMPrepUSB” button, we get to the formatting program window:
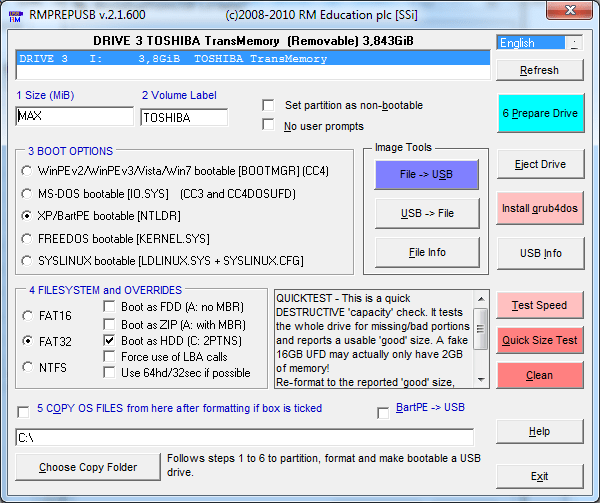
Place the checkboxes as in the above screenshot, press the “6 Prepare Drive” button - ATTENTION! ALL THE INFORMATION THAT WAS ON THE DEVICE WILL, OF COURSE, BE LOST!
Once the formatting is complete, all we now have to do is click the “GO” button. 
4. Boot from the USB flash drive and install Windows XP!
Process Windows installations XP in our case is slightly different from the standard one. When you first boot from a USB flash drive, we get to the menu GRUB4DOS:
We are interested in the second point. Select it and get to the following submenu:
1.Back to Main Menu
2. First part of Windows XP setup from partition 0
Select item No. 2 - “First part of Windows XP setup...”. The installation process then continues as usual until a reboot. After the reboot, you should boot from the USB flash again. We get to the menu again: GRUB4DOS:
1. EXPERIMENTAL - Start PLoP boot manager
2. Windows XP/2000/2003 Setup
Again select item No. 2, again we get into the submenu :
1.Back to Main Menu
2. First part of Windows XP<ваша версия Windows>setup from partition 0
3. Second part of 2000/XP/2003 Setup / Boot first internal hard disk
but here we already select point No. 3 - Second part...
After which, finally, Windows XP will be finally installed.
Creating bootable flash drives is a very popular task today, so instructions for using , a program that best helps in solving this problem, will be very relevant.
Interestingly, WinSetupFromUSB has other similar functions, but we will look at all of them during the instructions.
The use of this program begins with downloading it and this point should be given a little attention.
Where to download
Advice: Shouldn't searchWinSetupFromUSBin any search engines!
The fact is that this program can be found on our website.
If you download from other sites, a problem may arise, namely, most sites post already “added” programs.
And they are supplemented with all sorts of advertising and malware, even dangerous viruses such as Trojans. And there are also situations, as shown in Figure No. 1.
As you can see, here on the official website the program download button is shown in a red frame. But special attention should be paid to what is written next to “Download for free.”
And it says “version 1.0 beta”. This means that this site contains old version. After version 1.0, which was released in 2013, version 1.4 was released in 2015.
Today there is version 1.6 on the official website.
By the way, you should download it from the site winsetupfromusb.com. Downloading it from there is quite simple. To do this you need to do the following:
- Go to winsetupfromusb.com.
- Go to the “Downloads” tab, which is highlighted in Figure 2.

Scroll the page down a little (scroll the mouse wheel) and click on the inscription “WinSetupFromUSB 1.6.exe”, which is also highlighted in Figure No. 3.

Note: Usually on this page there is a tab with latest version program is already open. But if it is closed (the page will look like shown in Figure 4), you should click on the “+” sign (highlighted in the same figure), after which the tab will open and the link will become visible.

- The user will then be taken to the download page. There you need to click on one big button"Download".

Installation and launch
After the program is downloaded, it, of course, needs to be opened. To do this, simply launch the downloaded file. It will look like shown in Figure 6.

As we see, installation file is an archived image of the program in question. After launch, we are convinced of this - we see the window shown in Figure 7.

In this window you need to select where the actual WinSetupFromUSB file will be unpacked. By default, there will be a folder in which the downloaded file is located.
To select another location, you need to click on the button shown in Figure 7 with a red frame. After this, a window will appear, highlighted with a green frame in the same figure.
There, in fact, you should select where to unpack the WinSetupFromUSB launch file and click the “OK” button. She's the only one there.
After this, click the “Extract” button, that is, “Unpack”, highlighted in blue. Next we will see the unpacking process visually.
This window is also shown in Figure 8.

This window makes it possible to pause the process at any time (the corresponding button is highlighted in green in Figure 8), return everything to its original state (button in a red frame) or quit altogether (button in a blue frame).
Now in the storage location on our computer that we specified, we find a folder called “WinSetupFromUSB-1-6”. It will look something like what is shown in Figure 9.

Interestingly, this folder will not necessarily be the first in the list, even if you sort by creation date. So don't be surprised if you don't notice it right away.
This phenomenon is especially common in Windows 7. The contents of this folder are shown in Figure 10.

As you can see, there is a version for 32-bit Windows versions(underlined in red in Figure 10) and for 64-bit (underlined in blue).
Accordingly, in order to run the program in question, you need to run the program according to your version of the operating system.
Using the program
After this, the most important thing begins. At first everything looks as shown in Figure 11.
There are five main fields here:
- Flash drive selection field;
- Additional utilities;
- Field for selecting the operating system that will be on the flash drive;
- Additional options;
- Process options (progress bar and “Start” and “Exit” buttons).

The main task of this program is to create a bootable USB flash drive. Therefore, it is necessary to describe at the very beginning how this process occurs.
Creating a bootable USB flash drive
To perform this task, you should run WinSetupFromUSB and do the following:
- Insert the flash drive into the computer. After this, it will automatically appear in the window underlined in Figure 12 with a red line.
If it still does not appear, you should click on the “Refresh” button, that is, “Update”, because it is quite possible that the program will not be able to immediately find the drive.

- Now we need to choose which operating system we will write to the flash drive. To do this, put a checkmark next to the OS that we will record. After this, click on the selection button, which is shown in Figure 13 in orange.
A window with a green frame opens. In it we select the ISO image of the system that we are going to write to the flash drive.

- After this, all that remains is to press the “GO” button, which is located in area number 5 in Figure No. 11. Next, the recording process will begin.
Regarding additional functions, there are quite a lot of them here. The main ones are shown in area number 4 in Figure 11. They relate directly to the recording process.
For example, the “Advanced options” button is responsible for advanced options.
If you check the corresponding box, the window shown in Figure 14 will appear.

All these are specialized functions that relate to a particular operating system. More information about them can be found in the descriptions for these operating systems.
If you don't know what each of them means, it's best to leave all of these features alone.
If you check the box next to “Show Log”. This is a simple feature to show each step of the recording process. Very useful in cases where some error occurs.

Finally, the “Test in QEMU” checkbox is responsible for special testing of the flash drive, but this is a very risky function that can erase all data from the drive.
In general, it is better not to touch it at all.
Additional features
As mentioned above, WinSetupFromUSB has a number of additional utilities. You can find them in the area indicated by number 2 in Figure 11.
For example, there is a very useful utility called “BOOTICE”. It looks as shown in Figure No. 16.

BOOTICE is responsible for converting or returning to the MBR flash drive (main boot record) and PBR (boot code).
This program makes it possible to install Grub4DOS in MBR or BOOTMGR in PBR and so on.
Again, if you don’t know why all this is needed and what it is in general, then it’s better not to touch BOOTICE. Although all these functions are very useful.
Using this utility is very simple - to do this, select the appropriate drive and press the desired button.
To put it simply, it is designed to format flash drives, but not in the usual way, but using a special type of structure.
In particular, it is often used to make USB-ZIP flash drives from USB-HDDs.
Working with this utility is quite complicated, but if you’ve already found it, you should probably know which buttons do what.

Finally, the last utility in this section called RMPrepUSB. It performs all the functions of the two utilities described above and much more.
In addition, it has a very user-friendly interface. The most important thing is that there is Russian language here.
It can be selected by changing the options in the frame highlighted in green in Figure 18.
It is also very convenient that when you hover your mouse over each function in a window highlighted in yellow, its description appears.
By the way, it is short here, but very understandable.

In general, all this can and should be used. And it will be very easy to understand their use.
Visual instructions for using this program are shown in the video below.
How to create a bootable USB flash drive - WinSetupFromUSB
Instructions for using WinSetupFromUSB - Full description
I want to present one of the popular ways to create a bootable Windows flash drives 7, using the program WinSetupFromUSB. And I would like to note that this program It hasn't let me down yet.
The program is free and can be downloaded from the official website by following the link http://www.winsetupfromusb.com/downloads/.
After downloading the archive with the program, of course you need to unpack it. Next, go to the folder with the program and open the file that corresponds to the bit size of your system. My system is 64-bit, so I open the file with x64 bitness.

The program opened and in the upper part, we see the name and size of the flash drive that we inserted into the computer and are going to make bootable. Below we put a tick opposite the item Auto format it with FBinst , where in the selection items that appear, put a marker on the FAT32 item - this means that our flash drive will be formatted in this format. Next, check the box for selecting a Windows OS image and click on the browse button at the end of the line to open Windows Explorer.

In the explorer that opens, we find the prepared ISO image operating system, select it and press the button Open.

And as we see in the program, the path to our image is displayed. Everything is probably ready to record, press the button GO.

We respond to program warnings with consent. YES.


