Installing directory server centos 7. Automatic system update
CentOS is a free distribution based on the Red Hat Enterprise Linux source code, in fact, it is created from these sources with virtually no changes, the developers only cut out all the Red Hat branding. But unlike Red Hat, CentOS is completely free and receives regular updates, a little time after they are released for Red Hat since they are also built from source code.
Very often CentOS is used as an operating system for servers. In one of the previous articles we looked at how it is done. Today we will look at setting up a CentOS 7 server after installation. We'll go over all the basic settings you'll need to change to get your server ready for use.
1. Setting up a static IP address
The first thing you need to do is set up your network. On personal computers we use DHCP to obtain an IP address, and the computer will have a different address every time it starts, the server must always run on the same address, so we assign it a static IP. You also need to configure DNS and default gateway. But first install the net-tools utility:
yum install net-tools
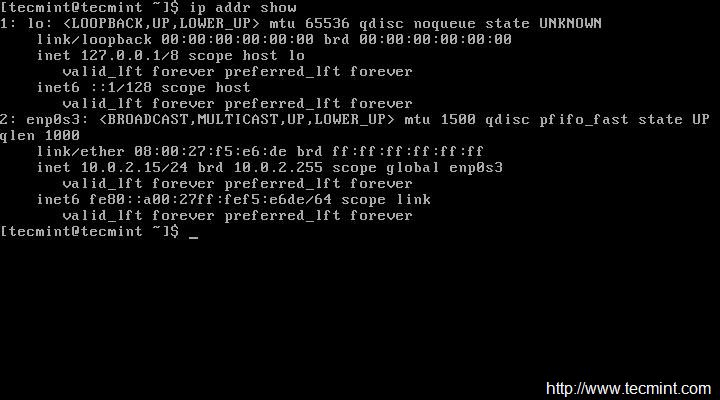
First, let's look at the available network interfaces and the current IP address:
Now you can proceed to configuring the interface through the file /etc/sysconfig/network-scripts/ifcfg-enp0s3, for example, using the vi editor:
vi /etc/sysconfig/network-scripts/ifcfg-enp0s3
IPADDR = your_ip
GATEWAY = gateway_for_network_access
DNS1 = IP_address_DNS1
DNS2 = IP_address_DNS2
After making changes, this file will look like this:

Then all that remains is to reboot the network to apply the new settings:
service network restart

Then, if necessary, you can change the IP address in the same way.
2. Computer name
The next thing we need to do is change the computer name. The current computer name is stored in the HOSTNAME variable:

To change it you need to edit the /etc/hostname file and replace the old name there with a new one.
vi /etc/hostname

You can also use the hostnamectl command:
hostnamectl set-hostname "hostname"
3. CentOS update
After installation it is customary to update software right up to new version to install all security updates. To update the list of packages in the repositories and install new versions, run the following command:
yum update && yum upgrade

4. Install a browser
In many cases you have to use CentOS from command line without a graphical interface, so you may need a browser to find something on the Internet or check the functionality of sites from the command line. To install the browser links, type:
yum install links

You can find other console browsers for Linux, such as Lynx or Elinks.
5. Setting the time zone
Correctly setting the time zone is very important for the server. This will clear up cluttered logs and allow your applications to display the correct date and time. The timedatectl utility is used for configuration.
First get a list of time zones:
timedatectl list-timezones
Then install the one you need, for example, Europe/Kyiv:
timedatectl set-timezone Europe/Kyiv
Then check:
7. Setting the locale
The locale determines the language and encoding that will be used on your system, for example, to enable the Russian language, set the value to ru_RU.UTF-8
localectl set-locale LANG=ru_RU.UTF-8
Then let's see what happened:
Then set the keyboard layout:
localectl set-keymap us
8. Disable SELinux
A set of SELinux policies are designed to control access to files in Linux system, but if you are not going to use them, then this feature can be disabled. To do this, run:
sed -i "s/(^SELINUX=).*/SELINUX=disabled/" /etc/selinux/config
Then restart your computer and check if the feature was actually disabled:
9. Create a user
It is unsafe to use the system as a superuser, and it is even more unsafe to leave open access to the root account via ssh. First create a regular user and set a password for it:
useradd username
# passwd password
Then add the user to the wheel group to allow the user to run as administrator:
usermod -G wheel username
Now all that remains is to correct the sudo settings; to do this, add the following line if it is not already there:
%wheel ALL = (ALL) ALL
10. Enable third party repositories
Adding third party repositories to a production server is not a good idea and can lead to bad consequences in some cases. However, sometimes you may need programs that are not in the official repositories. Therefore, let's look at how to add several repositories.
To add the Enterprise Linux Repository (EPEL) run:
yum install epel-release
# rpm -Uvh http://www.elrepo.org/elrepo-release-7.0-2.el7.elrepo.noarch.rpm
10. SSH setup
Most often we have to work with servers not directly, but over the network, via SSH. Typically the SSH service is already installed and activated, but there are a few settings you need to make to get it working properly. First you need to configure the use of only a secure protocol; to do this, open the /etc/ssh/ssh_config file and delete the Protocol 2.1 line. And instead add:
You also need to disable login as superuser:
PermitRootLogin no
11. Install Apache Web Server
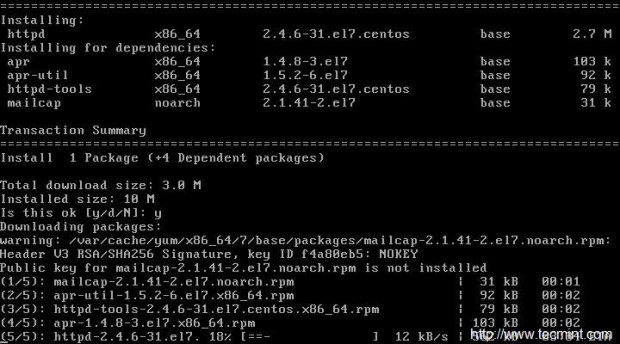
If you plan to use the machine as a web server, you will need Apache. With it you can host websites, multimedia content, client programs and much more. To install:
yum install httpd
Once the installation is complete, you will need to enable HTTP in your firewall before you can proceed:
firewall-cmd --add-service=http
# firewall-cmd -permanent -add-port=3221/tcp
# firewall-cmd --reload
Now all that remains is to add Apache to startup:
systemctl start httpd.service
# systemctl enable httpd.service

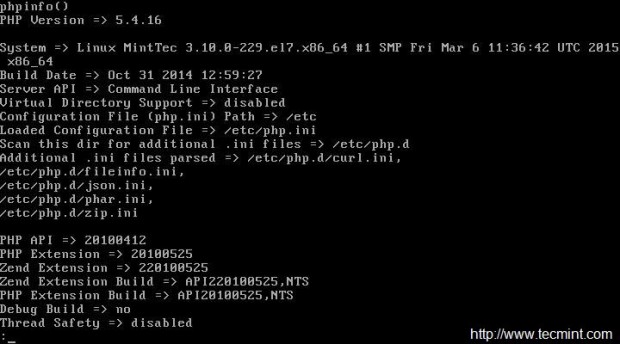
12. Install PHP
PHP is a modern web application and scripting language. It is often used as a programming language general purpose. To install:
After installation you need to restart Apache:
echo -e "" > /var/www/html/phpinfo.php
Then open the created file in your browser:
links http://127.0.0.1/phpinfo.php
13. Database installation
MariaDB is a database based on MySQL source code. Red Hat-based Linux distributions use MariaDB instead of MySQL. Databases are an indispensable thing on a server, so setting up CentOS after installation should include installing it. To install MariaDB, type:
yum install mariadb-server mariadb

Then run and add to startup:
systemctl start mariadb.service
# systemctl enable mariadb.service
And allow the service in the firewall:
firewall-cmd --add-service=mysql
All that remains is to run the setup script:
/usr/bin/mysql_secure_installation

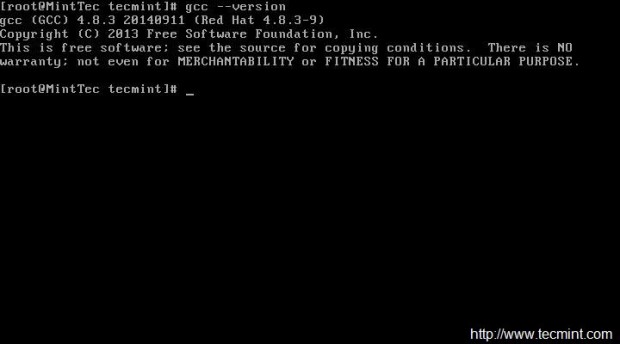
14. Install GCC
GCC stands for GNU Compiler Collection, a set of compilers that are considered the standard for building programs on Linux. But it doesn't come with CentOS by default, so to install, type:

Then you can look at the GCC version:
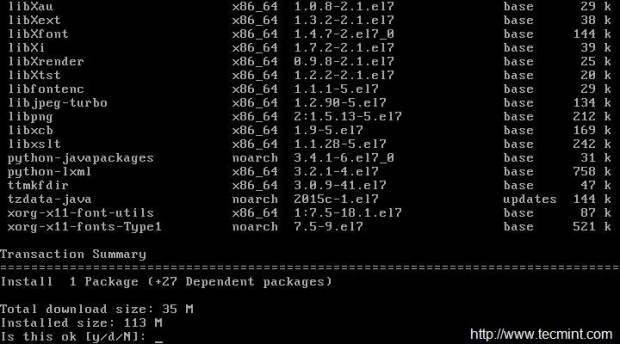
15. Install Java
Java is a general purpose objective-oriented programming language. It is not installed by default, so configuring CentOS 7 after installation may include installing it. To do this, run:
yum install java
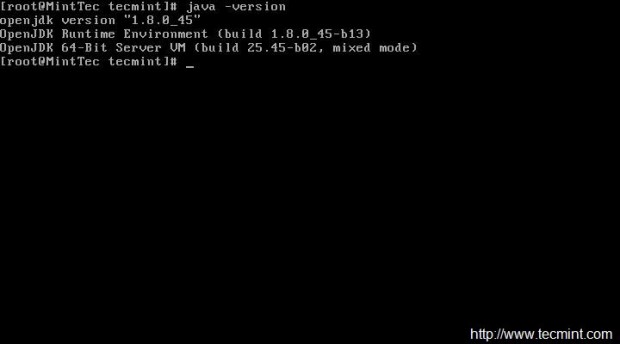
Then check the version:
Conclusions
In this article, we looked at how to configure a CentOS 7 server after installation. As you can see, there are many basic steps that it is advisable to do before using the server in production. If you have any questions, ask in the comments!
Installation and subsequent setting operating system CentOS 7 will occur on a virtual machine created in the VrtualBox program, this instruction It is also fully suitable for installation directly on a hardware server.
CentOS is a Linux distribution based on and compatible with Red Hat's commercial Red Hat Enterprise Linux. Each version of CentOS has a 10-year support period. CentOS is updated every 6 months to support new hardware.
In this article you will find a step-by-step description minimal installation of CentOS 7, for your convenience and visual structuring, the material is divided into several main parts.
Preparing for installationGo to the official CentOS website
Click "Get CentOS Now"

On the page that opens, click on the “Minimal ISO” button


Upon completion of loading we have ISO image installation disk CentOS 7. This image must be burned to disk (if installed on a hardware server) or used as is (if installed on a virtual machine). If you are planning to install the system on a virtual machine, you may also find the following articles useful:
Installing CentOS 7Everything is ready for installationCentOS 7. Start your computer or virtual machine, having previously set it to boot from CD-Rom (if using virtual machine specify the ISO file directly). As a result of the download you will see the following menu:
Start the installation process.
Run diagnostics on the media and start the installation process.
Select the second item and press "Enter".

After verifying the media, the CentOS 7 installer will launch.
Select the Russian language and click on the “Continue” button.

We will carry out the settings in the following order: setting up the keyboard; network setup; date and time; installation location.

Let's set up the keyboard, to do this, click on the "Keyboard" button and change the priority of the layouts, moving the English layout to the top (select it and move it using the arrows). You can change the key combination for switching keyboard layouts (for example, to Ctrl+Shift), to do this, click on the "Options" button and make the necessary changes. After completing all the settings, click “Finish”.

Click on the "Network and host name" button. By default, the network is disabled; to enable the network adapter, you need to click on the switch in the upper right corner of the screen. If your network has a configured DHCP server, then all settings will be picked up automatically. Also, if your network has a configured DNS server, a hostname will be generated. If there are no DHCP and DNS servers, then the settings must be specified manually. If you plan to use the installed system to solve server problems, I strongly recommend that you specify the network settings and host name manually! Specify the host name, and to configure the network you need to click on the "Configure..." button

On the "General" tab, be sure to check the box next to "Automatically connect to this network when available," otherwise, after restarting the computer network connection will not be active.

On the "Ethernet" tab, in the "MAC address of the device" position, you must specify network adapter.

On the "IPv4 Settings" tab, in the "Configuration Method" drop-down menu, the default item is "Automatic (DHCP)", change to "Manual", then click on the "Add" button, specify: address (must be free!); netmask; gateway; DNS servers are specified separated by commas; You can also specify the search domain (if you are using a domain network).

If you do not use IPv6 on your network, on the "IPv6 Settings" tab, in the "Configuration method" drop-down menu, select "Ignore".

Setting the date and time. Select the appropriate section in the installation menu. We indicate the city and region, then activate the “Network time” switch in the upper right corner of the screen. We check that the time is successfully synchronized with the NTP server. Click "Finish" to return to the main installer menu.

Click "Select Programs". In this article we will look at the "Minimal installation" option. It seems to me that a more correct solution is precisely this concept when setting up a server. All necessary programs and services that are required on the server are installed and configured later. Select "Minimal installation" and click the "Finish" button.

Let's move on to the "Installation location" section. Select the disk on which we are going to produce installing CentOS 7. Check the “I will configure partitions” checkbox and click the “Finish” button.

I specifically use a disk that already has partitions, mark it and click on the “-” button to delete.

If the installer detects that the operating system is installed (on the partition being removed), you will be prompted to confirm the removal.
Click the "Delete" button.

After you have cleared the entire disk, click on the link "Click here to automatically create them." The disk partitioning program will automatically create the following partitions:

It is necessary to slightly change the created structure. I will not create a separate partition and mount point for the home directory. To do this, you need to select it and delete it:

After we deleted the home partition, we were left with free space on the disk. Let's increase the swap size and set it equal to the volume RAM, in my case 2Gb. To do this, select a partition and in the “Desired Capacity” line set the required volume:

Let's increase the size of the root partition; to do this, select it and set the required volume in the "Desired Capacity" line (you can specify a size larger than the available space, so the partitioning program will automatically calculate and allocate all remaining free space to the partition):

You can also change the group name in the "Volume Group" drop-down menu. Select our disk in the “Name” field, indicate the name and save:

Click the "Finish" button to complete disk partitioning.
The markup program will display a list of changes, click the "Accept changes" button.

At this stage, you can create system users and set a password for the root user. In this example, I will not create any users, but instead use the root system user entry.
Click on the "ROOT PASSWORD" button:

Let's set a password for the root user. If the system considers the password weak, you must confirm it double click Click the "Done" button.

We are waiting for the CentOS 7 installation process to complete. Upon completion, click “Reboot”.

On this installing CentOS 7 completed.
Setting up the CentOS operating systemFirst launch of CentOS.
Now we will not consider fine-tuning the system, but will focus on the necessary minimum for the correct operation of the OS.

The default download is uninformative. After the system starts, we are presented with a standard prompt for entering a username and password. Then, as you wish, you can connect via ssh, or log in using the console.
It is also necessary to secure the remote connection to the server running CentOS 7 - .
After completing these steps, we will add the most popular repositories EPEL and rpmforge.
Yum -y install epel-release
Updating the base system after installation.
Let's add several useful utilities that may be useful during server operation.
iftop:
Yum -y install iftop
Two interesting task managers:
Yum -y install htop yum -y install atop
I'm used to working using Midnight Commander; I'm quite satisfied with both the ease of navigating the file system and the built-in mcedit editor.
Yum -y install mc
That's it for the basics setting up CentOS 7 after installation completed.
I often have to work with projects of various sites, having knowledge and experience in administering the Linux OS, it was decided to raise own web server based on CentOS 7, for testing and debugging projects. In this article, in addition to the minimum set of commands for installing LAMP on CentOS 7, I will talk about increasing the security of your server. We will not disable SELinux, instead let's configure it for use on a web server, in addition let's install and basic configure Firewalld.
Let's take a closer look installation and configuration FTP servers on CentOS 7 based on ProFTPD. As always, for ease of perception, the material is divided into semantic blocks. In this article you will find solutions to the following problems:
- Installing LAMP on CentOS 7
- Setting up SELinux
- Installing and configuring phpMyAdmin on CentOS 7
- Creating and configuring virtual hosts
- Creating databases for websites
- Installing Joomla 3.6 on CentOS 7
- Installation and configuration of FTP server
- Installing and configuring Firewalld
Connecting the EPEL repository:
Sudo yum -y install epel-release
Let's update the system:
Sudo yum -y update
Let's install file manager. I'm used to working using Midnight Commander; I'm quite satisfied with both the ease of navigating the file system and the built-in mcedit editor. Run in terminal:
Sudo yum -y install mc
Setting up SELinuxSELinux is a forced access control system designed to increase the security level of your server. In some cases, using SELinux may cause problems during the installation and configuration of system components. There are two solutions to this situation: properly configure SELinux or simply disable it. In any case, you need to weigh the risks. If you set up a test server in local network for personal tasks, you can simply disable SELinux, but in case of combat use of the server on the Internet, I recommend that you make maximum use of all available security measures. Which way to go is your decision. I don't disable SELinux.
Setting permissions in SELinux
To work with the SELinux context, we need the semanage utility included in the policycoreutils-python package, let's install it:
Sudo yum -y install policycoreutils-python
It is possible to set as temporary permissions (will work until the system is rebooted):
Sudo chcon -R -t httpd_sys_content_t /path/to/www sudo chcon -R -t httpd_sys_rw_content_t /path/to/www
So are permanent permissions:
Sudo semanage fcontext -a -t httpd_sys_content_t "/path/to/www(/.*)?" sudo semanage fcontext -a -t httpd_sys_rw_content_t "/path/to/www(/.*)?" sudo restorecon -R /path/to/www
These permissions must be specified after creating the home directory for your site (discussed in detail below).
Where /path/to/www is the path to the root directory of your site
httpd_sys_content_t – allow read access
httpd_sys_rw_content_t – allow write access.
Disabling SELinux
To disable, run in the terminal:
Sudo sed -i "s/\(^SELINUX=\).*/\SELINUX=disabled/" /etc/sysconfig/selinux sudo sed -i "s/\(^SELINUX=\).*/\SELINUX=disabled /" /etc/selinux/config
To apply the settings you need to reboot the system:
Sudo systemctl reboot
After reboot, check the status with the command:
Sestatus
You should see the following information:
SELinux status: disabled
Installing and configuring MariaDBRun to install:
Sudo yum -y install mariadb-server mariadb
Let's start the service:
Sudo systemctl start mariadb.service
Add to startup:
Sudo systemctl enable mariadb.service
Perform basic setup:
Sudo mysql_secure_installation
Let's take a closer look at the settings:
Enter current password for root (enter for none) leave the field empty press Enter Set root password Y New password: Set the password Re-enter new password: Confirm Remove anonymous users Y Disallow root login remotely Y Remove test database and access to it Y Reload privilege tables now? Y All done! If you"ve completed all of the above steps, your MariaDB installation should now be secure. Thanks for using MariaDB!
Installing and Configuring ApacheTo install Apache, run in a terminal:
Sudo yum -y install httpd
Apache is configured by editing the configuration file:
The following changes need to be made:
# Let's check if the line at the end of the file is uncommented: IncludeOptional conf.d/*.conf # Also add the following line below: ServerName 127.0.0.1
Launch Apache:
Sudo systemctl start httpd.service
Let's add the service to startup:
Sudo systemctl enable httpd.service
By going to:
http://xxx.xxx.xxx.xxx
(where xxx.xxx.xxx.xxx is the IP address of your server), you should see the Apache test page:

* If the Apache test page does not open for you, disable Firewalld for a while, detailed setup firewall will be discussed below:
Sudo systemctl stop firewalld
Let's hide information about the Apache version, modules and operating system (by default, this information is available to everyone from the outside world):
Sudo mcedit /etc/httpd/conf/httpd.conf
Add to the end of the file:
ServerSignature Off ServerTokens Prod
Restart the service:
Installation and PHP setupInstall PHP:
Sudo yum -y install php php-mysql php-gd php-ldap php-odbc php-pear php-xml php-xmlrpc php-mbstring php-snmp php-soap curl curl-devel php-mcrypt php-pecl-apc
Edit the php configuration file:
Sudo mcedit /etc/php.ini # uncomment and make changes realpath_cache_size = 1024k
Restart Apache:
Sudo systemctl restart httpd.service
Installing phpMyAdmin, restricting accessInstallation:
Sudo yum -y install phpmyadmin
Edit the configuration file:
Sudo mcedit /etc/httpd/conf.d/phpMyAdmin.conf
Make the following changes allowing connections from remote hosts::
# Apache 2.4
# Require ip 127.0.0.1
# Require ip::1
Require ip xxx.xxx.xxx.xxx (IP address of the client machine)
Require all granted
# Apache 2.2
Order Deny,Allow
Deny from All
Allow from 127.0.0.1
Allow from::1
# phpMyAdmin setup page
# Apache 2.4
# Require ip 127.0.0.1
# Require ip::1
# Allow remote connection from a specific IP
Require ip xxx.xxx.xxx.xxx (IP address of the client machine)
# Allow everything remote connections
Require all granted
# Apache 2.2
Order Deny,Allow
Deny from All
Allow from 127.0.0.1
Allow from::1
Attention! In order to increase server security, I do not recommend that you use permissions for all remote hosts (i.e. Require all granted), these settings are provided in this article for your reference.
Restrict access to the directory /usr/share/phpMyAdmin/ to a specific IP address Require ip xxx.xxx.xxx.xxx(where xxx.xxx.xxx.xxx IP address of the client machine), and also, if necessary fine tuning, restrict access to the directory /usr/share/phpMyAdmin/setup/ to Require ip 127.0.0.1 upon completion of all settings.
I do not encourage the use of phpMyAdmin on production servers. However, for a beginner or a test server, this web panel provides a certain level of convenience.
Restart Apache:
To access the phpMyAdmin web interface, type in the address bar:

User: root
Password: You set it during the MariaDB setup phase
To access the phpMyAdmin settings page, type in the address bar:
Http://server ip-address/phpmyadmin/setup

Don't forget to restrict access to the settings page once all installations are complete.
Creating a database for the siteCreating a database in the console
Connect to the MySQL server:
Mysql -u root -p
Enter the root user password (we set it at the beginning of the article) and press Enter.
Creating a database:
CREATE DATABASE `site` CHARACTER SET utf8 COLLATE utf8_general_ci;
It is advisable to immediately select a base mysql data, because all further settings will be made in it.
Use mysql;
Create a site user with the password Zaq12wsx for the database site data:
Attention! use complex passwords.
GRANT ALL PRIVILEGES ON site.* TO "site"@"localhost" IDENTIFIED BY "Zaq12wsx" WITH GRANT OPTION;
Disconnect from the MySQL server:
Creating a database using phpMyAdmin
Open in browser
Http://server ip address/phpmyadmin
Go to the "Databases" section

Specify the database name, quote and click "Create"

Go to the "Users" section, click "Add user"

Provide a username, limit local access, set a password and confirmation. Check the "Grant all privileges to the database "base name" (in our case, site)" checkbox. Click "Forward" to continue.
Attention! Use strong passwords.

Click on the "Exit" icon to exit phpMyAdmin.

You have successfully created a database and a privileged user for your site.
Creating a home directory, setting permissions, preparing JoomlaCreate a home directory for the site:
Sudo mkdir /var/www/html/site.ru
Create a directory for storing logs:
Sudo mkdir /var/www/html/site.ru/logs
Go to the home directory of the site:
Cd /var/www/html/site.ru
For Joomla 3.6 installations You will need wget and unzip, run in the terminal:
Sudo yum -y install wget unzip
Download from the official website latest version Joomla, at the time of writing this is version 3.6.2:
Sudo wget https://github.com/joomla/joomla-cms/releases/download/3.6.2/Joomla_3.6.2-Stable-Full_Package.zip
Let's unpack:
Sudo unzip Joomla_3.6.2-Stable-Full_Package.zip
Let's set file permissions:
Sudo find . -type f -exec chmod 0644 () \;
Let's set directory permissions:
Sudo find . -type d -exec chmod 0755 () \;
Let's change the owner to the Apache user:
Sudo chown apache:apache -R /var/www/html/site.ru
Attention! If you have not disabled SELinux, you need to enable read and write for Apache:
Sudo yum -y install policycoreutils-python sudo semanage fcontext -a -t httpd_sys_content_t "/var/www/html/site.ru(/.*)?" sudo semanage fcontext -a -t httpd_sys_rw_content_t "/var/www/html/site.ru(/.*)?" sudo restorecon -R /var/www/html/site.ru
Creating, configuring and testing virtual hostsCreate a virtual host site.ru:
Sudo mcedit /etc/httpd/conf.d/site.ru.conf
Specify settings virtual host:
Restart Apache:
Sudo systemctl restart httpd.service
Creating other virtual hosts is similar, but don't forget to create home directories for new sites.
To verify that the virtual host is configured correctly, you need to edit hosts file on the client machine.
# Open with a text editor C:\Windows\System32\drivers\etc\hosts # Make the following changes xxx.xxx.xxx.xxx site.ru xxx.xxx.xxx.xxx www.site.ru
# Open with a text editor sudo mcedit /etc/hosts # Make the following changes xxx.xxx.xxx.xxx www.site.ru site.ru
*Where xxx.xxx.xxx.xxx is the IP address of your server
Save and reload your browser.
Installing Joomla and launching the siteOpen in browser:
http://site.ru
http://www.site.ru
meets you Joomla installation wizard:

You need to select the installation language for Joomla 3.6.2. indicate the name of the site, administrator email, login, administrator password and password confirmation. Click "Next" to continue.

Database configuration. Specify the database type, leave the server name as default "localhost". Specify the username (in my case site), password (Zaq12wsx) and database name (site). You can also specify manually or automatically the "Table Prefix". A prefix can be used when storing data from several sites in one database; in this case, for each site you must specify a different prefix from others. Click "Next" to continue installing Joomla.

Complete installation. On this page you can see a summary of all site settings, as well as install demo data. Click on the "Install" button.

We are waiting for completion Joomla 3.6.2 installation process on CentOS 7 web server.

I offer you right away Russify Joomla 3.6.2. Click "Install language packs".

Select the required language from the list.


At the moment we will not be using multilingual functionality on our website. Specify the language of the control panel, as well as the language of the site, and click "Next".

Click "Remove 'installation' directory".

Installing Joomla 3.6.2 on your own web server CentOS 7 completed successfully.

To install ProFTPD do:
Sudo yum -y install proftpd proftpd-utils
Start the service:
Sudo systemctl start proftpd
Enable proftpd in startup:
Sudo systemctl enable proftpd
Edit the server configuration file:
Sudo mcedit /etc/proftpd.conf
Change the "DefaultRoot" parameter to the following form:
DefaultRoot~
Comment out the default parameter "AuthOrder":
#AuthOrder mod_auth_pam.c* mod_auth_unix.c
Add the following parameters to the end of the file:
AuthUserFile /etc/ftpd.passwd RequireValidShell off AuthPAM off RootLogin off PassivePorts 30000 35000 ListOptions -a LoadModule mod_auth_file.c AuthOrder mod_auth_file.c
Let's look at the list of users:
Sudo cat /etc/passwd
Command output:
*** sshd:x:74:74:Privilege-separated SSH:/var/empty/sshd:/sbin/nologin mysql:x:27:27:MariaDB Server:/var/lib/mysql:/sbin/nologin apache :x:48:48:Apache:/usr/share/httpd:/sbin/nologin
In my case Apache has the following user and group IDs: UserId=48, GroupId=48.
We create a virtual ftp user with login site, user ID 48, group 48 and home directory /var/www/html/site.ru:
Sudo ftpasswd --passwd --file=/etc/ftpd.passwd --name=site --uid=48 --gid=48 --home=/var/www/html/site.ru --shell=/bin /false
After executing the command, the system will ask you to enter a password twice for the user being created (I strongly recommend using complex passwords). As a result of executing the command, the /etc/ftp.passwd file will be created with an entry about the user.
You can change the user password with the following command:
Sudo ftpasswd --file /etc/ftpd.passwd --passwd --name=site --change-password
Edit permissions for the file with users:
Sudo chgrp nobody /etc/ftpd.passwd sudo chmod 640 /etc/ftpd.passwd
SELinux. Allow me full access to files for proftpd:
Sudo setsebool -P allow_ftpd_full_access=1
Restart the proftpd service:
Sudo systemctl restart proftpd
Firewalld - increasing server security levelFirewalld is a new firewall included with CentOS 7. To install Firewalld, run:
Sudo yum -y install firewalld
Let's launch:
Sudo systemctl start firewalld
Include in autoload:
Sudo systemctl enable firewalld
Let's check:
Sudo systemctl status firewalld
If you go to the site now, nothing will open for you. Firewalld is blocking network connections. Let's see what is allowed by default:
Sudo firewall-cmd --permanent --list-all
Command output:
Public (default) interfaces: sources: services: ssh dhcpv6-client masquerade: no forward-ports: icmp-blocks: rich rules:
Ssh is permanently allowed, as is the dhcp v6 client. I don’t use ip v6 on the server, so I’ll remove the corresponding rule:
Sudo firewall-cmd --permanent --zone=public --remove-service=dhcpv6-client
For the web server to work, you must enable the http service (port 80):
Sudo firewall-cmd --permanent --zone=public --add-service=http
If you plan to use https on your site, you must enable the https service (port 443):
Sudo firewall-cmd --permanent --zone=public --add-service=https
For the FTP server to work, it is necessary to open 21 ports, as well as ports 30000-35000 to use passive mode in FTP clients:
Sudo firewall-cmd --permanent --zone=public --add-port=21/tcp sudo firewall-cmd --permanent --zone=public --add-port=30000-35000/tcp
Let's reload the rules:
At this stage of Firewalld configuration, your site is accessible again. But I would like to suggest you take a few more steps to increase the security level of your server. There is a fairly detailed written one. One of the setup steps is changing the standard port; let's look at the Firewalld settings in more detail when changing the ssh port.
Let's permanently allow (so that it doesn't get lost after a reboot) the connection to port 2220/tcp (we'll hang sshd on it):
Sudo firewall-cmd --permanent --zone=public --add-port=2220/tcp
Let's reload the rules:
Sudo firewall-cmd --reload
Let's check:
Sudo firewall-cmd --zone=public --list-ports
Command output:
2220/tcp
The port is open. Editing the sshd config:
Sudo mcedit /etc/ssh/sshd_config
We make changes:
*** # If you want to change the port on a SELinux system, you have to tell # SELinux about this change. # semanage port -a -t ssh_port_t -p tcp #PORTNUMBER # In the file you only need to specify the port Port 2220 #AddressFamily any #ListenAddress 0.0.0.0 #ListenAddress:: ***
Let's restart ssh:
Sudo systemctl restart sshd.service
Also, if you are using SELinux (I hope you have not disabled it), you must run additional settings. This is due to the fact that SELinux will not allow you to connect to ssh on non-standard port (2220):
Sudo semanage port -a -t ssh_port_t -p tcp 2220
After checking the ssh connection on the new port, close access to port 22:
Sudo firewall-cmd --permanent --zone=public --remove-service=ssh
Reload the rules:
Sudo firewall-cmd --reload
Let's check the Firewalld settings:
Sudo firewall-cmd --list-all
Command output:
Public (default) interfaces: sources: services: http https ports: 2220/tcp 21/tcp 30000-35000/tcp masquerade: no forward-ports: icmp-blocks: rich rules:
We have opened access to the server via http protocol, https, ftp, as well as port 2220 on which the ssh service now runs.
Hi all! Today in the article we will look at the installation CentOS 7 Minimal, initial network setup and installation of a graphical interface called Mate. We already have an article and video about it, but there are several subtleties when installing Minimal, more on them below.
The first difference is that the image is slightly larger - 700 MB, but this is still incomparable with the volume of a DVD or Full edition. The next difference, which follows from the previous one, is that there is no option to select additional software for installation (screenshot below):
CentOS 7 also added the ability to enable the network interface directly during installation - this was not the case in version 6, however, I will additionally demonstrate the most visual way to configure the network interface in version 7.
Installation process
So, we perform all the steps sequentially, wait 15-30 minutes and enter your login/password (after connecting through the terminal).
My first instinct was to check if the network interface was working and if an address had been assigned to it - I entered the ifconfig command, and, as it turned out, this command on version 7 it is obsolete and instead you need to use the ipaddr command to display information about interfaces and the iplink command to display statistics on them.
But since everyone is accustomed to the standard commands of the net-tools package, it will need to be installed using the yum install net-tools command. However, remembering the first feeling of misunderstanding when my network did not work in the minimal installation on version 6, I want to additionally show a very simple way to configure it - more on that below.
Important! The ifconfig command is deprecated. For network interaction with the server, we recommend using the “ip” command (ip -a), which is superior in functionality (from the point of view of L2 and L3) to “ifconfig”.
Configuring network interfaces using nmtui
We enter the command nmtui - as a result, a simple one should start GUI to configure the network (screenshot below):

For example, I want to change the settings of a single interface - select the first option Edit a connection and we see the following picture:

Choose Edit... and do whatever we want with the interface :) As you can see in the screenshot below, our server received an IP address via DHCP - this suits me and I will leave everything as it is. The main goal was to demonstrate this utility - nmtui

Installing MATE and required packages
So why MATE? The answer is simple - it is much lighter, very undemanding of resources and extremely easy to install. So, let's produce several simple steps for installing packages (below):
- yum groupinstall "Development Tools" - installation of the necessary set of packages for the GUI to work (only if not already installed);
- yum install epel-release - installing the EPEL repository;
- yum groupinstall "X Window system" - installs the X Window System group package, this will take about 5 minutes. The package itself has a volume of 73 MB;
- yum groupinstall "MATE Desktop" - installing Mate directly - quite a large package - 506 MB;
Installing the CentOS 7 operating system differs in many ways from that of other Linux kernel-based distributions, so even an experienced user may encounter many problems when performing this task. In addition, the system is configured during installation. Although you can configure it after completing this process, the article will provide instructions on how to do this during the installation.
Installation of CentOS 7 can be performed from a flash drive or CD/DVD, so first prepare a drive with at least 2 GB.
It is worth making an important note: closely follow the implementation of each step of the instructions, since in addition to the usual installation you will be configuring future system. If you ignore some parameters or set them incorrectly, then after starting CentOS 7 on your computer, you may encounter many errors.
First you need to download the operating system itself. It is recommended to do this from the official website to avoid problems with the system. In addition, unreliable sources may contain OS images that are infected with viruses.

When choosing, take into account the capacity of your drive. So, if it holds 16 GB, select "Everything ISO", thereby you will install the operating system with all components at once.
Note: if you are going to install CentOS 7 without an Internet connection, you must choose this method.
Version "DVD ISO" weighs about 3.5 GB, so download it if you have a flash drive or disk with at least 4 GB. "Minimal ISO"- the most lightweight distribution. It weighs about 1 GB, since it lacks a number of components, for example, there is no choice of graphical environment, that is, if you do not have an Internet connection, then you will install the server version of CentOS 7.
Note: after the network is configured, you can install a graphical desktop shell from the server version of the OS.
Once you have decided on the operating system version, click the appropriate button on the website. After this, you will be redirected to the page for selecting a mirror from which the system will be loaded.

Step 2: Create a boot drive
Immediately after the distribution image is downloaded to the computer, it must be written to a drive. As noted above, you can use either a flash drive or a CD/DVD for this. There are many ways to perform this task, you can find all of them on our website.
Step 3: Start your PC from the boot drive
When you already have a drive with a recorded CentOS 7 image in your hands, you need to insert it into the PC and launch it. This is done differently on each computer, depending on the BIOS version. Below are links to all the necessary materials, which tell you how to determine the BIOS version and how to start the computer from the drive.
Step 4: Pre-configuration
When you start the computer, you will see a menu in which you need to determine how to install the system. There are two options to choose from:
- Install CentOS Linux 7- normal installation;
- Test this media & Install CentOS Linux 7- installation after checking the drive for critical errors.
If you are sure that the system image was recorded without errors, then select the first item and click Enter. Otherwise, select the second option to ensure the suitability of the recorded image.


The entire system pre-configuration process can be divided into stages:
- Select a language and its variety from the list. Your choice will determine the language of the text that will be displayed in the installer.
- "Date and time".
- In the interface that appears, select your time zone. You can do this in two ways: click on your locality on the map or select it from the lists "Region" And "City", which is in the upper left corner of the window.

Here you can define the format of the displayed time in the system: 24 hour or AM/PM. The corresponding switch is located at the bottom of the window.

After selecting your time zone, click "Ready".
- In the main menu, click on the item "Keyboard".
- From the list in the left window, move the desired keyboard layouts to the right one. To do this, select it and click on the corresponding button at the bottom.

Note: The keyboard layout above is the priority one, meaning it will be selected in the OS immediately after it boots.
You can also change the keys to change the layout in the system. To do this you need to click "Options" and specify them manually (the default is Alt+Shift). After setting, click on the button "Ready".
- From the main menu, select "Network & Host Name".
- Set the network switch, which is located in the upper right corner of the window, to position "Enabled" and enter the hostname in the special input field.

If the Ethernet parameters you receive are not in automatic mode, that is, not via the DHCP protocol, then you need to enter them manually. To do this, click on the button "Tune".


On the tab "Ethernet" from the list, select your network adapter to which the provider cable is connected.

Now go to the tab "IPv4 Settings", define the setup method as manual and enter in the input fields all the data provided to you by the provider.

- Click on the menu "Program selection".
- On the list "Basic environment" select the desktop environment you want to see in CentOS 7. Along with its name, you can read a short description. In the window "Add-ons for the selected environment" select the software you want to install on the system.


Note: All software listed can be downloaded after the operating system installation is complete.
After this, the preliminary setup of the future system is considered complete. Next you need to partition the disk and create users.
Step 5: Partitioning the Drives
Disk partitioning when installing an operating system is a critical step, so you should carefully read the guide below.
Initially, you need to go directly to the markup window. To do this:

You are now in the markup window. The example uses a disk on which partitions have already been created; in your case there may not be any. If there is no free space, then to install the OS you must initially select it by deleting unnecessary partitions. This is done as follows:

After this, the section will be deleted. If you want to completely clear your disk of partitions, then perform this operation on each one separately.
Next, you will need to create partitions for installing CentOS 7. This can be done in two ways: automatically and manually. The first involves selecting an item "Click here to automatically create them".

But it’s worth noting that the installer suggests creating 4 partitions: home, root, /boot and swap partition. At the same time, it will automatically allocate a certain amount of memory for each of them.

If this layout suits you, click the button "Ready", otherwise you can create all the necessary partitions yourself. Now we will tell you how to do this:

After creating the partition, you can change some settings on the right side of the installer window.

Note: if you do not have sufficient experience in partitioning disks, it is not recommended to make changes to the created partition. By default, the installer sets the optimal settings.
Knowing how to create partitions, partition the disk as you wish. And press the button "Ready". At a minimum, it is recommended to create a root partition, indicated by the symbol «/» and swap partition - "swap".
After clicking "Ready" A window will appear listing all changes made. Read the report carefully and, if you notice nothing unnecessary, click the button "Accept changes". If there are discrepancies in the list with previously performed actions, click the button “Cancel and return to partition settings”.

After partitioning the disks, the last, final stage of installing the CentOS 7 operating system remains.
Step 6: Complete installation
After partitioning the disk, you will be taken to the main menu of the installer, where you need to click the button "Start installation".

After this you will be taken to a window "Custom Settings", where you need to perform a few simple steps:

All this time, while you were creating a user and setting a password for the superuser account, background The system was being installed. Once all the above steps have been completed, all that remains is to wait for the process to complete. You can track its progress using the corresponding indicator at the bottom of the installer window.

Once the bar reaches the end, you need to restart your computer. To do this, click on the button of the same name, after first removing the flash drive or CD/DVD with the OS image from the computer.

When you start the computer, the GRUB menu will appear, in which you need to select the operating system to start. In the article, CentOS 7 was installed on a clean hard drive, so there are only two entries in GRUB:

If you installed CentOS 7 next to another operating system, then there will be more lines in the menu. To launch just now installed system you need to select an item "CentOS Linux 7 (Core), with Linux 3.10.0-229.e17.x86_64".
Conclusion
After you start CentOS 7 through the GRUB boot loader, you need to select the created user and enter its password. As a result, you will be taken to the desktop, if one was selected for installation during the system installer setup process. If you followed each step outlined in the instructions, then system setup is not required, since it was completed previously, otherwise some elements may not work correctly.


