Date intitle datalife engine control panel. Setting up the DataLife Engine
It is probably common for all people to forget some information. This especially applies to passwords and logins from various sites.
You (or the person who gave you access) created a strong password, but did not write it down in a secluded place and forgot it. What to do in this case?
By default, DataLife Engine does not allow password recovery for the Administrators group. This is done for obvious reasons - after all, if a person has access to your mail, then he has access to your website.
But you can enable password recovery option in a standard way(via the recovery form) and for administrators. Read about how to do this in this article.
The same article is devoted to those cases when standard password recovery is not enabled, but you need to regain access to the control panel.
I will tell you about two recovery methods, they are simple. Everyone chooses the method that seemed more convenient to him.
Restoring access to the site control panel in DataLife Engine via SQL query
From the title, I think you already understand that to change the password you need to make an SQL query in your database. I described in detail how to make an SQL query in .
You need to make a request of the following type:
UPDATE `dle_users` SET `password` = "202cb962ac59075b964b07152d234b70" WHERE `user_id` = 1;
Where " 1 " is the administrator ID (change it to yours), and " " – password "123" in encrypted form.
After the request has been successfully completed (if you encounter any difficulties, write about it in the comments), you can log into the site’s control panel using your username and password “123”.
Restoring access to the site control panel in DataLife Engine through an additional user
In this case, you need to register a new profile on your site and give it the proper rights.
To do this:
1. Register a new profile (be sure to remember your login).
2. In your database, run the SQL query:
UPDATE `dle_users` SET `user_group` = "1" WHERE `name` = "login";
Where " login" – login of the new user (change to yours).
That's all, actually. Using this request, we make the specified user an admin, and with his data you can log in to the control panel of your site.
For informational purposes only. The administration is not responsible for its contents. Download for free.
Dear friends,
We present to you new version our script DataLife Engine v.13.1 NULLED. This release will add support for automatic update plugins for new versions and a number of other improvements in the plugin system, new features have been added for more comfortable work with additional fields, a new type of rating “Like and Dislike” has been added, an improved search for publications in the admin panel, and much more, read more about this and more...
The following changes were prepared and implemented:

1. Added the ability to automatically update the script in the admin panel within one version of the script, in cases where, for example, fixes for found vulnerabilities or other bugs are released. In cases where changes are made to the distribution within one version, for example, when patches for vulnerabilities are released, or other problems with the script are identified, it will be possible to update the script in the admin panel within this current version of the script.

2. Added the ability to automatically update plugins on the site. To do this, the plugin sets a URL to obtain information about the availability of a new version. At this URL, the plugin developer’s site should return an array in JSON format, which should contain information about the current version of the plugin, as well as a link to download the current version of the plugin. For example, the given URL should return the value ("version":"2.0","url":"https://dle-news.ru/test/test.zip"). After which, when checking for updates, the site administrator will be able to find out about the availability of new versions of the plugin and update the plugins in the admin panel in one click.

3. For the plugin management system, the ability has been added indicate the number of replacements that need to be made for each search criterion in the file. For example, you need to find and replace some code in a file that appears several times in this file, you can specify how many times this code needs to be replaced. To replace all occurrences of this code, you can leave this parameter empty, thereby the replacement will be made wherever the code you specify occurs.

4. For the plugin management system, the ability has been added automatic deletion of files downloaded along with the plugin in the archive additional files, in case the plugin is removed from the site. To do this, the ability to choose whether to delete additional files or not is added to the plugin parameters. Thus, you can independently decide whether it is necessary to clear the server of additional files in the event of its removal from the site, or whether they need to be left.
5. For the plugin management system, the ability has been added use the (THEME) tag in the names of folders located in ZIP archives. When loading an archive through the plugin system, this tag will be replaced with the name of the template used. For example, by placing the file /templates/(THEME)/test.tpl in the archive, your template file will be placed in the template used on the site. Thus, when using complex plugins that contain example template files, they can be immediately loaded into the desired folder containing the template used by the user.
6. For the plugin management system, the ability has been added use control characters of the preg_replace function, such as \\1, etc., in the “Search and Replace” action in the replacement string, which removes restrictions on the search and replacement of some codes in DLE.

7. For additional fields of the "Image" and " Image gallery" , added the ability to assign each image individually its own personal description, which is also used as an HTML alt attribute when displaying data in additional fields on the site.

8. For additional fields of the "Image Gallery" type, added the ability to change the sort order of downloaded pictures by simply moving them with the mouse. Once the images are uploaded, you can swap the images as you wish. Also, uploaded images can be transferred to other additional fields.

9. A new rating type “Like and Dislike” has been added for publications and comments. which keeps separate records of both the number of likes and the number of dislikes. For this purpose, new tags have been added for publication and comment output templates: (likes)- which displays the number of likes, (dislikes) - which displays the number of dislikes, as well as the tag text- which displays the text enclosed in the tag if it is enabled in the settings this type rating.

10. In the user profile settings in the admin panel, the ability has been added set a list of categories to which this particular user is allowed to add publications. This will allow, for example, journalists to maintain personal columns in which other journalists (or some of them) do not have the right to publish. Or vice versa - exclude a journalist from a specific news category if, for example, he is incompetent in it.
11. In the user profile settings in the admin panel, the ability has been added establish a list of trusted categories into which this particular user is allowed to add publications without moderation. Such personalization will allow for much more flexible delimitation of rights, without creating a bunch of user groups, including groups for each specific journalist.

12. For an advanced search for publications in the admin panel, in the publication editing section, the ability to select where to search has been added. You can search through all content, or separately by headings, brief description, full description and additional fields. Search algorithms have also been significantly improved to more accurately locate publications.
13. For an advanced search for publications in the admin panel, in the publication editing section, the ability to search simultaneously in several categories to choose from has been added.
14. Added the ability for the tag cloud using the characters "&" and "#", which allows, for example, to use the names of various brands in the cloud, for example, "H&M", etc.

15. In the script settings in the admin panel, the ability has been added permission for the site administration to log in to the site using social networks. When this setting is enabled, users in the administrators group can also log in to the site using their social network accounts.

16. In the admin panel, in the comments editing section, the ability to search for comments in the text. IN this section you can search for the comments you need to edit by any keywords. This makes editing comments more convenient.

17. In the admin panel, in the cross-reference management section, the ability has been added for mass actions on links, set the replacement “Only in static pages”, as well as “In static pages, news and comments”.
18. To preview banners in the advertising management section in the admin panel, Added connection of your template styles from the preview.css file. Thus, you can see a more correct design of your advertising code if it uses classes from your template.
19. Added for short news output template (shortstory.tpl) using tags text, which display the enclosed text in them if there are no publications according to these criteria. Thus, you can reassign the standard system message about the absence of publications in any particular section of the site, making it unique, for example, for each section of the site. These tags can also be used in templates that are used for custom display of publications using the tag (custom ...)

20. For the E-Mail template of the message that is sent upon recovery forgotten password, added the use of new tags: (%losturl%), which displays only the URL of the link to reset and generate a new password, as well as (%ipurl%), which only displays the URL of the link to reset the IP block. Thus, you can separately specify the design you need in the email for these links, for example, in the form of buttons. You can also, for example, refuse to display a link to remove IP blocking if you do not use this feature on your website.
21. Improved system for deleting categories in the admin panel. If the category being deleted contains subcategories that are also subject to deletion, then all actions for publications that contain the deleted category will be automatically extended to publications that also contain subcategories to be deleted. And the same actions will be applied to these publications in subcategories.

22. For the module "Filter by: IP, Login or E-Mail" the ability has been added adding blocked addresses or logins, or e-mails in whole lists at once, and not one at a time. This significantly speeds up the adding process if you already have a ready-made list of what needs to be blocked.

23. For the module "Filter by: IP, Login or E-Mail" the ability has been added editing existing rules. You can select and edit any rule without having to delete it and add it again.

24. For the module "Filter by: IP, Login or E-Mail" the ability has been added selecting several or all added rules at the same time, and mass unlocking these rules in one click.
25. Support has been added for the "Filter by: IP, Login or E-Mail" module use of IPv6 addresses that can be specified to block access to the site. The ability to specify IPv6 subnets for blocking has also been added.
26. Added the ability to specify IPv6 addresses in the user profile, from which authorization for the user is allowed. You can also specify not only a separate address, but also an IPv6 subnet.
27. For the module for custom sorting of publications on the site, displayed by the tag (sort), the ability to set sorting for each specific category, and not for all categories at the same time, has been added.
28. For links published in publications, the ability to using block elements in them, such as "p", "div", etc. This allows DataLife Engine to more accurately and correctly comply with HTML5 standards.
29. Added the ability to add new users in the DataLife Engine control panel, when working with the panel using smartphones.
30. Changes have been made to the operation of tree comments. If the maximum nesting for replies to comments has been reached, then in the case of a reply to the comment, these replies remain in the discussion thread at the maximum nesting. Previously, when the maximum nesting was reached, it was impossible to reply to a comment. Now the answer remains possible in any case.
31. For additional fields of the "Cross-References" type, added the ability to use in symbol values double quotes, and the ampersand symbol.
32. If for the E-Mail template of the message that is sent when recovering a forgotten password, the use of the HTML format for this letter is set, then the links generated by the tag (%lostlink%) in this template will be generated in the form of ready-made HTML code, and not just text links.
33. The ability to install has been added to the script settings Posts are sorted by default by the number of comments. The same thing has been added for setting sorting criteria when viewing a catalog.
35. Changes have been made to the operation of additional fields, if the field has restrictions on adding by user groups. If the value of an additional field was added by a user who has the right to do so, and the publication is subsequently edited by a user who does not have the rights to fill in this field, then the value of this field is no longer cleared, but remains as it was previously filled in by the user who has the right to do so. right.
36. The limit on the number of characters in the Description meta tag for categories has been increased to 300 characters. The maximum length now corresponds to the maximum length set by the search engine. Google system, to display this information in search results.
37. Improved search for similar news on the site. The display of similar news has become more relevant by sorting the found publications.
38. Improved support for IPv6 addresses of site visitors. In some specific cases, the full address might not fit into the database. The lengths of the fields are now reserved according to the RFC 4291 specification.
39. Improved generation of the og:description meta tag of the Open Graph protocol when viewing full news. Formation occurs more correctly when additional fields for publications are used as the main content.
40. Improved performance of the DataLife Engine security system, in order to more correctly check data on subdomains, on some hosting sites, it has a subdomain structure in the form of subfolders of the main domain.
41. Added support for the tel protocol: for links published on the site using BB tags.
42. Updated visual editors TinyMCE and Froala up to the latest versions. A number of identified errors in these editors have been corrected.
43. Problem fixed, using in additional user profile fields fields of the "List" type, in which values using the "|" symbol were used.
44. Problem fixed, in which, in the plugin management section, if the action on a file in the menu was changed, some symbols could incorrectly change in the values specified in the fields.
45. Problem fixed, in which it was impossible to use tags for internal pages of the site, and only allowed use for external sites.
46. Problem fixed, in which it was impossible to start updating the site to a new version if the site was in an encoding other than UTF-8 and the administrator’s login or password contained letters written in Cyrillic.
47. Problem fixed, in which a pop-up window about the receipt of new personal messages did not appear if the user independently logged out of his account on the site, and then logged in again after some time.
48. Problem fixed, in which editing comments in the script control panel did not work if the TinyMCE editor was enabled in the script settings.
49. Problem fixed, in which the number of days during which you can add comments to a publication was not displayed, if such limits were set in the script settings in the admin panel.
50. Problem fixed, in which an additional field of the “Downloadable file” type was not displayed on the site as a link to download a file, but was displayed as a simple tag.
51. Previously discovered and reported minor errors in the script have been corrected.
From the author: Greetings, friends. In this short overview article we will look at how the DLE admin panel works, where the entrance to the DLE admin panel is located and how to get to the admin panel. As you understand, the article is primarily aimed at those who have just begun their acquaintance with CMS DLE.
So, you have installed the DLE engine on your hosting or local server. How can I get into the DLE admin area now? It’s simple, to do this, just go to the main page of your site and add the line admin.php to the address, and then go to the new address. For example, the address of my website is dle.loc, respectively, the DLE admin panel is located at the following URL - dle.loc/admin.php

When we try to log into the DLE admin panel, we will quite logically see an authorization form where we must enter the administrator login and password that we created during the DLE installation stage. Let's log in. After successful authorization, we find ourselves in the holy of holies of our site - the DLE control panel.

It is worth noting that the DLE admin panel is built quite logically and intuitively. If you try to compare with the admin panels of other CMS, then the DLE admin panel will be a little more complex than the WordPress admin panel, but simpler and more understandable compared to the Joomla admin panel. Appearance The DLE panel admin is also worthy of praise; working with the admin panel is quite pleasant and convenient.
In the upper right corner we can see data on our profile, where you can change your E-mail, name, password and other similar data. Also nearby there is access to the two most frequently used functions when managing a site - adding news and Editing news. Since DLE is a news engine, it is logical that news management functions are provided for easy access.

Let's try to add the first news, or article, if you will, to our site. To do this, click the Add news button and fill out the form provided to add news. Essentially, we just need to indicate the title of the article, select a category for it, and also fill out a short and full description added article.

Let's save the news and see if it appears on the main page of the site. The article has appeared and this is great, because you can add your other articles and news just as easily and simply.

Let's also change the name of the site. This can be done in the Script Settings - System Settings section. In the Site Name field, enter the desired name.

Now in the browser tab we will see what we need as the name of the site. As you can see, everything is really convenient, logical and understandable in the DLE admin panel. In the following articles we will get acquainted with other DLE capabilities, but this is where we will probably end the current article. If you want to get to know DLE more deeply and learn how to create websites on this engine, then be sure to pay attention to our course. Well, with this I say goodbye to you. Good luck!
There are a huge number of sites on the Internet, and they all run on different engines. The differences mainly lie in functionality engines and ease of use for third-party site users. The most popular engines are Joomla, WordPress, Drupal, DLE. Let’s look at the latter in more detail, since, being one of the most convenient and simple engines, it is increasingly chosen by webmasters and becomes the basis of most web resources.
The DLE engine is DataLifeEngine - the basis that was previously expected to be used for resources with news feeds and reviews. Today, a wide variety of sites dedicated to any topic run on this engine.
The DLE engine has earned its popularity thanks to its enormous functionality, all of which is written about in detail on the website dle-news.ru. The creators of this engine offer two versions of their product: paid and free. It is quite logical to assume that free version will be with more limited capabilities. But despite this, the free version of the DLE product is an excellent engine for both novice webmasters and more advanced ones. Sites not only with news, but also those dedicated to cooking, medical topics, etc. work great on it.
On which hosting can you install DLE?
Before you start installing the DLE engine, it would be a good idea to familiarize yourself with the requirements that it places on the server. First, there are several installed libraries: PHP Zlib, PHP XML, PHP GD2, PHP iconv. Besides, software must include Apache version 2.0 and higher, PHP 4.3.2+ or PHP 5.0+ and MySQL version no older than 4.0. RAM must be at least 8 megabytes in size, but this is the minimum. Nobody forbids using RAM with 16 megabytes, on which the product will work even better.
When using the DLE engine on the server, it is better to disable safe mode, which is designated as SafeMode.
Checking hosting for compliance
The description of the installation process that you will read below is based on the conclusions made after installing the engine on a test web resource. For a more visual example, screenshots of each stage of the installation process are provided.
We begin the installation by checking full list settings. To do this, add to the root of the site text document, give it the name phpinfo.php, and write the code in it:
Then we run the script that we managed to create. In the browser we type the following: https://my_site.ru/phpinfo.php. After this we can see the following picture on the page:
Those places circled in red are the main parameters that determine the further operation of the web resource being created. For example, in order to be able to work with graphic objects, normal operation is required PHP Libraries GD2. If it is installed incorrectly, the captcha will not be displayed on the site.
Also, in order for the created web resource to work normally, you need to install MySQL database. The system will request a login and password. In order not to forget this data, it is better to write it down somewhere. To configure the database, we use the control panel that is available on the hosting.
Detailed instructions for installing DLE
After the package with the engine is downloaded to your computer, you need to unpack and install it. But we will not install everything, but only the upload folder and the Documentation folder. If the hosting has a recognition function zip archives, then the installation process will go faster. If this function is not supported, then files from the archive will have to be downloaded separately.
It is very convenient to work with TotalCommander when installing the DLE engine. When you copy files or folders to the server, the checkbox “Translate file names to lowercase” must be removed.
If the server allows you to recognize and unpack the archive, we place all the files that are in the upload folder into it at once. 
Now we shut down TotalCommander and continue the installation using the ftp client. For the site to work correctly, you must very carefully enter the data of the server files and folders. 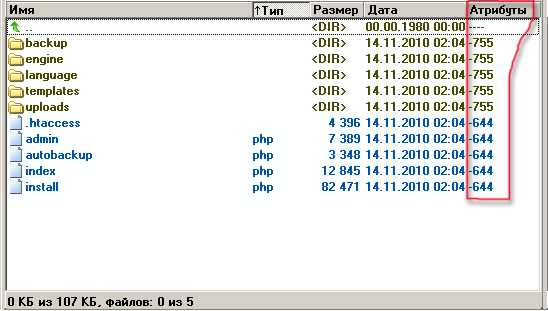
To adjust the Attributes, you need to select the desired folder. Once you change folder permissions, they are not replaced with the contents of the folders. The most convenient way to select files and folders that we will change is through TotalCommander or the keyboard shortcut Alt+A. 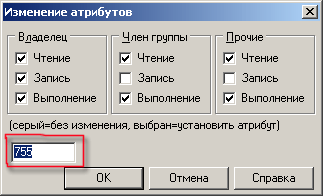
In the window that opens, enter what we need and click OK.
— Set the templates folder and all its subfolders to write permission (CHMOD 777)
— Set all files in the templates folder to write permission (CHMOD 666)
— Set write permissions (CHMOD 777) for the backup, uploads folders, as well as for all folders located inside them.
— Set write permissions (CHMOD 777) for the /engine/data/, /engine/cache/, /engine/cache/system/ folders.
When all adjustments have been made, enter the following entry in the browser: https://proba.regciti.ru/install.php. It means that we are going to run a file called install.php. After the file is launched, hints will appear in each window that opens. Based on these signatures, we continue the installation process. Basically, it will start automatically, and the system itself will check all those files that need to be installed and notify you when the installation is complete.
Now you can see the preliminary result of what you have been working so hard on all this time. Enter https://your site name/index.php into the browser line. A demo page will open in front of you. To log into the admin panel and start working, you need to enter the following entry in the address bar: https://your site name/admin.php. On the screen in case correct installation The following picture should appear: 
We agree with the proposal that is displayed in the lower left corner and begin the installation. After clicking this button, a window will appear asking you to read the terms of the license agreement. You will be able to move to the next page only if you accept this agreement and check the appropriate box. Click “continue”: 
After this, the process of checking all those components and files that have been installed will automatically begin. The script will automatically indicate the errors that were made and that need to be corrected in order to continue working. This picture contains a list of several items. They should be without a red outline - this will mean that the script did not detect any errors and you can continue working. If any item is outlined in red, we correct the error. In principle, the script may require you to fix errors, and you can refuse, but then expect the system to crash at some points. And it will only be your fault, not the providers or users. If the errors cannot be corrected, you can ask for advice or help from the provider who provides you with space on the server. 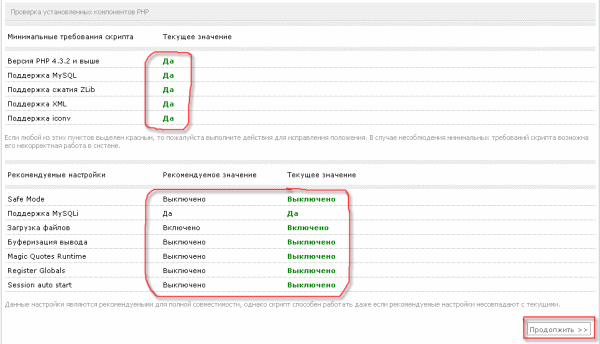
At the bottom of the window there is also a list of items that should be without a red outline. But these errors are not so critical and may not affect the operation of the future site. The thing is that the script has certain standard settings, and they may not always match user settings. It is better at this stage to consult with the hosting provider and clarify whether any of the settings highlighted in red may not coincide with those proposed by the system.
We continue and get a new window that opens. Here you can find out what mistakes were made when you made changes to Attributes for folders and files. The script itself will tell you where you made mistakes or missed something. 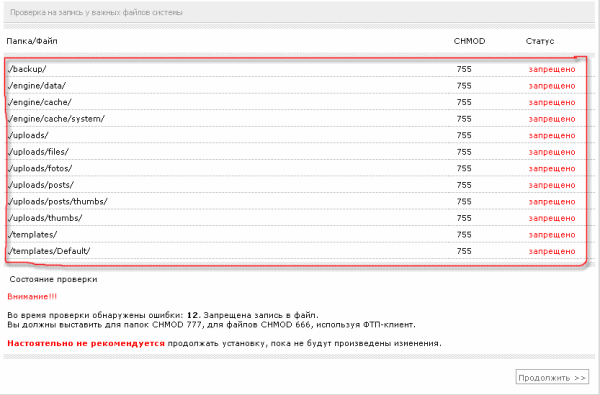
If there are still errors, it is better to correct them through an FTP client. After the adjustment, we update the page and see if there are still places where adjustments need to be made. If you did everything correctly and the system did not allocate any places with errors, congratulations! You have successfully completed one of the most difficult and critical stages of installation, and now you can safely continue! 
MySQL Server:
MySQL encoding:
The following picture shows places that need to be entered very carefully and correctly. 
The name of the database will be the same as we assigned it at the very beginning. In our case it is proba_regciti.
In the “User name” section, enter the login of the user on whose behalf the database was created. At that stage, we also wrote down the login and password just in case.
We indicate the address email in the E-mail line. Click “Continue”. If there are no input errors, the following message will appear on the previous page: “Congratulations! Installation completed successfully."
In the next window that opens, we pay attention to several points. 
When you installed the script, a database was automatically created with it, an admin account was created, and system operation settings were created. To avoid losing all settings and having to re-install, it is recommended to delete install.php.
I hope now you understand how to install DLE on your hosting. If you still have questions, ask them in the comments to this article.
Published by authorI greet everyone who devotes their precious time to these lines.
In this article I want to talk about ways to optimally configure the server and DataLife Engine content management system. Over 4 years of working with Internet sites and servers, I have learned that security comes before convenience and that attention needs to be paid to it. Reservation: I do not claim ownership of anyone's intellectual property! All material was collected on the Internet.
Below we will describe actions that will help distribute the server load, protect it from DOS attacks, limit access to the FTP protocol and correctly configure the DataLife Engine system.
Security and configuration of your server.
1. Setting up the server configuration using the front-end Nginx to Apache combination.
The advantages of such a scheme can be understood with a small example. Imagine that your web Apache server it is necessary to service about 1000 requests simultaneously, many of them connected to slow communication channels. In the case of Apache, we will end up with 1000 httpd processes, each of which will be allocated RAM, and this memory will not be freed until the client receives the requested content.
In the case of a scheme using a front-end server, we will receive significant resource savings due to the fact that after receiving a request, nginx passes the request to Apache and quickly receives a response. As a result, Apache, after giving the response to nginx, frees the memory. Next, the nginx web server interacts with the client, which is precisely written to distribute static content to a large number of clients with little consumption of system resources.
For our bundle to work correctly, we need a module for Apache. This need arises for the following reason: requests to Apache come from the IP address on which nginx is running, accordingly, only the IP address will appear in the Apache log files nginx servers. Also without using of this module problems will begin with scripts that use the visitor’s IP address and the mechanism for restricting access by IP addresses using .htaccess will stop working correctly.
Installing NGINX on popular OS.
Red Hat Enterprise Linux 4/CentOS 4
To install nginx in these operating systems you need to connect an additional package repository.
Red Hat Enterprise Linux 5/CentOS 5
To install nginx on these operating systems, you need to connect an additional EPEL package repository.
ASPLinux Server 5 / Fedora
nginx is included in the standard distribution package.
If the repositories are connected or simply not required, run: yum install nginx
Installing Apache.
To install the Apache web server, just run: yum install httpd
Installing mod_rpaf.
1.
Install the httpd-devel package:
yum -y install httpd-devel
2. Download and install mod_rpaf:
Enter the directory /usr/local/src
cd /usr/local/src
Load the mod_rpaf-0.6.tar.gz file into /usr/local/src
wget http://stderr.net/apache/rpaf/download/mod_rpaf-0.6.tar.gz
Unpack mod_rpaf-0.6.tar.gz
tar xzf mod_rpaf-0.6.tar.gz
Go to the directory where you unpacked it
Installing the module in the system
apxs -i -c -n mod_rpaf-2.0.so mod_rpaf-2.0.c
3. Next, you need to create a mod_rpaf configuration file - /etc/httpd/conf.d/rpaf.conf and add the following lines to it:
RPAFenable On
RPAFproxy_ips 127.0.0.1 xx.xx.xx.xx yy.yy.yy.yy
where xx.xx.xx.xx and yy.yy.yy.yy are the IP addresses of your server. If there are more than two IPs on the server, add them using the same analogy.
service httpd restart
4. In nginx, the following lines must be specified inside the http() block:
proxy_set_header Host $host;
If these lines are specified, there is no need to add them.
If nginx.conf is modified, nginx should be restarted:
/etc/init.d/nginx stop
/etc/init.d/nginx start
5. How to check if the installed module is working?
On any of the domains that are located on your server, place the test.php file with the contents:
" echo $_SERVER["REMOTE_ADDR"]; ?>"
Next, follow the link, where domain.tcom is your domain name. If an IP is displayed that is different from the IP of your server, the module is working correctly.
Setting up NGINX.
Below is the nginx configuration file for working as a front-end server. It is assumed that nginx will run on all interfaces on port 80, and Apache will run on interface 127.0.0.1 and port 8080. Save this configuration file in the /etc/nginx/ directory with the name nginx.conf.
user nginx;
worker_processes 10;
error_log /var/log/nginx/error.log debug;
pid /var/run/nginx.pid;
events (
worker_connections 20000;
}
http(
include /etc/nginx/mime.types;
default_type application/octet-stream;
log_format main "$remote_addr - $remote_user [$time_local] $status "
""$request" $body_bytes_sent "$http_referer" "
""$http_user_agent" "http_x_forwarded_for"";
access_log /var/log/nginx/access.log main;
sendfile on;
tcp_nopush on;
tcp_nodelay on;
keepalive_timeout 30;
send_timeout 900;
server_tokens off;
server(
listen 80;
server_name_;
server_name_in_redirect off;
access_log /var/log/nginx/host.access.log main;
location/(
proxy_pass http://127.0.0.1:8080/;
proxy_redirect off;
proxy_set_header Host $host;
proxy_set_header X-Real-IP $remote_addr;
proxy_set_header X-Forwarded-For $proxy_add_x_forwarded_for;
client_max_body_size 10m;
client_body_buffer_size 128k;
proxy_connect_timeout 90;
proxy_send_timeout 90;
proxy_read_timeout 90;
proxy_buffer_size 4k;
proxy_buffers 4 32k;
proxy_busy_buffers_size 64k;
proxy_temp_file_write_size 10m;
}
}
Apache setup.
In the Apache configuration file /etc/httpd/conf/httpd.conf, find the line:
and replace it with the line:
Listen 127.0.0.1:8080
Setting up mod_rpaf.
Add the mod_rpaf module to your Apache configuration file. To do this, add the following line to the /etc/httpd/conf/httpd.conf file:
LoadModule rpaf_module modules/mod_rpaf-2.0.so
Then add the lines to the same file:
RPAFenable On
RPAFsethostname Off
RPAFproxy_ips 127.0.0.1 192.168.0.1
RPAFheader X-Real-IP
Instead of 192.168.0.1 you need to put the server IP address.
2. Server configuration for protection against DOS attacks.
Enable caching in nginx home page for those who don't have cookies.
Add restrictions to nginx.conf:
limit_req_zone $binary_remote_addr zone=two:20m rate=2r/s;
server(
location/(
limit_req zone=two burst=5;
}
}
}
We use tail and awk:
tail -f /var/log/nginx/access.log | grep GET / HTTP/1.1" 503
Connect the log:
tail -f /var/log/nginx/access.log | grep GET / HTTP/1.1" 503 | awk "( print $1 )"
We get the IP of the machines:
iptables -A INPUT -p tcp -j DROP -s $IP
Enter the IP in the Firewall:
tail -f /var/log/nginx/access.log | grep GET / HTTP/1.1" 503 | awk "( print $1 )" | xargs -t -l iptables -A INPUT -p tcp -j DROP –s
Now let's set connlimit for iptables to limit bot connections. In the rules we set permission for 5 connections from one IP, and 25 from a class C subnet.
DDOS attack with 16,000 bots - Load average: 1.4 1.9 2.0
Restricting FTP access
For this we need the .ftpaccess file. It will help you block or allow FTP access from specified IP addresses. Someone may ask the question: “I have a dynamic IP, how can I use .ftpaccess correctly?” I only mean the answer: “If you need this security add-on, purchase a static IP from your provider. They won’t ask you for a lot of money for it.”
To create the .ftpacces file we need SSH access. You can use winscp program. There can be a lot of settings in .ftpaccess, but we are only interested in one parameter. By writing these lines in the file you will completely block access from everyone:
Deny from all
After what is written above, no one will be able to access FTP. To add access permission to a specific IP, you need to specify the following parameters:
Allow from 127.0.0.1
Deny from all
Naturally, the address 127.0.0.1 is given as an example and needs to be replaced with your own.
Important! It is best to deny access via FTP to absolutely everyone and connect only via SSH.
Protecting the DataLife Engine content management system.
1. Install and configure.
2. Rename the admin panel file and make a fake one at the old address (www.sait.com/admin.php) when going to which the user will be blocked by banning his ip in .htaccess.
Renamed? Now we create a file ip.txt in the root directory to store IP addresses. We give it and .htaccess rights CHMOD – 777.
Create a file admin.php with the following content:
$ip = getenv("REMOTE_ADDR");
$log = fopen("ip.txt", "a+");
fwrite($log, "// ".$ip."\n");
fclose($log);
$f = fopen($_SERVER["DOCUMENT_ROOT"] . "/.htaccess", "a");
fwrite($f, "\ndeny from " . $ip);
fclose($f);
DataLife Engine Admin Panel
Text, for example: Your ip is in the logs, I will find you!
Be afraid, nonentity, ha-ha!
"3. Add additional authentication in the admin center.
You must come up with another username and password (do not use your administrative account details). The second login and password must be completely different from the first. Have you decided? Great! Now let’s encrypt our password in md5 (you can do this on the website md5encryption.com).
Next, open admin.php (remember, we previously renamed it and, therefore, if you called it superadmin.php, you need to open this particular one) and after the line:
add:
$login="enter the invented login";
$password="and generated password in md5";
if (!isset($_SERVER["PHP_AUTH_USER"]) || $_SERVER["PHP_AUTH_USER"]!==$login ||
md5($_SERVER["PHP_AUTH_PW"])!==$password) (
header("WWW-Authenticate: Basic realm="Admin Panel"");
header("HTTP/1.0 401 Unauthorized");
exit("Access Denied");)
4. Disable php functions not used by the system.
To search for the php.ini file, create a file phpinfo.php with the text:
After searching, be sure to delete phpinfo.php!
disable_functions = allow_url_fopen, eval, exec, system, passthru, scandir, popen, shell_exec, proc_open, proc_close, proc_nice, get_current_user, getmyuid, posix_getpwuid, apache_get_modules, virtual, posix_getgrgid, getmyinode, fileowner, filegroup, getmypid, apache_get_version ap, ache_getenv, apache_note, apache_setenv, disk_free_space, diskfreespace, dl, ini_restore, openlog, syslog, highlight_file, show_source, symlink, disk_total_space, ini_get_all, get_current_user, posix_uname, allow_url_fopen
5. We create filtering for GET and POST requests, preventing injections into the database and obtaining data from it.
Create a .php file with a custom name and the following content:
//set to one if you want to enable query debugging
$debug = 0;
$bag_req = array("select", "eval", "echo", "UPDATE", "LIMIT", "INSERT", "INTO", "union", "CONCAT", "INFORMATION_SCHEMA", "OUTFILE", " DUMPFILE", "LOAD_FILE", "BENCHMARK", "SUBSTRING", "ASCII", "CHAR", "database", "HEX", "\\.\\/", "%00", "\\.htaccess ", "config\\.php", "document\\.cookie");
$request = serialize($_GET);
if($_GET)
{
foreach ($bag_req as $key => $value) (
{
Query found in array $value
$request";
}
}
}
if($_POST)
{
$request = str_replace("selected_language", "sl", serialize($_POST));
$urequest = urldecode($request);
$brequest = base64_decode($request);
foreach ($bag_req as $key => $value) (
if(preg_match("/$value/i", $request) || preg_match("/$value/i", $urequest) || preg_match("/$value/i", $brequest))
{
if($debug == "1") $do_debug = "
Query found in array $value, which blocks proper operation
$request";
die("BAD REQUEST $do_debug");
}
}
}
?>
We save it on the server in any directory of the DLE system. Open the file engine/classes/mysql.php and after:
if(!defined("DATALIFEENGINE"))
{
die("Hacking attempt!");
}
connect the created file:
include_once(ENGINE_DIR."/file_path/name.php");
6. When using free components for DLE, be sure to find out the opinion of a specialist about their reliability.
If you have any questions, please contact search engines- all material is freely available!
Anything to add? You are welcome to discuss!
Good luck to you and your projects!


