Php installation on windows 7. How to install local Apache server with Php, MySQL, phpMyAdmin on a Windows computer
Installing a web server on Linux:
- If you have Ubuntu, then the article “How to install Apache web server with PHP 7, MariaDB/MySQL and phpMyAdmin (LAMP) on Ubuntu 16.10” is suitable for you.
- If you have Arch Linux, then the article "Installing LAMP (Linux, Apache, MySQL/MariaDB, PHP7 and phpMyAdmin) on Arch Linux / BlackArch" is suitable for you.
Local server very useful tool. It will definitely be useful for webmasters, PHP programmers, and penetration testers. All programs included in a typical web server installation are free and open source. A local web server consumes minimal resources and is actually not difficult to install and configure.
This instruction will tell you how to install a local web server without using ready-made assemblies. This method has its advantages. The most important of them are: complete control over what you install; opportunity to use the most latest versions software.
If you follow the instructions exactly, then everything will definitely work for you! Except for those who have Windows XP - if you like this operating system, then special instructions have been made for you.
I will show an example of installation on Windows 10, but if you have a different Windows version, then don’t let this bother you - the procedure is identical everywhere. I will download the latest (most recent) versions of the programs at the time of writing. If by the time you read, new versions will be released, then download them.
Installation steps:
You may also find it useful:
1. Preparation (downloading programs included in the server, creating the server structure)
We need:
- Apache(directly web server)
- PHP- work environment PHP programs(required by almost all websites)
- MySQL- database management system (required by most websites)
- phpMyAdmin- Very handy tool for database management
The official website of the Apache developers is httpd.apache.org. You can download Apache from this site. But official version compiled using an old compiler, for this reason it does not work with new versions of PHP. PHP authors recommend Apache from apachelounge.com/download. Therefore, for this instruction, we download Apache from the site apachelounge.com/download.
If you have a 64-bit version of Windows, then you can choose both 64-bit and 32-bit versions of components. The main rule is that all components must be of the same bit size. If you have a 32-bit version of Windows, then all components must be 32-bit. This does not apply to phpMyAdmin, which is written in PHP. For PHP programs, the concept of bit depth is not applicable.
The free version of MySQL is called MySQL Community Server. It can be downloaded on the page. There is an executable installer on the same page, but I recommend downloading the ZIP archive. On the download page we are asked to register or log in to an existing one. account- but this is not necessary. Just click on the link " No thanks, just start my download" Pay attention to the bit depth.
We also need a Visual C++ Redistributable for file Visual Studio 2015-2019, i.e. Visual C++ redistributable component for Visual Studio 2015-2019 (or any other later), you can download it on the official Microsoft website using the link (direct link to download the 64-bit version; direct link to download the 32-bit version).
So, I downloaded the following files:
- httpd-2.4.29-Win64-VC15.zip
- php-7.2.0-Win32-VC15-x64.zip
- mysql-8.0.11-winx64.zip
- phpMyAdmin-4.7.6-all-languages.zip
- vc_redist.x64.exe
Install the file vc_redist.x64.exe.
2. Create a web server structure
Let's create the directory structure of our server. The main idea is to separate executable files and website files with databases. This is convenient for server maintenance, including backups.
At the root of the disk C:\ create a directory Server. In this directory, create 2 subdirectories: bin(for executable files) and data.
Go to the directory data and create subfolders there D.B.(for databases) and htdocs(for websites).
Go to the directory C:\Server\data\DB\ and create an empty folder there data.
Map of important folders that are mentioned in this manual:
C:. - Sendmail ├───certs ├── ─data │ ├───DB │ │ └───data │ └───htdocs │ └───-phpmyadmin └───manage
3. Installing Apache 2.4
The contents of the downloaded archive (more precisely, only the directory Apache24), unpack into C:\Server\bin\.
Go to the directory c:\Server\bin\Apache24\conf\ and open the file httpd.conf any text editor.
In it we need to replace a number of lines.
Define SRVROOT "c:/Apache24"
Define SRVROOT "c:/Server/bin/Apache24"
#ServerName www.example.com:80
ServerName localhost
DocumentRoot "$(SRVROOT)/htdocs"
DocumentRoot "c:/Server/data/htdocs/"
DirectoryIndex index.html
DirectoryIndex index.php index.html index.htm
# AllowOverride controls what directives may be placed in .htaccess files. # It can be "All", "None", or any combination of the keywords: # AllowOverride FileInfo AuthConfig Limit # AllowOverride None
# AllowOverride controls what directives may be placed in .htaccess files. # It can be "All", "None", or any combination of the keywords: # AllowOverride FileInfo AuthConfig Limit # AllowOverride All
#LoadModule rewrite_module modules/mod_rewrite.so
LoadModule rewrite_module modules/mod_rewrite.so
Save and close the file. That's it, Apache setup is complete! A description of each changed directive can be found on this page.
Open command line(this can be done by pressing the Win+X keys simultaneously). Select Windows PowerShell (Administrator) there and copy there:
C:\Server\bin\Apache24\bin\httpd.exe -k install
If a request is received from the firewall for Apache, click Allow.
Now enter into the command line:
C:\Server\bin\Apache24\bin\httpd.exe -k start
And press Enter.

Enter root as the username. Leave the password field empty. If everything is done correctly, then everything should look like this:

7. Server use and data backup
In the catalog c:\Server\data\htdocs\ create folders and files, for example:
c:\Server\data\htdocs\test\ajax.php - this file, accordingly, will be available at http://localhost/test/ajax.php, etc.
To create a complete backup of all sites and databases, just copy the directory C:\Server\data\.
Before updating modules, make a backup of the folder bin- in case of problems, you can easily roll back to previous versions.
When reinstalling the server or updating it, you need to re-configure the configuration files. If you have copies of these files, the process can be significantly speeded up. It is advisable to backup the following files:
- c:\Server\bin\Apache24\conf\httpd.conf
- c:\Server\bin\mysql-8.0\my.ini
- c:\Server\bin\PHP\php.ini
- c:\Server\data\htdocs\phpMyAdmin\config.inc.php
All settings are stored in them.
8. Additional PHP setup
PHP is now a very powerful, flexible, user-friendly tool. On local computer it can be used to solve a variety of problems that are not necessarily related to the generation of Web pages. When solving extraordinary problems, you may run into restrictions set in the settings. These settings are contained in the php.ini file (c:\Server\bin\PHP\php.ini). Let's look at some of them:
Memory_limit = 128M
sets the maximum amount of memory that a script can use
Post_max_size = 8M
sets the maximum amount of data that will be accepted when sending using the POST method
;default_charset = "UTF-8"
sets the encoding (by default, the line is commented out)
Upload_max_filesize = 2M
the maximum size of a file uploaded to the server. The size is initially set to a very small size - only two megabytes. For example, when loading a database into phpMyAdmin, you will not be able to upload a file larger than 2 megabytes until this setting item is changed.
Max_file_uploads = 20
maximum number of files to upload at one time
Max_execution_time = 30
maximum execution time for one script
Changing these settings is completely optional, but it is useful to know about them.
9. Additional settings for phpMyAdmin
We have already configured phpMyAdmin and for most people the basic functionality is enough. However, on home page phpMyAdmin there is an inscription: “Additional features of phpMyAdmin are not fully configured, some functions have been disabled.”
New features are:
- showing relationships between (related) tables;
- adding information about tables (starting from version 2.3.0 you can describe in a special table ‘table_info’ which column will be shown in the tooltip when moving the cursor over the associated key);
- creating a PDF diagram (starting from version 2.3.0 you can create PDF pages, showing the relationships between your tables);
- display column comments (since version 2.3.0 you can make a comment describing each column for each table. And they will be visible in the "print preview". Since version 2.5.0, comments are used on own pages tables and in view mode, appearing as tooltips above columns (property tables) or embedded in the table header in view mode. They can also be shown in the table dump);
- create bookmarks (since version 2.2.0, phpMyAdmin allows users to bookmark queries. This can be useful for frequently used queries);
- history of SQL queries (starting from version 2.5.0 you can save your history of all SQL queries, which were made through the phpMyAdmin interface);
- designer (starting from version 2.10.0, the Designer tool is available; it allows you to visually manage relationships between tables);
- information about recently used tables;
- customizing the interface of frequently used tables;
- tracking (starting from version 3.3.x, a tracking mechanism is available. It helps you track every SQL command that was executed by phpMyAdmin. Recording of data manipulation and command recording is supported. Once enabled, you will be able to version tables);
- user settings (starting from version 3.4.x, phpMyAdmin allows users to set most settings and save them in the database);
- custom menus (starting from version 4.1.0 you can create user groups that will only have access to assigned menu items. A user can be assigned to a group and will only see menu items available to their group);
- hide/show navigation items (starting from version 4.1.0 you can hide/show items in the navigation tree).
- and others
Now we will configure these additional features to the fullest. Go to the link http://localhost/phpmyadmin/chk_rel.php and click "Create database". After this, all new features will be activated.
A few screenshots of the new features:
1) Designer

2) Tracking

10. Installation of a mail plug
In the C:\Server\bin\ directory, create a new directory called Sendmail. Now in this directory create a file sendmail.php with the following content:
#!/usr/bin/env php
Open the PHP configuration file, it is located here C:\Server\bin\PHP\php.ini. And add one line there:
Sendmail_path = "C:\Server\bin\PHP\php.exe C:\Server\bin\Sendmail\sendmail.php --dir C:\Server\bin\Sendmail\emails"
Save the file and restart the server. Great, now all sent emails will be saved in the directory C:\Server\bin\Sendmail\emails\

Letters will have the extension .eml and they can be opened, for example, by the program Thunderbird. Or a regular text editor.
11. Adding a PHP directory to PATH on Windows
If this is not done, there may be problems with some PHP modules, including php_curl.dll, php_intl.dll, php_ldap.dll, php_pdo_pgsql.dll and php_pgsql.dll. At least, every time the server starts, the following appears in the logs:
PHP Warning: PHP Startup: Unable to load dynamic library "C:\\Server\\bin\\PHP\\ext\\php_curl.dll" - \xef\xbf\xbd\xef\xbf\xbd \xef\xbf\ xbd\xef\xbf\xbd\xef\xbf\xbd\xef\xbf\xbd\xef\xbf\xbd\xef\xbf\xbd\xef\xbf\xbd\xef\xbf\xbd\xef\xbf\xbd\ xef\xbf\xbd\xef\xbf\xbd\xef\xbf\xbd\xef\xbf\xbd\xef\xbf\xbd \xef\xbf\xbd\xef\xbf\xbd\xef\xbf\xbd\xef\ xbf\xbd\xef\xbf\xbd.\r\n in Unknown on line 0 PHP Warning: PHP Startup: Unable to load dynamic library "C:\\Server\\bin\\PHP\\ext\\php_intl.dll " - \xef\xbf\xbd\xef\xbf\xbd \xef\xbf\xbd\xef\xbf\xbd\xef\xbf\xbd\xef\xbf\xbd\xef\xbf\xbd\xef\xbf\xbd \xef\xbf\xbd\xef\xbf\xbd\xef\xbf\xbd\xef\xbf\xbd\xef\xbf\xbd\xef\xbf\xbd\xef\xbf\xbd\xef\xbf\xbd \xef \xbf\xbd\xef\xbf\xbd\xef\xbf\xbd\xef\xbf\xbd\xef\xbf\xbd.\r\n in Unknown on line 0 PHP Warning: PHP Startup: Unable to load dynamic library " C:\\Server\\bin\\PHP\\ext\\php_ldap.dll" - \xef\xbf\xbd\xef\xbf\xbd \xef\xbf\xbd\xef\xbf\xbd\xef\xbf\ xbd\xef\xbf\xbd\xef\xbf\xbd\xef\xbf\xbd \xef\xbf\xbd\xef\xbf\xbd\xef\xbf\xbd\xef\xbf\xbd\xef\xbf\xbd\ xef\xbf\xbd\xef\xbf\xbd\xef\xbf\xbd \xef\xbf\xbd\xef\xbf\xbd\xef\xbf\xbd\xef\xbf\xbd\xef\xbf\xbd.\r \n in Unknown on line 0 PHP Warning: PHP Startup: Unable to load dynamic library "C:\\Server\\bin\\PHP\\ext\\php_pdo_pgsql.dll" - \xef\xbf\xbd\xef\xbf \xbd \xef\xbf\xbd\xef\xbf\xbd\xef\xbf\xbd\xef\xbf\xbd\xef\xbf\xbd\xef\xbf\xbd \xef\xbf\xbd\xef\xbf\xbd \xef\xbf\xbd\xef\xbf\xbd\xef\xbf\xbd\xef\xbf\xbd\xef\xbf\xbd\xef\xbf\xbd \xef\xbf\xbd\xef\xbf\xbd\xef \xbf\xbd\xef\xbf\xbd\xef\xbf\xbd.\r\n in Unknown on line 0 PHP Warning: PHP Startup: Unable to load dynamic library "C:\\Server\\bin\\PHP\ \ext\\php_pgsql.dll" - \xef\xbf\xbd\xef\xbf\xbd \xef\xbf\xbd\xef\xbf\xbd\xef\xbf\xbd\xef\xbf\xbd\xef\xbf\ xbd\xef\xbf\xbd\xef\xbf\xbd\xef\xbf\xbd\xef\xbf\xbd\xef\xbf\xbd\xef\xbf\xbd\xef\xbf\xbd\xef\xbf\xbd\ xef\xbf\xbd \xef\xbf\xbd\xef\xbf\xbd\xef\xbf\xbd\xef\xbf\xbd\xef\xbf\xbd.\r\n in Unknown on line 0
To avoid these warnings, you need to add the path to PHP to your system environment variables.
Click the Start button (or whatever it's called on Windows 10?), start typing " Changing system environment variables» and open the corresponding settings window.

There click " Environment Variables»:

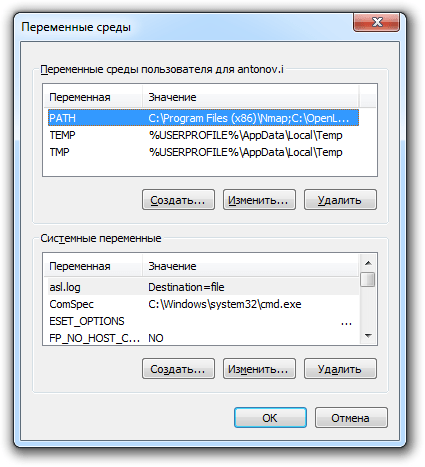
In the window " System Variables» find and click on Path, then click " Change»:


Move the entry to the top:

Close all windows and save your changes.
Restart the server.
12. Freeze, slow traffic and/or server error Asynchronous AcceptEx failed
If your server freezes even without load - it does not show web pages until restarted, and in the server logs there are errors Asynchronous AcceptEx failed:
AH00455: Apache/2.4.9 (Win64) PHP/5.5.13 configured -- resuming normal operations AH00456: Apache Lounge VC11 Server built: Mar 16 2014 12:42:59 AH00094: Command line: "c:\\Server\\ bin\\Apache24\\bin\\httpd.exe -d C:/Server/bin/Apache24" AH00418: Parent: Created child process 4952 AH00354: Child: Starting 64 worker threads. (OS 64)The specified network name is no longer available. : AH00341: winnt_accept: Asynchronous AcceptEx failed. (OS 64)The specified network name is no longer available. : AH00341: winnt_accept: Asynchronous AcceptEx failed. (OS 64)The specified network name is no longer available. : AH00341: winnt_accept: Asynchronous AcceptEx failed. (OS 64)The specified network name is no longer available. : AH00341: winnt_accept: Asynchronous AcceptEx failed. (OS 64)The specified network name is no longer available. : AH00341: winnt_accept: Asynchronous AcceptEx failed. (OS 64)The specified network name is no longer available. : AH00341: winnt_accept: Asynchronous AcceptEx failed.
Then add to the Apache configuration file:
AcceptFilter http none AcceptFilter https none EnableSendfile off EnableMMAP off
13. Configuring cURL in the Apache web server on Windows
If you don't know what cURL is, then you don't need it. Those. Feel free to skip this step.
cURL is a console utility that allows you to exchange data with remote servers using a very large number of protocols. cURL can use cookies and supports authentication. If a web application requires cURL, then this must be specified in the dependencies. Many popular applications do not require cURL, for example phpMyAdmin and WordPress do not need to configure cURL.
If cURL is not configured correctly, you will receive errors:
Fatal error: Call to undefined function curl_multi_init() in ...
curl error: SSL certificate problem: unable to get local issuer certificate
To make cURL work in Apache on Windows you need:
1) Be sure to add the PHP directory to PATH (system environment variables). How to do this is explained just above:
2) In a file C:\Server\bin\PHP\php.ini line should be uncommented extension=curl
This is usually not required, but if you wish, you can make a backup copy of the server binary (executable) files. All these files are located in the folder C:\Server\bin\. These are Apache, MySQL and PHP - i.e. programs that are responsible for the operation of the server, but which we can download from official websites and configure again at any time.
If you want to make a backup copy of them (for example, before upgrading the server), then stop the services:
C:\Server\bin\Apache24\bin\httpd.exe -k stop net stop mysql
And copy the folder to a safe place C:\Server\bin\.
By the way, you can copy the entire server, i.e. folder C:\Server\- in this case, you will simultaneously get a backup copy of both executable files and data (databases, websites).
When the copying is complete, start the services again:
C:\Server\bin\Apache24\bin\httpd.exe -k start net start mysql
15. Server update
All components that make up the web server are actively being developed and new versions are regularly released. When a new version is released, you can update one component (for example, PHP), or several at once.
Deleting a server
If you no longer need the server, or you want to install it again, stop the services and remove them from autostart by sequentially executing on the command line:
C:\Server\bin\Apache24\bin\httpd.exe -k stop c:\Server\bin\Apache24\bin\httpd.exe -k uninstall net stop mysql c:\Server\bin\mysql-8.0\bin\ mysqld --remove
To download the Windows distribution of PHP 7, you should visit the binary file download section of the official PHP website. Each release comes with four options:
- x86 Non Thread Safe- 32-bit CGI version of the distribution;
- x86 Thread Safe- 32-bit version for installation as a Web server module;
- x64 Non Thread Safe- 64-bit CGI version of the distribution;
- x64 Thread Safe- 64-bit version for installation as a Web server module.
Option Thread Safe is designed to safely execute PHP 7 in parallel threads within a single system process, for example, if PHP is installed as an Apache Web server module. Since we are going to use the built-in server, it doesn't matter which distribution is chosen, it is best to use the option Non Thread Safe. The latter option is also used when connecting PHP as an external FastCGI application, which is launched for each external request.
Before the name of the distribution, one of the abbreviations VC11, VC14 can be placed, meaning the versions of Visual Studio (2012 and 2015, respectively), with which the distribution was compiled. In order to successfully run the project, you should download the appropriate Visual C++ Redistributable Package for Visual Studio, which contains the necessary dynamic libraries:
Attention!
Libraries from the English version of Visual Studio are required; the Russian version of the package will not work.
After downloading the zip archive, you should unpack it into some folder, for example C:\php.
You can make sure that PHP 7 is available by running the command line, and then go to the C:\php folder using the command
>cd C:\php
By running the php command on the command line with the -v parameter, you can find out the current version of PHP:
> php -v PHP 7.0.0 (cli) (built: Dec 3 2015 09:31:54) (NTS) Copyright (c) 1997-2015 The PHP Group Zend Engine v3.0.0, Copyright (c) 1998-2015 Zend Technologies
In order for the PHP command to be available anywhere in the file system, the path to the PHP interpreter should be specified in the path environment variable.
To access environment variables, you need to open the Control Panel, go to the section System. The fastest way to get to this point is to right-click on the button Start and select item System from the context menu. On operating systems earlier than Windows 8, select Start paragraph Computer and select the item in the context menu Properties. In the Control Panel window that opens with the active section System click on the link on the left Advanced System Settings. Then in the System Properties window, on the Advanced tab, click the button Environment Variables. In the dialog box that opens, in the section System Variables you should look for the path environment variable and complete it with the path to the C:\php directory. The individual paths in the value of the path variable are separated by semicolons (a semicolon is not required at the end of the entire line). After this, the php command will be available in any folder on your computer.
And describes only distinctive points, which relate to installing Apache24 and PHP7 on Windows. The description of installing the MySQL DBMS remains the same and is not repeated in this instruction.
Before you continue reading, pay attention to whether you really need to install and configure all this under Windows? Maybe you should pay attention and not waste your time and nerves setting up the same thing directly in Windows? In any case, read the article about. Perhaps it will save you not only time, but also health.
This manual is intended for developers with basic knowledge Apache and PHP. This manual will describe only difference in installing Apache and PHP with basic instructions for installing PHP 5.6. If you do not know what a WEB server, http protocol and PHP interpreter are, then you can always learn about it in more detail by reading the documentation.
I will not answer in the comments questions the answer to which is in this or the main instructions; the link to the main instructions is indicated in the first paragraph, as well as questions that relate to understanding the work of Apache and PHP, and even more so to questions about errors in development. For this, there are appropriate resources, literature, forums, and courses. However, you can always ask any question you are interested in. Perhaps someone from the community can help you.
So, let's go!
Installing Apache 2.4 VC14
- Loading Apache 2.4 binaries VC14 for your system via the link http://www.apachelounge.com/download/ Download the 64-bit version of the server. At the time of writing these lines, the file was called like this: httpd-2.4.17-win64-VC14.zip
- If you need any additional modules, you can download them there (not necessary for the basic installation)
- Download and install Visual C++ Redistributable for Visual Studio 2015 updates from the Microsoft website.
- Unzip the contents of the folder Apache24 from the downloaded archive to D:\USR\apache. Please note that in D:\USR\apache you need to put not the Apache24 folder from the archive, but its contents. There is no need to install anything.
- Change the value in the file ServerRoot on "d:/USR/apache" (line 37) and value DocumentRoot(And Direcroty) on "d:/USR/www" (lines 243 and 244). You should also uncomment line 219 and change it to: ServerName localhost:80
- We change the log storage parameters in the same file (find the parameters and change): ErrorLog "D:/USR/log/apache-error.log" CustomLog "D:/USR/log/apache-access.log" common
- Install the Apache service. Open the command line on behalf of the Administrator and insert the following line there: D:\USR\apache\bin\httpd.exe -k install
- We monitor error messages during service installation. If everything is done correctly, there should be no errors. If, after executing the line, the command line does not appear again, then you did something wrong. Simply use the copy and paste functions to avoid typing errors.
- Create a shortcut on the desktop for D:\USR\apache\bin\ApacheMonitor.exe and/or put it in startup (to open the startup window in WIN8..10 you need to press WIN+R, then enter shell:Startup and click OK)
- Launch ApacheMonitor. A shortcut will appear in the system tray. Left-click on it and select Apache24 -> Start.
- In the browser go to http://localhost/ - you should see It works!
- If you don’t see such an inscription, we figure out what went wrong (we read the logs, google, try to figure out the problem ourselves, since we decided to understand the intricacies of the web server)
Installing PHP 7
- Download the latest version VC14 x64Thread Safe via the link http://windows.php.net/download/. Please note that you need exactly VC14 and exactly Thread Safe. The file you need will most likely be named something like: php-7.0.0-Win32-VC14-x64.zip
- Extracting the contents of the archive into D:\USR\php. As with Apache, there is no need to install anything.
- To file D:\USR\apache\conf\httpd.conf add the lines: LoadModule php7_module "d:/USR/php/php7apache2_4.dll" AddHandler application/x-httpd-php .php # Path to the php.ini file PHPIniDir "D:/USR/php"
- And we change meaning parameter DirectoryIndex on index.html index.php (line 278)
- Using ApacheMonitor restart Apache (Apache24 -> Restart)
- We go to the browser http://localhost/index.php and make sure that PHP is working (the browser will display PhpInfo output).
- Making a copy of the configuration file template D:\USR\php\php.ini-development with name D:\USR\php\php.ini- This is a configuration file for PHP.
- Editing the configuration file D:\USR\php\php.ini. Using the search, we find inside the file, uncomment it and change the parameters. Note that the extension parameter specifies a set of PHP extensions. Uncomment the extensions that you need. In the example, the extensions that I needed. Specify your time zone, not mine: extension_dir = "D:/USR/php/ext" sys_temp_dir = "D:/USR/tmp" extension=php_curl.dll extension=php_gd2.dll extension=php_gettext.dll extension=php_mbstring. dll extension=php_mysqli.dll extension=php_openssl.dll date.timezone = Europe/Zaporozhye
If you have problems running curl, please refer to these instructions.
- Execute on the command line php -m to view the list of connected extensions.
- Restarting Apache using ApacheMonitor
The installation and configuration of everything else has not changed. Please refer to the PHP 5.6 Installation Guide for details.
We indicate the version of our operating system (I indicated 64-bit Windows), and go to the download page (Go to Download Page https://dev.mysql.com/downloads/windows/installer/5.7.html).

I chose to download the full msi installer. At the time of writing this note, MySQL version 5.7.21 was current, and a distribution kit named mysql-installer-community-5.7.21.0.msi was downloaded.
Apache 2.4
At the time of writing this article, x64 version 2.4.33, built on the vc14 base, was available:
httpd-2.4.29-o110g-x64-vc14.zip.
The archive size is about 10 MB.
PHP 7.2
At the time of writing this article, the x64 version of PHP 7.2 (7.2.2), Thread Safe, built on VC15 was available: php-7.2.2-Win32-VC15-x64.zip.
Zip archive size: 24 MB.
Now there is a newer one.
phpMyAdmin (PMA)
To manage MySQL databases on your local computer, install the free phpMyAdmin package.
Download its distribution from the site http://www.phpmyadmin.net/
At the time of writing this article, version 4.7.7 was available:
phpMyAdmin-4.7.7-all-languages.zip
Size - about 11 MB.
We put the contents of the archive in a pre-prepared folder, for example:
D:\sites\localhost\www
Installation list
Distributions have been downloaded. Install in this order:
- MySQL
- Apache - setting up virtual servers, checking for html
- PHP - with additional Apache settings we check on php_test.php
- phpMyAdmin (with additional php settings)
Installing MySQL
Launch the previously downloaded MySQL installer (mysql-installer-....msi).
In the License Agreement window, check the box:
I accept the license terms
- and click the Next button.
In the Choosing a Setup Type window, select the Custom item (to choose the parameters for installing the MySQL server yourself). Click the Next button.
In the Select Products and Features window, be sure to select the MySQL Server - X64 component. Other components are optional. Having selected a component on the left side of the window, click the right arrow so that this component, from those available for installation, moves to the right side of the window - the list of what we will install.
Click Next after selecting the components.
In the Installation window, click the Execute button to start the installation.
You can monitor the installation progress by clicking the Show Details button.
When the installation is complete (Status becomes complete), click the Next button to proceed to configuring the MySQL server.
In the Product Configuration window, click Next.
In the Type and Networking window
Leave the Standalone MySQL Server option enabled and click Next.
In the next Type and Networking window
set the item Config Type = Development Machine
Leave the checkboxes next to TCP/IP and Open Firewall port for network access.
The connection port with MySQL is also left at its default value (Port Number = 3306).
Check the box next to Show Advanced Options.
In the Accounts and Roles window, set the password for the main user (with the login root - administrator).
In the MySQL User Accounts field, you can add other users who will have access to MySQL databases. We will not create others for now: we will connect as root.
In the Windows Service window, leave the Configure MySQL Server as a Windows Service checkbox (so that the MySQL server starts as a system service).
Leave the system service name (MySQL57) as default.
We will start the MySQL server service manually (we only need it while developing and testing local sites), so uncheck the Start the MySQL Server at System Startup option (so that the server does not start every time you start Windows).
We will start the service on behalf of the Standard System Account (we do not change this option).
In the Plugins and Extensions window, leave everything as it is. Click Next.
In the Advanced Options window, you can change the parameters of the logs (logs) where the server writes messages during its operation. Here you can leave everything as is.
In the Apply Configuration window, click the Execute button to apply the server configuration.
When finished, click the Finish button.
In the Product Configuration window, click Next.
In the last Installation Complete window, the checkboxes for items can be left unchecked. Click Finish.
The installation and configuration of the MySQL server is complete.
You can manually start/stop the MySQL server by going to the list of Windows services.
Find MySQL57 in the list, right-click on it and select "Start/Stop".
Installing Apache 2.4 for Windows
There are many articles on the Internet that describe how to install Apache 2.4 for Windows. I may repeat something, but I will present my version step by step.
The archive downloaded from the developer's website (using the httpd-2.4.29-o110g-x64-vc14.zip option) contains the Apache24 folder. We place it, along with its contents, on drive C:
In addition to the package itself (Apache24 folder), the archive contains the readme_first.html file, which is useful to read.
Particular attention should be paid to the presence of the Visual C++ 2015 x64 Redistributable Package in the installed Windows OS.
This package contains a set of libraries without which this Apache build will not work.
You can download this package for free from the Microsoft website, using the link (https://www.microsoft.com/en-us/download/details.aspx?id=49984) given in the readme_first.html file. Be sure to install it if it is not already on your OS.
If there are programs installed on your computer that listen on port 80, then it is better to discourage them from using this port, or assign them another one. The Apache server is configured on this port by default, see the Listen parameter in the file C:\Apache24\conf\httpd.conf
Let’s try to start the server (later we’ll consider the option of starting the server as a system service).
To do this, launch the command line in administrator mode (as administrator).
Go to the folder C:\Apache24\bin and run the program httpd.exe

When you launch it for the first time, you may see a Windows Security Alert indicating that Windows Firewall has blocked some features of this application (see figure)

Check the box that allows Apache HTTP Server communication for Private Networks.
Working on public networks can be prohibited.
Open any browser and enter http://localhost/ in the address bar.
- the builder page for this Apache server package should appear.

(it is installed with the package in the C:\Apache24\htdocs folder - this is the value of the DocumentRoot variable in the httpd.conf file,
but we will change it later).
This means that the Apache server starts and works normally.
If the server does not start, then you need to see what errors it gives. Errors can be seen at startup: on the command line and in the file C:\Apache24\logs\error.log
Let's now make sure that the Apache server is started by the service (described in readme_first.html, included with the distribution).
In a command line running as administrator, go to the C:\Apache24\bin folder and run the command
httpd -k install
It is convenient to monitor the status of the Apache server service and restart it (we will do this often as we configure) through the program C:\Apache24\bin\ApacheMonitor.exe. Make a shortcut for it and place it in a convenient place to launch (in the taskbar or on the desktop).
All that remains is to configure the Apache server to suit our needs:
orient to the folders in which our sites will be located;
prepare to work with MySQL and PHP.
Let's say we want to have 2 sites on our local computer named localhost and wp-test
http://localhost/
http://wp-test/
To do this, the system file C:\Windows\System32\drivers\etc\hosts should contain the following lines
127.0.0.1 localhost
127.0.0.2 wp-test
The first line usually already exists by default.
We fill the second one ourselves.
These lines indicate that hosts named localhost and wp-test should be searched by IP addresses 127.0.0.1 and 127.0.0.2
- both addresses correspond to the local computer.
Restarting the OS is not necessary.
Let's create folders on the local computer for storing site files, for example in the folder:
D:\sites\localhost
D:\sites\wp-test
In each of these folders we will create 2 files with the names
access.log
error.log
and the www subfolder
D:\sites\localhost\www
D:\sites\wp-test\www
- in these folders we will create index.html files with the following content:
this is localhost
this is wp-test
Now let's configure the Apache server to use virtual hosts corresponding to our sites.
Let's edit the server configuration file (C:\Apache24\conf\httpd.conf).
To do this, you need to open it in a text editor.
For this I use NotePad++ (a very feature-rich free editor).
I usually write virtual hosts at the end of this file.
Let's add the following lines there:
#localhost
We check whether pages at addresses open in browsers
http://localhost/
http://wp-test/
When opened normally, the page should display the following lines:
this is localhost
And
this is wp-test
Similarly, you can create other virtual web servers on your local computer.
Additional settings for Apache that may be useful.
Installing PHP 7
The contents of the downloaded archive php-7.2.2-Win32-VC15-x64 are placed in the folder C:\php\
We carefully read the file C:\php\install.txt from the distribution kit.
This file briefly describes how to install PHP on your system and configure it to work with Apache.
The path C:\php is added to the system PATH variable
To test PHP on our local site http://localhost/
Let's create a php_test.php file in its folder (D:\sites\localhost\www) with the following content:
Then, when you open the address http://localhost/php_test.php, a page with data from the phpinfo command should open.
Let's prepare Apache to work with PHP
In the httpd.conf file
In the place where modules are loaded (look for the LoadModule command group), at the end of the group (if there is no such line already) add:
LoadModule php7_module "C:/php/php7apache2_4.dll"
Let's indicate the path where php is installed with the directive:
PHPIniDir "C:/php"
In section
DirectoryIndex index.html index.php
In section
add a line
AddType application/x-httpd-php .php
Save httpd.conf and restart Apache.
After this, the test page http://localhost/php_test.php will open.
Let's edit the PHP settings file for phpMyAdmin and more.
Rename the php.ini-production file to php.ini (leave it in the same folder C:\php\)
Edit php.ini like this
Let's uncomment the line
Extension_dir = "ext"
Enable the parameter (default=Off)
Enable_dl = On
Specify the folder for downloading temporary files
Upload_tmp_dir="d:/sites/uploadtemp" upload_max_filesize = 500M
In the section; Dynamic Extensions;
Let's uncomment the lines:
Extension=gd2 extension=mbstring extension=mysqli
Let's enable another extension:
Extension=openssl
In order, for example, to update WordPress plugins on a local site through the admin panel. Otherwise the error appears: No working transports found.
To execute long scripts, we will extend the maximum execution time, for example, like this:
Max_execution_time = 300
Installing phpMyAdmin
After downloading the distribution and placing its contents in the folder D:\sites\localhost\www
go to the documentation folder \www\doc\html and open the setup.html file
Following his instructions, we will create a config subfolder in the root directory of the site (www) (this is necessary while configuring phpMyAdmin with a script that can be launched by opening the setup page at http://localhost/setup/).
Let's rename the file \www\config.sample.inc.php located in the root directory
to the working file \www\config.inc.php
- open this file for editing and define the $cfg["blowfish_secret"] parameter in it - filling it with any symbols, for example, the phrase ANY_WHAT_YOU_WANT:
$cfg["blowfish_secret"] = "ANY_WHAT_YOU_WANT"; /* YOU MUST FILL IN THIS FOR COOKIE AUTH! */
and, saving, close this file.
Let's check if the site pages open:
http://localhost/
http://localhost/index.php
At htmlAcademy and I work there as a mentor. As part of the intensive course, students will have to improve their work environment and this note is aimed at simplifying this difficult task for a beginner. There are different ways to raise a full-fledged LAMP stack, but we will go the classic way. Let's configure all components separately (without using ready-made combines) and start with PHP (there will definitely be a note discussing ready-made LAMP assemblies). Since I plan to work as mentors at PHP intensives in the future, I am going to write similar instructions for repetition in other operating systems (Linux, macOS). As they say, it’s better to sweat once, but then it will become easier for everyone. So let's get started.
Download PHP for Windows
Go to the official website and download the current version of PHP. At the time of writing, this is - 7.1.4 . There are several distribution options available on the page. I have Windows 7 x64, so I choose a zip archive with VC14 x64 Thread Safe.
Please note that there are two distribution options available for download: Thread-Safe (TS) And Non-Thread-Safe (NTS). The choice depends on how you plan to use the interpreter. TS is recommended to be used for a single web services process (for example, configured via the mod_php module for Apache). NTS is recommended for using IIS (Internet Information Service) and alternative FastCGI web servers (for example, Apache with the FastCGI module) and command line.
Install PHP 7.1
Let's start preparing PHP for comfortable work from the command line. In the previous step, you downloaded the archive with the PHP distribution. Unlike most programs, PHP is supplied in a simple archive, and not as an installation package. Therefore, you will have to extract the files yourself to any directory convenient for you. I prefer to store such things in the root of the system drive. Create a directory in the root of the “C:” drive (or any other place) "php" and extract the contents of the downloaded archive into it.

Many files will appear in the directory, but we are most interested in:
- go-pear.bat– script for installing PEAR. You can read more about PEAR in the official documentation.
- php.exe– allows you to execute PHP scripts from the console;
- php-win.exe- allows you to execute PHP scripts without using the console;
- php-cgi.exe– required for executing PHP code in FastCGI mode;
- php7apache2_4.dll– integration module with Apache 2.4.X web server;
- phpdbg.exe– debugger;
- php.ini-development– example of a PHP configuration file for a development environment
- php.ini-production– example of a PHP configuration file for a production environment
Connecting the configuration file
We have the unpacked distribution kit, let's connect the configuration file for it. We are going to do experiments, so we will take as a sample php.ini-development. Make a copy of this file to your php directory ( C:\php) with name php.ini. IMPORTANT! Make a copy, not a simple rename. During development, you may need to change the configuration file and there is every chance of making a mistake that will be difficult to detect.
In such cases, there is nothing better than returning to the reference settings. In our case, it will be enough to copy the file again php.ini-development V php.ini. So, at the end of the actions, the php.ini file should appear in the directory with php. In further notes we will definitely talk about its contents in more detail.

Testing PHP from the command line
At this step, the so-called “installation” is completed. Open your console ( cmd.exe, the shortcut is available in the Accessories menu) and enter the command:
C:\php\php.exe --version
The result will be something like this:
PHP 7.1.4 (cli) (built: Apr 11 2017 19:54:37) (ZTS MSVC14 (Visual C++ 2015) x64) Copyright (c) 1997-2017 The PHP Group Zend Engine v3.1.0, Copyright (c) 1998 -2017 Zend Technologies
The result confirms that PHP is working. For example, try creating a new script file (I created the “test.php” file right in the root of the “C:” drive) and place the text in it:
Now try executing this file and see the result:
C:\php\php.exe –f test.php
Function phpinfo() displays PHP configuration information in a convenient form. We'll talk about this function later.
Simplifying access to php.exe
PHP is ready to work, but you must admit that entering the path to the PHP interpreter into the console every time is quite inconvenient. To make your life easier, let's make some small changes to the environment variables. Let's launch the applet in the control panel "System"(or just press the hotkey "Windows + Pause Break". Then click on the button "Change settings". In the window that appears "System Properties", let's go to the bookmark "Additionally". Find and click on the button "Environment Variables".
Find a variable in the list "PATH" and press the button "Change", the variable editing window will appear. In the “Variable value” field we need to add the path to the directory with PHP. Go to the very end of the line and, separated by semicolons, indicate the path to the directory with PHP: C:\php;

That's it, click "Ok". Now reboot the system (alas, you have to). After restarting Windows, you can access PHP simply: php. For example, to display the version name, just write:
Php –version
And to interpret the test.php file located in the root of the “C:” drive:
Php –f C:\test.php
Or even launch the built-in web server:
Php -t C:\ -S 127.0.0.1:8888 Listening on http://127.0.0.1:8888 Document root is C:\ Press Ctrl-C to quit.
To test, open a web browser and try going to http://127.0.0.1:8888/test.php. Please note that after the parameter –t we specify the path to the directory that will become the root directory of the web server. All scripts located in this folder will be available for request from the client. I have one file on drive “C:” 1.php and that is exactly what I am asking for.

Assoc .php=phpfile ftype phpfile="C:\php\php.ee" -f "%1" -- %~2
A little more about environment variables
Now let's talk about how PHP will look for the configuration settings file (remember, php.ini). The documentation provides a complete search chain. To avoid unnecessary complications, I recommend immediately adding a new one to the environment variables - "PHPRC" and as a value specify the path to the directory with the configuration file. My config is located in the same directory as the main php files, therefore I specify the value of the variable -
"C:\php". A reboot will be required after making the change.

That's all for me. The first part of the manual for beginners is ready.


