How to create a table in denver. Setting up databases in Denver (Denwer), phpMyAdmin, MySQL
Besides being memorable, .com domains are unique: This is the one and only .com name of its kind. Other extensions usually just drive traffic to their .com counterparts. To learn more about premium .com domain valuations, watch the video below:
Turbocharge your Web site. Watch our video to learn how.
Improve Your Web Presence
Get noticed online with a great domain name
73% of all domains registered on the Web are .coms. The reason is simple: .com is the where most of Web traffic happens. Owning a premium .com gives you great benefits including better SEO, name recognition, and providing your site with a sense of authority.
Here's What Others Are Saying
Since 2005, we've helped thousands of people get the perfect domain name
- the negotiation was very fast and clear. Good job - Carlos Restrepo, 12/2/2019
- Our company owns all the related domains around the one I purchased so naturally I was concerned that whomever I was dealing with to purchase FlaxLinen.com would create the shenanigans you often hear about when purchasing a premium domain. I was super excited to see that HugeDomains allowed me to purchase the domain strictly through their online system. Their agreement was straightforward, written in plain English with regards to domain transfer and they managed to get me access to the DNS fairly quickly. Also helps they are a Denver based company just like us. Highly Recommended! - Zeshan Ahmad, 11/28/2019
- This company makes buy domains so easy. I would recommend them to anyone. They are simply - GREAT TO WORK WITH!! - Raquel Nevado, 11/25/2019
- More
PhpMyAdmin – This is a script that is written in PHP and provides the ability to manage databases MySQL data. Allows you to run SQL query commands, work with database fields and tables (create, edit, delete, etc.). In PhPMyAdmin you can create new databases, make backups and much more. PhpMyAdmin is installed on almost every hosting and is included in the standard configuration of the local Denver server.
In most cases, when working with Joomla, PhрMyAdmin is used only for creating new databases (most often this is done in Denver) and for copying and restoring (Import/Export). The remaining features of PhрMyAdmin are used by advanced Webmasters and developers.
In this article I want to talk about situations in which you can use PhpMyAdmin.
Creation of a database (mostly in Denver).
To do this, type this path in the address bar of your browser:
http://localhost/tools/phpmyadmin
Following this link will launch phpMyAdmin. (Denver must be installed and running).
In order to create a database, you need to enter the name of the future database in the New database field and click the create button, it is worth noting that the database encoding for Joomla must be in UTF-8 (as in the figure below).

If you also need to create a user for the new database, then you need to click on the privileges button and on the page that opens click the link " Add a new user"(The user has certain privileges that are established when he is created, due to these privileges he can change, delete, create new tables and fields in the database). If phrMyAdmin is on the hosting, then login/authorization occurs using the specified username and password) .

Next, you need to fill in the required fields and click the ok button at the bottom of the screen; an example of filling out the fields and actions is shown in the figure below. If everything was done correctly, you will see a message that it has been added new user.

Note. Creating a user is possible only in Denver; on regular hosting, as a rule, the user has already been created and has all the necessary privileges (username and password are sent to your email), or a new user is created through a separate interface of the hosting provider (with all the necessary privileges), where You enter the username and password yourself and then they are used for authorization in phpMyAdmin (just don’t forget to write it down somewhere).
Creating a database backup using phpMyAdmin
To create backup copy database, go to home page phpMyAdmin and in the left window select the desired database (for which you need to make a backup) by clicking on it.
In the image below, a database named auto (45), in brackets indicates the number of tables that are in the database.

After you select the database, a new window will open with its contents. Next, you need to click on the button “ Export" at the top of the window (as shown in the image below).
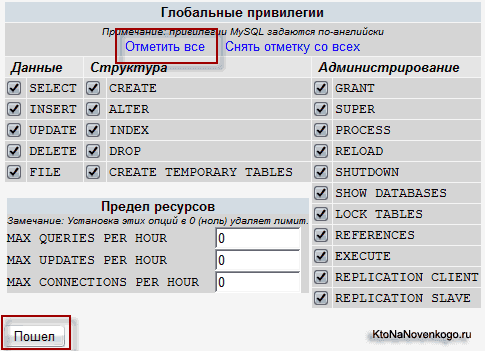
The “Export” button means copying the database to text file and save it on your computer. By clicking this button, a new window will open with export settings settings, all you need to do here is select all the database tables, check the box " Save as file" and press the button ok in some versions of phpMyAdmin this button is called went.

Please note that when exporting a database, you can specify various settings, for example, pack the database into an archive; this is mainly used when the size of the database is very large and takes up tens or even hundreds of megabytes, since exporting such a heavy database is not possible on some servers It will work out due to hosting limitations. To solve this problem, you need to set the format in which the database will be packaged during export and click the ok button.
Restoring a database from a backup using phpMyAdmin
To restore from a database backup, you need to perform the following sequence of actions. First you need to clear the existing database of all tables. To do this, you need to log in to phpMyAdmin, select the required database in the left column that you are going to restore from a backup copy and in the window that appears you need to go to the very bottom of the page and click on the link “ Mark all" and select the option " Delete» from the drop-down list.

This will open the following window with a list of all tables to confirm the deletion of tables. You need to click on “ Yes" After this, you can restore the database from a previously made backup copy.
To do this, go to the tab “ Import" and in the window that appears, click on the button " Review» and find the previously made copy of the database on your computer. Next, you need to make sure that the encoding is UTF-8. Then press the button " OK" and wait for the database backup to finish loading.
Other uses
Here are some more examples of using PhpMyAdmin: one day, while testing one component, the database was somehow damaged, as a result of which the site stopped working completely. During database corruption, if this happens, a message is displayed stating that the database is damaged or there is no connection. To solve this problem, you need to go to PhpMyAdmin, which also displays the corresponding message. Next, you need to check the damaged database table and select the option from the list - "Restore table", after which you will see the following message: The SQL query was executed successfully.

Optimizing tables in the database via phpMyAdmin
There are also quite useful feature table optimization. This option deletes all already deleted data that is still stored in the tables, thus significantly clearing the table of garbage and reducing its size. To optimize tables, you need to check all the database tables and click on the link from the list "Optimize table". Just be sure to back up your database in case something goes wrong.
The following way to use PhpMyAdmin features is the implementation of SQL queries to database tables. This moment is extremely convenient, especially when you need to change something of the same type in all the texts of your site at once. For example, if the number of articles on your site is more than 100, then doing it manually is quite time-consuming and labor-intensive. And here one request and everything is ready.
Just always remember and do not forget that before making any changes you should always do backup data. Articles in Joomla are contained in a table called " jos_content", therefore, to make changes to all texts, you need to click on the name of this table. In the window located in the center, go to the “Browse” tab.
On the page that appears, click on "Change". In the new window you need to enter the text of the SQL query, which will make changes to all articles. On the right in the PhpMyAdmin window, you can select only those fields in which you want to make changes.
From all of the above, it turns out that for a restful sleep you need to have up-to-date backups of your database and files on your local PC. These same backups can be used when you transfer your site to a new hosting.
PhpMyAdmin is an important part of the Denwer virtual machine. But at the same time, this is a separate program that may receive updates. They correct errors, add functions, and simplify work. And what to do if it appears new version? Rearrange the entire server again? Or use an outdated build? Neither one nor the other. You can replace the phpMyAdmin module in the Denwer program. To do this, you do not need to update it entirely.
How to update the module on Denver.
About phpMyAdmin
This is a graphical client, it is used to work with databases. In particular, with the MySQL DBMS, which is also included in the Denver kit. If you do not install such an add-on, you will have to manually enter all SQL queries. The English version can be downloaded from phpmyadmin.net, the Russian version from php-myadmin.ru. There you will find a list of updates, news, instructions, articles, FAQ. And in the RU sector there is even a forum.
IMPORTANT. Before updating the application, check if it is compatible with other modules.
You may have to download new versions of MySQL and PHP after the update. To log into the client, launch the local server using the desktop icon and enter “http://localhost/” in the browser address bar. There are library settings and information about them.

Update
During installation, Denver creates a virtual disk on which the distributions must be placed. This can be done through Windows Explorer. Simply copy and paste the application files just like you would any other documents.
Here's how to update phpMyAdmin in Denwer:

But what if MySQL is not password protected? You cannot enter without an access code. To fix this, change the configuration.

Now you can log in with a blank password.

This update is complete. And literally in a few minutes.
To load new versions of libraries into Denwer, you do not need to enter complex commands. No installer files or numerous settings are needed. Just copy the module to a folder, change one configuration and that's it.
Hi all! Today I will talk in detail about how to work with Denwer- local server. Let's look at installing Denwer, configuring it and uninstalling it. A terribly hackneyed topic that is present on every blog dedicated to website creation. My blog will be no exception. It’s just the foundation, the foundation for future victories, which you can’t do without. Well, to make it interesting for readers who are already familiar with Denwer local hosting, I will consider a couple of subtleties that are difficult to find on other Internet resources:
- how to create multiple websites in Denver;
- how to russify phpMyAdmin

What is Denwer? This is a program for quickly deploying a local server on your computer. No need to install separately Apache server, the MySQL database management system and the admin panel for the phpMyAdmin database, spend a lot of time, effort and nerve cells on this. Just download it, install it in a few minutes, figure it out in an hour, and then practice working with any . Denver is a sandbox where you can safely test new solutions before implementing them into production projects.
Denwer installation
To download Denwer, you need to go to this page and register. Registration is very simple - just enter your First Name, Last Name and email. Be sure to indicate your existing email, because the download link will be in the email sent to this address.
The Denwer installer consists of just one file with permission .exe and a very long name that begins with Denwer3... . After running this file, a browser window will open (close it so as not to get in the way) and a command line, in which Denwer will be installed. Command line, of course, it’s black and scary, but you don’t need to be afraid of it - everything is not complicated there, and now you’ll see it.
1. Read the welcome message from Denwer, close your browser and press Enter. To see the pictures better, just click on them.

2. Next, you should specify to which folder on your computer the Denver files will be copied. By default, the directory is C:\WebServers, you can be simple and just press “Enter”, then confirm your choice by entering the English letter “y” (from the word “yes”) and pressing “Enter” again.

3. In the next step, you will be asked to specify the name of the virtual disk on which the local server will be located. The default name is Z, since it is unlikely that a disk with that name already exists in the operating system. You can specify another letter of the Latin alphabet. To confirm your choice, press “Enter” - the installer will create a virtual disk and test it, all you have to do is use the “Enter” button again.

4. Now you need to choose one of the two proposed options. In the first option, the local server will start along with the download operating system, in the second - only when you want it, using the Start Denwer shortcut on the desktop. I always choose the second option.

5. The last thing we will be asked to do is create shortcuts on the desktop. Agree by entering English letter"y" and pressing "Enter".
That's it, installation is complete! Now three new shortcuts have appeared on the desktop:

- — loading the local server, if you chose the first option in the installation, then this shortcut will have to be used every time to start working in Denver;
- Stop Denwer - before shutting down Windows is better stopping hosting using this shortcut will allow you to avoid possible errors and malfunctions in Denver.
How to work with Denwer
For the local server to work, you must start Denver using the Start Denwer shortcut on your desktop. The console window will appear and disappear, and the “feather, letter and black hat” icon will appear on the taskbar, in the area next to the clock. Now, when you go to “My Computer”, you can see a new local disk with the name you gave him.
To load files and folders onto it, you do not need to use a special one; work with it as with other disks of your operating system. By default, there is only one test site in Denver, test.ru. Where are his files? In the directory \home\test1.ru\www. It is in the www folder that you should upload the files of the future site - this is its root directory.
Now let's look at all the utilities that allow you to work with Denwer. We go to its main page by typing http://localhost in the browser. If everything is in order, you will see a page with an optimistic inscription - “Hurray, it’s working!”
If instead you see a blank white page, turn off the Internet, close the browser, restart Denwer and go to http://localhost again. As soon as it appears home page Denver, the Internet can be turned on again.
Great, scroll down the page to the title.

1. DNSearch: file search— the name speaks for itself: searching for files on a local server.

I think all the points are clear, so I won’t dwell on it.
2. List of registered sites— all sites created on Denwer will be displayed here:

Initially, there is only the test1.ru domain, but you can create as many new sites as you like and give them any names. We'll talk about how to create several websites on a local server below.
If you create a site on a local server with the same name as an Internet resource on the Internet, then when local hosting is running, the site from your computer will be displayed. Don't be scared by this.
3. Creating new MySQL databases and users.
All modern CMSs are database-based. Denver supports free open system database management (DBMS) MySQL. This utility is intended specifically for creating a new database.

Fill in the Database Name, User Login fields and enter the password twice. Leave the MySQL administrator password blank. Write all this information down somewhere so you don't forget. This is what you need to enter when installing the CMS.
4. phpMyAdmin - administration of the MySQL DBMS.
What is a database? A set of values and keys. To work with the database, a special query language SQL is used, which not every user knows or wants to learn. To make it possible to work with databases without knowledge of SQL, it is used special program, a kind of database administration panel - phpMyAdmin. She has GUI, in which you will work with databases - delete, create, edit tables. phpMyAdmin itself converts all your actions into SQL queries, which will be sent to the database for execution. I will tell you in more detail about working with phpMyAdmin a little later, but now let’s touch on the issue of its Russification.
phpMyAdmin only has English language interface, but this can be fixed. and copy it to a directory on the Denver virtual disk: \home\localhost\www\Tools\phpmyadmin\lang. Clear your browser history and restart Denwer if you have it enabled. Login to phpMyAdmin by typing in your browser http://localhost/tools/phpmyadmin/index.php, and change the interface language to Russian:

How to create multiple sites on a local server
Many people think that Denwer is capable of supporting only one standard domain test1.ru, but this is not so. It allows you to create as many websites as you like on local hosting. This is done simply. Go to the home directory on the denwer virtual disk and create a folder in it with the name of the future site (for example, imya_sayta.ru). Go into it and create a www folder, in which all the files of the future site will be located. Now the directory structure resembles test1.ru, already discussed above. After Denver restarts, the new site will appear in the list of available ones.
This is another article from the Webmaster Tools section, in which I want to talk called Denwer, which can be freely downloaded from the developer’s resource. First, I’ll tell you what a local server is and why we need to work with it. Simply put, you can install and configure it on your computer, receiving free analogue hosting (read about what hosting and domains are).
In this case, you don’t have to buy hosting and don’t even have to have Internet access. The capabilities that Denver provides you are practically no different from those of a remote host, and it will consist of the same components and have the same capabilities. It already contains read more about this script), the Apache server (read), has PHP support and much more.
Where to download Denwer, how to install and run it?
You can download separately all the local server components described above and install them on your computer and configure them correctly, but not everyone is able to do this. And even those who understand what’s what can experience a lot of difficulties during installation and especially when configuring it.
Therefore, to make life easier for you and me, various installation packages (assemblies) were invented and created, allowing us to download a fully working and configured complex with minimal effort.
All you have to do is download the appropriate assembly and install the engine of your project (Joomla, WordPress, etc.) on it, and then start working on it, just as you would do if you found the engine files on a physical host. By the way, as an option and alternative to this solution, you can consider, i.e. capable of working with Joomla and WordPress. But in this article we will talk specifically about localhost.
So, what do the developers of such free installation packages offer us? Let me list links to resource pages where you can download them, and then I’ll tell you in detail about the installation and configuration of one of them, which I chose as my favorite.
This is my personal choice, and you can use the package that you like best. Fortunately, working with them is quite similar and, having understood how to work with one assembly (today we will talk exclusively about Denwer), you can easily figure out any other.
Where you can download local server assemblies for free:
- Denver - free download
- VertrigoServ -
By clicking on the link, you will have to register in the form provided, after which you will receive an email with a link to download the Denwer distribution.
You run the downloaded file with the exe extension, agree to install the package, after which it begins to unpack, and then a browser window with a description of the installation will also open, which you can immediately close, and a black DOS window with the installation wizard will also appear:
Following the instructions of the wizard, press “Enter” to continue the installation. In the next window we need to indicate in which folder on our computer we will install the server. You can select, for example, C:\server .

Press “Enter”, when asked if you really want to install Denver in this particular directory, you answer by installing “y” (Y) and press “Enter” again. We are further informed that a separate virtual disk will now be created, which is necessary for the functioning of all components of the local server.
Just press “Enter”, and in the next window select a letter for the virtual disk. This letter, naturally, should not be currently used by your system (i.e. the drive, the Latin letter “c”, definitely should not be selected).
It is better to choose one of the last letters of the Latin alphabet, for example, Z. If it turns out that this letter is already used to designate a disk in your Windows operating system, you will see a message about the impossibility of creating such a disk.
In this case, you will need to press “Enter” and repeat the step of entering the name of the installation directory, press “Enter” again and enter a different letter. You can see which drive letters are already occupied in your computer in “My Computer”.
If the letter you selected is not occupied, you will see a message indicating the successful creation of the virtual disk.

Press “Enter”, which will begin copying the files of this assembly to the computer folder you previously specified. Next, you will be asked to select a download option, to which you respond by entering one and pressing “Enter”. You will also be asked whether to create shortcuts to start, stop or restart on the desktop, to which you will answer “y”.
Using these shortcuts you will be able to start or stop the server. The installation wizard will then close, and a browser window will open with a page describing the next steps of working with the Denwer assembly.
Checking the health of the local server
Next, you go to the desktop and launch Denver by clicking on the “Start” shortcut. At the same time, a DOS window will open for a short time indicating that the server is starting, and then icons in the form of a feather and a black hat will appear in the tray (the area on the right side of the Windows taskbar, next to the clock), indicating that it is running.
Now type localhost in the address bar of your browser, which will take you to a page that says “Hurray, it’s working.” This means that the assembly was successfully installed on your Windows computer. By scrolling down this page, you will see links to check its functionality:

You follow this link, then in the window that opens, enter some text in the “Text” field (preferably in Russian - check that everything is in order with the encoding) and click on the “Send via mail” button. If everything worked correctly, you will receive a message like: OK, the mail() function worked correctly. But you also need to check that the letter actually arrived.
To do this, you need to go to our virtual disk (remember the letter you specified when installing this assembly) and follow the following path:
Z:\tmp\!sendmail\
By the way, you can go not to the virtual disk, but to the real one, where you have a local server installed (in my case, it’s drive C) along the same path:
C:\tmp\!sendmail\
If everything is in order with sending mail, then in this folder you should find the letter you sent. By opening it, you can check whether the Russian language encoding is correct.
Setting up and installing Joomla or WordPress in Denver
First, you will need to go to the folder where you installed the assembly (for me it is c:\server\) and follow the following path:
C:\server\home\localhost\www\
In this WWW directory you must create a directory into which you will subsequently need to upload engine files (Joomla, WordPress, etc.). You can come up with the name of the folder yourself, for example:
After creating the folder, restart the local host using the “Restart Denwer” shortcut on the desktop (if it has not already been launched, then launch it). To check its functionality, enter in the address bar of your browser:
Http://localhost/Proba/
If a page opens with the title “http://localhost/Proba/”, then everything is in order. If no window opens, try restarting Denwer again.
Now you need to install the engine (Joomla, WordPress, etc.) in exactly the same way as you did for real hosting (the installation of Joomla is described (in details and pictures). How to install SMF forum I wrote, and it’s covered in quite some detail at the link provided.
Those. you need to copy the engine files to a folder created on your computer (it acts as local hosting). In my case this is the folder:
C:\server\home\localhost\www\Proba\
This process will differ from installing the engine on a real host () only in that for copying files no need to use FTP manager- an ordinary conductor will do just fine, or something like the Total Commander described in the link.
After you copy the Joomla or WordPress files to the Denver folder, you need to install the site or blog by typing in the browser address bar:
Http://localhost/Proba/
As a result, the installation wizard window for a particular engine will open. Then you follow the same scenario as during a normal installation on a real hosting, with the only exception that you, as described in the article about installing Joomla (see link above), and in the manner described below.
Creating a database and user using Denwer
In order to get into the phpMyAdmin program, which is included in the local server build kit, you need to type the following URL in the address bar of your browser:
http://localhost/tools/
In the window that opens, click on the link called “phpmyadmin”, which will open the main page of this program. On it, in the “Create a new database” area, you enter the desired database name (for simplicity, it can be called the same as the directory for the site in the localhost folder, i.e. “Proba”, in my case) and click the “Create” button "
Now we return to the phpMyAdmin main page by clicking on the house icon in the left column of the program window. Find the “Privileges” link in the “MySQL” area and click on it.

On the phpMyAdmin page that opens, in the center, you should find the “Add new user” item and click on it.

In the “Username” area, enter the desired name (for simplicity, I again use “Proba”), in the “Host” area, enter localhost, in the “Password” and “Confirmation” areas, enter some very complex password twice.
In the “Global Privileges” area, click on “Check all” so that the database user you create has maximum rights.
That's it, the database and user in Denver are created. Now you can use this data when Joomla installation, WordPress, etc., which will follow the same sequence as when installing on a real hosting. Once this process is complete, your resource will be available at:
Http://localhost/Proba/
You can work with Joomla or WordPress in the usual way, but at the same time, the work of editing engine files, installing and removing various extensions is significantly simplified and accelerated, and you also have the opportunity to work on your project even there. where there is no internet access.
Transferring a website to hosting
After finishing the project you should transfer website from Denwer to hosting so that it becomes available to visitors from the Internet. This is done in the same way as if you were simply moving from one hosting to another or restoring your site from a backup copy (I wrote about creating and restoring from a backup).
To do this, you will need to use the FileZilla program (which I wrote about) to move all the files from the local server folder (in my case the “Proba” folder) to the root directory of the remote host (usually either PUBLIC_HTML or HTDOCS).
And then open the configuration file of your engine for editing and change the parameters of the absolute path to the files and folders of this engine, as well as the database name, user and password, to those that you set when creating a new database on the hosting. All this is described in detail in the article about backup and site transfer, the link to which you will find by going up a couple of paragraphs).
How to remove Denver from your computer
Quite often the question arises of how to remove this assembly from your computer. The main problem with uninstallation is disabling the virtual disk created during installation. But first things first. First, of course, you will need to stop the local server using the appropriate shortcut on your desktop.
Then delete virtual disk, which was created during installation. Remember what letter you assigned to this virtual disk and go to Windows via the following path “Start” - “Run” (you can press the Win + R key combination instead), enter the command in the window that opens:
Subst z: /d
Instead of the virtual drive letter Z, you will need to enter your choice (drive Z suggests cz as the default virtual drive letter). Well, to permanently remove the Denwer assembly from your computer, it will be enough to delete the WebServers directory (by default this is the “C:\WebServers” folder) and remove three shortcuts from the desktop of your operating system Windows systems. That's it, we can assume that we managed to remove it with little blood.
Good luck to you! See you soon on the pages of the blog site
You might be interested


