Windows system configuration. What is msconfig, how to run it in Windows, configure it correctly and what can it do? Where is the Windows 7 configuration?
msconfig is a utility for configuring the operating system Windows systems. The main purpose of this program is to search and isolate OS problems. msconfig is an additional tool for identifying problems that may prevent Windows from starting normally. Using the utility, you can disable regular services and automatically downloaded programs, and then enable them one by one. If a problem occurs after you enable a particular service, that service may be the source of the problem.
msconfig utility window in Windows
Running msconfig in Windows 7 in different ways
There are several options for running the settings utility, but not all of them are equally practical. The very first one is the simplest and fastest.
Method 1
Open Start and in the search input line enter msconfig. The search results will display the required utility, so run it.

Method 2
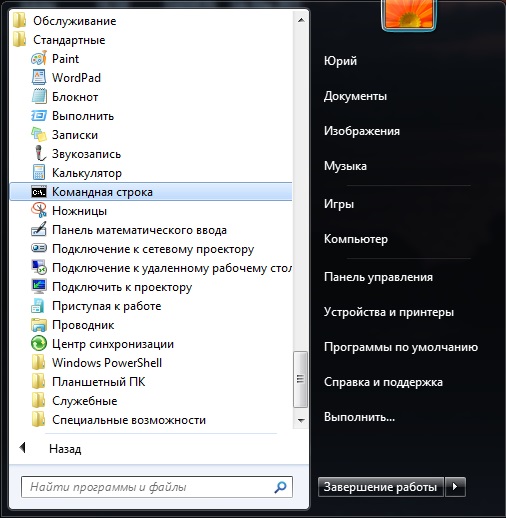
Open Start - All programs. In a folder Service or Standard open Command line.

A window with a black background will open. Enter msconfig and press Enter.

Method 3
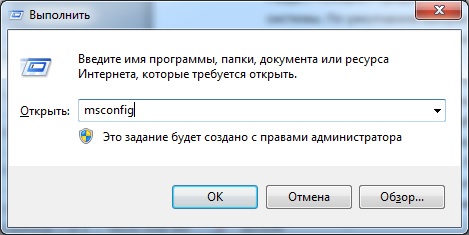
Open Start and select the button Execute.

In the window that opens, enter msconfig and press the button OK or Enter on the keyboard.

Method 4
The longest way to open the utility is to find it yourself in the placement folder. Go to directory:
C:\Windows\System32
And find the file in it msconfig.exe, which needs to be launched. 
26.11.2009 22:52
System setup- This diagnostic a tool designed to configure Windows 7 startup settings in order to identify the causes of problems with the computer and operating system. Using the System Configuration program, you can identify drivers, programs and components that, due to incorrect operation, cause errors during the startup and operation of Windows 7.
Launching the System Configuration Program
To launch System Setup, open the Start menu, type in the search bar, and press Enter.
You can also use the combination Windows keys+ R , enter and press OK.

General tab

On the tab You can choose one of three options for starting the operating system:
Normal launch
In this Windows mode 7 starts in the usual way. “Normal startup” is used when there are no problems loading the OS or after troubleshooting.
Diagnostic run
In diagnostic startup mode, only the basic services and drivers necessary for the functioning of the operating system and computer are launched along with Windows. If the problem does not disappear when diagnostic startup is enabled, then most likely the main files and Windows drivers. If there are no problems when diagnostic startup is enabled, then you need to use the mode Selective launch.
Selective launch
In this mode Windows startup 7 is produced using core services and drivers, as well as other services and downloadable programs selected by the user. Three additional options are available:
- Load system services– if this parameter is enabled, the operating system boots from standard set services necessary for its operation.
- – if this parameter is enabled, then programs marked with checkboxes on the tab are launched along with the operating system.
- – This option is enabled by default and is grayed out. This option restores the original Windows 7 startup settings if changes are made on the tab.
Selective startup should be used if diagnostic run passed without errors. Turn on additional services and programs one by one, and monitor the system until you identify the cause of the errors.
Loading tab

Default operating system
If you have several installed on your computer operating systems, you can set any of them to be loaded by default. To do this, highlight the desired operating system and click the button Use as default.
You can also set a custom multiboot menu delay time by setting the time in seconds in the field Time-out.
To remove an operating system from the list, select it and click the button Delete.
Safe Mode
Safe Mode is a mode of operation of the operating system with a limited set of services, devices and drivers necessary for the functioning of the computer.
Windows services that start in safe mode:
- Windows Event Log
- Plug and Play device support
- Remote Procedure Call (RPC)
- Cryptography Services
- Windows Defender
- Tools Windows management(WMI)
Devices and drivers that run in safe mode:
- Domestic hard drives(ATA, SATA, SCSI)
- External hard drives (USB)
- Floppy drives (internal and USB)
- Internal CD and DVD drives (ATA, SCSI)
- External USB drives for CDs and DVDs
- Keyboards and mice (USB, PS/2, serial port)
- VGA video cards (PCI, AGP)
Check the box Safe Mode and select one of the download options:
Minimum– launch Windows 7 Explorer in safe mode using only basic Windows devices, drivers and services, without network support.
Another shell– loading the command line, basic devices, drivers and services of Windows 7. Explorer and network components are disabled.
Recovery Active Directory – launch Windows 7 Explorer in safe mode using only essential services, devices and drivers, as well as the Active Directory directory service.
Net– launch Windows 7 Explorer in safe mode using only the main components of the operating system, as well as the following network components:
- Network adapters (wired Ethernet and wireless 802.11x)
- Dynamic Host Configuration Protocol DHCP
- Network connections
- NetBIOS support module over TCP/IP
- Windows Firewall
Download log– all information about the process Windows boot 7 saved to file %SystemRoot%/Ntbtlog.txt.
Basic video– standard VGA drivers are loaded instead of drivers corresponding to the video card.
OS information– When Windows 7 boots, the names of the downloaded drivers are displayed.
Make these boot options permanent– if this option is enabled, then the system settings you have changed can only be canceled manually. You cannot undo changes by selecting Normal Startup on the General tab. Also you will not be able to undo changes using the function Use original boot configuration on the tab .

To configure advanced boot options for Windows 7, on the tab, click Additional options .
Number of processors
This setting allows you to limit the number of both real and virtual processors used in the system. Select the checkbox and use the drop-down list to specify the number of processors that you want to use starting from the next system startup.
Maximum memory capacity
This setting allows you to limit the amount of physical RAM, used by the operating system. Select the checkbox and in the text field specify the maximum amount of RAM (in megabytes) that will be used by the system starting from the next startup.
PCI blocking
If this setting is enabled, the operating system does not allocate I/O and interrupt resources on the PCI bus. In this case, the I/O and memory resources specified in the BIOS are preserved.
Debugging
When enabled, you can set global kernel-mode debugging options for device driver developers.
Services Tab

Tab Services contains a list of services that start automatically when Windows 7 boots. All these services are divided into two categories:
- Microsoft services, on which the operation of the operating system depends;
- third party services, necessary for the operation of drivers and some programs.
When identifying the causes of problems that occur during startup or operation of Windows 7, you need to follow these steps:
1. On the tab
- Turn on Selective launch.
- Check the box Load system services.
- Uncheck Load startup items.
2. On the tab Services:
- Check the box .
- Disable all third party services from running.
3. Restart your computer.
If problems do not occur after rebooting, then system components Windows 7 is working fine, but the cause of the errors is most likely due to incorrect operation one or more third party services. To identify which service is causing the failure, enable one service at a time, restart the computer, and monitor the system status.
If your system still experiences errors after disabling third-party services, the underlying operating system components may be damaged. To identify the cause of the errors, follow these steps:
1. Uncheck Don't display Microsoft services.
2. Disable all Microsoft services, then enable them one at a time, restart your computer and monitor the changes until you identify all the services causing the failure.
Startup tab

- In column Startup item The program name is displayed.
- In column Manufacturer- program developer.
- In column Team indicated executable file, which starts with the OS, as well as the location of this file.
- In column Location the registry key responsible for automatic start programs along with Windows 7.
- In column Shutdown date The date for disabling startup items that do not start automatically with the operating system is indicated.
If in Windows work 7 problems arise, you can try to determine the cause of the problem by disabling the automatic launch of programs one by one. To identify which program is causing the crash, turn off the startup of all programs, and then turn on one program at a time, restart the computer and monitor the system status.
To prevent the program from starting with Windows 7, you need to uncheck the box next to its name and click the button Apply.
Service tab

Tab allows you to quickly launch Windows configuration, administration, and diagnostic tools. Select the desired tool and press the button Launch.
About the program– display information about Windows versions 7 installed on your computer.
Change User Account Control settings– setting up the UAC component Windows security 7, asking for confirmation of actions that require administrator rights.
Help Center The main place to view alerts and take actions that help Windows 7 run smoothly. Action Center lists important messages about security and computer maintenance settings that require your attention.
– a set of tools for automatically resolving some common problems when working with networks, hardware and devices associated with the use of the Internet, as well as program compatibility problems.
Computer management– a set of tools for managing hardware, software and network components Windows 7.
System Information– a Windows 7 component that displays detailed information about hardware configuration, components and software computer, including drivers.
Event Viewer– a tool for viewing detailed information about important events that occur in the system (for example, programs that do not start properly or updates that are downloaded automatically). This information may be helpful in troubleshooting problems and errors in Windows 7 and installed programs.
Programs– Windows 7 Programs and Features tool, designed to enable or disable Windows 7 components, as well as to remove programs or change their configuration.
System properties– basic information about the hardware and operating system. Version and status Windows activation 7, performance index, computer name, domain name and workgroup settings.
Internet Options– parameters Internet browser Explorer.
IP protocol configuration– view and configure the computer’s network address (in the command line).
is a powerful diagnostic and performance monitoring tool built into Windows 7.
Resource Monitor– a tool for viewing processor usage information, hard drive, network and memory in real time.
Task Manager– displays applications, processes and services that are currently running on the computer. You can use it to monitor your computer's performance or stop applications that are not responding. Monitoring the network status and viewing its operating parameters.
Command line– a Windows 7 feature that allows you to enter MS-DOS and other commands without GUI user.
Registry Editor– a tool designed to view and change parameters in system registry, which contains information about the operation of the computer.
System Configuration is an application included in the Windows operating system and is designed to configure the system startup. Also, entering the system configuration is used to troubleshoot problems due to which the system does not start correctly.
How to call up the system configuration
There are several ways to start the system configuration.
Via run msconfig
You can open the system configuration using the msconfig command, and to do this, launch the Run application by simultaneously pressing the WIN + R keys on the keyboard.
You can use the msconfig command in Windows 10 to enter the system configuration
A window called Run will open in which the msconfig command is entered, and to run msconfig you need to click OK.
Via Control Panel
You can enter the system configuration through the Control Panel. We launch the Control Panel and in it open the System and Security category and in it we find and click on the Administration item.
 Through Administration you can go to the Windows 7 system configuration
 A window called Administration will open.
 Windows 10 system configuration is launched through the Control Panel
 In this window, find the System Configuration item and open it. Place the cursor over this item and press the right mouse button, and then in the window that opens context menu select Open.
Windows System Configuration
The system configuration consists of 5 tabs called General, Download, Services, Startup, Service.
General
The first System Configuration tab displays system startup options. To know which launch to choose in the system configuration, let’s consider them in more detail. In the system configuration, there are generally three launch options.
 Windows 7 System Configuration
 Normal launch
If you select normal startup in the system configuration, then all programs that are on autostart will start along with the computer and all Windows applications. After installing the system, it is best to switch from this mode to the Selective Startup mode so that only the programs, applications and applications you select will start with the system. Windows services.
Diagnostic run
This startup will only launch essential Windows applications and services. This method is not recommended for inexperienced users, since not everyone knows how to start the necessary services when necessary. By starting the computer in this mode, services and applications that you will need to return to normal or custom mode may be disabled, and you will need to start them to correct the system configuration.
Selective launch
This startup will only launch essential applications and services, as well as the applications, services, and programs you select.
Loading
This tab in the system configuration Boot displays all installed systems on your computer, and the current and default ones are marked.
 Where to find the system configuration
 On this tab you can set the Safe Mode option so that after rebooting the computer will start in safe mode. Safe mode can be launched in four options.
Minimum
In this mode, the system will launch only the necessary system services, without access to the Internet.
Another shell
In this mode, it will open command line and the necessary system services will start, without access to the Internet.
Active Directory Service Restore
In this mode, the system will start only the necessary system services and the Active Directory service.
Net
In this mode, the system will launch only the necessary system services and provide access to the Internet.
Also on this tab, by checking the box next to the desired item, you can disable or enable:
- Without GUI - screen off Windows greetings. It is recommended to disable this item in the system configuration.
- Boot log - will save all information about system boot to the file %SystemRoot%Ntbtlog.txt.
- Basic video - the system will boot with minimal VGA parameters instead of video adapter drivers
- Information about the OS - when the system starts, all the names of the drivers that are launched will be displayed on the screen.
You can also open on this tab additional window by clicking the Advanced options button.
 In the system configuration, the number of processors in msconfig gives
 In the window that opens called Advanced Boot Options, you can set some options.
- Number of processors - indicates how many processors should be used when the system starts.
- Maximum memory - indicates the maximum amount physical memory which should be used the next time the system starts. Since the system itself uses the maximum memory by default, it is not recommended to set the maximum memory. msconfig is reset and sets it to no more than 4 GB.
- PCI blocking - prohibits the redistribution of I/O resources and IRQs on the local PCI bus, and are stored in the BIOS.
- Debugging - Enables global kernel mode port debugging options.
Services
This tab displays all Windows services and their status, whether they are running or not.
 Where is the Windows 7 system configuration
 It is not possible to disable services in the system configuration, as without some services Microsoft system simply won't be able to work. In order to know for sure which services can be disabled in the system configuration, you need to check the box next to Do not display Microsoft services and then the services that can definitely be disabled will be displayed.
Autoload
This tab displayed all programs that automatically launched along with the system.
 How to enter Windows 10 system configuration
 Starting with the Windows 8 operating system, for convenience, startup was moved from the system configuration to the Task Manager.
Service
This tab displays a list of applications that start when the system starts.
 How to open Windows 10 system configuration
 Each application has brief description what is it for, and you can also see where this application is located. By selecting required application You can run it by clicking on the Run button and it will open.
The Windows 7 operating system allows you to manage the boot parameters of installed operating systems, manipulate services and startup. The “System Configuration” utility, called by the msconfig command, is intended for this.
How to enter the msconfig.exe configurator?
There are several ways to launch the utility. We will give 3 of the simplest ones.
Search string
To launch the utility, you must enter the word in the search bar of the Start menu msconfig, and then select the found utility from the search results.
Run command
Open the Run submenu located in the Start menu and type in the text field msconfig, then press Enter or the “OK” button.
Command line
Open Start - All Programs, and then in the Accessories folder select Command Prompt.
In the window that opens with a black background, enter msconfig and press Enter.

In addition to the listed methods, it is possible to open the utility directly from the folder where it is located. To do this, go to the C:\Windows\System32 directory and run msconfig.exe.
Correctly setting up msconfig for current needs
The "System Configuration" (MSCONFIG) utility window has several tabs: "General", "Boot", "Services", "Startup" and "Service".
General
The “General” section is designed to select one of three options for loading the operating system. By default, “Normal startup” is selected, which loads all the necessary drivers, services and programs at startup.

The user can install “Diagnostic startup” to load only the drivers and services necessary for the system to function. This mode is used to identify the causes of errors in Windows 7. For example, when loading, an unknown error began to appear, or after some time the computer simply rebooted or displayed blue screen"death". The cause may be errors in drivers or system files, or the error may be caused by installed application. If in diagnostic mode there are no problems with the system, then the user program is to blame.
“Selective startup” serves for further diagnostics and identification of the causes of problems in the system. You can sequentially enable additional services and startup programs. It is recommended to start the system by first enabling system services, then enabling items in startup and rebooting. At the last step, enable “Use original boot configuration”, which will correspond to the normal OS startup option. This way, you can localize the cause and identify the group of programs or services that lead to errors.
The “Boot” section allows you to manage the loading of installed operating systems. If you have multiple systems installed, you can configure which one will boot first. To do this, select one of the systems from the list and click on the “Use as default” button. Additionally, you can set the waiting time for the user to select a particular system by changing the time interval in the “Timeout” field.

Here you can also configure additional download parameters. Enabling the Safe Mode feature will allow you to run the operating system with limited capabilities. In this case, only the most necessary drivers and devices are loaded. This mode is used to diagnose software faults.
There are several options for working in safe mode:
- “Minimal boot” essentially allows you to load a minimal set of drivers and use only the required number of devices, without support for network services and devices.
- "Another Shell" allows you to additionally use the command line in safe mode, however Windows Explorer will be unavailable, just like the network.
- “Restore Active Directory” – allows you to start Windows Explorer in safe mode with support for Active Directory directories.
- “Network” – loads network services and devices.
- “Without GUI” – disables the operating system boot animation.
- “Boot log” – enables the ability to save information about system boot to a file (keep a boot log). The log is saved in the file “Ntbtlog.txt”, which is located in the system folder %SystemRoot%.
- “Basic video” – makes it possible to replace video card drivers. That is, instead of the installed video drivers, standard VGA drivers will be used.
- “OS Information” – allows you to display information about loaded drivers during system boot.
You can also set other additional boot options for Windows 7 by clicking on the corresponding button under the OS list. The purpose of this section is to set limits on the use of physical resources at startup.

- “Number of processors” – limits the use of multi-core processor cores by specifying their number.
- “Maximum memory” – sets the limit of used RAM.
- “PCI blocking” – allows you to limit the use of I/O devices connected to the PCI bus.
- “Debugging” – activates debugging mode. It is used primarily by driver and software developers.
Services
“Services” section – used to enable and disable all operating system services. During system diagnostics, you can disable some services to identify the causes of malfunctions. To hide system services, check the “Hide Microsoft services” checkbox. After that, on the “General” tab, set the “Selective startup” mode and enable the “Load system services” item. On the Services tab, disable all other user services and restart your computer. If problems do not arise after this, then the user services are the cause. Now turning on services consistently, you can easily determine the source of the problems. If the problem does not disappear, then the reason lies in system services. Disable all services and then enable them one by one to identify the source of the system failure.

The “Startup” section – allows you to enable or disable the automatic launch of certain programs when the OS starts. To disable automatic download any program, you should uncheck the box next to the selected program and click the “OK” button. You can manage startup parameters to diagnose problems or increase system boot speed. Often, while using a computer, a user has up to 20 applications in startup, most of which he is not even aware of. Naturally, such a number of programs significantly slows down Windows loading. If you are diagnosing the system, you can disable all programs in startup, and then turn them on one by one to determine the source of the error.

Service
The “Service” section is used to launch additional system utilities. Here the user can launch additional diagnostic, administration and operating system management tools. Just select the utility you are interested in (next to it there is a brief description of each of them) and click on the “Launch” button to open it.

As you can see, the “MSCONFIG” utility is quite easy to use and allows you to diagnose software problems when loading the Windows system. But still chaotic changes in this application can lead to undesirable consequences, so write down the changes you make so that in case of problems you can easily return everything to its original position.
The article describes what the utility is msconfig, what are its main benefits and how to use it correctly to solve problems with Windows and prepare the way for error testing.
Among other repair utilities included in Windows, msconfig.exe(aka utility System Configurations) certainly stands apart. It is most often used for:
- configuration of the system startup type (selection of a special mode)
- changing the boot procedure
- selection of services and programs at system startup
- launching special repair or statistical utilities
The configuration utility is a window of several tabs, and in latest version Windows one of them () migrated to the Task Manager. Msconfig.exe is launched in several ways, the simplest of which is:
WIN+R->msconfig
Let's check each of the tabs:
Msconfig: selecting services and drivers for Windows
The first tab will be General. Here we will be greeted by several points characterizing the option to start services and drivers.

- Normal launch– an option that occurs by default and is saved from the moment you install Windows. At this time, the system will load drivers for all installed (and subsequently installed) devices and those services that, according to according to Windows, are needed for operation if the system does not register any errors in operation. There is no need to change anything in this option... as long as the user has not changed anything in the list of services, in the startup folder or other settings. As soon as you make changes to the startup method, prohibit programs from starting, change the task schedule, or add your own, the startup option automatically changes to Selective startup
- Diagnostic run– this option is somewhat reminiscent of Windows Safe Boot Mode. After a reboot, only the drivers and services of the system itself will work in it: no other programs or third-party drivers will start working, and pre-installed and updated drivers will be replaced with those that “arrived” with Windows installation(so to speak, international). However, antivirus software is often included in this privileged list. The meaning is clear - this launch option is used in an attempt to isolate the problematic part of the software when the OS is unstable
- Selective launch will allow you to boot the system, bypassing programs that have been prescribed over time, loading (or not loading) the main services. By setting or deleting the autoload setting, you can determine whether its contents are interfering with normal operation, or whether the reason lies elsewhere. A changed item with the original boot configuration means that you have made changes to boot entry. This often happens when using a multiboot system with 2 or more operating systems, when editing local disks (letters, size or deleting/recreating volumes), etc.
The next tab displays a list of Windows systems as the bootloader sees them. So, if you have a second Linux installed, the bootloader rightly has no idea about this. The same goes for the OS. Windows various generations: when it was in fashion Windows XP, its bootloader about Windows 7 or 10 and never heard of it. So what about Windows 10 in the bootloader from Windows XP there is nothing. But 10 already knows everything about previous versions of the Microsoft OS, so they are great. But for security reasons, correction of the list of systems in this part of the window is excluded: you will not be able to rename, delete from here, or rearrange them, since the utility is not granted such rights. This option is presented for purely informational purposes.
However, the lower part of the tab window already contains customizable options, some of which may be useful. The simplest, but required - Time-out-change the display time of the menu for selecting operating systems (if there are several of them). By Windows default leaves us 30 seconds for this. If there is only one system, the bootloader is wise to omit the menu. But if there are 2 or more copies of Windows, you don’t have to wait half a minute, but set the desired time.

On the left are special boot options. Among them is the notorious Safe Mode, which completely prevents the launch of programs and drivers other than those installed by the system. Moreover, in addition to the option itself, you can set additional parameters for Safe Mode, including:
– Safe mode with a full user interface, but disabled network driversThe functionality of the utility continues with the next column of settings, which will allow the user to change some boot parameters in both Safe Mode and Normal Mode. Something like this:
- Without GUI– during boot you will not see the usual welcome screen, only a black screen without any information
- Download log– after downloading, all information about running services and drivers is entered into a special log file, which can be found at C:\Windows\Ntbtlog.txt
- Basic video– a very useful parameter that allows you to load an image from a video card using ONLY drivers pre-installed by the system (and not those that you installed from the video disk, downloaded from the Internet, etc.). An important option when something goes wrong after updating your video driver
- OS information– the option must be used with the Without GUI. The system boot will be accompanied by a black screen displaying complete information on the loaded drivers. If the system crashes during boot, this mode can help identify the driver that causes the system to crash.
Button : options are not for everyone
The only available button in this quadrant of the window is Additional boot options, where can I force this copy of Windows start, either ignoring the data from or, on the contrary, strictly following it (this part of the tab was left by the developers at the beta stage: they pushed through some settings for testing, but they “forgot” them there).

For example, you can ask Windows to start with a LIMITED set of processors and physical memory. However, contrary to some misconception in an attempt to speed up Windows startup, specifying the maximum number of processors and the entire amount of RAM at the moment of startup will NOT affect the boot speed.

But your system may be configured in such a way that redistributing I/O and IRQ resources along the PCI bus (and this is what this checkbox does) will cause a system failure upon boot, and you will inevitably encounter a startup error: it will be either a black screen or BSOD. If you encounter this problem, try booting into Safe Mode and removing the “check” from the item, or you will have to clear the CMOS memory with a battery or jumper. It's okay - everything can be fixed. In general, when experimenting in this part of msconfig, remember:
By default, Windows devotes all its efforts and resources to launch, and it does this based on the results of the POST check carried out by . At the same time, the system selects the startup and operation parameters for itself EVERY TIME during boot, and it is better not to interfere with this process.
Next option debugging– an even more unknown test tool for mere mortals for developers of drivers for new devices. Work with potential drivers is carried out at the level, and for work it is necessary to use a special control channel. It is highlighted immediately after this option is activated. Debugger/debugger (type WinDbg), connected via the specified port, will allow you to work out the device under study. However, if Windows does not detect it on the default COM1 port (if the settings of the debugger itself are incorrect), the system may very well freeze. Ordinary users who do not use debugging when solving problems or solving problems related to software development for Windows have nothing to do here.
Msconfig: Services Tab
Everything is simple here. The list shows services that start at boot and are running right now. The option Do not display Microsoft services is often useful here if we are interested in those downloaded with Windows programs from the outside. By checking or unchecking the box, you can check the influence of a particular program on startup if you are going to catch the culprit of unstable operation.

The settings applied here are consistent with the settings in the tab General. As soon as you add or remove a service from this list, the startup option in the first tab will change to Selective.
In Windows 10, the contents of the tab moved to the Task Manager, but owners of previous versions could at least somehow control the ever-expanding list of programs that launched along with Windows right from here, slowing down the boot process. Plus, the background hangs in the number of running processes, slowing down work in the current session:

the list of automatically downloaded programs is now here

but autoloading in windows 7 was possible
However, to get the most complete understanding of startup management, it is better to pay attention to the article
Msconfig: Tools Tab
The tab, unlike the previous ones, allows you to run the selected process right now using the button Launch. Moreover, this is done on behalf of the administrator with the indication full path to the executive file in the system directory. All the utilities listed here are not just anything, but those that belong to the repair or statistical category. Knowing what tools are available from here can be a huge time saver without knowing.
 In addition, it is possible to add the programs we need, like those already available.


