How to check if the hard drive is working on a laptop. How to check the hard drive on a laptop
Frequent errors in the system or even reboots with a “screen of death” force a thorough analysis of all computer components. In this article we will talk about the easiest way to check bad sectors on a hard drive, as well as assess its condition without calling expensive specialists.
All further actions will be carried out using a special software. You don’t have to use each software one by one, because it will be enough to choose only one option. First, we suggest that you familiarize yourself with all the presented methods in order to ultimately choose the ideal solution for yourself.
Method 1: HDD Health
The simplest and fastest program that can quickly check hard drive for serviceability, is HDD Health. The local interface is very friendly, and the built-in monitoring system will not let you miss serious problems with the memory device, even on a laptop. Both HDD and SSD drives are supported. The process of use itself is as follows:

Unfortunately, the program, other than for informational purposes, does not in any way assist the user in correcting errors. It is suitable for one-time assessment and monitoring, but to correct detected problems, you will need to contact Method 2 or other programs.
Method 2: Victoria
Victoria is rightfully considered one of best programs for testing and recovery hard drives, which contain bad sectors. It does not require installation, because the developers immediately created portable version, which is launched from the archive. The process of checking the drive here is as follows:
- Download the archive from the official Victoria website, open it and run the executable file.
- Move to the tab "Standard".
- Click the button here "Passport" to view the hard drive information, and then select the device you want to check.
- Drive information is also displayed in the status bar at the bottom.
- In the tab "SMART" you can get basic information about disk health. To do this, click on the button "Get SMART".
- The output of information will not take much time. However, after that you will receive a table with values and status marks. Check it out to be a little aware of the health of your device.
- Then go to the main tab "Tests".
- Leave all settings at default for now, just run the scan.
- Blocks of different colors will begin to be created in the window. The range up to green is considered normal, then blocks are considered unstable, and blue marks mean the presence of errors (most often these are bad sectors). Latency information is displayed in the section on the right.
- Upon completion of scanning, you should separately familiarize yourself with the number of red and blue blocks. If it is large enough, then the disk is considered unstable.
- Recovery occurs due to the reassignment of bad sectors; during the scan they are simply hidden. This is done through testing with the attribute set "Remap". You will learn more detailed information about restoration a little later.


Additionally, we would like to draw your attention to the fact that some users may experience problems running tests in Victoria due to established regime AHCI. To avoid difficulties, it is recommended to select IDE mode(Compatibility). Find all the necessary information on this topic in the materials listed below.
If during the analysis you found a large number of bad sectors and want to restore the drive using the same software, we recommend that you read the instructions provided in our other article at the following link. There, the author described this process in as much detail as possible, explaining each action that is necessary to complete.
Method 3: HDDScan
Another program similar to Victoria, but with a more modern interface is called HDDScan. We recommend using it in the case when some difficulties arise with Victoria or you are not satisfied with it for certain reasons. The testing process is not much different here.
- To get started, you can get basic information about the health of your drive by selecting it and clicking on "SMART".
- The information here is displayed at approximately the same level as was shown in Victoria.
- Next, return to the main menu and run one of the types of tests. You will learn more about them below.
- Leave the analysis settings unchanged.
- To display detailed information, double-click the left mouse button on the task line.
- As you can see, the scanning map is almost the same as in the version discussed earlier, only the color marks are slightly different in delay.
- Upon completion of the analysis, you can view a detailed report, which shows the status of the drive in the form of a graph and additional information.


Now let's take a closer look at each testing option, because it is important to choose the right methodology to get accurate information:
- Verify— scanning sectors without reading data on them;
- Read— checking sectors with reading data (accordingly, it will take much longer);
- Butterfly— reading blocks in pairs, one from the beginning and one from the end;
- Erase— recording blocks filled with sector numbers (delete all user data).
The program, like the first one, only diagnoses problems. Above we have already provided links to articles through which identified failures can be eliminated.
Conclusion
Nowadays, various developers have created a fairly large number of programs that allow you to check your hard drive for errors. They work on approximately the same principle, so there is little point in disassembling them. Instead, we recommend that you read the separate material on our website, which contains reviews of the most popular detailed solutions.
If you suddenly discover that the drive you are using is not working at all, repairs are a must. However, only specialists can not always help with this. Certain actions are quite doable manually. Read more about this further.
If the hard drive is not visible in the system at all, refer to the following material:
Today you were introduced to software verification methods hard drive for performance. As you can see, there is nothing complicated about this; you just need to select one of the proposed software to start testing.
If the HDD makes strange sounds or there are problems with writing and reading information, you should use one of the programs to check the hard drive for errors. Depending on the task (checking the disk surface for damage, searching for bad sectors, correcting errors, etc.), different software may be useful.
You can quickly check the disk for errors using standard system tools, but to restore the hard drive you will need special third-party programs. Having learned how to check the health of a hard drive using various utilities, a user of any level will be able to cope with any problems that may arise.
The CheckDisk system service is the simplest program for diagnosing a hard drive, which is not able to find complex errors and fix them bad sectors, but is useful for fixing basic problems. It is available on all versions of Windows OS and can be used to check drives of any type. All users need to know how to check a hard drive for errors with this tool.
The graphical interface version of the utility is most convenient for novice users. You can launch it through the disk management menu, which can be accessed in two ways:
- in Windows XP/Vista/7 - select “Management” in context menu“My computer”, then go to the desired menu;
- in Windows 8/10 - press the Win+X combination and select the appropriate item.
In the window that opens, select the device that needs analysis, right-click on it and select “Properties” from the drop-down menu. By going to the “Service” tab, you need to run the hard drive diagnostic program.
The system will check and automatically correct errors if the disk is not currently busy with read or write processes. Otherwise, the program will offer to test after restarting the PC. If necessary, in the scan results window you can see detailed information about the status of the HDD.
The GUI version does not always help, so check state of hard disk is sometimes required from safe mode or without starting the operating system at all. In such cases, the console comes to the rescue; you can launch it before the system starts using boot disk.
Once you open the recovery console, you need to run the chkdsk /f command, which will check all connected drives. In some cases, this will help fix the error. However, in most situations, if a HDD failure has made it impossible to start the system, a more in-depth check of the hard drive’s condition will be required.
To take advantage console command from inside the system you need:
- run command line(via Win+X or by entering cmd in the Run window);
- enter the chkdsk command indicating the letter of the partition being checked and additional flags;
- Confirm the operation by pressing Y.
Checking the HDD via the command line will be a little faster than when using the GUI version of the program; the results will be shown here in the console.
The Linux system also has standard tools - hdparm and smartctl, launched from the console.
Simple programs for quickly checking HDD
If standard utilities are not suitable, hard drive diagnostics can be carried out using simple third party programs. They allow you to get more information about the health status of the HDD, but in case of serious problems they will not be suitable, since they cannot be used to fix the damage.
HDDScan is a free program that performs analysis in two modes:
- according to S.M.A.R.T. indicators;
- linear processing.
The tool evaluates the read and write speed of various sectors, marking the “slow” cells. During the analysis, the program ensures that the tested hard drives do not overheat; at the end of processing, the user is presented with a full report.
HDDScan good versatility. The utility allows you to check disks for errors, regardless of the type of device: you can use it to check how external hard disk, and analyze a RAID array, SSD drive or memory card.
Crystal Disk Mark has only one function - it evaluates the read and write speed. Despite this, it is often used, since it is still possible to check the hard drive for serviceability using just two indicators.
Used for the test different algorithms, one of which is sequential recording mode. The program gradually fills all the space on the drive with blocks of a size specified by the user, after which it cleans the HDD. The same technique is used by hard drive manufacturers to check product quality. Its disadvantage is that it accelerates the wear of SSD drives.
CrystalDiskInfo And DiskCheckup They are similar in their set of functions, differing only in the interface. They check the status of the hard drive using S.M.A.R.T. algorithms and compile a history of checks, which allows you to track the dynamics of changes. CrystalDiskInfo has more options for visualizing history. For example, you can create a graph, not just get a written report.
Another feature of these programs is convenient system notifications. In-depth hard drive tests usually take a long time. If the user needs to step away from the computer, they can turn on critical notifications. HDD errors by E-Mail.
Programs from hard drive manufacturers
Some HDD manufacturers have developed their own utilities to analyze the status of the hard drive. They are intended for use with devices of the same name; diagnosing a hard drive from another company is possible with their help, but this must be done carefully. Unlike more simple programs, these utilities have versions in different languages, including Russian. Which program is better to analyze the HDD status?
The proprietary program from Seagate exists in two versions: a standard version for running under Windows and a DOS version in ISO image format, from which you can make bootable USB flash drive. It is recommended to use the second option, since the check in this case will be more accurate and efficient.
SeaTools uses part of the S.M.A.R.T indicators. to test the hard drive without giving away details about each item. Three tests can be performed:
- short self-test of HDD;
- short rapid test;
- a long-term check in which all sectors are read sequentially.
As the scan progresses, the program automatically corrects any errors found.
Owners of hard drives from WD should know how to check the performance of hard drives using proprietary software from this manufacturer. The range of its capabilities is similar to that of the program from Seagate, but is somewhat expanded and allows for more in-depth work with the affected device.
There are two additional functions:
- deep disk formatting - the program writes zeros to all sectors, permanently destroying information;
- blocking access to bad sectors - the program marks bad blocks, preventing the writing of new information to them.
Unlike SeaTools, this program for diagnostics, the HDD can be freely used with devices from any manufacturer to check the hard drive for errors - no problems were identified with this.
Deep testing software
If you need not only checking the hard drive for errors, but also correcting bad sectors, you cannot do without sophisticated software that carries out the most in-depth analysis of the HDD state.
Victoria HDD
According to many users, Victoria HDD is the best software for detecting hard drive problems. The program gained this reputation due to its wide range of functions.
Victoria exists in two versions:
- with a graphical shell for use from inside Windows;
- with a DOS shell to create a boot disk.
It's better to use the second version. Diagnostics of the HDD outside the system allows you to achieve better results, so it is always recommended to follow the principle “if possible, test the disk from the boot disk.” IN as a last resort You can use a LiveCD of another OS, for example, a Linux distribution like Ubuntu.
Victoria HDD has a variety of functions:
- quick and complete disk scan;
- reassignment of bad sectors and their restoration;
- checking the status of contacts in the IDE or SATA cable;
- equipment performance analysis;
- viewing S.M.A.R.T. indicators.
When checking, you need to pay attention to the access time to sectors. It should not exceed 200-600 ms. You can also see the temperature of the disk during operation, but this is not so important.
HDD Regenerator
HDD Regenerator is a program for professional hard recovery disk. It not only marks bad sectors as unused, but also tries to revive them. For this purpose it is not used standard method deep formatting, but its own algorithm based on transmitting signals of different levels to the sector. Despite its professional level, inexperienced users can also use this software, since testing a hard drive with its help is not difficult thanks to its convenient Russian-language interface.
Program features:
- ensuring data safety - it works only in read mode;
- support for different file systems;
- the ability to scan the disk surface;
- real-time monitoring.
The program is not suitable for everyone, since you can check your hard drive for functionality for free, but you will have to pay $90 for the sector recovery function.
If you don’t want to pay, you can use TestDisk, a free program that can restore the partition table, boot sectors and MFT. It also detects bad sectors, can recover deleted information and fix errors file system. The only drawback is the lack GUI, you have to work from the console.
If, after checking the HDD and correcting all problems, the computer does not stop working incorrectly, it is worth checking the registry. Perhaps the failures are caused not by hardware failure, but by internal system errors.
Surely many PC and laptop users have had to deal with various kinds of problems that arose with their hard drive. In this article we will try to answer basic questions regarding the operation of a hard drive and use a specific example. what to do, when, how to check the serviceability of the media and whether it’s even worth spending your nerves and time on it.
As an example, let's take one of the most popular hard drives, which is equipped with thousands of computers and laptops - a hard drive from Seagate. The main problems of the “experimental” are freezing operating system or refusal to load at all, various errors, creaking and clicking. So, how to check the health of the hard drive on your computer?
Software
One of the most interesting (and free) programs for checking a hard drive from a technical point of view is HDDScan, which can be downloaded from the official website upon request in any search engine.
The first step is to check the S.M.A.R.T indicators. hard drive (built-in technology that evaluates the hard drive using self-diagnosis equipment with a prediction of the remaining “life” time), and then a qualitative test of the media surface will be passed to identify bad sectors (bad blocks).

But before we check the status for any problems, let's do small retreat to understand the principle of operation of the HDDScan utility, explaining in more detail what S.M.A.R.T. are, bad blocks and why some of them cannot be “cured”, especially since numerous reviews about this program are left by users who do not fully understand what it is for blocks, tracks and sectors.
Operating principle
The hard drive consists of glass and aluminum plates, which are coated with a layer of technical ferromagnetic material. That is, simply put, a hard drive is a magnetic recording device. The heads, which are located on the surface of the carrier, hover at a height of 10-13 nm and never touch the surface itself, which, by the way, is very easy to damage.

The conveyor at the final stages of hard drive production carries out low level formatting, which forms a “map” of the hard drive, dividing it into tracks and sectors. Special servo marks are also applied, which are responsible for accurately placing the head on the desired track of the hard drive.
Sectors
The unit of measurement of a hard drive is a sector, which consists of 512 bytes of data, and in order to format the media at a low level, special and very expensive equipment is required - “Servowriter”, so it is performed only in factory conditions, and all information recorded using this equipment will never be overwritten by any service. If someone promises you to check the condition of your hard drive and do it, you should know: this cannot be done at home.

The manufacturer records exclusively service information in the sectors: the physical address of the sector itself and the address marking indicating the beginning of the track. This information is often called hard disk partitioning, and it is needed for the media to function correctly so that the hard drive heads accurately land on the desired sector and track for reading and writing data.
After purchasing a hard drive, the user has access to almost its entire capacity, with the exception of service information, which contains the MBR (master boot record) and built-in service utilities. The area of the disk where this data is located is more magnetized, preventing the user from accidentally or intentionally deleting service information.
Firmware
Data about sectors, tracks and their numbers are presented in a special table that is not available for BIOS and any OS. This table is located in the service area, which is a kind of mini-operating system and, together with the Firmware, controls all the actions of the hard drive. Some users are wondering: is it necessary to update or even change the built-in firmware before checking the health of the hard drive on a laptop or a regular PC? The answer is clear: no. All modern media do not require any firmware updates.

All the information that is recorded in the service area along with the firmware is the disk passport: S.M.A.R.T. attributes, a table with identified defects, bad blocks that cannot be corrected, and reassigned sectors.
Types of sectors
Before you check your external hard drive for serviceability, it is important to know that there are three types of bad sectors: physical, logical and software. When the operating system tries to read a bad sector, it tries to load the data several times, and if this fails, the OS recognizes the sector as bad and writes all the necessary information to the normal sector, which is located on the backup track. This process is called Remapping, or in common parlance remap.
Moreover, whether to carry out or postpone a remap is decided only by the hard drive controller, and not by the user or third-party software, which can only “hint” to the hard drive about the need for a remap. Before checking for serviceability, the built-in utilities always check the defect table, which contains all bad sectors that were either reassigned by the system or marked as unrecoverable.

In total, there are two tables with defects - the factory one (Primary List), which reflects the results of initial tests on the conveyor with already marked bad blocks, and the current one (Grown List), which is filled in as current problems accumulate.
Bad sectors. How to fix them?
Before checking for serviceability, you need to know about the types of bad sectors and the possibility of their further rehabilitation in case of damage.
According to reviews, physically faulty bad blocks cannot be restored by any formatting. The only thing that can be done is to reassign bad sectors as spare ones from backup tracks. A significant disadvantage of this method will be a decrease in the performance of the hard drive, since the heads will have to cover a greater distance and make additional movements to search for information on the backup tracks.
Physical bad sectors are hard drive defects that are mechanical in nature: a damaged magnetic layer of the media surface, chips, scratches, etc. Very often, such problems arise after a hard drive has been hit, when one or more heads have been damaged and come close to the magnetic drive , scratched its surface. Overheating or vibration, as reviews indicate, can also cause bad sectors. In this case, the bad block must always be replaced and reassigned with a normal sector from the backup track.
Creaking and clicking
If you have often heard a creaking or clicking sound inside system unit, then the reason in most cases lies in the hard drive head positioner. The carrier tries to read the information over and over again, wearing out the positioner in a certain position, as a result of which a small squeak occurs.

The cause of clicks may be the reassignment of bad sector tracks to spare ones. They are not always nearby, so the heads often and sharply change their direction from side to side, as a result of which specific clicks are heard.
Another one of possible reasons Clicking and squeaking is a violation of the factory markings as a result of the mechanical impact described in the section above. The servo markers can be destroyed, and the head can no longer accurately get to the sector it needs, which is why multiple attempts by the carrier are heard to read the information and get into its “track”.
According to reviews, the only panacea for creaking and clicking that is available to the average user is the built-in utilities of the operating system, which, if it doesn’t help get rid of the problem, will at least make the hard drive work for some more time.
How to check a hard drive for good sectors?
Logical bad blocks, which arise as a result of errors in sector logic, can be divided into correctable and faulty ones. Let's consider in which case it is impossible to fix a logical bad block.
As mentioned above, each sector of the hard disk, in addition to user data, carries part of the service information about the layout and physical addresses that determine the beginning of the sector. If this information has been damaged for various reasons (mechanical or physical impact), then it can only be restored under factory conditions, which is very problematic for the average user.
But if, before checking the hard drive for serviceability, you did not hit or overheat it, that is, the service information in the sectors is not damaged, you can restore the data and the performance of the media using checksum each sector (ECC - error correction code). Each unit of media contains this data, and this is what utilities use to rehabilitate the hard drive.
If you believe the reviews, various kinds of software errors on the hard drive, such as incorrectly marked sectors or tracks, are “treated” by regular formatting or software built into the operating system.
To sum it up
After we have figured out the operating principle of the hard drive and identified the points that can be corrected and which cannot, you can safely run disk testing with the HDDScan utility and look at the results, drawing appropriate conclusions for yourself. Positive Feedback There is a lot about this software on the Internet, so it can be recommended to both novice users and experienced professionals.
Once you know the current state of S.M.A.R.T., you can make a prediction - restore this disk or purchase a new one.
Hard drives are the most unreliable component modern computer. Typically modern hard drives They last up to 3 years, after which they have to be replaced. The worst thing about this situation is that it is very difficult to predict exactly when the hard drive will fail. Because of this, inexperienced users Important data is often lost. In this material we will talk about how to check a hard drive for serviceability and correctly assess its condition. Step No. 1. Checking the health of the hard drive using CrystalDiskInfo If you want to check the health of the hard drive, the first thing you need to do is install the CrystalDiskInfo program. This free program collects all available information about the hard drive and, based on it, provides an assessment of its technical condition. If the hard drive is fully operational, then the technical condition of the hard drive will be indicated as “Good”. If there are problems with the hard drive, then you will receive an “Alarm” rating. Well, in cases where the hard drive is on the verge of death, the program gives a “Bad” rating.
You can also view the original S.M.A.R.T data in the CrystalDiskInfo program. (the program uses them to evaluate the state), the temperature of the hard drive, the number of times the hard drive was turned on, and the number of hours worked. Step No. 2. Check the hard drive for errors using the HD Tune program. It is also very important to check your hard drive for errors. The easiest way to do this is to use the free HD Tune program (or its paid version HD Tune Pro). So, in order to execute hard check disk for errors, launch the HD Tune program, go to the tab and click on the “Start” button.
After this, the HD Tune program will begin checking the hard drive for serviceability. During the verification, you will be able to observe this process. Normal areas of the hard drive will be marked in green, and damaged areas in red.
A fully functional hard drive should not have any damaged (red) blocks at all. Step No. 2. We check the hard drive for service manually. In addition to testing using programs, the hard drive can be checked for service manually. To do this, simply try to write a large number of small files (a couple of megabytes in size) to disk. For example, you might try to copy a large folder of photos to disk.
If the file writing test went well, then try testing how the disk works when reading data. To do this, try copying data from the disk you are testing. Conclusions A fully functional hard drive should pass all three of the tests described above without any problems. CrystalDiskInfo should be rated Good, HD Tune should show no errors, and manual write/read testing should pass without difficulty. If this is the case for you, then most likely your hard drive is fine and will work for a long time. But, of course, there are no guarantees here and cannot be. Therefore, the only way to reliably protect your data is backup. The most important data (personal photos, videos, documents) should be stored on several hard drives.
– the most unreliable component of a modern computer. As a rule, modern models last up to 3 years, after which they have to be replaced. The worst thing about this situation is that it is very difficult to predict exactly when the hard drive will fail. Because of this, inexperienced users often lose important data. In this material we will talk about how to check a hard drive for serviceability and correctly assess its condition.
Serviceability check based on data from “S.M.A.R.T.”
If you want to check your hard drive for serviceability, then the first thing you need to do is install the program. This free program collects all available information about the drive and, based on it, provides an assessment of its technical condition. If the drive is fully operational, then its “technical condition” will be indicated as “Good”. If there are any problems with it, then you will receive an “Alarm” rating, but in cases where the HDD is on the verge of death, the program gives a “Bad” rating.
Also in the CrystalDiskInfo program you can view the source data of the “S.M.A.R.T.” system. (the program uses them to assess those conditions). To figure out what a particular parameter means, you can use . There is a table with detailed description all parameters of the “S.M.A.R.T.” system. In addition, in the CrystalDiskInfo program you can see the number of starts, the number of hours worked, the exact name of the model and even serial number drive.
Checking the health of the hard drive under load
If the S.M.A.R.T. system does not show any problems, then the hard drive can be checked for serviceability by creating a large load. To do this, simply try to write a large number of small files (a couple of megabytes in size) to the drive. For example, you might try to copy a large folder of photos onto it.
- If the disk is good, then the copying process should proceed without any incidents. In this case, the copying speed should be more or less stable throughout the entire copying process (with the exception of a slight drop in speed immediately after the start of copying).
- If the hard drive is faulty, the copying speed will fluctuate greatly (from normal to very slow). In some cases, the copying process may freeze or be interrupted. Some files may not be copied, and the system will report errors. In particularly advanced cases, a cracking or grinding sound may be heard, and the drive may turn off ().
If the file writing test went well, then try testing how data reading works. To do this, try copying data from the disk you are testing.
Checking for errors in HD Tune
The next step is to check the health of the hard drive using specialized programs. Such programs allow you to check your hard drive for errors and identify existing problems, even if they do not appear during normal use. Let's start checking with free program(or its paid version HD Tune Pro).
To check your hard drive for errors, run the HD Tune program, go to the tab and click on the “Start” button.

After this, the HD Tune program will begin checking the hard drive for serviceability. During the verification, you will be able to observe this process. Normal areas of the hard drive will be marked in green, and damaged areas in red.

On a fully functional hard drive, there should be no damaged (red) blocks at all; the entire surface should be marked green.
Checking for errors using Victoria 3.5
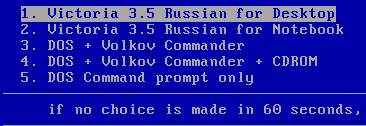
To get the most accurate check, you need to use the program, you can download it as an iso file, for example, (here is version 3.5, which is best suited for checking outside the operating system). The downloaded iso file must be written to a CD (or flash drive) and the computer booted from it. After booting your computer from this CD, you will need to select one of the versions of the Victoria program. For desktop computers you need to select the version " Victoria for Desktop", and for laptops, respectively, "Victoria for Notebook". Other options in this menu launch the DOS operating system and Volkov Commander.
To start checking the entire surface of the hard drive, press the F4 key. After this, a menu with settings should appear. Here you need to select “Ignore Bad Blocks” and "Linear Reading". It should be noted that you need to use the Victoria program very carefully, since using some of its functions can delete data on the drive. For example, this can happen when you enable the “Write (erase)”, “Write from file”, and “BB = Erase 256 sect” options.
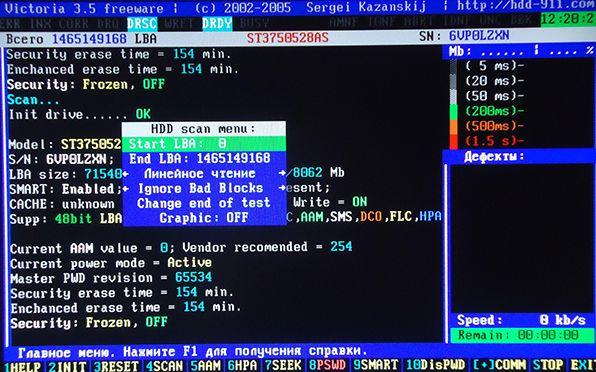
To start scanning, press the F4 key again. After this, all you have to do is wait until the verification is completed. At the end, if the hard drive is fully functional, you should see a screen like this.

If the hard drive has any problem areas, orange and red blocks will appear on the scanning screen. The more such blocks, the worse the condition of the HDD surface. If the number of red blocks is large, this means that the hard drive is faulty and it is time to replace it. Detailed information You can see the problems found on the right side of the screen, in the “Defects” window.
Error checking in Victoria 4.46
If you do not want to burn an iso image and boot from a disk from a computer, then you can use the Victoria 4.46 program, which works from the operating system Windows systems. You can download this version of the program, for example, .
After downloading, you will receive an archive that will need to be unpacked into any folder. To run the Victoria 4.46 program, open the folder with the contents of the archive and run the program vcr446f.exe. After launch, you will see the main Victoria window, it will look something like the picture below.
You should start studying the program from the “Standard” tab. Here on the right side of the screen there is a list of hard drives that Victoria was able to identify, information about the currently selected drive is displayed at the top left (if you wish, you can select another), and at the bottom there is a log of events, errors and other information.
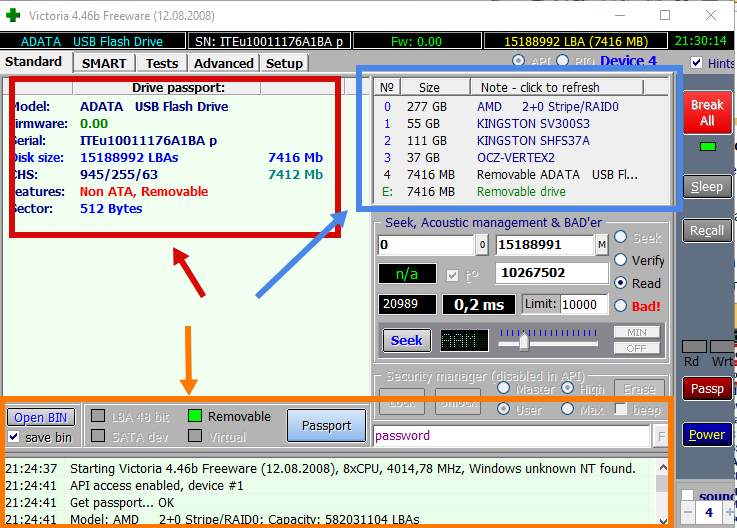
To check your hard drive for errors, you need to open the “Tests” tab. Here you must first click on the “ Passp” button (to get information about the drive), and then on the “ Start” button (to start the check).

After this, you just need to wait until the program finishes checking your hard drive.

During the scanning process, the Victoria program will find faulty and problematic drive blocks, the number of which will be displayed in the column on the right, as well as at the bottom of the screen.
Results of checking the health of the hard drive
A fully functional hard drive should pass all the tests described above without any problems. CrystalDiskInfo should be rated Good, manual read and write tests should pass without difficulty, and HD Tune and Victoria should not detect any problems. If everything is exactly like this for you, then most likely your hard drive is fully functional and will work for a long time.
But, of course, there are no guarantees here and cannot be. Therefore, the only way to reliably protect your data is backup. The most important data (personal photos, videos, documents) should always be stored on multiple drives.


