Add a new joomla template 3. Installing a Joomla template
This method settings can be used if you already have an existing Joomla and want to simply change the appearance of the site using a template.
1. Open the Joomla control panel and go to the menu "Extensions > Extensions Manager".

2. Using the button Package File "Browse" find the file "theme###.zip" in folder "joomla" template. Click the button to install the Joomla template.
3. Install all modules from the folder 'sources_XXX.zip'(previously this folder need to unzip according to the instructions in the file 'info.txt').
4. The next stage is installing demo data.
To install demo data, you must complete the following steps:
Step 1. Upload demo images.
Connect to the server using an FTP client. To download demo images, open the folder "sources" in the template.
The folder is here "to_the_root_directory", containing the files that need to be placed in the root Joomla folder.
Step 2. Import SQL file.
The last and most important step of installing demo data is importing the SQL file using a database management tool (phpMyAdmin).
SQL File - "dump. sql» is in the folder "sources" template.
Do NOT import the SQL file if you have a live website because... it will completely overwrite existing data!
Attention: Before importing the SQL file, make sure that the prefix of the database tables matches the prefix in the SQL file.
The table prefix can be checked directly in the database through a database management tool. Pay attention to the table names. The prefix is a set of characters before the table name. ( for example, in the table "jos_assets" the prefix is "jos_"). You can also find the database prefix in the “configuration.php” file in the Joomla root folder. Line 19: public $dbprefix = "jos_"; ( where "jos_" is the prefix)
If the table prefixes do not match, open the file "dump. sql" V text editor and, using Find and Replace (hotkeys CTRL+F or CTRL+H), replace the prefix "jos_" ( in the SQL file) database prefix. You can also use a detailed video tutorial on how to change the prefix in an SQL file.
or how to import SQL file using phpMyAdmin tool
Refresh your browser window. Please send us a request if you have any questions.
They have all the necessary functionality for a site, but it would be strange if all Joomla sites had the same appearance. And the site template determines not only the appearance of the site, but also its structure.
Installing and removing a template on Joomla3.X is practically no different from installing and uninstalling other types of Joomla extensions. However, there are some features when working with Joomla templates, which you will learn about in this article.
A Joomla template is an extension that defines the appearance of your site or its administrative panel.
There are two types of templates: Front-end Templates (website template) and Back-end Templates (admin panel template). By default, the Joomla distribution is equipped with 2 administrative panel templates, called Isis, Hathor, and 2 templates for the guest part of the site (Beez3 and protostar). After installing Joomla3.X, the default templates are visible in the Template Manager. There is no particular point in changing the template of the administrative panel, but the template of the site itself, which your visitors see, is usually changed.
Templates for Jomla3.X are not in short supply. Any search engine will give you a large number of companies distributing or selling Joomla templates. We will assume that you have found the template you need and are ready to install it on Joomla3. You need to start by checking the downloaded archive with the template.
Checking the downloaded template
First of all, unpack the downloaded template and find the template itself in the archive. Template manufacturers, in addition to the Joomla3 template itself, package templates for Joomla 2.5, their plugins, Quik Start Joomla and other extensions of their, and not only, production.
Next, unpack the archive of the template itself. Check for availability in the archive with the template installation file XML format. Typically, its name is templateDetals. Depending on whether the template archive contains an XML installation file or not, you must choose from the two template installation types below.
Installing a template with an XML installation file
If the template has an XML installation file, then you need to install the template as follows.
In the site's administrative panel, open the top menu tab Extensions → Extension Manager → Installation or on home page Control panels, EXTENSIONS menu.

Logging into the Joomla 3.2 Template Manager is slightly different.

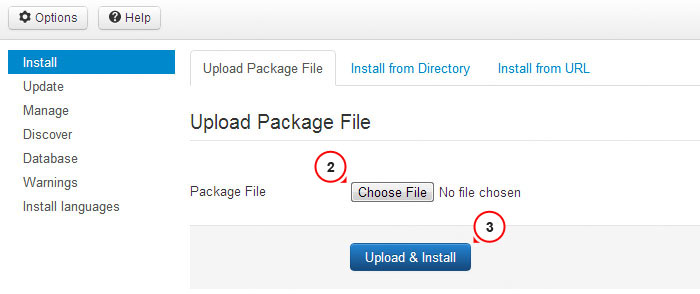
Of the three methods for installing extensions, choose the first: Download package file;

Using the “Select File” button, select ZIP archive template on your computer;

Click the blue “Download and Install” button;

A successful installation will be informed by Joomla with a green information line, an unsuccessful installation, as well as warnings will be informed by a line highlighted in pink.

Note. Many templates for Joomla3 are installed and work only together with their framework (Fraemwork).

The framework is an extension of the system plugin type and is activated in the tab: Extensions → Plugin Manager. If the framework is not included in the palgin package, it must be installed separately, as a plugin-type extension, and only then activated in the Plugin Manager (read in detail).
class="eliadunit">
Managing Joomla3 Templates
Joomla3 templates are managed in the Extensions → Template Manager tab. Here you will see a list of all templates. In the template scope column, you can see where the template is applied. This is the “Control Panel” or “Site”.

From the entire list of templates, one template must be designated as the default template. This template determines the appearance of your site.
How to make a template the main one (default)
To designate a template as the default template, you need to do two operations:
- Click on the star in the line with the template name or select the checkbox of the template and click the “Default” button at the top.
- Open the template for settings (click on its name) and in the “Assignments” settings item, link the entire site menu to the template.


The template designated as the master should be marked with a yellow star and a green checkmark.
The default template cannot be deleted.
Deleting a template
I never leave several templates on the site. One default template for the site and one for the administrative panel is enough. Unnecessary templates can be deleted.
To delete Joomla3 templates, you need to enter the tab Extensions → Extension Manager → Management.
- In the filter field at the top, select “Type” Template. Now in the extensions table you can see all the templates installed on the site;
- You can not delete the template, but simply disable the template (the “Disable” button).
- To remove a template, use the “Uninstall” button.


Second option for deleting a template
You can also delete a non-main Joomla3 template from the site directory via FTP. To do this, open the templates folder and delete the folder with the name of your template. After this, log back into the site’s administrative panel in the Extensions tab → Extension Manager →Management and update the cache (the “Refresh cache” button). If this is not enough, remove traces of the deleted template using the “Uninstall” button.
Attention: You will not be able to delete a template designated as the default template. Joomla blocks all objects assigned by default from deletion.
Installing a template without an XML installation file
Let's go back to installing the template. There are times when the template you like does not contain an XML installation file. To install such a template, you need to use the second option for installing the Joomla3 extension called "Install from directory".
In short, unpack the template archive on your computer, upload all files and folders of the template via FTP to the tmp folder of the site directory, in the administrative panel in the extension manager, click the blue “Install” button in the “Install from directory” tab.

If the path to the tmp folder (path_tmp) is correctly specified in the configuration.php file on your website, then the installation should be successful. More details about this option for installing a template without installation XML file read HERE.
You can install a template from a third-party repository using the template package URL. However, this installation method does not always work.

This completes the topic Installing and removing a template on Joomla3.X.
or install templates for a Joomla website yourself
Before we install Joomla template, it still needs to be found and downloaded.
The fact is that Joomla themes or templates are much less common than, for example, WordPress themes. Of course, you can find it on the Internet free templates for almost any CMS, but in our case the choice is not very large, since there are almost no Russified themes as such, so we will use Western resources. The joomla24.com portal is one such resource. It offers more or less a wide choice Joomla themes and templates, which, in principle, suits us. You can look for any other sites, but just keep in mind that we need new, modern templates for CMS Joomla .
Setting up and editing templates can be difficult. Perhaps you need knowledge in both CSS and the following Joomla lessons to become a professional in website design.
CMS Joomla. Install free website templates
1. From the website joomla24.com, download an archive with a free theme (template) to your computer.
We are looking for templates with a right side menu column or a left column (then you can change the location).
Typically, templates for CMS Joomla are distributed under a Creative Commons License, which allows you to copy, distribute and transfer this work, remake this work subject to copyright conditions. In general, if you are very interested, you can get acquainted with this license in more detail on the Wikipedia website. Some topics at the very bottom have a link to their creator, which, according to the conditions, cannot be deleted or can be removed, but for this they offer to pay for the work and the like. There are themes without any preconditions - just take it and use it. Well, if you have sufficient knowledge of HTML and especially CSS, you can create any themes yourself, using a standard template or some other one. That’s what I do and I don’t owe anything to anyone in this case, which is what I wish for you too.
2. Open Extensions → Extension Manager in the admin panel:
3. We are looking for the template archive on the computer → Download and install: 
As a result, you will see a message indicating successful installation.
4. Open the Template Manager in the admin menu: 
The system has several demo themes, one of which is activated.
5. Check the installed theme and click on the star on the right: 
The appearance of the site has changed. You can install other themes this way. At this stage, I advise you to return to the previously installed default site template, so that everything is like in that fairy tale, in the sense of clear and without errors. Besides, the template looks fine.
In the following lessons we will see how to create menus, categories, modules, materials and the like.
Knowledge and practice in the field HTML And CSS will always contribute to moving forward. Having mastered these fundamental disciplines, you can easily manipulate appearance page elements, even within the framework of a CMS - such manipulations will give you joy, confidence and courage in your experiments in creating websites, and whether you work for yourself or for someone in some decent company depends entirely on your aspirations .
After Joomla installations to virtual or local server, a novice administrator will be faced with the question: where to download and then how to install the template?
In this material we will look at how you can install a Joomla template and what installation options exist.
We will also give some examples of problems and their solutions that often appear during installation.
So, there are two ways to install a Joomla template:
- using the built-in Joomla “Extension Manager” installer;
- by copying template files to the “templates” folder via FTP.
The first method involves installation through the “Control Panel”; You must first find, download, and then install the theme template file in .zip or .tar.gz format. To get started, follow the link your_site.ru/administrator. After opening a new window, click on “Extensions” and go to “Extension Manager”.
In this section you can install not only templates, but also plugins, modules, components, and language packs. If you previously enabled the “Install from JED” function, then three or four options will be available to you:
- download the package file (you must specify the path to the file located on your computer);
- add from the directory (you must specify the path where the template is located on the web hosting);
- add from URL (enter a link through which you can download the template file).
Installing a template from a computer
Actually, the first option implies that you need to download the archive from your computer (if the template is in the archive, it will be automatically unpacked); the second option implies that you need to unpack the archive with the template yourself and move the theme files/folders to your server; The third option implies that the server must be configured properly for this link download feature to work.
The most preferable first option is to download the template from your computer. If the archive you are installing does not contain any errors, then in this case the template will be installed successfully. To check its functionality after installation, it should appear in the list and can be set as the default.
https://www.youtube.com/watch?v=vSdqjbuYW88
Installation via FTP (unpack the template into a folder)
Templates in Joomla 3.x can also be delivered via FTP, but only in unpacked form. To do this, you need to unpack the template on your computer and upload it to the server; At the same time, it is important to emphasize that all files/folders must be located in a directory that displays the name of the template (if the archive is called, for example, template, then the folder with all directories and files should have the same name). Which software It's up to you to use FTP for uploading. We can recommend, for example, Total Commander. The main thing is that you need to upload all files and folders to the corresponding directory: /path_to_joomla/templates/ 
Note that this loading method is used primarily in cases where you are unable to install a template due to limitations on the server, when you want to upload several templates at once, or when you created the template yourself. After successfully uploading files to the server, you need to go to the “Extension Manager”, go to “Search” and click on the “Find” button. After this, the system will try to detect all downloaded, but not yet installed extensions and templates that are present on the server. Now check the box to the left of the template and click on the “Install” button.
After this, the downloaded template will appear in the “Template Manager”, and all you have to do is assign it as the default. By the way, you should not use FTP to install components, plugins, modules, especially if you are still a completely “green” administrator. This is due to the fact that many extensions require a database to work correctly, and the tables of these extensions will have to be included manually if you use the FTP upload option.
After installing the Joomla management system on local or virtual server, we are faced with the question: how to install the template and where to download it? In this lesson we will look at how to install a template in Joomla 3 and what methods of installing templates exist. Selecting and installing a template is an important step that should be given special attention. I will also give examples and solutions to problems that may arise during the installation of the template.
How to install a template in Joomla 3.2?
There are two ways to install a template in Joomla 3.x:
1. using the standard Joomla installer via "Extension Manager -> Installation";
2. manually, by copying the template files to the templates folder (folder with the template name).
Method one, installation via the Administrator Panel (template file in .zip or .tar.gz format)
Log in to the admin area of your site ( www.your-site.com/administrator/)
You will be taken to the page Extension Manager
While on this page you can install Templates, Plugins, Modules, Components and Language packs. You will have three or four options (if you previously enabled the Install from JED plugin):
- Download the package file (select the package on your computer and click the download and install button)
- Install from directory (enter the path where the package is located on your web server)
- Install from URL - (enter the URL where the package is located)
Option 1 is used to download the package from your PC (the template package will be automatically unpacked and installed).
Option 2 means that you unzip the archive yourself and move the folders/files to your web server in the tmp folder.
Option 3 does everything itself, your web server must be configured properly for this option to work.
Here we select the first option: Upload package file.
Select the template package on your computer and click the " Download and install"

If the template package you are installing does not contain errors, then you will receive a confirmation message that the template was installed successfully.
Verifying the installation
After installing the template, go to the template manager, the installed template should appear in the list and you can set it as the default (this means that it will be enabled and displayed on the site).
Second installation option.
Installation via FTP (unpacked template package in a folder).
Templates in Joomla 3.x can also be installed via FTP (unpacked). Just unzip the template to a folder on your computer and upload it to the server (the template files must be located in the folder where the name of the folder is the name of the template). As FTP client you can use any software. The main thing is to make sure that you upload the template folder to the appropriate directory: /path_to_joomla/templates/ , where /path_to_joomla/ is the location of your site on the server. This method is used mainly when you created a template yourself or you are unable to install the template due to limitations on the server; this method is also suitable if you want to install several templates at once.
After the files are uploaded to the server, you need to go to Extension Manager -> Search and click on the Find button. The system tries to find all downloaded but not installed extensions and templates on the server and will display a list of all found packages for installation. Check the box to the left of the template and click the install button.

Note: Do not try to use FTP to install Components, Modules and Plugins, especially if you are new to these things. This is due to the fact that many extensions require databases to work, and the tables of these extensions must be enabled manually if you use this installer option.
After installing the template, go to the "Template Manager", the template you installed should appear in the list and you can set it as the default (this means that it will be enabled and displayed on the site).
That's all, if you still have questions or have problems with the installation, you can ask a question on the forum or in the comments below.