Ways to process xml in c. Working with XML in .NET Applications
Now we will study working with XML. XML is a format for exchanging data between sites. It is very similar to HTML, but XML allows its own tags and attributes.
Why is XML needed for parsing? Sometimes it happens that the site that you need to parse has an API with which you can get what you want without much effort. Therefore, just a piece of advice - before parsing a site, check whether it has an API.
What is an API? This is a set of functions with which you can send a request to this site and receive the desired response. This answer most often comes in XML format. So let's start studying it.
Working with XML in PHP
Let's say you have XML. It can be in a string, or stored in a file, or served upon request to a specific URL.
Let the XML be stored in a string. In this case, you need to create an object from this string using new SimpleXMLElement:
$str = "
Now we have in the variable $xml an object with parsed XML is stored. By accessing the properties of this object, you can access the contents of the XML tags. We’ll look at how exactly below.
If the XML is stored in a file or sent by accessing a URL (which is most often the case), then you should use the function simplexml_load_file, which makes the same object $xml:
$xml = simplexml_load_file(path to file or URL);
Working methods
In the examples below, our XML is stored in a file or URL.
Let the following XML be given:
Let's get the employee's name, age and salary:
$xml = simplexml_load_file(path to file or URL); echo $xml->name; //will display "Kolya" echo $xml->age; //will print 25 echo $xml->salary; //will output 1000
As you can see, the $xml object has properties corresponding to the tags.
You may have noticed that the tag
$xml = simplexml_load_file(path to file or URL); echo $xml->name; //will display "Kolya" echo $xml->age; //will print 25 echo $xml->salary; //will output 1000
There can only be one root tag in XML, just like the in regular HTML.
Let's modify our XML a little:
In this case, we will get a chain of requests:
$xml = simplexml_load_file(path to file or URL); echo $xml->worker->name; //will display "Kolya" echo $xml->worker->age; //will output 25 echo $xml->worker->salary; //will output 1000
Working with attributes
Let some data be stored in attributes:
$xml = simplexml_load_file(path to file or URL); echo $xml->worker["name"]; //will display "Kolya" echo $xml->worker["age"]; //will output 25 echo $xml->worker["salary"]; //will output 1000 echo $xml->worker; //will display "Number 1"
Tags with hyphens
XML allows tags (and attributes) with a hyphen. In this case, accessing such tags occurs like this:
$xml = simplexml_load_file(path to file or URL); echo $xml->worker->(first-name); //will display "Kolya" echo $xml->worker->(last-name); //will display "Ivanov"
Looping
Let us now have not one employee, but several. In this case, we can iterate over our object using a foreach loop:
$xml = simplexml_load_file(path to file or URL); foreach ($xml as $worker) ( echo $worker->name; //will display "Kolya", "Vasya", "Petya" )
From object to normal array
If you're not comfortable working with the object, you can convert it to a normal PHP array using the following trick:
$xml = simplexml_load_file(path to file or URL); var_dump(json_decode(json_encode($xml), true));
More information
Parsing based on sitemap.xml
Often a site has a sitemap.xml file. This file stores links to all pages of the site for ease of indexing by search engines (indexing is essentially site parsing by Yandex and Google).
In general, we shouldn’t worry much about why this file is needed, the main thing is that if it exists, you don’t have to crawl through the pages of the site using any tricky methods, but simply use this file.
How to check the presence of this file: let us parse the site site.ru, then go to site.ru/sitemap.xml in the browser - if you see something, then it’s there, and if you don’t see it, then alas.
If there is a sitemap, then it contains links to all pages of the site in XML format. Calmly take this XML, parse it, separate links to the pages you need in any way convenient for you (for example, by analyzing the URL, which was described in the spider method).
As a result, you get a list of links for parsing; all you have to do is go to them and parse the content you need.
Read more about the sitemap.xml device on Wikipedia.
What should you do next:
Start solving problems using the following link: problems for the lesson.
When you decide everything, move on to studying a new topic.
You've probably heard of XML and know many reasons why it should be used in your organization. But what exactly is XML? This article explains what XML is and how it works.
In this article
Markups, markup and tags
To understand XML, it's useful to remember how you can tag data. Documents were created by people over many centuries, and throughout that time people made notes on them. For example, teachers often make notes on student work to indicate the need to move paragraphs, make a sentence clearer, correct spelling errors, etc. By marking a document, you can determine the structure, meaning, and appearance information. If you have ever used hotfixes in Microsoft Office Word, then you are familiar with the computerized markup form.
in the world information technology the term "marking" has become the term "marking". Markup uses codes called tags (or sometimes tokens) to define the structure, visual appearance, and—in the case of XML—meaning of data.
The HTML text of this article is good example application of computer markup. If at Microsoft Internet Explorer right click on this page and select command View HTML Code, you will see readable text and HTML tags, for example
AND
. In HTML and XML documents, tags are easy to recognize because they are enclosed in angle brackets. In the source text of this article, HTML tags perform many functions, such as defining the beginning and end of each paragraph (
...
) and the location of the drawings.Features of XML
HTML and XML documents contain data enclosed in tags, but that's where the similarities between the two languages end. In format HTML tags determine the design of the data - the location of headings, the beginning of a paragraph, etc. In the XML format, tags determine the structure and meaning of the data - what it is.
By describing the structure and meaning of data, it becomes possible to reuse it in several ways. For example, if you have a block of sales data in which each element is clearly defined, you can load only the necessary elements into the sales report and transfer the other data to the accounting database. In other words, you can use one system to generate and tag data in XML format, and then process that data in any other systems, regardless of the client platform or operating system. This compatibility makes XML the basis of one of the most popular data exchange technologies.
Please note the following when working:
HTML cannot be used instead of XML. However, XML data can be enclosed in HTML tags and displayed on web pages.
HTML capabilities are limited to a predefined set of tags that are common to all users.
XML rules allow you to create any tags required to describe the data and its structure. Let's say you need to store and share information about pets. To do this, you can create the following XML code:
As you can see, the XML tags make it clear what data you are viewing. For example, it's clear that the data is about a cat, and you can easily determine its name, age, etc. Because you can create tags that define almost any data structure, XML is extensible.
But don't confuse the tags in this example with the tags in the HTML file. For example, if the above XML text is pasted into an HTML file and opened in a browser, the results will look like this:
Izzy Siamese 6 yes no Izz138bod Colin Wilcox
The web browser will ignore the XML tags and display only the data.
Well formed data
You've probably heard someone in IT talk about a "well-formed" XML file. A well-formed XML file must follow very strict rules. If it doesn't follow these rules, the XML doesn't work. For example, in the previous example, each opening tag has a corresponding closing tag, so this example follows one of the rules of a well-formed XML file. If you remove a tag from a file and try to open it in one of the Office programs, an error message will appear and it will be impossible to use such a file.
You don't need to know the rules for creating a well-formed XML file (although they are not difficult to understand), but remember that only well-formed XML data can be used in other applications and systems. If the XML file does not open, it is probably malformed.
XML is platform independent, which means that any program designed to use XML can read and process XML data, regardless of hardware or operating system. For example, if you apply the right XML tags, you can use a desktop program to open and process data received from the mainframe. And, regardless of who created the XML data, the data can be manipulated in a variety of Office applications. Due to its compatibility, XML has become one of the most popular technologies for exchanging data between databases and user computers.
In addition to well-formed tagged data, XML systems typically use two additional components: schemas and transforms. The following sections describe how they work.
Schemes
Don't be intimidated by the term "scheme". A schema is simply an XML file that contains rules for the contents of the XML data file. Schema files usually have the extension XSD, while XML data files use the XML extension.
Schemas allow programs to validate data. They form the structure of the data and ensure that it is understandable to the creator and other people. For example, if the user enters invalid data, such as text in a date field, the program may prompt the user to correct it. If the data in an XML file matches the rules in the schema, you can use any XML-enabled program to read, interpret, and process it. For example, as shown in the image below, Excel can validate data

Circuits can be complex, and this article cannot explain how to create them. (Also, there are likely IT people in your organization who know how to do this.) However, it is useful to know what the diagrams look like. The following diagram defines the rules for a set of tags
Don't worry if the example isn't clear. Just pay attention to the following:
The string elements in the example schema are called declarations. If additional information about the animal was required, such as its color or special characteristics, the IT department would add appropriate declarations to the diagram. The XML system can be modified as business needs evolve.
Declarations are a powerful means of manipulating data structure. For example, an ad
If the data in an XML file follows the rules of the schema, then the data is said to be valid. The process of checking that an XML data file conforms to schema rules is called (logically enough) validation. The big advantage of using schemas is that they can prevent data corruption. Schemas also make it easier to find corrupted data because XML file processing stops when a problem occurs.
Transformations
As discussed above, XML also allows for efficient use and reuse of data. The mechanism for reusing data is called an XSLT transformation (or simply transformation).
You (or your IT department) can also use transformations to exchange data between back-end systems, such as databases. Let's assume that database A stores sales data in a table that is useful to the sales department. Database B stores income and expense data in a table specifically designed for accounting. Database B can use a transformation to take data from Database A and put it into the appropriate tables.
The combination of the data file, schema, and transformation forms the basic XML system. The following figure shows the operation of such systems. The data file is checked against the schema rules and then passed in any suitable way for transformation. In this case, the transformation places the data in a table on a web page.

The following example shows a transformation that loads data
Name
Breed
Age
Altered
Declawed
License
Owner
This example shows what the text of one type of transformation might look like, but remember that you may be limited to a clear description of what you need from the data, and that description can be done in your native language. For example, you might go to the IT department and say that they need to print sales data for specific regions for the last two years, and that the information should look like this and that. The department can then write (or modify) the transformation to fulfill your request.
Microsoft and a growing number of other companies are creating transforms for a variety of purposes, making XML even more convenient to use. In the future, it will likely be possible to download a conversion that suits your needs with little or no additional customization. This means that over time, using XML will become less and less expensive.
XML in the Microsoft Office system
Professional editions of Office provide enhanced XML support. Beginning with the 2007 Microsoft Office System, Microsoft Office uses XML-based file formats such as DOCX, XLSX, and PPTX. Because XML stores data in a text format rather than a proprietary binary format, clients can define their own schemas and use your data in a variety of ways without having to pay royalties. For more information about the new formats, see Open XML Formats and File Name Extensions. Below are other benefits.
This is all great, but what if you have XML data without a schema? It depends on what Office program you use. For example, when opening an XML file without a schema in Excel application it assumes that the schema exists and allows you to load the data into an XML table. You can use XML lists and tables to sort, filter, and calculate data.
Enable XML features in Office
By default, the Developer tab is not visible. It must be added to the ribbon to use XML commands in Office.
Purpose of the work: gain practical skills in processing data presented in the Extensible Markup Language format ( XML).
Job objectives:
– study data description technology XML;
– study main library classes FCL, supporting the processing of data presented in the format XM L;
– complete a practical task on developing an application in C#.
Brief theoretical information
Format XML is a way of storing data in a simple text format, which means that the data can be read by almost any computer. This circumstance makes this format very suitable for use when transmitting data over the Internet and can even be read directly by a person.
XML is a markup language that can be used to describe arbitrary data. Based on this language it is possible to organize the storage of information and its exchange, independent of either specific applications or the platform on which they are executed.
XML- documents. The completed data set is known in XML as XML-document. XML-a document can be a physical file on your computer, or it can be just a line in memory, but it must be complete and follow certain rules. XML-the document consists of several different parts, the most important of which are XML elements that contain the data that actually makes up the document.
Microsoft. NETFramework uses an object data model XML Document Object Model( DOM) to provide access to data in XML-documents, and additional classes for reading, writing and navigating within XML-document. These classes are supported by the namespace System.XML. An example of a description of a book catalog in the DOM is shown in Fig. 8.1.
The description of an XML document includes statements written in accordance with the requirements of its syntax. When creating XML-document, instead of using a limited set of specific elements, it is possible to create your own elements and assign them any names of the user’s choice. This is why XML is extensible. Consequently, this language can be used to describe almost any document: from a musical score to a database.
Catalog
Rice. 8.1. Hierarchical document structure
For example, a book catalog could be described as shown in Listing 8.1 (line numbers are not part of the document XML). To create XML-document in the environment VisualStudio . NET you should use the command File\ NewFile and select the template name in the drop-down list of templates XMLFile.
Listing 8.1. Text XML-document
Line 1 of this listing contains an announcement XML, identifying the text as a document XML.Despite the optionality of the announcement XML, the document must include it to identify the version being used XML, since the document is without declaration XML may be further considered as appropriate latest version XML, which may result in errors. Information parameter version indicates version XML, used in the document, parameter encoding– document encoding ( utf-8).
Line 2 contains a comment starting with the characters . Comments can be posted throughout XML-document.
IN XML- the document data is marked using tags(elements), which are names enclosed in angle brackets ( < > ). Tag names in XML-document (such as CATALOG, BOOK,TITLE,AUTHOR,PAGES,PRICE, PDATA in Listing 8.1) are not XML language definitions and are assigned when the document is created. For tags you can choose any correctly specified names, for example INVENTORY instead of CATALOG or ITEM instead of BOOK. Line 3 contains the root tag - CATALOG, which opens the markup of the entire document. When it finishes writing the root tag, the framework automatically inserts the end tag (line 18 of Listing 8.1), marking it with the symbols .
Note. Trying to create more than one root element in XML-document is an error.
The root element can contain an arbitrary number of nested elements. In Listing 8.1 XML-the document has a hierarchical structure in the form of a tree with elements nested within other elements and with one top-level element Document element, or Root element(in our example - CATALOG), which contains all other elements. Root element CATALOG includes descendant elements BOOK. In turn, the element BOOK consists of descendant elements TITLE, AUTHOR,PAGES,PRICE, PDATA.
Well-formed XML documents. The document is called correctly formed(well-formed) if it meets the following minimum set of rules for XML-documents:
– XML-the document must have only one root element - element Document. All other elements must be nested within the root element;
– elements must be nested in an orderly manner. If an element begins inside another element, then it must end inside that element;
– Each element must have a start and end tag. Unlike HTML, XML does not allow the end tag to be omitted even if the browser is able to determine where the element ends;
– the name of the element in the start tag must exactly match (case sensitive) the name in the corresponding end tag;
– the element name must begin with a letter or an underscore ( _ ), followed by letters, numbers, and symbols: dot ( . ), dash ( - ) or underscore.
These are the basic rules for correct formation XML-document. Other concepts of the XML language (attributes, primitives, relationships) have their own rules that must be followed. We can say that if a document is created correctly and no errors occur when displaying or using it, then this is a correctly formed document. If you make a mistake in any tag HTML-page, then the browser will simply ignore the corresponding tag, and the error is in the tag XML-page will make it impossible to display it. If one of the errors is present, the analyzer built into Internet Explorer (sometimes called XML-processor, or parser) determines its position
FCL Library Classes for reading XML files. Working with XML-documents support the following library classes FCL: XmlTextReader, XmlDocument, XPathNavigator.
Class XmlTextReader is an abstract class that performs reading and provides fast delivery of uncached data. This approach is the least expensive in terms of server resources, but it forces data to be retrieved sequentially, from start to finish.
Class XmlDocument represents an implementation of the model DOM. This class holds data in memory after calling a method Load() to retrieve them from a file or stream, provides a tree view of the document in memory with navigation and editing capabilities, and also allows you to modify the data and save it back to the file.
Class XPathNavigator same as class XmlDocument, keeps in memory XML- entire document. It provides advanced data search capabilities, but does not provide the ability to make changes or save them.
Class XmlTextReader. Let's look at a simple example. Place elements on the form richTextBox And button(Fig. 8.2). When you click a button on an element richTextBox The file whose contents were presented in Listing 8.1 will be loaded. The code for the function called when the button is clicked is shown in Listing 8.2.

Rice. 8.2. Reading results from Xml-document
Listing 8.2. Button click handler code
//Cleaning the element richTextBox1
richTextBox1. Clear();
// Call a static method Create() returning a class object
// File book.xml is in the same location as the executable file
// programs
// Method Read() moves to the next node Xml-document
while (rdr.Read())
if(rdr.NodeType ==XmlNodeType.Text)
richTextBox1.AppendText(rdr.Value + "\r\n");
Class XmlReader can also read strongly typed data. There are several methods ReadElementContentAs, performing reading, among which ReadElementContentAsDecimal(),ReadElementContentAsInt() ,ReadElementContentAsBoolean() etc.
Listing 8.3 shows how to read values in decimal format and perform mathematical operations on them. In this case, the price of the element increases by 25%. The results of running this code are shown in Fig. 8.3.

Rice. 8.3. Reading results from Xml - document
only titles and prices of books
Listing 8.3. Reading data with strong type checking
// Cleaning the element richTextBox1
richTextBox1. Clear();
// Create a stream to read from a file book. xml
XmlReader rdr = XmlReader.Create("book.xml");
while (rdr.Read())
if (rdr.NodeType == XmlNodeType.Element)
// Checking element name
if (rdr. Name == " PRICE")
// Method ReadElementContentAsDecimal() performs
// convert element content to type decimal
decimal price = rdr.ReadElementContentAsDecimal();
richTextBox1.AppendText("Currentprice= " + price +
"rub\r\ n");
// Price change by 25%
price += price * (decimal).25;
richTextBox1.AppendText("Newprice= " + price +
" rub\r\n\r\n");
else if (rdr.Name == "TITLE")
richTextBox1.AppendText(rdr.ReadElementContentAsString() + "\r\n");
Class XmlDocument. This class and its derived class XmlDataDocument used in the library .NET to represent the document object model DOM.
Unlike class XmlReader, Class XmlDocument offers not only reading but also writing capabilities, as well as random access to the tree DOM.
Let's look at an example in which an object of a class is created XmlDocument, the document is loaded from disk and a list window with book titles is displayed (Fig. 8.4).

Rice. 8.4. Display book titles in a list.
In the application form class, create a class object XmlDocument:
XmlDocument_doc = new XmlDocument();
The button click handler code is shown in Listing 8.4.
_doc.Load("book.xml");
// Get only those nodes that are needed
XmlNodeListnodeLst = _ doc. GetElementsByTagName(" TITLE");
// View in class loop XmlNodeList
foreach (XmlNodenodeinnodeLst)
listBox1. Items. Add(node. InnerText);
Let's introduce into the application the ability to display information about a book whose title is highlighted in the list, for which we'll add an event handler listBox1_ SelectedIndexChanged as shown in Listing 8.5.
Listing 8.5. List item click handler
private void listBox1_SelectedIndexChanged(object sender, EventArgs e)
// Create a search string
string srch = "KATALOG/BOOK";
// Search for additional data
XmlNode foundNode = _doc.SelectSingleNode(srch);
if (foundNode != null)
MessageBox.Show(foundNode.OuterXml);
MessageBox.Show("Not found");
The results of the application are shown in Fig. 8.5.

Rice. 8.5. Displaying information about the selected list item
Using a class XmlDocument You can also insert nodes into an existing document using the method Create- Element() .
For example, to create a new element BOOK you need to write the following code:
XmlElement newBook = _doc.CreateElement("BOOK");
Create elements nested within an element BOOK, you can use the following code:
// Create a new element AUTOR
XmlElement newAuthor = _doc.CreateElement("AUTOR");
newAuthor.InnerText = "C.Baydachny";
The complete code of the button click handler is shown in Listing 8.6, the results of its operation are shown in Fig. 8.6.
Listing 8.6. Button click handler
privatevoidbutton1_ Click(objectsender, EventArgse)
_doc.Load("book.xml");
XmlElement newBook = _doc.CreateElement("BOOK");
// Create a new element TITLE
XmlElement newTitle = _doc.CreateElement("TITLE");
newTitle.InnerText = ".NET Framework 2.0";
newBook.AppendChild(newTitle);
// Create a new element AUTOR
XmlElement newAuthor = _doc.CreateElement("AUTOR");
newAuthor.InnerText = "C.Baydachny";
newBook.AppendChild(newAuthor);
// Create a new element PAGES
XmlElement newpages = _doc.CreateElement("PAGES");
newpages.InnerText = "498";
newBook.AppendChild(newpages);
// Create a new element PRICE
XmlElement newprice = _doc.CreateElement("PRICE");
newprice.InnerText = "590";
newBook.AppendChild(newprice);
// Create a new element PDATA
XmlElement newpdata = _doc.CreateElement("PDATA");
newpdata.InnerText = "2006";
newBook.AppendChild(newpdata);
// Add to current document
_doc.DocumentElement.AppendChild(newBook);
// Write the document to disk
XmlTextWriter tr = new XmlTextWriter("bookEdit.xml", null);
tr.Formatting = Formatting.Indented;
_doc.WriteContentTo(tr);
tr. Close();
XmlNodeListnodeLst = _ doc. GetElementsByTagName(" TITLE");
// View in class loop XmlNodeList
foreach (XmlNodenodeinnodeLst)
listBox1. Items. Add(node. InnerText);
When using classes XmlDocument And XmlReader The following features must be taken into account. If you need random access to a document, you should use the class XmlDocument, and if you need a threading model, then classes based on the class XmlReader. Class XmlDocument is highly flexible, but its memory requirements are higher than those of the class XmlReader, and performance when reading a document is lower.

Rice. 8.6. Running application window
with added node
Class XPathNavigator. Class XPathNavigator is part of the namespace System. Xml. XPath, designed to increase performance. This space provides only reading of documents, therefore there are no editing tools in it, and classes are built to ensure fast execution on a given XML-document loops and selection operations in cursor style.
The best way to use classes from a namespace System. Xml. XPath is document viewing book. xml in a cycle.
Place elements on the form listBoxAndbutton. The button click handler code is shown in Listing 8.7, the results of executing this code are shown in Fig. 8.7.
Listing 8.7. Button click handler
privatevoidbutton1_ Click(objectsender, EventArgse)
// Create an object with the name doc class XPathDocument and transfer
// in its name constructor XML- file book.xml
XPathDocument doc = new XPathDocument("book.xml");
// Create an object with the name nav class XPathNavigator object based
// XPathDocument. Object nav can be used read-only
XPathNavigator nav = ((IXPathNavigable)doc). CreateNavigator();
// Create an object XPathNodeIterator for directory nodes
// and its child nodes
XPathNodeIterator iter = nav.Select("/KATALOG/BOOK");
while (iter.MoveNext())
// Method SelectDescendants() class XPathNavigator selects everything
// descendant nodes of the current node that meet the selection conditions
XPathNodeIterator newIter =
One of the most important improvements in Excel 2003 is the ability to open, import and export XML (extensible Markup Language) data of any structure. Previous versions of Excel had limited support for XML: they only allowed spreadsheets to be saved and opened with a specific XML schema, called XML tables(XML Spreadsheet). Data in XML files based on other schemas was simply blocked.
Opening and Importing an XML List
To open a list saved in an XML file, simply select File? Open. From the file type drop-down list in the Open Document dialog box, select XML Files or All Microsoft Office Excel Files (the latter is the default type in Excel). After specifying the file you need and clicking the Open button, the Open XML dialog box shown in Figure 1 will appear. 29.6. The first option, As An XML List, creates a list in which each element of the XML structure becomes a column (Figure 29.7).
Rice. 29.6. Select the first option to open all elements of the XML structure as list columns, or the third option to work only with individual elements
As can be seen from Fig. 29.7, the result of opening an XML file as an XML list is a list object in which the columns represent the elements of the source file in order. All entries from the source file are included in the final list.
File command? Open creates a new book. To create an XML list in an existing workbook, you need to use the Data? XML? Import (Data ? XML ? Import).

Rice. 29.7. Each element in the open XML file is associated with a column in the resulting XML table, which Excel turns into a list object.
Working with an XML list occurs in the same way as with any list object - that is, you have the right to apply an auto filter and an advanced filter, calculate totals, sort, expand the list and publish it on a Share-Point site.
For example, in the list in Fig. 29.7, we can add a calculated column to get the cost of a shipment based on the unit price, quantity, and discount (columns Price, Quantity, and Discount, respectively). To do this, we must enter a suitable heading in cell F1 and the formula =C2*D2*(1-E2) in cell F2. Excel will add column E to the list. In Fig. Figure 29.8 shows the result of these actions after automatic propagation of the formula from cell F2 to the remaining cells of column E.
Updating an XML List
The XML list is updated on demand. To refresh it with the current data from the original XML file, simply click the Refresh XML Data button on the List toolbar or select the command
Data? XML? Refresh XML data (Data ? XML ? Refresh XML Data). Unlike other types of lists and queries, an XML list cannot be updated on a schedule.

Rice. 29.8. You can work with an XML list just like you would with any list object. In this case, by creating a new column header and writing a single formula, we added a calculated column to the list
Working with Columns in an XML List
When working with columns in an XML list, you have all the techniques described in Chapter 28 (see the section “Inserting and Deleting Rows and Columns”) at your disposal. So, to delete a column, select it and select the Delete Column command from the Edit menu. If we want to place the Discount column between the Price and Quantity columns, this will look like selecting the Discount column and dragging it to the left of the Quantity column.
If you only want to work with certain columns of the XML structure, or want to display the columns in a different order than the default, in most cases it is more convenient to open the list by selecting the third option in the Open XML dialog box, which we'll cover in the next section.
Mapping XML Elements and List Columns
Opening a file as an XML list (see Figure 29.6) works well for relatively simple structures. When the source file has a fairly complex organization,
Most likely, you will only be interested in some of the data that makes up it. In such cases, a third opening option is recommended, namely Use The XML Source Task Pane. Excel then looks for the schema file associated with the file being opened. If such a schema is found, the data file opens in XML Design view, where the elements of its structure are presented in accordance with the schema displayed in the XML Source task pane, similar to Fig.
29.9. If the data file does not require a schema, but Excel is able to provide its own schema,
Based on the data structure, you will see the following information window.


Click OK. The list opens in Design view and the file structure appears in the XML Source task pane.
Refresh XML Data Import XML Data
Rice. 29.9. If you open an XML file to map list items and columns, Excel opens the list in Design view. The data will appear in the worksheet only after you drag XML elements from the task pane onto the worksheet and refresh the list or import
In the example shown in Fig. 29.9, the source file contains information about the range of books offered. To create a list object in a worksheet that displays these fields, you need to select (Ctrl-click) the headings of interest and then drag them onto the worksheet. (In Excel, the process of associating XML elements with list headings is called display(mapping).) The result is shown in Fig. 29.10.

Rice. 29.10. Drag headings from the XML Source task pane to create a list,
displaying only certain columns (all XML elements are mapped here)
To populate the created list, use the Data? XML? Refresh XML data (Data ? XML ? Refresh XML Data) or Data? XML? Import (Data ? XML ? Import). The Refresh XML Data command transfers data to a list from a file whose structure is reflected in the XML Source task pane. The Import command allows you to get records from any file that has exactly the same structure, and therefore it asks for its name. Importing is especially useful when you have a number of similarly structured XML files.
ADVICE
If you sequentially import several files with identical structure, each subsequent result replaces the previous one. If you need to import several files at once, select the Data? XML? Import. Then, in the Import XML dialog box, while pressing the Ctrl key, select the names of all the files you are interested in.
Below are a few additional notes regarding importing files:
An Excel workbook may contain multiple imported diagrams or structures. To import the following diagram or add structure, select Data
XML? Import or display XML Source task pane, click
XML Maps (Worbook Maps) and then the Add button.
Elements of the same structure can be associated with multiple lists, but each element can only be associated with one list.
Elements from the same diagram are allowed to be displayed on several worksheets in the same workbook, but not in different workbooks.
Export XML list
To export the contents of the current XML list as a properly organized XML file, select Data? XML? Export (Data ? XML ? Export) and specify the file name. Please note that if the file already exists, your data will replace the current contents of that file. The Export command is useful when you want to make Excel a tool for editing an existing XML file or adding new data to it. You can also use it to create new files according to an existing schema or structure based on the data itself.
NOTE
The Export command does not enable data validation rules provided by the schema. The export subsystem detects and reports erroneous data, but nevertheless exports it to a file.
The previous article described general concepts regarding XML. In this article we will learn how to perform basic actions related to changing, adding, searching in an XML file.
XML file that is used for the example.
xml dom
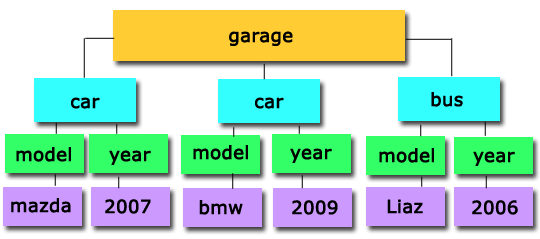
At the moment, our file contains the following structure:

Relationship between nodes in XML DOM, main points:
1. Any node in the DOM tree has a parent ParentNode. In our example, garage is the parent of both car elements, and both car elements are, in turn, parents of model and year elements.
How to get the parent of the car xml element?
Console.WriteLine(elmRoot["car"].ParentNode.Name); //Result: garage
2. A parent can have children ChildNodes. For example, for the garage node the children are both car elements. The car elements also have children model and year.
ChildNodes, is a collection that stores all child xml elements; to access the desired element, you need to specify its index. (The index always starts from zero!)
For example: how to get the first child element?
ElmRoot.ChildNodes;
3. As in ordinary life, a child can be born first FirstChild, or last LastChild.
If we take the car element as an example, then
FirstChild is model LastChild is year
4. In turn, there are also connections between the child elements; they can be brothers or sisters, if we draw parallels with real life.
A child may have, for example, a Previous Sibling brother and a Next Sibling brother
Console.WriteLine(elmRoot.ChildNodes.FirstChild.NextSibling.Name); //Result: year Console.WriteLine(elmRoot.ChildNodes.LastChild.PreviousSibling.Name); //Result: model
If the element is not found, then an exception is thrown: NullReferenceException, so when working with xml, always use try catch blocks.
Console.WriteLine(elmRoot.ChildNodes. LastChild.NextSibling.Name); Console.WriteLine(elmRoot.ChildNodes. FirstChild.PreviousSibling.Name);
LastChild is NextSibling;
FirstChild is PreviousSibling;
Using the methods described above, you can easily move to the desired node and get any value you need.
How to get the value of an xml element?
The xml value of an element can be obtained using the InnerText property, for example:
Console.WriteLine(elmRoot["car"].FirstChild.InnerText); //Result: Mazda
Another way to get the same xml element value:
Console.WriteLine(elmRoot.FirstChild.FirstChild.InnerText); //Result: Mazda
The sequence of movements along the DOM tree:
Garage -> car -> model -> Mazda
We get the year:
ElmRoot["car"].LastChild.InnerText; //Result: 2007
Subsequence:
Garage -> car -> year -> 2007
Another example: 3 ways to get the same result.
Console.WriteLine(elmRoot.LastChild.FirstChild.InnerText); Console.WriteLine(elmRoot["car"].NextSibling.FirstChild.InnerText); Console.WriteLine(elmRoot.ChildNodes.Item(1).FirstChild.InnerText); //Result: BMW
If you need to get the year for an element with the value Mazda:
Console.WriteLine(elmRoot.FirstChild.LastChild.InnerText); //Result: 2007
For BMW (two ways, get the same result)
Console.WriteLine(elmRoot.ChildNodes.Item(1).ChildNodes.Item(1).InnerText); Console.WriteLine(elmRoot.ChildNodes.ChildNodes.InnerText); //Result: 2009
How to change xml element values?
Using property InnerText() You can both get and change the value of an xml element, for example, change the year.
//Set a new value elmRoot.FirstChild.LastChild.InnerText = "2010"; //Display the new value on the console screen Console.WriteLine(elmRoot.FirstChild.ChildNodes.Item(1).InnerText); //Result: 2010
At the same time, you need to remember that all changes occur with the virtual xml file; if you open the physical file, you will see that the year 2007 is still indicated in it.
In order for the changes to take effect, you need to use the Save method, for example:
ElmRoot.Save("xml file name or stream");
Now the information will be changed in the “physical” xml file.
How to get the number of child elements?
Console.WriteLine(elmRoot.FirstChild.ChildNodes.Count);garage -> car contains 2 children: model and year
Console.WriteLine(elmRoot.FirstChild.FirstChild.ChildNodes.Count);
garage -> car -> model contains 1 child xml element.
Accessing Child Elements
by index
ElmRoot.ChildNodes.Name; elmRoot.ChildNodes.Name; //Result: car
Using a loop
Foreach (XmlNode nod in elmRoot.ChildNodes) ( Console.WriteLine(nod.Name); ) //Result: car, car
How to get xml element name?
elmRoot.Name; //Result: garageCreating a new XML element
Let's create a new element in our XML document so that it differs from the other two (car), let's call it bus (bus).
When creating a new element, we will use the recommendation from the msdn website and instead of the standard new XmlElement we will use the CreateElement method.
XmlElement elm = xmlDoc.CreateElement("bus");
Creating and adding a new xml element
Let's create a new xml element named "BUS".
XmlElement elmRoot = xmlDoc.DocumentElement; Console.WriteLine(elmRoot.ChildNodes.Count); //car, car XmlElement elmNew = xmlDoc.CreateElement("bus"); elmRoot.AppendChild(elmNew); Console.WriteLine(elmRoot.ChildNodes.Count); //3 car, car, bus xmlDoc.Save("xml file name");
Explanation:
1. First we get a root element to which we will attach new elements.
2. As a check, we will display the current number of child elements of the garage element: 2 (car and car)
3. Create a new BUS element
4. Using the method AppendChild adding a new element to the tree
5. Let's use the check again and display the current number of elements for the garage element, now there are 3 of them: car, car, bus.
6. For changes to affect the physical file, save
In the XML file itself, the new element will look like this:
How to add a new xml element?
Task: create a new XML element and add some text content to it, for example the year of manufacture.
String strFilename = @"C:\lessons\Auto.xml"; XmlDocument xmlDoc = new XmlDocument(); xmlDoc.Load(strFilename); XmlElement elmRoot = xmlDoc.DocumentElement; XmlElement elmNew = xmlDoc.CreateElement("bus"); XmlText new_txt = xmlDoc.CreateTextNode("2006"); elmRoot.AppendChild(elmNew); elmRoot.LastChild.AppendChild(new_txt); Console.WriteLine(elmRoot.ChildNodes.Name); //bus Console.WriteLine(elmRoot.ChildNodes.LastChild.InnerText); //2006 Console.Read();
In XML file:
For clarity

Now let’s create a “bus” node with the same architecture as car, that is, add nodes: model, year and some text content.
Creating an XML Element with Children
string strFilename = @"C:\lessons\Auto.xml"; //create a new xml document in memory XmlDocument xmlDoc = new XmlDocument(); //load the xml file into memory xmlDoc.Load(strFilename); //Get the root element XmlElement elmRoot = xmlDoc.DocumentElement; //Create 3 elements: bus, model, year XmlElement elmBUS = xmlDoc.CreateElement("bus"); XmlElement elmModel = xmlDoc.CreateElement("model"); XmlElement elmYear = xmlDoc.CreateElement("year"); //Set values for elements: model, year XmlText year_txt = xmlDoc.CreateTextNode("2006"); //XmlText mod_txt = xmlDoc.CreateTextNode("liaz"); add otherwise //Add two child elements to the bus element: model and year elmBUS.AppendChild(elmModel); elmBUS.AppendChild(elmYear); //Add values to the model and year nodes elmModel.InnerText = "liaz"; elmYear.AppendChild(year_txt); //Add a new xml element bus to the tree elmRoot.AppendChild(elmBUS); //Check if everything is added as it should Console.WriteLine(elmRoot.ChildNodes.FirstChild.InnerText); Console.WriteLine(elmRoot.LastChild.LastChild.InnerText); //If everything is in order, then use the Save method xmlDoc.Save("xml file name");Result:
How can I shorten this code? For example, as follows:
String PathXmlFile = @"C:\lessons\Auto.xml"; XmlDocument xmlDoc = new XmlDocument(); xmlDoc.Load(PathXmlFile); XmlElement elmRoot = xmlDoc.DocumentElement; XmlElement elmBUS = xmlDoc.CreateElement("bus"); XmlElement elmModel = xmlDoc.CreateElement("model"); XmlElement elmYear = xmlDoc.CreateElement("year"); //Add values to the model and year nodes elmModel.InnerText = "liaz"; elmYear.InnerText = "2006"; elmBUS.AppendChild(elmModel); elmBUS.AppendChild(elmYear); elmRoot.AppendChild(elmBUS); //If everything is correct, then call the Save method xmlDoc.Save("xml file name");
Let's shorten the code a little more, to do this we'll use the InnerXml property:
XmlDocument xmlDoc = new XmlDocument(); xmlDoc.Load(PathXmlFile); XmlElement elmXML = xmlDoc.CreateElement("bus"); string txt = "
Result
Get a list of elements using GetElementByTagName
GetElementByTagName returns XmlNodeList, which contains all descendant elements belonging to the specified element, for example, we need to get all the car models that are stored in the garage:
XmlDocument xmlDoc = new XmlDocument(); xmlDoc.Load(strFilename); XmlNodeList modelName = xmlDoc.GetElementsByTagName("model"); foreach (XmlNode node in modelName) ( Console.WriteLine(node.InnerText); ) //Result: mazda, bmw, liaz
Access using index:
String PathXmlFile = @"C:\lessons\Auto.xml"; XmlDocument xmlDoc = new XmlDocument(); xmlDoc.Load(PathXmlFile); XmlNodeList modelName = xmlDoc.GetElementsByTagName("model"); Console.WriteLine(modelName.InnerText); //Result: liaz
How can I change the text content of a newly created "bus" element using the GetElementByTagName method?
String PathXmlFile = @"C:\lessons\Auto.xml"; XmlDocument xmlDoc = new XmlDocument(); xmlDoc.Load(PathXmlFile); XmlNodeList modelName = xmlDoc.GetElementsByTagName("model"); Console.WriteLine(modelName.InnerText); //Received the value: liaz
Or you can change the name liaz to Ikarus
Console.WriteLine(modelName.InnerText = "Ikarus");


