Yandex disk log into someone else's page. Yandex.Disk: how to open access and log in to your page? How to upload a file, folder, video, photo, link to Yandex.Disk? Comparison of OneDrive, Google disc, DropBox, Yandex Disk
Good day everyone! Today we are talking about very convenient service, which I have been using in my work for a long time - Yandex Disk. What kind of “beast” is this? - you might ask. I will talk about this in detail in the article below. If you have any questions, ask them in the comments, we will figure it out and look for answers! In the meantime, let's get acquainted with one of the most convenient file storages from the developers of the popular Russian search engine Yandex.
1. Yandex Disk: what is it
Yandex.Disk is a popular cloud storage, which allows users to store various information (photos, videos, audio, texts and other files) in the so-called “cloud”, i.e. on a server on the network. Data stored on Yandex.Disk can be shared with other users, and also accessed from various devices– other computers, tablets and smartphones. Basic version Yandex.Disk is completely free and available to everyone. I remember that in 2012, registration was by invitation only, and I used an alternative service - Dropbox. But now I have completely switched to Yandex Disk Cloud. After all, free, and even accessible from everywhere, 10 GB is never superfluous.
2. Yandex Disk: how to use - step-by-step instructions
So, I convinced you, and you decided to install Yandex Disk on your computer. Now let’s take a closer look at how to use Yandex Cloud (also called Yandex.Disk, since it is a cloud data storage).
2.1. How to create Yandex Disk (registration in Yandex Cloud)
In order to start using Yandex.Disk, you need register and start mailbox from Yandex(if you already have one, go straight to the second point).
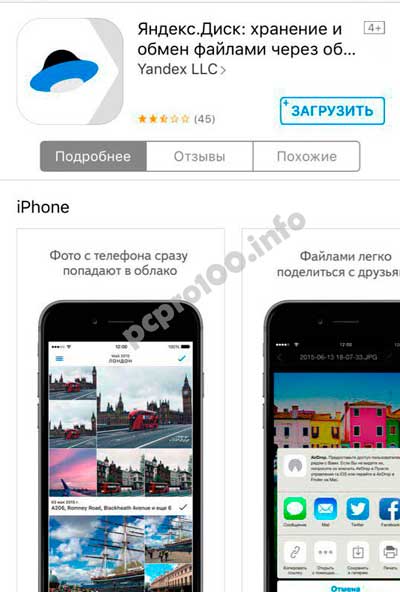
4. Installing Yandex.Disk on a smartphone. Free apps available for iOS and Android, so you can download them without any problems App Store And Google Play. The application for iOS does not have a very high rating, there are some shortcomings, all of which can be seen in the reviews.
2.3. Yandex Disk: how much free space?
Immediately after registering and installing Yandex.Disk, you can access 10 free GB of space in the Cloud. This is quite enough for a start; it lasted me about six months. What to do if there is not enough space?
- Additional free 10 GB for inviting friends. You can get 512 MB of free cloud space for each friend you invite. Go here - https://disk.yandex.ru/invites and you will see your referral link, which you need to copy and send to your friends. After each user registers using your link, you will receive additional disk space, and the invited friend will receive an additional 1 GB.

- Additional up to 250 GB as a gift from Yandex partners. Various promotions are regularly held that will allow you to get additional gigabytes of free space. You can track current promotions on this page.
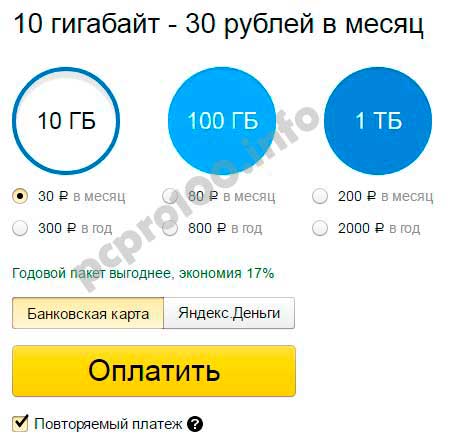
And of course, as you can expect from Yandex, additional space can be purchased. However, the pleasure does not come cheap:
If you need a lot of space in the Cloud, but don’t want to pay, you can create several mailboxes and create Yandex.Disk for each of them.
2.3. Login to Yandex Disk
Registration has been completed, the available space has been sorted out, the question arises - ?
You can view downloaded files in several ways:
1. Open the Yandex.Disk folder shortcut on the Desktop, if you did not delete it after installation.
2. Open Yandex.Disk in the My Computer folder.
3. Click on the Yandex.Disk icon in the taskbar, located in the far right corner of the screen.

4. Log in to your Yandex mail through any browser and at the top there will be a link to the Cloud:
6. Go to home page Yandex, being logged in to the mail. In the upper right corner there will be a link to Yandex.Disk:

2.4. How to upload files to Yandex Disk - 7 easy ways
Let us now consider the most important point, because of which we took all these actions -. Again, there are several ways to do this:
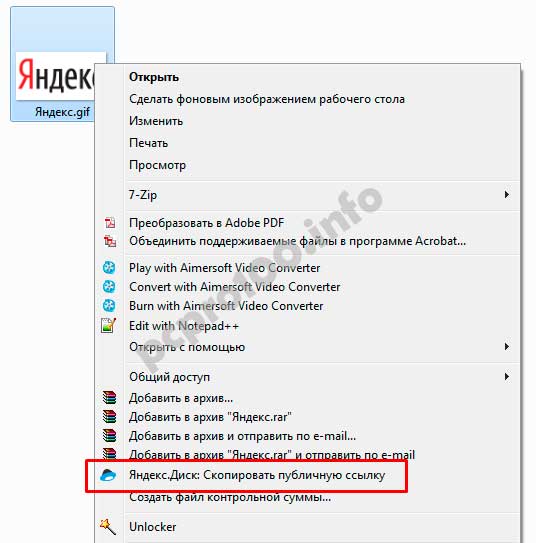
1. Through context menu . Select the file that needs to be uploaded to the Cloud, right-click on it and select the item: “Yandex.Disk: Copy public link”:
2. Copy the file to the Yandex.Disk folder(I wrote above how to enter it). By default, this folder is synchronized automatically, so when you copy there, all files will be immediately added to your Disk.
3. Upload files via mobile application iOS or Android. I can consider this method in a separate article, if you leave such a wish in the comments.
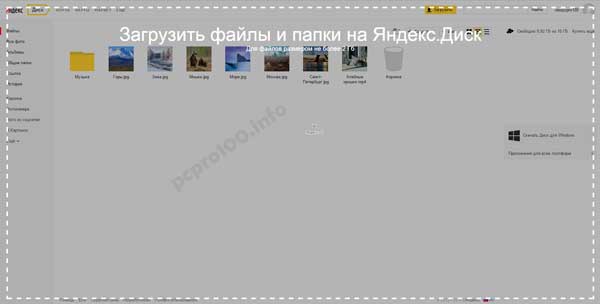
4. Upload a file to the Cloud via browser. To do this, simply drag and drop the selected files into a browser window with Yandex.Disk open:
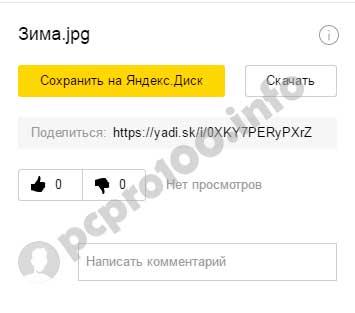
5. Copying other people's files. If someone shared with you a link to a file that is stored on Yandex.Disk, you can easily save it to your Cloud. To do this, you need to follow the sent link like https://yadi.sk/*** and click on the “Save to Yandex.Disk” button on the right.
They also often ask - how to upload a folder to Yandex Disk. The principle is the same as stated above in the files section. But there is one more additional advantage - the folder can be assigned to Shared access. This way, other users to whom you grant access rights will be able to view and download files in this folder, as well as upload their own files there.

How to upload a video to Yandex Disk?– is also a very popular question from Cloud users. This is due to the fact that video files are usually large, and many people worry that they simply won’t “fit” and cannot be stored there. This is not true, video files, just like photos, can be uploaded and stored on Yandex.Disk.
2.5. Yandex Disk: how to transfer files to another user

You can also remove access to the file by clicking the mouse and switching it to the OFF position.
If for some reason you need to remove Yandex.Disk from your computer, then you should do the same as with a regular application - use standard means operating system.
Let's move on: Start -> Control Panel -> Programs and Features
In the window that appears, select Yandex.Disk (usually it is the last one in the list) and click the “Delete” button. The downloaded files will remain in your account, only the application will be deleted from your computer.

Yandex.Disk is a cloud file storage. Allows you to remotely access data from various devices, as well as transfer it to other users global network, provide download links.
After registering on Disk, 10GB is available to the user. If desired, it can increase the storage capacity. Add another 10, 100 or 1024 GB for a fee.
Files on Yandex.Disk can be managed through the web interface, directly in the browser, or through a special system application. Data is stored in the service cloud for an unlimited time, downloaded via an encrypted Internet channel and scanned by an antivirus.
Online (without downloading to a PC) in the cloud you can play and view:
- video (AVI, MP4, WMV, MKV);
- audio (MP3, MKA, AAC);
- books (EPUB, FB2);
- documents (Word - DOC/DOCX, RTF, TXT);
- images (JPG, GIF, BMP, GIF);
- archives (RAR, TAR, ZIP).
1. To register in the cloud, open the page in your browser - https://disk.yandex.ru/.
2. Click the “Start your disk” button.
3. In the registration form, indicate your first and last name.
4. Create your own login or select one of the options generated by the service based on your data (click under the name field).

5. Create a password of 15-20 Latin letters and numbers (mixed) and enter it in the two subsequent fields (“Create a password”, “Repeat…”).

6. Customize additional authentication, checking the rights to the profile (optional - via phone or security question):
- Via mobile: enter your mobile number from international code; click “Get code”; In the drop-down field, enter the verification code received via SMS.
- Without a phone: above the “Get code” button, click the “I don’t have a phone” link; Click to open the list in the line " Security Question", select the appropriate question; on the next line print the answer.

Installing and launching the application
Upon completion of creation account the service will prompt you to install an application for working with storage. To use it, follow the instructions below:
1. When you first log into your profile, on the additional panel, click “Download Disk...”.

Note. If you have closed the panel with the link, on your profile page, at the top right, under the “Applications for all platforms” caption, click the “Windows” icon (or other platform you use).
2. Run the downloaded file.
3. If you do not want to install additional Yandex products (browser, manager, search engine on home page), uncheck the boxes next to their names in the installer window.

4. Click "Done". Wait for the installation to complete.
5. In the “Settings” application window, click “Login”.

6. To change the location of the Yandex.Disk folder, follow the link “Customize location...”.

7. In the “Location” block, click the “Change” option. Specify the new path in the window that opens.

To avoid creating another folder in the specified directory, click on the checkbox in the “Create subfolder...” setting. Click "OK".
How to use the Yandex.Disk folder?
1. To open a folder, press “Win + E”, click its shortcut in the window that appears. Or double-click the application icon on your desktop.

2. Creating a new folder in a directory is carried out in exactly the same way as in Windows OS:
- open the Yandex.Disk directory;
- right-click on the free space;
- in the drop-down context list, select: “Create” → “Folder”;
- Name the folder according to the type of data you intend to store in it (for example, bookmarks, music, books, etc.).

3. To copy a file from your computer to a cloud folder, do this:
- left-click on it once;
- Press the “Ctrl” + “C” keys together (the “Copy” command);
- go to the cloud folder (see previous instructions);
- right-click to open the context menu;
- click “Insert”;


2. A settings panel will appear in the upper right part of the profile. Click “Open” in it general access"so that the downloaded data becomes available to other users.
Have a comfortable time working online!
Good day!
To quickly transfer files to other people, and even between your PC, laptop and phone, it is very convenient to use Yandex disk (cloud service for storing files). I uploaded photos to it once (for example) - and they can be viewed from all devices that have access to the Internet. In addition, you can significantly save space in your phone’s memory (many people often don’t have enough of it) by setting up automatic uploading of videos and photos to the cloud.
Add to this the ability to work with Word documents, Excel and Power Point online (without installing anything on your PC). It's very convenient!
Not to mention that information on cloud drives is more reliably protected from various misunderstandings (viruses, problems with file system, incorrect formatting etc.) than on a classic HDD. Those. it makes sense to send some of the information to the cloud for backup copy(by the way, it can be done automatically, more on this later in the article).
Actually, in this article I wanted to show how all this can be quickly configured and used. I think the note will be useful to everyone who is still new to cloud disks.
And so, closer to the topic...
Registration and login to the disk [On Windows and Android]
In general, registration on the service is quite standard for such products. First, follow the link below to the official Yandex disk website and click the “Start disk” button (see screenshot below).

Next, you need to provide your details: first name, last name, login, password and phone number. By the way, if you already have mail from Yandex (or you use other products of this company), then registration is faster (just log into your account, the link will be located above the registration form).

After you register, you can start downloading applications for Windows and Android (to access and work with files on the disk).
For Windows

I won’t show the entire installation process, because... The installation is standard (like other programs) and does not contain anything complicated (interesting).

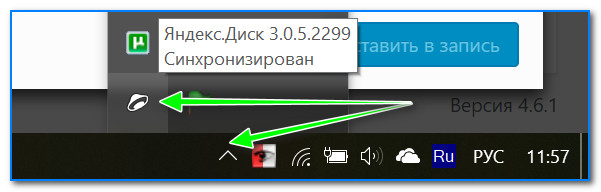
After installing the application, a characteristic “Yandex disk” icon will appear on your desktop and in the system tray, see the screenshot below. Clicking on it will open a window with all files, folders
The window for working with disk files is no different from the classic Explorer: all actions are the same. As a rule, creating, editing and deleting files and folders does not cause any difficulties even for novice users.

For Android
Installing the application on Android is also standard. Just go to Google Play (link above) and click the install button.

After installation, open the application shortcut, enter your username and password (specified during registration), set a PIN code (this is necessary so that no one except you can access the disk, even if you lose your phone), and woo-a-la - you're in the disk. See screenshots below.

How to increase free space on Yandex disk
In general, the allocated disk space is constantly changing (depending on different promotions, conditions, etc.): for example, several years ago I was given 10 GB during registration (it’s difficult to predict how much they will give you at the time of registration).
They also give extra as a bonus. space for using the mailbox (in my case 9 GB), and for installing the application on the phone (32 GB). In total, it turns out to be about 47 GB (which is quite enough for documents, photos, files).

If you need significantly more space, you can buy it for a small amount per month. In order to see the current rates: simply open the Yandex Disk application and at the bottom of the window click on the “Buy more” link (see screenshot below).

For example, today “extra” 100 GB costs only 67 rubles/month. If you need much more, for example, 1 TB, you will have to fork out 167 rubles/month.

How to upload files and photos to disk
On Windows
This question is usually asked by people who have not yet worked with Yandex disk. In general, everything is actually very simple: first you need to open the disk (you can use the tray icon, see screenshot below).

After some time, the files will be downloaded: opposite them you will see small green checkmarks (synchronized). See example below.

By the way, it is not necessary to launch the Yandex Disk application: for example, in Explorer (Windows 10) there is a link to the folder with the disk. Just open the desired directory and copy files into it (if you have synchronization enabled in the application settings, the files will also be sent to the cloud).


For automatic download photo on Yandex disk:
- launch the application;
- then in the menu open the “Settings” tab;
- enable auto-upload of photos via Wi-Fi (or even select the “Over any network” option if you use unlimited internet on the phone);
- Now all photos will be automatically uploaded to Yandex disk. Even if something bad happens to your phone, you can quickly restore all your pictures. Reliable and convenient!

How to make files available for download by other users
Option #1
If you use the Yandex Disk application, this is done very quickly - just select a file or folder and click on the “Copy link” button in the menu.


Option #2


Option #3 (if we are talking about Android)
First, open the Drive application and go to the desired directory.


How to set up automatic creation of copies of my documents to a cloud drive (backup!)
Everything is quite simple. I'll look at it step by step.
1) First, open the Yandex disk settings (to do this, you can use the tray icon next to the clock. See the screenshot below).

2) Next, I immediately recommend going to the “Advanced” tab and checking that synchronization is enabled (that is, all created and modified files in your folder on your hard drive will be immediately uploaded to the Yandex disk in auto mode (that is, duplicated) )).

3) In the "Basic" tab, check that the program starts automatically. Then open the folder location settings.

4) Look where the folder that will be synchronized with the cloud is located (if necessary, move it to another HDD partition).

5) Now open Explorer, right-click on the system Documents folder and open its properties. Example below.

Open File Explorer and go to the properties of the Documents folder.
6) In the "Location" tab, click the "Move" button and move it to any of the folders located in "C:\Users\alex\YandexDisk" * (* the path is shown as an example, you will have your own directory - see point 4 just above, where we looked at directories in the application settings) . Those. We are moving our system folder "Documents" to a folder that will be synchronized with Yandex disk.

7) Personally, I named my folder “My Documents”, into which I moved the system “Documents”. Now all files (photos, documents, videos, etc.) that fall into this folder will be automatically duplicated in cloud drive!

8) You can work with the transferred documents, both in the directory located on the HDD, and by opening the Yandex disk application. Comfortable!

Restoring a modified file
By the way, what else is captivating about Yandex disk: you can view the history of file changes. Just imagine, you edited a document incorrectly and saved it. And then they remembered that they had removed the unnecessary stuff from it... What should I do?

Additions are welcome...
That's all, good luck!
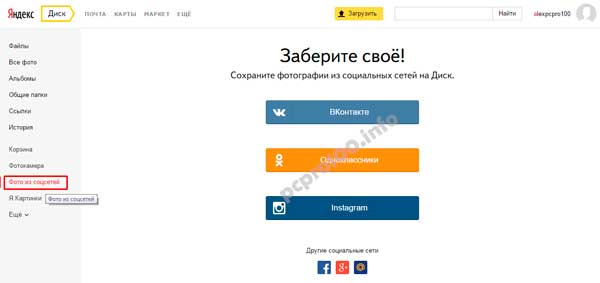
Hi all! Today we’ll talk about Yandex disk logging into your page. The Yandex company is famous for its diverse and interesting free services, of which we can highlight the Yandex.Disk cloud storage. Here, each user is allowed to freely store their personal data with a total volume of up to 10 GB. You can get an additional 1 GB by following this link. To increase space, a subscription fee is also provided, for example, 10 GB for 30 rubles per month. From the service you can save photos both from the computer itself and from social networks.
In previous years, access to Yandex.Disk was limited to invitations, but now this service can be used by any owner of a Yandex mailbox. Users have many questions regarding this storage, and in this article I will try to analyze the main points regarding logging into the storage from different devices. 
Yandex disk log into your page from your computer
Using a computer, do the following:

Logging in from another computer is done in the same way. Be sure to log out of your email when you finish work for security purposes. To do this, click “Logout” after clicking on your login on the page. 
Password recovery in Yandex disk
If you have forgotten your password, you will have to recover it for future visits to your vault. To restore, follow these simple steps:


Login from your phone to Yandex disk
If you urgently need to use files located in the storage and there is no computer nearby, enter the storage with mobile device via the application.
- Install the official application on your smartphone by downloading it from the store for free.
- Wait for the installation to complete.
- Log in to the application.

Please note that through applications it is possible to register and recover your password. The application is supported on " Windows Phone", "iOS" and "Android".
This is the end of the article, and in it I covered you as simply as possible on the issue of logging into the Yandex.Disk storage from common devices. I hope I didn't miss anything.
Conclusion
So I opened the topic - “Yandex disk log into your page ». After reading, you learned all the nuances of this topic. I hope everything is clear to you now and don’t forget to ask your questions in the comments!
Yandex disk - log in to your page from different devices
Convenient free cloud storage with which you can share files with friends and colleagues, store data that you need to access from anywhere, create and edit documents and images. It's all about Yandex Disk.
Before you start using the cloud, you must first create (register) it. This process for Yandex Disk is quite simple. Actually, Disk registration means creating a mailbox on Yandex. Therefore, we will consider this process in detail.
- First of all, you need to go to the Yandex main page and click the button "Get mail".

- On the next page, enter your first and last name, come up with a username and password. Then enter your phone number and click "Confirm number".

- We are waiting for a robot call that will tell us the code, or an SMS with a code that must be entered in the appropriate field. If the numbers are correct, confirmation will occur automatically.

- We check the data and click on the big yellow button with the inscription "Register".

- After clicking, you will be taken to your new mailbox. Look at the very top, find the link "Disk" and we move along it.

- On the next page we see the Yandex Disk web interface. We can get to work (installing the application, setting up and exchanging files).

Let us remind you that Yandex’s policy allows you to create an unlimited number of boxes, and therefore Disks. So, if the allocated space seems not enough, you can create a second (third, n-th).


