We turn home acoustics into wireless ones: MPOW StreamBot (Bluetooth) vs. AirTry (Wi-Fi)
Recently, more and more often you can meet people who listen to music not through headphones, but through the use of Bluetooth speakers. This portable device is a housing in which, along with the speakers, there is a battery and a receiver that receives a signal from the phone via a Bluetooth channel.
Portable speakers have a pleasant sound and high volume; unfortunately, their purchase often involves significant financial expenses. Let's look at how to make a Bluetooth speaker with your own hands, while saving a decent amount of money.
Required Components
Before you begin manufacturing, you need to make sure that all the required elements are at hand. These include:
- An old small speaker or a housing and two speakers.
- A Bluetooth receiver that receives a signal from the phone and transmits the sound of the melody to the speakers. You can order this component in China or in an online store located nearby. Typically, such products are relatively inexpensive. Currently, the receiver can be purchased for $6 including shipping.
- Battery from an old phone. The larger the battery capacity, the longer the speaker will work without the need to connect to charger.
- Sound amplifier (from $0.5 on Aliexpress). The current example uses a Class D amplifier, model pam8403, 5V.
- You will also need a working soldering iron, solder, sealant or glue.


If all the required components are already on the table and ready for use, then you can begin assembling the device.
Powerful DIY Bluetooth speaker
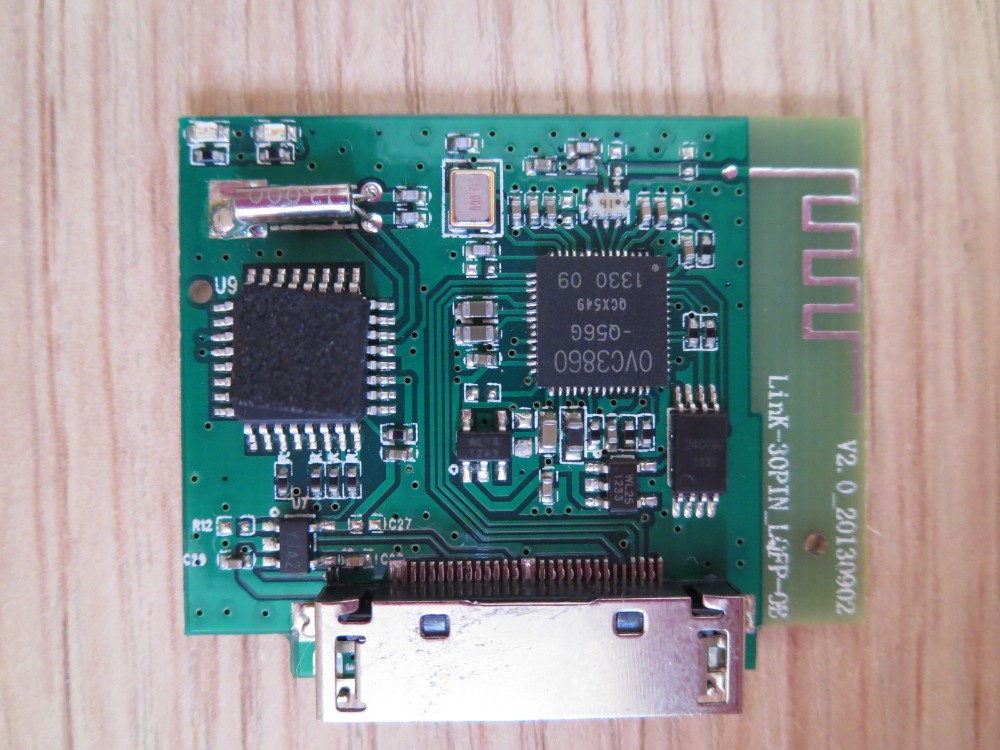
The first stage of manufacturing is to become familiar with the bluetooth receiver circuit. To do this, you need to disassemble its body. Inside there is:

- antenna;
- Bluetooth receiver;
- memory;
- charging controller;
- two LEDs displaying the charge level and the process of replenishing the capacity;
- sound amplifier;
- capacitor;
- power on/off switch;
- The board also has soldered sockets for connecting a charger (Micro-USB) and connecting headphones or speakers via a 3.5 mm jack.

On the back side, depending on the receiver model, there may be a small battery. It will need to be replaced with a more capacious one to increase the time battery life columns. This is the only modification that will be required on the purchased receiver.
Connecting a high-capacity battery
Do-it-yourself battery replacement for a Bluetooth speaker is carried out as follows:
- The soldering iron heats up and its tip solders two contacts (plus and minus) on the board. The procedure ensures that a battery with a low capacity is disconnected. Then you can peel it off and put it away or leave it in the case.
- Two wires are soldered onto the prepared battery (if it is removable). In the case of non-removable batteries, everything is simpler - there the contacts come straight from the case, so you don’t have to solder anything.
- Observing polarity, solder the wires to the receiver board. The battery and receiver are marked with positive and negative polarity contacts.
- Check the work done by turning on the device. The LED indicator should indicate this.
- Two wires come from the speaker responsible for the left channel - plus and minus. They should be connected to the corresponding pins on the board (they are marked “L”). The channel for the speaker is selected randomly.
- From the speaker that is selected to play the right channel, also take two wires and solder them to the circuit. The place in this case is indicated by the letter “R”.
- Unsolder the charging connector and switch.
- Make them remote by soldering wires of the required length.
- Make holes in the housing to install the specified elements.
- Install using epoxy resin or other durable substance.


Soldering amplifier contacts
The next major step in creating a homemade portable speaker is to solder all the necessary contacts to the amplifier. Let's analyze this procedure step by step in the context of connected elements. So, to connect the amplifier to the receiver, you will need to solder three wires from the mini-jack plug to it. This is done like this:

At this stage, the signal arrives from the receiver to the amplifier, but does not pass further, since the wires from the two speakers are not connected to it. At the top of the board is the "Out" mark, and next to it are two sets of pins (plus and minus). The do-it-yourself bluetooth speaker connection diagram is as follows:
Now the speakers are connected to the amplifier and receiver, which means the connection of all the necessary contacts is almost complete. All that remains is to supply power to the amplifier: If everything is functioning properly, the components are assembled inside the speaker housing.
This completes the assembly. If you want to get a more accurate option, you will need:
In this case, all working elements will be hidden under the body, which will give the Bluetooth speaker an attractive appearance and similarity to the mass production model.
As a result, homemade portable speaker will cost the owner 7-8 dollars, which is significantly less than the prices of the cheapest ready-made options offered by manufacturers. Before starting work, you will have to purchase the required elements, so the process includes a little preparation. The only tools you need are a soldering iron and some thin wires. If you strictly follow the instructions, assembling and soldering the contacts will not cause any difficulties; in addition, all connection points are marked accordingly on the boards.
The word Bluetooth is the technology for transmitting data over a radio channel over a short distance of several meters, for communication between mobile phones, computers and others. digital devices. Bluetooth interface is different low level energy consumption and low cost. Currently used most often for communication between cell phones and wireless headsets. The Bluetooth radio interface was intended for transmitting data and voice messages.
In the traditional version of the headset, the Bluetooth module has a small chip lithium ion battery 3.7V 50mA, microphone, speaker and power button.
The low cost of the hardware, a good degree of protection and ease of use have made this standard very popular. Bluetooth uses frequencies in the region of 2.4-2.48 GHz and does not require licensing. Currently, the global industrial community has accepted this technology as a general standard.

The user experience that Bluetooth technology provides is sure to be hugely popular. Let's say, when you come to the office, your pocket computer is immediately automatically synchronized with your desktop PC, new contacts are transferred to your mobile phone, etc.

The Bluetooth module contains a forming, receiving and transmitting part of the equipment and built-in software. Communication between the module and the host controller is made using a high-speed USB interface or a UART/PCM interface. The host controller interface in the Bluetooth module is the command interface. The host sends commands through the IHC, and in response receives messages from the module about their execution; The communications manager sets up the required host controller configuration.

Bluetooth has two communication options: synchronous and asynchronous. The first type is designed to establish a symmetrical connection and is used for voice transmission. The information transmission speed is 64 Cit/s. The asynchronous version is designed for packet data transmission, the transmission speed is 720 Kbps. At the beginning of the block there is an access code, followed by a packet header containing checksum packet and information about its parameters, and at the end an area directly containing the information being sent.
The diagram of one of the Bluetooth radio modules is shown below:

The frequency spectrum allocated for Bluetooth has a range of 2.402...2.480 GHz, which is divided into several channels. The bandwidth of each channel is 1 MHz. Channels are changed according to a pseudo-random law. Constant alternation of frequencies allows the radio interface to broadcast information over the entire range and eliminate interference from other devices. If this channel is busy, the system will switch to another, free from interference.
Discuss the article BLUETOOTH DEVICE DIAGRAM
Technological progress is moving forward by leaps and bounds, now even preschoolers have a mobile phone and know how to access the Internet, and seeing a person talking to himself on the street, no one will twirl his finger at his temple - everyone is already familiar with a Bluetooth headset, which is a wireless technology. This transmitter operates using encrypted signals, which, in addition to convenience, allows you to protect personal data. The wireless module allows you to establish communication among several devices.
Bluetooth application
This device is now built into almost all cell phones and many laptop models. This allows you to significantly expand their communication abilities:
- You can exchange various files (photos, videos, music) between phones, phone and laptop, communicator, camera.
- The module allows you to connect any peripherals(wireless headset, headphones, speakers, video cameras and other gadgets).
- Talk on the phone without holding it with your hands.
- You can create a wireless network between several of your PCs and other devices at home or in a small office, allowing you to have constant access to the necessary files from any device.
- The Bluetooth adapter allows you to access the Internet by synchronizing your PC with your mobile phone.
- Type 2.0
- Built-in amplifier
- Output power 5 W (2 x 2.5 W)
- Lower limit of frequency range 100 Hz
- Upper limit of frequency range 20,000 Hz
- Height 70 mm / Width 70 mm / Depth 65 mm
- USB powered
2. The next component is the Bluetooth module. A quick inspection of the sites www.dx.com and www.aliexpress.com found suitable modules for 6-7 US dollars (http://www.dx.com/s/bluetooth+audio+receiver+module). However, according to an ad on a local flea market website, there was suddenly an option that could be picked up tomorrow for $10. I didn’t really want to wait for packages from Chinese friends, so I bought what I had. My option (Bluetooth Music Receiver Adapter Dock Adapter Audio Stereo a2dp 30 pin)
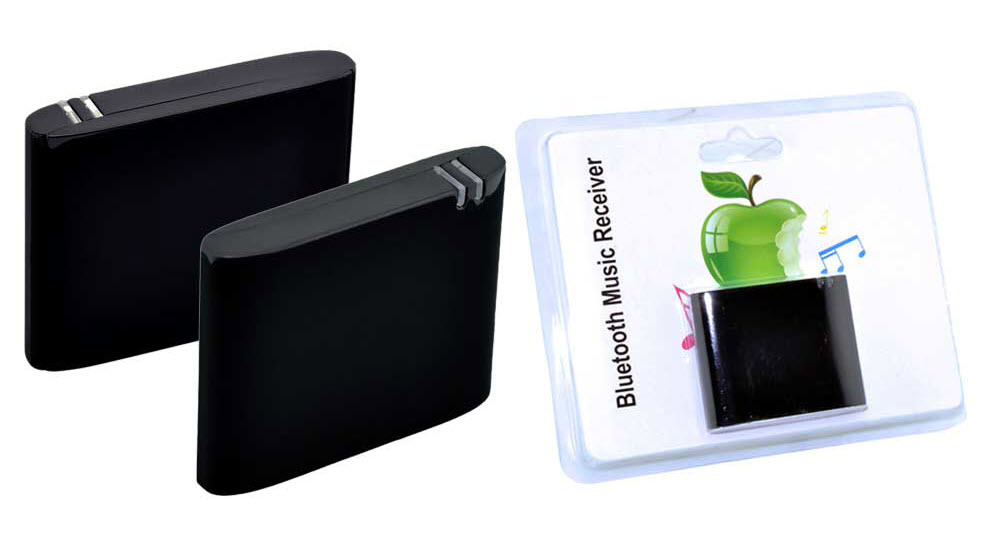
This adapter is designed to connect to legacy docking stations with a 30-pin Apple connector. To pair newer i-gadgets (with a lightning connector) or Android gadgets via Bluetooth.

3. And the last component is the lithium-ion battery. Everything is simple here. Since our speakers are powered by a standard USB cable (5V), we take any portable charger with a USB output and a capacity no matter how much money you spare. (http://catalog.onliner.by/portablecharger/~fp=5v)
Here, the larger the battery capacity, the longer the music plays.
Assembly.
First of all, we need to disassemble the SVEN 315. I used the video instructions.
Then we disassemble the Bluetooth module and remove the board. This is only needed for my specific 30-pin model (for boards ordered from http://www.dx.com/s/bluetooth+audio+receiver+module this will not be required).
Having disassembled the speaker, we shorten the audio input wire and solder it to the Bluetooth module. We also branch and solder the +5v power supply from USB.


We secure everything inside with thermoplastic glue so that nothing dangles.

After installation you can check it. We connect the speakers via USB to a portable charger. And we pair it with the phone.

That's it.

We have created excellent budget portable speakers with which you can safely go on a picnic with friends.
CubeBox is a DIY ultra-portable wireless speaker with impressive bass and an attractive design.
Distinctive features:
- high efficiency of audio effects due to the use of 65 mm stereo speakers
- Long battery life - up to 8 hours of continuous music playback.
- Pairing is possible with any Bluetooth-compatible devices, including smartphones, MP3 players, tablets and computers.
Technical Specifications:
- Two full range 3W stereo speakers.
- High efficiency amplifier PAM8403.
- Long lasting 5200mAh battery.
- Micro USB charging.
- Bluetooth
Speaker manufacturing
Video instructions for production
Materials and tools
We need these following parts and tools to make this Bluetooth speaker.
Materials
- Stereo amplifier module PAM8403;
- 3W stereo full range speaker – 2 pcs.;
- Micro USB charging module;
- Bluetooth module;
- 18650 li-On battery – 2 pcs;
- DC switch;
- Boost Converter;
- wires;
- Acrylic sheet 4 mm thick.
Tools
- Metal saw;
- Bor machine / Dremel (optional);
- soldering iron;
- Glue gun;
- Wire cutters and strippers;
- sticky tape.
- superglue.
- Marker.
- Crown.
- sandpaper or file


Case manufacturing

We glue the speakers using a glue gun, there is a very important point here. It is necessary to go very well along the edges with glue to ensure a tight fit to the acrylic wall.


The sequence of gluing the walls of the body.
Gluing the cut out parts of the future column can be done using quick-setting glue.
First apply superglue to the edges of the frame with the speaker speaker, then carefully position the 2-wall with the speaker and hold it a little until they are well glued.


After this, you can glue another wall.


For fixation, you can use various devices as you wish.
Soldering modules
The most interesting part of the assembly for many is the soldering of components; everything is very simple here:
First, let's connect the amplifier and Bluetooth module BT162
Turn on and heat the soldering iron.
Connect the power wires (red and black) to the amplifier, then the wires (green, yellow, blue) to the audio input, be sure to make sure the polarity is correct.


Add a power module.


Using this module, you can increase the voltage to the required 5 volts.
A blue potential meter is used to regulate the voltage. Solder 2 wires to the step up module and to the charge module.
Installation of housing components
Charge module and switch
First we glue the charge module, for this we use a glue gun. It's fast and cheap. Then glue the switch and solder the wires from the charge module to the switch.


Battery
We solder and glue together 2 18650 batteries and glue the assembly onto the wall of the rear panel. Where the charge module was placed.


Installation of main modules
First we install the voltage converter, then the remaining modules, we fasten everything in the same way using thermal glue.
After installing the components, we perform final soldering.


We solder the power wires from the step module to the switch, do not forget to check the polarity, this is very important.
Gluing the back panel.


After all the components are assembled, glue the remaining walls of the case, carefully apply glue and hold the walls until the glue sets.


Apply a large amount of superglue to the edges first, then carefully attach back panel and hold it a little until it sticks properly. Finally, apply hot glue to attach the back panel more firmly.
After attaching the back panel, we solder the speaker wires to the amplifier and check everything for functionality. Final assembly.
After which you can glue the remaining parts of the body. After gluing, you can use sandpaper and a file to clean the edges of the walls from traces of glue.
That's all the instructions, I hope you liked it.


Wireless devices have a number of advantages over conventional ones. One of the most significant advantages is mobility, the ability to take such a device with you on any trip. However, wireless speakers also have a high price, which makes their purchase impossible for a number of citizens. Then on help will come simple instructions for making a Bluetooth speaker at home with your own hands.
REFERENCE! To manufacture such a device, you will need not only all the basic elements that will be listed below, but also basic assembly and soldering skills from the user.

What you need for work
- For full sound, devices will need speakers. In total you should take 4 of them: two under low frequencies, two under the top ones.
REFERENCE! It is not necessary to use exactly 4 speakers. There are options for a three-speaker build. One of them acts as a subwoofer, the other two are responsible for reproducing high frequencies. You can also use two identical speakers, which will not be separated in frequency.
- Crossover with two channels(2 pcs.).
- Two passive membranes.
- Battery.
- Charger.
- Amplifier.
- Bluetooth module.
- Boost converter.
- Power connector.
- Switch switch.
- Case material.
REFERENCE! The optimal material for assembling the case is plywood, since it is easy to obtain and easy to process.
Materials and tools
For making homemade speaker you will need a number of tools and materials.
- Glue.
- A hacksaw, jigsaw and other tools for working with plywood or any material that will serve as a housing for the device.
- Marker, pencil and other items for marking.
- Ruler
Assembly diagram

As can be seen from the diagram, the speakers are connected via HF and LF pairs to the crossovers, which receive the signal from the amplifier. This was done to provide better sound quality to the device. To increase the sound quality of low frequencies, you should also install a low-pass filter between the crossover and the woofer, which will remove all upper harmonics, providing high-quality and deep bass.
Information from the Bluetooth module is sent to an amplifier, which is designed to pre-filter and amplify the signal. The amplifier module itself is powered by batteries (or rechargeable batteries). The voltage from them rises to 14 V and is supplied to the input of these two elements.
A protection board should also be placed between the supply voltage and the boost module, which will provide the device with short circuit protection.
A simple way to make bluetooth speakers
First of all, to make such a device you will need frame. The best solution will be its production made of plywood.
Important! When choosing the size of the case, you need to take into account that it must accommodate not only all the electronic components, including speakers, amplifier and battery, but also passive membranes.
Panels
On the front panel it is necessary to make holes for 4 types of speakers. A pair of large holes are intended for woofers. Smaller holes are needed for tweeters. The devices should be placed in pairs, a pair of LF and HF on the left and right.
The rear panel should contain passive membranes, as well as charging connectors and a power switch.
REFERENCE! The best material for gluing plywood parts is wood glue.
The side panels must be sealed and treated, since damage to their integrity will lead to a deterioration in the sound quality as a whole and the appearance of unwanted vibrations in the case.
On the rear panel, as mentioned earlier, there are passive membranes that significantly increase the depth of the bass. They are not electronic devices and do not require inclusion in the scheme. The membranes are attached to the body with helium super glue.
REFERENCE! In order to reduce the body's own vibration, you should glue a couple of MDF strips. This will prevent unwanted sounds caused by panel vibration.
Assembly
After all the component parts of the case are ready, you should begin assembling the electronic components.
Nutrition
You should start with nutrition. If the voltage is supplied from batteries, an additional protection board will be required. Because lithium-ion batteries are very sensitive to both short circuit and overcharging.
IMPORTANT! Make sure that the voltage across all battery cells is the same. Otherwise, the device will work for a very short time.
Along with the protection board, you should also connect the power switch. When connecting the latter, the polarity must be observed, otherwise the device will fail. To check this, you should first connect the battery and check the voltage.
Bluetooth
The next step would be bluetooth connection module. This element has separate outputs for power and separate outputs for audio. The module itself already has both an ADC and a receiving antenna, so it will receive and process the signal itself. Power to the module will come from the protection board to special contacts.
REFERENCE! This element should be located in an accessible place so that the user has the ability to turn it on/off, as well as pairing and configuration at any time.
The Bluetooth module, in turn, should be connected to the amplifier via a step-up stage.
The signal from the amplifier will go to crossovers, the main task of which is to separate the sound into high and low frequencies. The corresponding speakers are connected to the corresponding output.
When all the elements are connected, they should be placed on the back panel. It is advisable that the wires do not cross each other. This may cause unnecessary interference that will affect the sound quality.
After all the parts have been placed, the front panel should be secured. The jbl portable speaker is assembled and ready to go.

Options for portable Bluetooth speakers that you can make yourself
There are many variations in assembling Bluetooth speakers. You can use not four, but two identical speakers, to which the same sound will be supplied. Such a device will have smaller dimensions, but the sound quality will be somewhat worse.
There are also assembly variations with two tweeters and one large subwoofer.
Whether a speaker is powerful or not depends on its components.
REFERENCE! The larger the size and power of the speakers, the greater the battery capacity will be needed to maintain normal operation of the device.
If the user needs a very small portable speaker, then such a device can be assembled using only one speaker. To do this, you only need the speaker itself, a battery (can be used from an old phone), a Bluetooth module, a charging module, an amplification stage and a power switch.

- First of all, you need to place the battery in the case. Connect the charge module to it, which is equipped with two LEDs signaling the charging process.
- The Bluetooth module and amplification stage should also be connected to the battery. Element to provide wireless communication must be connected via a power switch.
- From the Bluetooth component, the signal will be sent to the speaker through an amplifier. The module itself has corresponding outputs that should be connected, observing the polarity.
There are a few basic tips to keep in mind when assembling.
- Don't forget about grounding.
- Should be observed polarity. Otherwise the device will fail.
- Wires, which connect the elements, should be done as briefly as possible, and they should not intersect with each other.
- The housing must be sealed, since if there are unintended holes, they can vibrate, creating an unpleasant sound.
- All basic elements must be easily accessible.
- The components must be securely glued to avoid damage during transportation.
- To avoid short circuit, V All elements should be checked for polarity when connecting.
- The main elements that are responsible for adjustment and configuration (Bluetooth module, power switches, amplifier with gain control) should be placed so that control of their parameters is comfortable. It is also necessary to take into account the possibility of replacing one of the components without having to completely disassemble the entire device.
MPOW Streambot Box sells well Chinese online stores, which has quite good reviews there. And given the support for the A2DP profile and AAC/aptX ® codecs, it fits my needs perfectly. I won’t go into details regarding codecs and profiles, but here’s some good introductory material on this topic.
Equipment and appearance
Srteambot is supplied in a small box made of thick cardboard. The kit includes only a 2 x Mini-Jack 3.5 mm cable, an RCA-Mini-Jack 3.5 mm adapter and a USB-microUSB power cable.The standard delivery package requires a high-quality power supply, because... If the speaker does not have a USB output, you will have to buy a separate power source. Connecting to cheap power supplies is fraught with noticeable hum and other interference in the sound of the final system.
Similar properties manifested themselves when I connected the receiver to one with built-in USB ports, but no such problems arose when connecting.
Connecting a BT receiver takes just seconds. After power is applied, pressing a single key will make the device visible on the network. All that remains is to select “StreamBot Box” in the corresponding menu on the client device.
That's it, the receiver is ready for use. You can connect 2 clients to it at the same time; to do this, turn off Bluetooth on the first client and repeat the pairing procedure with the second.
As for sound, everything is not so clear. My laptop supports the aptX ® codec, so I don’t hear a noticeable difference in sound on the Microlab Pro 2, much less the Logitech X-240. But an Android smartphone cannot boast of such functionality, and a decrease in bitrate is felt on both speakers. The sound at volumes above average would be called “mushy”; there is also a lack of high frequencies.

With a short period of inactivity (10-15 minutes at a glance), MPOW Streambot turns off and, accordingly, terminates existing connections. For further playback, you need to activate the receiver by pressing a button. This approach is absolutely unacceptable for a stationary device, so for my purposes I had to abandon the use of Streambot Box.

And finally - the range of action. If everything is fine within one room, then when you go with the phone to the kitchen or balcony, which are located behind a load-bearing wall, the connection is often interrupted.
What's inside?
The device is disassembled by unscrewing four screws under the rubber feet on the bottom of the device. Inside we find a tiny circuit board and a piece of metal that explains the weight of this device.
The heart of Streambot is the popular module based on the CSR8645 chip. The price of such boards on Aliexpress varies per piece. Why popular? Because it is cheap and used in many wireless speakers, headphones and headsets made in China.
To amplify the power of the sound signal, a separate microcircuit is used -.
What I liked
- Easy to connect and use
- No delay during playback
- Auto shutdown when inactive
- Range
Wi-Fi audio receiver AIRTRY
Price:I found AirTry after purchasing the BT receiver in the catalog of the Era-in-ear online store and bought it out of curiosity. This device allows you to broadcast audio via Wi-Fi using the Apple AirPlay and DLNA/UPnP protocols. It is also notable for the fact that it is manufactured in Korea, as evidenced by the inscriptions both on the box and on the device itself.
Equipment and appearance
The standard delivery set includes: 2 audio cables (2 x Mini-Jack 3.5 mm, Mini-Jack 3.5 mm - RCA), power supply with USB output (5 V, 0.7 A), cable for connecting to the power supply and illustrated instructions in English language. |  |
 |  |
The device itself is sealed in a white plastic case, upper part which is glossy, and the bottom is made of ordinary rough plastic. All connectors are concentrated on one edge: audio input, output and microUSB for power. Two mini-jack connectors provide pass-through connection of the device.
 |  |  |
Unlike MPOW SreamBot, this device does not have any weights and weighs only 40 grams, and its soft, non-rubberized legs “contribute” to the movement of the box even with light contact with the wire.
Connection, configuration and operation
AirTry Music Receiver can act as a client in Wi-Fi networks or a full-fledged access point in the 2.4 GHz band (g/n). The last mode, judging by the instructions, is intended for use in a car. After power is applied, the receiver creates an open access point called Airtry_MP_AP. We connect to it and go to the address 10.10.10.254 to the settings page. |  |
After connecting to home Wi-Fi network, the device will reboot, blink the indicator LED that I forgot to mention in the previous section, and will be ready for use as soon as the LED stops blinking (after 30 seconds).

The receiver is immediately detected in iTunes, and the laptop connects to it without any problems. Unfortunately, the very first tests indicated that this device was unsuitable for use in my home theater setup due to the large delay during playback. For music, 2-3 seconds do not play any role.

After updating the firmware to version 1.2.0 and re-configuring, audio and video desynchronization seems to have become less frequent, but the 1-2 second delay from pressing the Play button to the start of playback still remains, and in everyday use this behavior is somewhat annoying. Latest version The firmware can always be found, it is installed through the receiver’s admin panel, which can only be accessed after a reset.

On Mac OS, AirTry can be set as the default output device. There are no problems with iOS either.

The operating range depends on the Wi-Fi coverage area in your apartment. It easily copes with a one-room apartment in a panel house, so the receiver works both in the kitchen and on the balcony. As for the sound quality, I didn’t notice any difference between a wired connection and audio transmission via Wi-Fi.
What's inside?
AirTry is as easy to disassemble as Streambot. There are screws under the two legs on the bottom that need to be removed. Next, use a pick to unclip all the latches and the case is disassembled.The power amplifier integrated into the DAC is significantly inferior to the discrete solution in the reviewed BT receiver. So, in the Streambot Box, with a load resistance of 16 Ohms, it “produces” 132 mW, while the DAC from Wolfson, with a similar resistance, is capable of only 18 mW.
What I liked
- Pass-through capability
- System expandability
- Sound quality
- Playback delay
- Limitation when working with Android
Bonus: First generation Apple TV
Cost: 325 hryvnia / 13 dollarsOn a weekday, when leaving the grocery store, I noticed a fairly impressive size “Second Hand” store. I don't hesitate to buy clothes in such places, because... for the right price you can find very good things there, so I stopped by on occasion. At the entrance, there were two baskets about two meters long with various used equipment and among them, to my surprise, was. This hefty box, more reminiscent of a modern Mac Mini, was released in 2007 (9 years ago!) and is based on a single-core Intel processor Pentium x86 architecture.

Unfortunately, I got the Apple TV without a remote control, and to this day I haven’t bothered to buy a new one, but by connecting the media player via an Ethernet cable to home network, iTunes recognized it without any problems and the music could be streamed. The delay feels less than with the AirTry, but is still annoying.
It is worth noting here that the first Apple generation TV has a full optical output along with the usual analogue one, so for good acoustics this option would be even preferable.

In general, for $13, this box is a treasure trove of quality components. Consider an excellent 36-watt power supply (5 V, 7.2 A), a Wi-Fi mini-PCI card with support for b/g/n standards and two antennas, and a 40 GB IDE HDD. Despite the outdated technical specifications media player by adding a modern hardware decoder instead of a Wi-Fi module and replacing the old HDD with flash memory.
Advantages
- System expandability
- Minimum playback delay
- Sound quality, optical output
- Power consumption (~20 W)
- Inability to install system device output
Results
The transformation was successful; AirTry was introduced into the current setup in pass-through mode, which is used to play music from various mobile devices. To play video as part of the recreation center, a wired connection is still used.
For convenient switching, I used a switch that I picked up from the official FiiO representative office in 2014. In theory, it was intended to compare sound sources, but in reality it serves as a switch for speaker systems. :)
 |  |  |
All this is a temporary solution, since I still want to get rid of the wires. I'm currently looking at the 3rd generation Apple TV. True, I’m not going to stop using a MacBook, but it’s not clear what to do with Android smartphones, which I would also like to integrate into my home system. Maybe get one?


