How to change your desktop wallpaper in Windows. Customizing the appearance To change the font size
The concept of personalization first appeared in Windows Vista. This is a set of several mechanisms united under one “roof”, with the help of which you can influence the appearance of the interface operating system. This mechanism was transferred to the new operating system practically unchanged, with some improvements in the interface and the use of additional effects.
As before, the Personalization mechanism is located on the Control Panel (Fig. 7.1).
Rice. 7.1. Launch the Personalization component
Using the Personalization mechanism, you have access to configure the following system interface parameters:
R Desktop themes;
P desktop background;
P window colors;
R sounds;
R screensavers;
P desktop icons;
P mouse pointers;
P drawing account.
Let's briefly consider these parameters.
7.1. DESKTOP THEME
The visual design of the Desktop is the first thing that catches your eye after starting the operating system. As they say, “you are greeted by your clothes,” and it is this fact that affects whether you will be able to use the operating system with pleasure in the future or simply get used to it. It has long been proven that the visual perception of an object clearly affects its practical use.
So, let's see what the new Windows 7 operating system offers us in terms of visual design.
After launching the Personalization mechanism, you will see a window with the theme settings tab activated (Fig. 7.2). The Desktop Theme changes not only the Desktop background, but also sounds, window color and other parameters. However, once you select a Desktop theme, you can further change each of the components of the selected theme, including the background and sounds. How this is done is written below.

Rice. 7.2. Setting the Desktop Theme
The Windows 7 operating system in its standard configuration offers a choice of two theme options: Aero and standard basic themes. Users whose computer power meets the recommended requirements for installing the Windows 7 operating system are a little more fortunate, since instead of the standard theme, they can choose one of the Aero themes, which have much more visual effects. Other users can also install Aero themes, but as a result they will only get the appropriate Desktop background and sound scheme, but will not be able to enjoy most of the effects: window transparency, taskbar additions, visual effects when switching between windows, etc.
Installing the theme is quite quick - you just need to select the theme you like from the list. As a result, you immediately see the result and can easily install the one
The theme that best suits your mood and idea of what your desktop should look like.
Also note that at the top right of the list is a link to More Internet Topics. Clicking on it will take you to the Microsoft website, to the personalization section, which contains a wide variety of themes and desktop backgrounds that are not included in standard set. By clicking the Download button and selecting the Open option in the window that appears, you simplify the process of installing the theme into the operating system as much as possible. All you have to do is wait for the download process to complete and allow the installation of the new theme. Any theme that is installed in a similar way, for example by downloading from the Internet, subsequently ends up in the My Themes section, located at the very top of the list of themes.
7.2. DESKTOP BACKGROUND
Desktop background like component themes can also be changed at any time. For example, do you like the sounds of the installed theme, but don't like the background used? No problem: changing your desktop background is as easy as changing the theme itself, so don't worry, just choose a different one.
To change the background, click on the Desktop background link (see Figure 7.2). In the window that opens (Fig. 7.3) you will see a list of images that change depending on which location source is selected. For example, you can use images from an image library or select the most popular photos. If you don’t have enough of what you have, you can always click the Browse button and specify any folder with images.
Just like the theme, the background image changes on the fly so you can see the results right away. If you don’t like it, choose any other image, especially since there are quite enough ways to do this.
Now comes the fun part. The operating system allows you to set either one permanent image or set up a slide show of your selected images. Setting a “stable” image is very simple: select a suitable background and click the Save changes button. To set up an image slideshow, you need to do the following.

Rice. 7.3. Changing the desktop background
1. Mark the images that should be included in the slide show. In this case it is most convenient
save the desired images into one folder, and then specify it using the Browse button. After
To do this, you can click the Select All button to select all images at once. You can also
mark images using the Ctrl or Shift key.
2. Specify the position of the image by selecting one of the following from the list of the same name
values Fill, Fit, Stretch, Tile, Center. If the image
higher screen resolution, this will not lead to problems, you just need to select from the list
Fill or Stretch position. If the image resolution is lower and when
stretching it becomes distorted, you can modify the Desktop background by choosing a color that
will complement the image. To do this, use the Change background color link at the bottom of the window.
3. Select the frequency of changing images using the Change images list
every. There are options from 10 seconds to 1 day. The most optimal and “calm” option is
set the frequency around 1 hour: it’s both pleasing to the eye and not boring.
4. Specify the method for changing images. By default, the images are rotated in order, as
shown in the list. If you want to add some variety to your slideshow, you can check the B
random order.
To apply the changes you have made, click the Save Changes button.
7.3. WINDOW COLOR
The ability to customize the window color scheme has been carried over from the Windows XP operating system, without any changes. To use this mechanism, you need to click on the Window color link at the bottom of the window shown in Fig. 7.2.
There are quite a lot of controls to choose from, the color scheme of which you can customize. Some of them apply only to the Aero theme, while most of them relate to the standard Desktop theme, as indicated by the inscription in the window that opens.
Here, in addition to the actual color design of windows and its elements, you can also customize the display of inscriptions, specifying the font and size. For example, you can set a different font for the window title, define the spacing between icons, the color of hyperlinks, and much more.
7.4. SOUNDS
Sounds, that is, sound design, are directly involved in the perception of the Desktop, so it is only natural that the Windows 7 operating system allows you to customize them at your discretion.
To switch to sound management mode, select the Sounds link in the window shown in Fig. 7.2.
A similar configuration method existed in Windows Vista, and compared to this operating system in Windows 7, there were no significant changes in this regard.
Controlling sounds is very easy. There are more than ten different sound schemes to choose from, which you can set using the Sound scheme list. Once the sound scheme is selected, you can proceed to manage the sounds responsible for various operating system events.
In the central part of the window (Fig. 7.4) there is a list of all system events and sounds associated with these events. If the sound is installed, a loudspeaker icon is displayed next to the corresponding event. Regardless of whether the sound is installed or not, you can change it or link it to an event, for which you use the Sounds list: having marked the desired event, expand the Sounds list and select from it one of 40 sounds at your discretion. If you don’t need any sound for the event at all, select No from this list.

Rice. 7.4. Changing the soundtrack
You can do the same with any system event. This will create a new sound scheme, which you can save using the Save As button, allowing you to select it at any time.
If you are not satisfied with the set of system sounds, you can specify your sounds using the Browse button. By default, only WAV files can be selected. But is this a problem if there are a large number of programs with which you can easily convert any audio file to WAV?
SCREEN SCREEN
Because there are times when you are not at your computer, your operating system may display a splash screen when you enter power-saving mode. At the same time, in addition to saving energy, you get a pleasing picture. And in addition, you can make it so that exiting the screensaver mode will be possible only after entering the password. This means that the information on your screen can't be seen by anyone, especially people who don't need to see it in the first place.
The mechanism for working with screensavers has remained virtually unchanged since its appearance in earlier versions of the operating system. Why change anything in a useful and, most importantly, properly working mechanism?
To be able to manage screensavers, select the Screensaver link, which is located in the lower right part of the window shown in Fig. 7.2.
In the window that appears (Fig. 7.5), you can select any screensaver you like from the Screensaver list. At the same time, a small copy of the screensaver is displayed on a small screen at the top of the window. If you click the View button, you can see its work “live”, in full screen mode.

Rice. 7.5. Setting up your screensaver
Almost all screensavers have settings that can be customized. For example, if you select the Photos screensaver, as shown in Fig. 7.5, then after clicking the Options button you can specify the folder with your images that will participate in the slide show. You can also choose the speed at which these images change.
If you want to exit screen saver mode only when you enter your password, select the Start at login screen check box. This opportunity is very often used by office workers, especially if one office is shared between several colleagues.
7.6. CHANGING YOUR DESKTOP ICONS
As you may have already noticed, by default, immediately after installation, the operating system displays only the Recycle Bin icon on the Desktop. It is not clear what the reason for this decision is, because the Computer and Network icons are used much more often in practice, and yet the developers decided not to display them. This kind of “disgrace” is very easy to fix.
First of all, you need to launch the mechanism for working with icons, for which you use the Change desktop icons link on the left side of the window shown in Fig. 7.2.
As a result, a window will open in which you will see a list of standard icons, as well as parameters that show their current state (Fig. 7.6). If you want the Computer and Network icons to be present on the Desktop, simply check the appropriate boxes in this window.

Figure 7.6. Settings appearance and icon display
As with previous operating systems, in Windows 7 you can change the icon by clicking the Change Icon button. As a result, a window will open containing a fairly large set of various icons. To return the standard icon image, click on the Normal icon button.
If you want the desktop icons to change when you install a new desktop theme, check the Allow themes to change desktop icons checkbox. In this case, the icons may take on a more original appearance.
7.7. CHANGING MOUSE POINTERS
The ability to customize mouse pointers existed in the earliest versions of the Windows operating system, so Windows developers 7 decided not to reinvent the wheel and use an already established mechanism. At the same time, they took it in the form in which it is present in Windows Vista.
As before, the user has the ability to configure the following parameters.
P Mouse buttons. You can adjust the double-click speed, enable or disable sticking, and reconfigure the button layout for left-handers.
R Pointers. There are over 10 different signage designs to choose from. In this case, you can customize the appearance of the pointer for each mode and enable the display of shadows. It is also possible to allow or disable changes to pointers when installing new themes.
P Pointer parameters. You can customize pointer settings such as the speed of its movement, hiding from the screen when entering from the keyboard, setting the pointer to a button by default, displaying a “tail”, etc.
R Wheel. The mouse wheel can also be customized, for example, you can specify the number of lines by which you want to scroll the contents of the window with one scroll of the wheel. If you have a mouse whose wheel can be tilted left and right, you can also use this feature for scrolling, for example, you can set the entire screen to scroll, which is convenient when reading e-books.
7.8. CHANGING YOUR ACCOUNT PICTURE
The account picture is what you see when you enter your login password or when you exit screensaver mode. Additionally, this graphic also appears at the top of the Start menu. Not everyone likes the icon chosen by the system, such as a bunny or a fish. The icon can be changed, and this is done very simply.
As a result, a window will open in which you will see a set of images, as well as the image that your account is currently using (Fig. 7.7). Any image present in the window can become a picture for your account; you just need to select it and click the Change picture button. You can also select your own picture. To do this, you just need to follow the Search for other pictures link and indicate its location on the disk. At the same time, the main graphic formats files.

Rice. 7.7. Changing your account picture
In the same way, you can change pictures for other accounts that are registered in the operating system. If you have administrator rights, of course...
Using and setting up gadgets
As mentioned earlier, unlike Windows Vista, in which gadgets could only be displayed in a special sidebar, in Windows 7 they can be placed anywhere on the Desktop (Fig. 9.1). In addition, it became possible to change the size of the gadget window.

Rice. 9.1. Example of gadgets on the desktop
The number of gadgets is increasing every day, and their quality is also increasing. Windows 7 comes with 9 standard gadgets. In addition, you can download new ones from the Microsoft website or from any other.
Gadgets vary in purpose. The most interesting ones are those that work as web services. Examples of such gadgets are weather, currency, news, etc. informers, that is, those that display data from the Internet. There are also gadgets general purpose, such as a clock, various mini-games, slideshows, etc.
To manage gadgets, use the Control Panel item called Desktop Gadgets (Fig. 9.2). After launching it, a window will appear (Fig. 9.3).

Rice. 9.2. Launching the Desktop Gadgets mechanism

Rice. 9.3. List of available gadgets
This window displays a list of gadgets that are currently installed on the system. Over time, as the number of gadgets increases, all of them do not fit in this window, so the list can be scrolled using the navigation bar in the upper left corner of the window.
Each element of this list is provided with a short description, which appears when the desired gadget is selected. By default, this window is displayed in compact mode, so you will need to enlarge it to see the description. To do this, select the Show details link in the lower left corner of the window.
As mentioned above, new gadgets can be downloaded from the Internet, in particular from the Microsoft website. To do this, use the Find gadgets on the Internet link in the lower right corner of the window.
To add a gadget to your Desktop, simply drag it from the list to your Desktop. Or right-click on the gadget and in the appeared context menu select Add. For example, let's look at the use and configuration of a standard weather gadget (Fig. 9.4).

Rice. 9.5. Example of a weather gadget
The window size of almost any gadget can be changed. In this case, increasing the window size can add functionality. For example, if you drag a weather gadget onto the desktop, by default it will be displayed in a smaller version, which implies displaying only the weather forecast in the selected city at the current moment. If you enlarge it, it will show the weather forecast for four days and in more detail (Fig. 9.5).

Rice. 9.5. Enlarged gadget window
The window is enlarged as follows. If you move the pointer to the gadget, an additional panel with buttons appears, among which there is a Larger button. When pressed, the window size increases.
On the same panel there is also a Settings button, which opens a window with gadget settings. In our case, if you click this button, the window shown in Fig. 9.6. Here
There are only two parameters that affect the operation of the gadget - changing the type of temperature display and choosing the city in which the weather should be shown.

Rice. 9.6. Gadget setup
To change the city to any other, for example, St. Petersburg, type part or all of the city name and click the search button. As a result, a list of matches will appear from which you must select the desired position. After that, click OK and enjoy the result.
The desktop background does not have to be one color at all; you can use pictures as a background. Select link Change desktop background(Change the desktop background) in the control panel to open the settings dialog (Fig. 16.8).
Rice. 16.8.
You can change the desktop background by defining a background image, or by defining a special pattern that will fill the desktop. A wallpaper is a graphic file that is displayed on the desktop surface as its background. You can use ready-made drawings or create your own. The pictures that come with Windows are selected from a list. If you want to use your own drawing, use the button Review(Browse) to indicate where it is located.
If the size of the picture differs from the size of the desktop, then in the drop-down list Display(Position) you can choose an option to solve this problem. You can display the design in the center, stretch it to fill the entire screen, or multiply it by covering the desktop with a repeating pattern. You can also choose your desktop background color by selecting it from the corresponding list.
Click the button Customize your desktop(Customize Desktop) to open the dialog additional settings desktop parameters (Fig. 16.9). Using the tab General(Common) of this dialog, you can change the image of some required icons located on the desktop, and even remove icons from the screen altogether. By checking and unchecking the checkboxes at the top of the dialog, you place and remove corresponding icons on the desktop. By selecting the design of one of the icons and clicking on it, you can change it. To do this, click the button Change icon(Change Icon) and select a new icon in the dialog that appears. The lower part of the dialog is intended for configuring the Desktop Cleanup Wizard. If you check the box below, a wizard will be launched once every sixty days to clean your desktop of debris. All icons that you have not used for a long time will be moved to special folder, the icon of which will appear on the desktop. To start cleaning immediately, click the button Clear now(Clean Desktop Now). Using this procedure, you can clean up your computer desktop by hiding unnecessary icons.

Rice. 16.9.
The second tab of the dialog allows you to select a Web page on the Internet as your desktop, local network or on your computer. After completing the settings, press the button OK, to close the dialog. Also click OK, to close the settings dialog and return to selecting a task in the control panel.
Select link Select screensaver(Choose Screen Saver) in the control panel. A settings dialog will appear, opened on the screensaver settings tab, often called a screensaver, from the English word Screen Saver (Fig. 16.10). As you can see, you could go to this tab without exiting the setup program. The screensaver is an image that appears on the screen when you have not been using your computer for a while, but it is not turned off. This dialog allows you to configure the appearance of the screensaver. You can select a dynamic image from the list and set time intervals after which the screensaver will be turned on. You can see the splash screen in the preview area, and if you want to see the splash screen enlarged to fill the entire screen, use the button View(View). The screensaver will disappear when you begin to operate the computer, for example, by moving the mouse or pressing a keyboard key. You can set a password so that only you can remove the screen saver from the screen. In addition to the screensaver settings, this tab allows you to configure the monitor’s energy-saving functions.

Rice. 16.10.
An interesting feature of Windows XP is the use of pictures stored in the folder as a screensaver. My drawings(My Pictures). On the list Screensaver(Screen Saver) an element appears indicating a slide show from this folder. You can put it in a folder My drawings(My Pictures) any of your images. When you select a slide show from the list of screensavers, the pictures will be displayed sequentially on the screen.
You can configure the display duration and other parameters by clicking the button Settings(Settings). Click on the shortcut Registration(Appearance) to display the corresponding tab of the settings dialog (Fig. 16.11). You have the opportunity to customize the appearance, color and size of fonts for window titles and menu command names. But setting up all the design elements is a rather labor-intensive task.

Rice. 16.11.
To make customization easier, the concept of a design scheme is introduced and there are a number of pre-configured schemes. You can choose a ready-made design scheme, or you can create it yourself. In addition, you can modify an existing circuit. To save the design scheme, use the button Save as(Save As). The view of the diagram can be viewed in the preview field, which is a picture of a set of windows with all the attributes, so that when they change, you can quickly observe these changes. After completing the settings, press the button OK, to close the dialog and return to selecting a task in the control panel.
Hello!
Every computer user (especially the female half :)) tries to give their Windows originality and customize it for themselves. It's no secret that not everyone likes the basic settings, and besides, they can even slow down your PC if it is not particularly powerful (by the way, such effects include the same Aero).
Other users want to disable various graphical bells and whistles, because... we’re simply not used to them (after all, all this didn’t exist in Windows 2000 and XP before. I, for example, am generally quite ascetic about this, but I have to help other users...).
So, let's try to change the appearance of the seven a little...
How to change the theme?
Where can you find a lot of new topics? At the office Microsoft website has a sea of them: https://support.microsoft.com/ru-ru/help/13768/windows-desktop-themes
Theme - in Windows 7, the theme refers to everything that you see. For example, the picture on the desktop, window color, font size, mouse cursor, sounds, etc. In general, all display and audio are related to the selected topic. A lot depends on it, which is why we’ll start setting up our OS with it.
In order to change the theme in Windows 7 you need to go to personalization settings. To do this, it is not necessary to go to the control panel; you can simply right-click anywhere on the desktop and select “personalization” from the menu (see Fig. 1).
There are quite a lot of other topics on the Internet, just above under the title of this subsection of the article I provided a link to the office. Microsoft website.
By the way, an important point! Some themes may even cause your computer to slow down. For example, themes without the Aero effect (which I talked about here:) run faster (usually) and require lower computer performance.
How to change the background, wallpaper on your desktop?
Large selection of ready-made wallpapers: https://support.microsoft.com/en-us/help/17780/featured-wallpapers
The background (or wallpaper) is what you see on your desktop, i.e. background picture. This picture has a very big influence on the design. For example, even the taskbar bar changes its color depending on what picture was selected for the wallpaper.
To change the standard background, go to personalization (note: right click on the desktop, see above), then at the very bottom there will be a link “” - click it (see Fig. 3)!
By the way, the background on the desktop may be displayed differently, for example, there may be black stripes along the edges. This happens because your screen has a resolution (more about this here -). Those. roughly speaking, a certain size in pixels. When it doesn't match, then these black stripes are formed.
But Windows 7 may try to stretch the picture to fit your screen (see Fig. 4 - the lowest red arrow: “Fill”). True, in this case, the picture may lose its entertainment value...
How to change the size of icons on the Desktop?
Change icon size- very simple! To do this, right-click anywhere on the desktop, then select the “view” menu, then select from the list: large, medium, small (see Fig. 5).
How to change the sound design?
To do this you need to open in control panels Personalization tab, and then select Sounds.
Here you can change the usual soundtrack to various others: landscape, festival, heritage, or turn it off altogether.
How to change the screensaver?
We also go to the personalization tab (note: right-click anywhere on the desktop), select the screensaver item below.
How to change screen resolution?
Option #1
Sometimes you need to change screen resolutions, for example, if the game is slow and you need to run it with lower parameters; or check the operation of a program, etc. To do this, right-click on the desktop, and then select screen resolution from the pop-up menu.
Option No. 2
Another way to change the screen resolution is to configure it in video drivers (AMD, Nvidia, IntelHD - all manufacturers support this option). Below, I will show how this is done in ItelHD drivers.
First you need to right-click on the desktop and select “ Graphic characteristics"(see Fig. 12). You can also find the video driver icon and go to its settings in the tray, next to the clock.
Rice. 12. Graphic characteristics
Rice. 13. Resolution, display section
How to change and customize the START menu?
To customize the START menu and taskbar, right-click on the "START" button in the lower left corner of the screen, then select the properties tab. You will be taken to the settings: in the first tab you can configure the taskbar, in the second - START.
It probably doesn’t make much sense to describe every checkbox in the settings. It’s best to set it up experimentally: if you don’t know what the checkbox means, turn it on and see the result (then change again - look, at random you will find what you need :))..
Setting up showing hidden files and folders
Here, it is best to enable the display of hidden files and folders in Explorer (many beginners get lost and don’t know how to do this), as well as showing file extensions of any file types (this will help avoid some types of viruses that masquerade as other types of files).
This will also allow you to know for sure what kind of file you want to open, and also save time when searching for some folders (some of which are hidden).
To enable display, go to control Panel, then to the tab design and personalization. Next, look for the link “ Show hidden files and folders"(in the Explorer settings section) - open it (Fig. 17).
- uncheck the box next to “ hide extensions for registered file types«;
- move the slider to “show hidden files, folders and disks" (see Fig. 18).
Desktop gadgets
Gadgets are small information windows on the desktop. They can notify you about the weather, about visitors mail messages, show time/date, exchange rates, various puzzles, slides, CPU load indicators, etc.
You can use the gadgets installed in the system: go to control Panel, enter “gadgets” into the search, then you just have to choose the one you like.
By the way, if the presented gadgets are not enough, then you can additionally download them on the Internet - there is even a special link for this under the list of gadgets (see Fig. 19).
Important note! A large number of active gadgets in the system can cause a decrease in computer performance, slowdowns and other delights. Remember that everything is good in moderation and do not clutter your desktop with unnecessary and unnecessary gadgets.
That's all for me. Good luck to everyone and bye!
Talks about working in the operating room Windows system(using the example of versions XP and 7), text editor Word 2010 and other applications necessary for every user: archivers, antivirus programs and programs for watching videos and listening to music (Winamp, QuickTime Pro). Much attention is paid to working on the Internet. Describes programs for viewing Web pages, email, as well as about various useful applications for working on the network - file download managers, ICQ, Windows Live Messenger, MSN and many others. The second edition covers a new OS - Windows 7, as well as latest versions applications for users.
For novice PC users.

Here you can customize the color scheme of the windows on your system. To select a color, click on it with the mouse. Using the slider located just below, you can adjust the brightness of the color. You can also mix colors: open the option Show color setting and use the sliders at the bottom to adjust these colors. To open the classic color settings window (Fig. 2.101), click on the option Open Classic Appearance properties to select other options. Here you can also select one of the design options from the list. In the window above you can see how the windows and headers will be displayed.
If you don't have a very powerful machine, I advise you to disable the Aero effect or even switch to the classic Windows view - this way Vista will use significantly less system resources.

? Desktop background- here you can set your desktop wallpaper. Compared to Windows XP, the desktop background selection settings have been greatly simplified. In the window that opens (Fig. 2.102), click on the picture you like, and it will be used as a background on your desktop. For convenience, all pictures are divided into several categories, and you can choose the image to your taste. The category of pictures is selected from the drop-down list at the top. Below you can choose how to display the pictures. To add a new image to the collection, click the button Review and select an image in the window that opens.

? Screen saver- selecting this item opens a window for setting up the screen saver (Fig. 2.103), which appears when you for a long time don't work on a computer. You can select your screensaver from the drop-down list. To view the splash screen, click the button View, button press Options Calls up the screen saver settings window. The time for turning on the screensaver is also set here. Clicking a link Change power settings Brings up the computer's power settings window, where you can set power options.

? Sounds- setting up sound effects. This window can also be called from the control panel. More details about this setting are described in section 2.6.7.
? Mouse pointers- in this window you can configure the mouse pointer and other mouse parameters. More information about setting up the mouse is described in section 2.6.7.
? Subject- when you select this option, a window opens Theme Options(Fig. 2.104). Here you can set the interface display option in Vista - it can be classic or Windows Vista (the latter, however, is installed by default).

? Display options- when you select this option, a window of the same name opens (Fig. 2.105), where you can set the monitor settings, screen resolution and color rendering.

To change the screen resolution, drag the slider Permission, the resolution will be displayed just below. Pressing a button Additionally calls the window more detailed settings monitor and video card (Fig. 2.106). Here you can reinstall drivers (if necessary) and find out information about the hardware.

On the tab Monitor(Fig. 2.107) it is possible to set the screen refresh rate.

Also in the window Personalization(Fig. 2.92) there are two more options that are worth paying attention to - and Change font size. Let's take a closer look at them.
? Change desktop icons- when you select this option, a window opens Desktop Icon Options(Fig. 2.108).

At the top of the window, you can specify which icons will appear on the desktop. If you want to remove any icon from the desktop, uncheck the box next to its name and click the button Apply for the changes to take effect. Here you can also change the icons for Computer, Recycle Bin, Network Neighborhood, Browser and Documents Folder. To do this, select the icon you want to change and click the button Change icon. In the window that opens (Fig. 2.109), select any icon you like.

? Change font size- this option opens a window Scaling(Fig. 2.110), in which you can change the font size.

If you think the font is too small, you can increase it. To do this, check the radio button Large scale (120 dpi). Pressing a button Special scale brings up a dialog box Selecting a scale(Fig. 2.111). Here you can adjust the font size yourself. The increase is shown as a percentage. An indicator of 200% increases the text by two times, 150% - by one and a half.

Customizing your desktop in Windows 7
In Windows 7, desktop settings are divided into three points - Screen resolution, Gadgets And Personalization. To open the settings menu, right-click anywhere on the desktop. We are interested in three last item in the menu - they are responsible for the settings.
When selecting the option Screen resolution, the resolution settings window opens (Fig. 2.112).

Here you can adjust the screen resolution in the drop-down menu. If you have two monitors connected to your computer, or a monitor and a TV, you can choose which screen to adjust the resolution for.
If you are satisfied with the screen resolution, but the test and icons are too small or, conversely, large, then you can also adjust this here. Click on the link Make text and other elements larger or smaller. In the window that opens, you can change the size of text and other elements on the screen. If you have good vision, then leave the option - 100%. If you have problems reading text and the icons seem too small, you can select the options Average 125% or Large 150%.

To install the gadget, download it, and then start the installation by double-clicking. After installing the gadget, you will see it in the settings window. To make the gadget appear on your desktop, right-click on it and select from the menu that opens Add. You can also double-click the desired gadget in the properties window to make the gadget appear on the desktop.
To remove a gadget, move your mouse pointer to it and click on the cross that appears above the gadget. Notice two more options below the close icon. The second option is to open the gadget settings window. The settings can be very different: if it is a news gadget, then from which sites does it receive information, if a calendar, then in what form is it displayed, etc. Under the settings option there is a special field with which the gadget can be dragged - click on the field , and then, holding the mouse, drag the gadget to the desired part of the desktop.
The third item of desktop settings is Personalization. When you select this item, a window of the same name will open (Fig. 2.93). Here you can customize your desktop themes, enable or disable your screensaver, change icons, and Windows theme.
Most of the window is occupied by a list of themes that you can set as desktop wallpapers. Most themes periodically change the desktop picture. If you don't want to look at flowers or landscapes, you can install the Windows 7 theme or blue desktop. However, it's your choice.
The design of Windows 10 contains elements of both versions 7 and 8 of the operating system. For example, the Start menu returned again, but in a slightly modified form. On the left side are recently open source software, and on the right side, instead of the list of applications, live tiles appeared.
Despite the fact that the developers listened to users and made the design more familiar - they changed the start screen, returned the Start menu, and so on, not everyone is satisfied with the existing system design. Therefore, there are several ways to make Windows 10 look like Windows 7.
Appearance
When the user first logs in to the desktop, they will see nothing but the Recycle Bin. In version 7 of the system, in addition to it, there were shortcuts to the desktop, network environment and user folders on the screen.
IN new version The system's themes and icons have changed. This parameter is the easiest to change. The Internet is full of topics, including Aero 7 - standard design sevens. It changes in the same place as the shortcuts - in the “Personalization” section.
Taskbar Settings
In Windows 10, the taskbar contains some elements that were not there in version 7 - the search bar and task view. These functions are more convenient for tablets than for the desktop version and therefore they can be hidden.
The search bar takes up a significant amount of space on the panel. To save space and so that the worker Windows table 10 was more similar in design to the seven, you can do two things: either remove the search bar completely, or make it in the form of a small icon that will be pinned to the taskbar.
For the first option, you need to right-click on the panel, click on “Search” and check the box next to “Hidden”. If necessary, you can call it with the Win button. To leave the search on the panel as an icon, instead of “Hidden”, select “Show search icon”.
View tasks button shows everything open processes and allows you to create a virtual desktop. You can remove it by right-clicking on the taskbar and unchecking the box next to “Show task view button”. You can see open programs and windows using the standard Alt+Win command.
Returning the standard Start menu
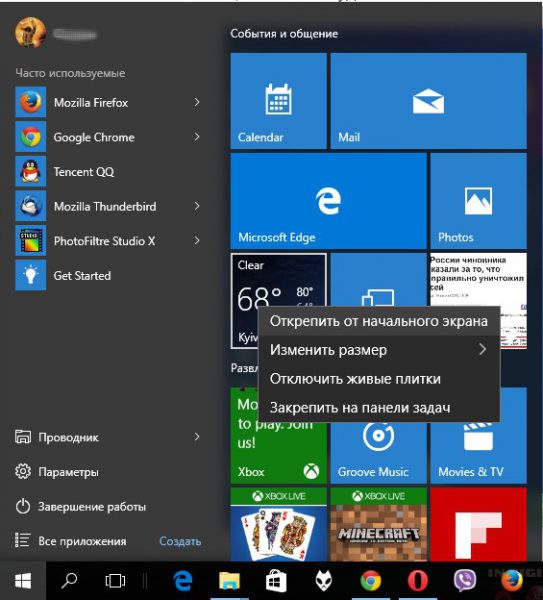
You can make the Start menu like Windows 7 either using system tools or using third party programs. You can return the Start menu using system tools or using additional utilities. In the first case, you just need to remove all the extra tiles from the right side of Start.
Open Start and right-click on the icons, selecting “Unpin from Start Screen”. The tiles will disappear and the menu will become more similar to version 7 of the operating system. You can also resize the menu so that the empty tile space doesn't take up too much space.
For quick access You can pin them to programs on the left side. Right-click on any empty space in the menu and select Properties. In the window that appears, go to the “Start Menu” and select “Settings”. Next, another window will appear with a list of applications that can be placed in the menu. This could be the Control Panel, Documents, and so on.
If this method is not suitable and you want a standard Start menu, then only special programs. For example, you can use Classic Shell - this is the most popular utility.
Download any of the above programs, run installation file and follow the program instructions. Many of them have flexible Start settings. 
Windows 10 provides more opportunities to return to a familiar look than Windows 8. Users may like some innovations and decide to leave everything as is, some decide to completely redo the appearance.
Video


