Nexus mod manager doesn't see skyrim. Description of the Mod Manager program
Nexus Mod Manager- he's the same NMM- mod manager - a program for installing, enabling and disabling mods for various games, in this news you can download the program for free, as well as learn how to install the HMM manager and how to use it.
This is the largest mod manager for a bunch of different games; at the time of publishing the news, there are already more than 32 games, including such large ones as Skyrim, Fallout 4, Witcher 3, WOT, Fallout 3 and others.
Using this program, you can manage mods for the game, automatically install them, enable, disable, and delete them.
Requirements to install and use Nexus Mod Manager:
For current versions NMM requires .Net Framework 4.6If you have more old version Net Framework, download and install a newer version:
- Microsoft .NET Framework 4.6 for Windows Vista SP2, Windows 7 SP1, Windows 8, Windows 8.1.
- Microsoft .NET Framework 4.6.1 for Windows 7 SP1, Windows 8, Windows 8.1, Windows 10.
Installing nexus mod manager:
Download the .exe file and run it.Complete the installation, you don’t have to change or touch anything.
At the end of the installation, a search window for installed games on your PC will appear:
You can stop the search, or specify the folders manually; after the program has found the game(s), you can select those for which you will install mods.
Next, the program will start; when it starts, it will ask what game you will be working with:

How to use Nexus Mod Manager (NMM)?
There may be some nuances to installing many mods; carefully read the installation process for each mod.Launch the manager and select the required game.
When you first launch the program for this game, you will receive a message asking you to select a location to place the mod catalog.

You can choose the folders in which the manager will store copies of mods, or disabled mods, you don’t have to change anything.
Next, you will be asked to create categories similar to the categories on the mod creator’s website.
This is convenient when there are a lot of mods, divide them into graphic ones, weapons, etc., etc. decide for yourself.
You can use auto-download and auto-install mods from the site nexusmods.com, you need to register on it and log in to the manager (bottom left).
To add a mod to the program, click Add from mod file

Select the file with the mod, it will appear in the list of mods:

To install, click on the green checkmark.
At the bottom, in the Mod Activation Queue tab, the installation status will be visible.
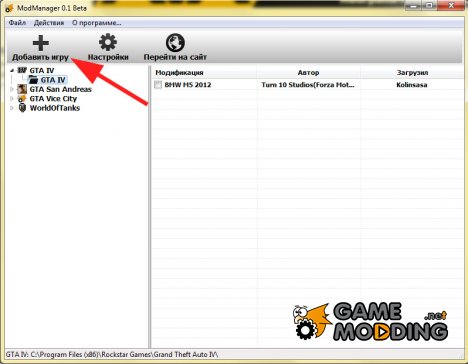
We present to your attention our unique development, thanks to which you can add modifications to the game with one click directly on the website. So, let's look at the mechanism of the program in more detail.
First, you need to install Mod Manager itself. This can be done by downloading the installer.
If you have installed modifications from our website before, then when you first start Mod Manager will automatically find installed games and add them to your database. If you have never installed mods from our site, then you need to first add at least one game. To do this, click on the "Add game" button:
Select the type of game and the folder in which it is located.
Now you can download any mod from the site via Mod Manager. Go to the description of any mod, for example this one. And click on the link "Download from our server via Mod Manager". As usual, you will see a page before the download. After waiting 10 seconds, clicking on the download button will show you the following prompt:

Check the "Do not show dialogue" box, click "Yes" and after a while this mod will be added to the list of mods for the selected game.
If you have several identical games installed in different folders, then this modification will appear in each such game.
But the installation is not finished yet! Now all that remains is to activate the mod in the game. To do this, go to the list of modifications and click the checkbox next to the modification that you want to activate in the game and after a few seconds you can safely enter the game with a new modification or continue downloading mods from our website.
In order to remove any modification from the game, just click on the checkbox again. The modification will be removed from the game, but will remain in the list in case you want to install it in the future.
For now, Mod Manager is at version 0.1 beta. We just made it, so there may be some errors in it. If something similar arises, please write to the forum.
Description:
This program is designed to automatically install mods in Skyrim: Special Edition, Fallout 4, Skyrim, Oblivion, Fallout 3, New Vegas, Dark Souls and other games, conveniently storing them, disabling unnecessary ones, etc. The program is in English, but is still easy to use.
Program features:
Select, download and install plugins from skyrim.nexusmods.com;
Select and install mods from your hard drive;
Automatically monitor and update installed mods at skyrim.nexusmods.com;
Manual sorting of installed mods;
Correct removal of installed mods;
Archive Invalidation support;
Start the game.
User Profiles
Attention!
To use the program, starting from version 0.50.0, you need .Net Framework 4.5
Installation:
The archive contains two versions, for WIN XP and for WIN Vista, 7, 8, 10, select the desired version.
1. Launch
2. Install
3. Launch Nexus Mod Manager
4. Select the game we are using (in our case, Skyrim)
5. Select the folder with the game
6. Register here: http://www.skyrimnexus.com/ and enter your login and password information. That's it.
7. To register, you must have an account mailbox on Google.com and it should look like this [email protected]
Other mailboxes like mail.ru and yandex.ru Nexus registers every other time!
8. You don’t have to register with Google and Nexus, just when the NMM program starts and asks you to confirm your login and password, click on the “Offline” button in this window and NMM will start.
Usage:
Adding mods:
Select the "Mods" tab.
On the left, click "Add Mod from file" (select an archive with a mod), or "Add Mod from url" (enter a link with a mod).
The selected mod appears in the list.
Select a mod from the list and on the left click “Activated the selected mod” and you’re done.
Disabling the mod:
Select from the list of mods, and on the left click "Diactivates the selected mod".
To connect to Nexus Mod Manager, registration on
Many avid fans of computer games know how much a well-created game mod can transform a game. Texture detailing is improving, game AI is growing, new characters are appearing, and the gameplay is becoming more exciting. At the same time, installing a new mod may be associated with the elimination of minor problems that could potentially negate all the advantages of this mod. This is where they come to our aid special programs to install mods, and I will focus on one of them, called “Nexus Mod Manager” in this material. In which I will tell you what Nexus Mod Manager is, how to install it, and how to use this program on your PC.
What is Nexus Mod Manager
Nexus Mod Manager (NMM) is free program open source, allowing you to download, install and update mods for a line of popular games.
The functionality of NMM is fully automated; all processes are completed in a couple of clicks, saving the user from various installation routines. Disabling (deleting) a previously installed mod is carried out no less quickly, allowing you to avoid wasting time searching and deleting the corresponding files in the game body.
To install the desired mod, you just need to select it, then Nexus Mod Manager will download and install this mod into the desired game directory on your PC.

Among the games supported by NMM is the popular action/RPG “Fallout 4”
How to download Nexus Mod Manager
- In order to start using Nexus Mod Manager you will need to download this program from Nexusmods.com.
- Go to this site, click on the inscription “not logged in” at the top, and in the window that opens, select “create an account” (create an account).
- On the page that opens, click on the “Register” button on the right (nexus mod manager registration), scroll down the page that opens and click on the “Create Account” button.

Click on “Create Account” to create an account
- In the registration window, enter your name or nickname (Username), email, password for your account (Password), the same password again (Confirm Password), indicate your gender (Gender).
- You will then be asked to answer a question in English by the program, which wants to make sure that you are not a bot.
- If you don't know English language at the proper level, then I recommend using translator programs that will help give the English version of the correct answer to the specified question.
- Then enter the captcha in the appropriate row, check the box next to “I’ve read and agree to the Terms of Use,” and click on the “Create Account” button.
- A registration confirmation letter will be sent to your e-mail, and after clicking on the appropriate link in it, you will be able to log into the site using the previously selected login and password.

Now download Nexus Mod Manager by selecting the appropriate version for your operating system, and install this program on your PC.
How to use Nexus Mod Manager
On its first start, NMM will start automatic search on PC games supported by it. If necessary, you can interrupt the process by independently checking or unchecking the desired games. If the Nexus Mod Manager does not find at least one of the supported games, it will terminate prematurely. You can directly tell the program the path to the game, without having to wait for NMM to find the game on your computer (click on the button with three dots next to the name of the desired game).
Then you will need to select one of the installed (and found by NMM on your computer) games with mods for which you want to work.

If you want to change the game you are currently working with, then click on the button in the upper right corner (Default game). You can also rescan your computer for NMM-supported games by clicking on “Rescan Installed Games”.
There are two main tabs on the main screen - “Mods” and Plugins (plugins for mods).

To install the mod, you will need to find it on one of the Internet resources. For example, you can use the already mentioned site Nexusmods.com, which contains a huge number of mods for NMM-supported games (for example, mods for the game Fallout 4).
- Go to Nexusmods.com, click on the “Files” tab, click on “Browse files”.
- Select the desired mod, in the mod description window that opens, go to the “Files” tab.
- Here you click on the “Download with manager” button, select the download using the “Nexus Mod Manager” auxiliary tool, and click on “Open link”.
- The selected mod will be downloaded to the PC using NMM, and will appear in the program's list of mods. To activate it, click on it, and then click on the button with the big green checkmark on the left.
- To manually add a mod that is already on our computer, just click on the green plus sign in the main NMM window and point the program to the path to the desired mod on your hard drive.
- After it is downloaded and appears in the list of available mods, it must also be activated by clicking on the green checkmark.
- To start the game with the mod we have chosen, click on big button top left “Launch (game name)”.
- If you need to disable a previously installed mod, then click on the desired mod and select “Diactivates the selected mod” on the left or double-click on the line with this mod.
Video on installing and using Nexus Mod Manager:
Conclusion
To use Nexus Mod Manager, you need to go through the registration procedure on the Nexusmods.com website, and then download and install NMM on your PC. Using the program is quite easy, the interface is simple and clear, managing the program will not cause any special problems for the user. Use NMM to work with mods, this will make working with them much easier, and the gameplay thanks to installed mods will shine with new, bright colors.


