Download minecraft to install mods. How to install mods in Minecraft? How to install textures for Minecraft
In this article I provide a brief guide to installing Minecraft mods via mLauncher. If something is not clear, or suddenly errors occur during installation, be sure to write in the VK group http://vk.com/mlauncher
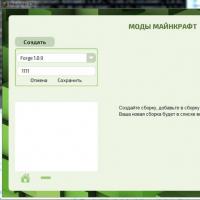
So. the latest version of the launcher - at the time of writing this is 1.30. Launch and go to the "Mods" section.
Let's create a new assembly. We indicate which version of Forge we will use and the name of the assembly, for example five units. It is important that we indicate the name of the assembly only in English letters. The launcher will not work with Russian assembly names. Click Save.

Now we add mods from the list to the assembly. You can remove the mod by clicking the minus icon at the bottom. As soon as you have added the necessary mods, exit the section by clicking the icon with the house.

The assembly will appear in the list of Minecraft versions. select and launch it just like regular Minecraft.

Now the answers to the questions:
I can't find the mod
Where are the build files located?
in %APPDATA%\.minecraft\home\<название сборки>
Where are the mod files?
in %APPDATA%\.minecraft\home\<название сборки>\mods
How to remove a mod from a build
You can only remove a mod from the launcher in the Mods section. If you try to manually delete the file from the %APPDATA%\.minecraft\home\ folder<название сборки>\mods. then it will load again when the build starts
What size are the mods?
There are all kinds of fashions. from 50 kilobytes to 100 megabytes. Therefore, I recommend not adding many mods to the assembly at once. you can pump out a very large amount of traffic.
Do mods download every time I start the build?
You got bored with minecraft and decided to diversify it with mods. But you are having difficulties with the installation, that's why you are here. After the minecraft 1.6 update, the client structure has changed, so there will be two instructions.
Most mods require a mod loader; the best option is minecraft forge, since most developers use its API to develop mods.
If the mod does not support (forge or modloader, etc.)
Versions up to 1.5 (inclusive)
1. Open minecraft.jar with any archiver (I recommend making a backup copy)
2. Open the archive with the mod in the same way
3. Drag the contents of the archive with the mod (.class files and if there are folders) into minecraft.jar
4. Launch minecraft.jar
Versions 1.6+
5. Open 1.x.x.mod.jar, remove META-INF and copy the files from the archive with the mod.
6. Launch the launcher, click “edit profile” (or create a new one) and change the version you are using to 1.x.x.mod
The mod supports Forge (and others like it)
Versions up to 1.5 (inclusive)
1. Download Minecraft Forge for your version
2. any archiver minecraft.jar
From:/Users/’UserName’/AppData/Roaming/.minecraft/bin/minecraft.jar (standard path)
3. Drag the contents of the archive with the Forge mod (.class files and if there are folders) into minecraft.jar
4. Launch Minecraft (it should launch). A mods folder will appear in the .minecraft directory.
5. Move the mod.zip or mod.jar to the mods folder (check the archive with the mod, it should contain .class files and folders)
6. If the mod requires third-party libraries, then download them and move them to the mods folder
7. Launch Minecraft. The number of loaded mods should increase on the main screen.
Versions 1.6+
1. Make a copy of .minecraft/versions/1.x.x and rename it to .minecraft/versions/1.x.x.mod
From:/Users/’UserName’/AppData/Roaming/.minecraft/versions/1.x.x (standard path)
2. Go to the 1.x.x.mod folder and rename 1.x.x.jar to 1.x.x.mod.jar
3. Rename 1.x.x.json to 1.x.x.mod.json
4. Open 1.x.x.mod.json and change id "1.x.x" to "1.x.x.mod"
5. Download Minecraft Forge
6. Run the downloaded file using .jar. The installer will open.
7. Select “Install Client” and specify the path to the minecraft folder (if it’s standard, don’t change anything) and click “ok”
8. Launch the launcher and create a new profile and select Forge as the version to use.
9. Launch minecraft. A mods folder will appear in the game directory.
10. Move the mod.zip or mod.jar to the mods folder (check the archive with the mod, it should contain .class files and folders)
11. If the mod requires third-party libraries, then download them and move them to the mods folder
12. Launch Minecraft. The number of loaded mods should increase on the main screen.
Hundreds of mods are now created for every game. They add variety to the game, expand its world and provide the player with more freedom. Minecraft has a huge number of mods because the game is incredibly popular. But to use them you need to learn the installation process. Want to know how? Then read the article and follow the directions.
Let’s immediately say that mods are divided into 2 types: those that replace game files and those that use a mod loader (Forge or Modloader). Since the first type of mod causes game files to be replaced, conflicts often arise that prevent the game from starting. Mod loaders make this process easier, eliminating problems with files. The developer, when uploading a mod to the network, must indicate the bootloader he needs. It is also worth knowing that Forge works with almost all mods written for Modloader. But you should not combine them, otherwise problems will arise when starting the game.
Minecraft 1.6.2: installing mods
Please note that earlier installation instructions may not apply to this version. Therefore, look not for minecraft.jar, but for 1.6.2.jar (or replace the 2 with 1). They should be located in the versions folder. The Forge mod loader will create its own folder there (if everything is installed automatically), so we will change the mods there.
We begin the installation by searching for the jar file. To do this, through Start, find the Run command, and type the following there: %appdata%\.minecraft.

Having done this, we move to the versions folder, which contains the versions and profiles already installed. We need a clean one. And if previously the file was called 1.6.2, now it will be called 1.6.2.jar.
When installing Forge or Modloader in a jar, there is a high probability that the game will replace all its files and remove mods. Here Minecraft launchers version 1.6 will come to the rescue, as they “find an approach” to several versions, for which you need to create your own. It can then be modified. This creates a backup copy. Don't forget that Forge will create the profile itself, so if you already use one, you won't need to create a new one.

Go to the versions folder, copying the folder called 1.6.2 there. In it you will see two files: with a json extension and a jar extension. Label them with numbers from the folder name.

There will be several lines there, but you need an id. Change the name of this line to your own and save the file.


Minecraft Forge - installation
How to install manually? Download the mod loader for a specific version of the game, open the archive.
In the Minecraft folder, select the bin folder and open it using the minecraft.jar archiver. If the game version is higher than 1.6, then you need to find jar profiles that are located in the versions folder.
We paste everything we found in the archive into the jar file and delete the META-INF folder. Enter the game. It is done.
It is advisable to download mods that work without a bootloader. Usually, a mods folder appears in the game folders, where all installed mods are located.
Install Modloader
There will be nothing new in the installation. Follow the instructions for the Forge program.
Mods for Minecraft: where to install?
After installing Forge, you can install mods that you have already downloaded. For example, Hammer mod version 1.6.2. This means that you need to install it for a game with the same characteristics.
Liteloader Mods
It is also a mod loader. Download and install in minecraft.jar. Drop mods with the .litemod extension into the mods folder and that’s it!
Where should I install the mod?
As mentioned earlier, the necessary information is always present in the mod description. If this is a jar extension, then you need to install it as Forge.
Player API is another library for mods. It may be that you need it too. In any case, be sure to carefully study the mod before downloading and there will be no problems with installation.
Congratulations my dear friend, now you know how to install mods, you can study further
Hello, young cubophiles. Today I will tell you how to install a mod on Minecraft (Minecraft). This is very easy to do, but you need to know some nuances.
Installing mods that work on Minecraft Forge
This method is suitable for the vast majority of modifications presented on our website! The difference is that they use Forge. You can read how to install it on the download page.
The instructions are suitable for any version of Minecraft: 1.5.2, 1.6.4, 1.7.2, 1.7.10 and others.
So, you have installed Forge and downloaded the mod file you need. It can have a jar or zip extension. In this case, there is no need to extract it from the archive! Copy the mod (Right mouse button - Copy).
Click on the round button with the Windows icon on the panel.
Enter or copy the text into the search: %appdata%.

Click on Enter. Open the .minecraft folder and then mods.


Paste the previously copied modification file (Right mouse button - Paste).
Installation completed!
How to check?
Now, to check whether we installed the mod on Minecraft correctly, we need to launch the launcher. Check if you have the Forge profile selected and click play.

On the main screen of the game, click Mods and see if our mod appears in the list.
In Minecraft, it's not easy and fast, but it's not very difficult either. If you follow the instructions exactly, then you will succeed, there are many points in the instructions for installing Minecraft mods, more than is usually given on other sites because I described everything in detail and I want you to be able to correct everything in case of an error. I highlighted the important ones in bold. everything else is a more detailed description.
1. Check compatibility versions of the mod and game. The versions must match, or the instructions for the mod must contain a note indicating which versions of the game the mod is compatible with.
In my case, the plugin version is indicated in its name, and the game version (shown immediately after entering the game) matches it:
2. Close Minecraft, if the game is running.
3. Open the game folder. Usually it can be found by entering “%APPDATA%\.minecraft” into “Start-Search Window” or “Start-Run”. You can manually find the game folder in Windows 7 at the address - C:\Users\User\AppData\Roaming\.minecraft.

4. Go to the "bin" folder and then create a copy of the minecraft.jar file(make a backup). If something is wrong, you can restore the game to its previous state.

5. Open and extract minecraft.jar using an archiver such as WinRar.

6. Copy the folder and mod files to the unzipped folder.
7. Delete the "META-INF" folder, if there is one. Without this, the game will not start; if there is no such folder, then skip this point and move on.
8. Select all files and send them to minecraft.jar archive(zip format).

9. Copy the resulting minecraft.jar file and paste it into the “bin” folder instead of the original (replace).
9. Launch the game. If the game does not start, then delete minecraft.jar and insert a backup copy in its place, always with the name minecraft.jar.