How to enable xmp in asus bios. How to enable XMP RAM profile? Let's use the XMP profile
Each RAM stick has its own timing - this is the time during which the RAM reads information. The smaller it is, the faster data processing is performed and the faster the PC runs. However, if you are not satisfied with the speed of the RAM, you can use XMP profile technology.
An XMP profile is a set of data about the special capabilities of a module. If you use it, the speed of the device will increase significantly.
Let's use the XMP profile
Most modern motherboards can enable the XMP profile in the BIOS settings automatically. However, if the profile is not enabled, then the motherboard sets the standard timing. Therefore, it is worth setting up the XMP profile yourself.
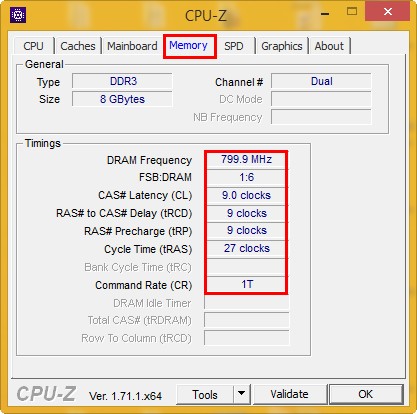
Load the CPU-Z program and go to the “Memory” tab. The timing is indicated here.
Then go to the “SPD” tab. The last column shows the actual timing, which is different from what may be indicated on the RAM stick.


Select this option and install “XMP”. Then press “F10” to save the changes. Now the timing will be lower.
One of the world leaders in the production of motherboards, ASRock Inc. introduces the new Z68 Extreme7 Gen3 motherboard supporting the latest XMP 1.3 technology. It provides a simple and reliable tool for enthusiasts to use in the future. The XMP 1.3 RAM standard will be announced along with the next generation Intel ® chipset, the Intel ® X79, in the fourth quarter of this year. In the meantime, ASRock is already introducing a motherboard supporting this standard on the Intel ® Z68 chipset, offering the user the first chance to try the technologies of the future.
ASRock Z68 Extreme7 Gen3
What is XMP 1.3?
Intel® Extreme Memory Profile (XMP) is an extension of the standard DDR3 RAM specification. XMP is a performance profile that allows users to set the speed of RAM without complex BIOS settings. The XMP 1.3 standard offers even finer tuning of RAM timings and the ability to fully unleash the potential of modules. Of particular note is the fact that only a motherboard that supports XMP 1.3 will be able to unlock the potential of XMP 1.3 standard memory! If the user is using a platform compatible with XMP 1.2, but with XMP 1.3 memory modules, the computer may experience instability or lower speed.
To get optimal RAM settings and more precise timing settings, all you need is to simply set the XMP 1.3 profile in the BIOS of your motherboard.

World's first board to support XMP 1.3: Z68 Extreme7 Gen3
In addition to the Z68 Extreme7 Gen3, ASRock will be introducing XMP 1.3 support to the entire series of PCIe Gen3 motherboards via BIOS update. With ASRock motherboards and Intel® XMP 1.3 certified RAM, overclocking is easier than ever.
Most people who build their own computer put a lot of emphasis on RAM, which allows the system to run at speeds that are slightly above standard. But the fact is that there is a very good chance that your RAM is not running at the maximum speed that it is capable of. It will not run with the advertised timings unless you manually configure your timings or enable XMP Intel. The option to enable this setting is not available in the BIOS of every motherboard. While all RAMs are not equipped with an XMP profile, the ones you choose for your high speeds are almost always equipped with high speed capability and have XMP as an option.
Intel XMP
RAM typically adheres to the standard speed set by JEDEC, the Joint Electronic Engineering Council. This is the reason why the operating systems you buy usually don't run at their advertised speeds as soon as you plug them in. Luckily, you don't have to go into your BIOS and manually set your RAM timings. Instead, the RAM you buy has a small amount of memory that provides several "Intel extreme memory profiles." Your BIOS is able to read these profiles and automatically adjust the optimal timings chosen by your RAM manufacturer. On an AMP processor, you will need to enable AMD Memory Profiles (AMP). This is AMD's version of AMD XMP.Enabling XMP
To enable XMP, you will need to access your computer's BIOS. You will have to restart your computer and then press the appropriate key to start the boot process. Usually this Esc, Delete, F2 or F10. Now you should look for the XMP option in your BIOS. If you don't find it on the main screen, you can find it under " Overclocking" Activate the XMP profile and then select the profile. There is usually only one profile for you. But if there are more, you can test two profiles and then choose one of the best available.And there I mentioned the phrase “XMP RAM profile”. Today I will reveal the meaning of this definition and explain a few points.
Let's say you have a RAM module that works with timings 9-9-9-27 . The letter with the number C9 in the description of the module proves just this. If you look at the module’s characteristics on the Internet, you can see exactly the same numbers – 9-9-9-27.
If you install such a bracket in your computer and run the CPU-Z program, and then go to the tab "Memory", then it’s possible that there will be timings 11-11-11-28

And if you go to the tab "SPD", then the timings will be indicated there, as written in the specifications for the module, that is, 9-9-9-27.

So, how can you make the RAM work at the timings specified in the specifications?
This is why there is a so-called XMP profile, which we will talk about now.
If you're in the market for new shoes, then UGG Australia boots might be the way to go. You can find them in the online store http://allshoes.com.ua. There you can find other types of shoes.
How to enable XMP profile?
If you don’t yet know what timings and the XMP profile (extreme memory profiles - eXtreme Memory Profiles) are, then I’ll explain now.
Timings– this is the time that RAM spends processing data; the shorter the timings, the faster the RAM works.
XMP profile– these are the advanced capabilities of the module, these capabilities include frequencies, timings and voltage. All this information is located on the module itself. When the computer boots, the BIOS sets optimized frequencies and timings that are in the XMP profile, however, it must support this technology.
Basically, modern motherboards support this technology and you can configure it through the BIOS, because, usually, it is not enabled by default. If the XMP profile is not enabled, then the motherboard will set the frequency, timing and voltage as standard, in accordance with the factory parameters.
Now let's try to enable the XMP profile through the BIOS. The ASUS motherboard is taken as an example.
So, let's say we have a memory module the same as was described at the beginning of the article.
And we find the tab.

In this tab we look for the option AI Overclock Tuner, if the parameter is set to "Auto", then the XMP profile is not activated, then click on this item and select X.M.P..

This profile should now be enabled. We exit the BIOS saving the settings. Next, run the CPU-Z utility and go to the tab "Memory" We see that the timings have changed and become 9-9-9.