Online photo editor to remove unnecessary things. How to remove people or unwanted objects from photos
They wanted to capture a landmark, but what they ended up with was a crowd of tourists, an attractive photo on a deserted beach, but in reality it turned out to be a portrait against a background of towels. Many users have encountered and continue to encounter such problems. There are programs that can help fix this and help with other minor problems related to photographs or images.
Processing a photo means not only making it lighter or more contrasting, but you can also completely remove from the frame everything that you think shouldn’t be there. You probably think that only a professional photographer can do this, but it’s not. Today there is a program that quickly helps rid the image of unnecessary details in the frame and remove unnecessary objects. To do this, you can use the Inpaint program.
Interesting articles on the topic:
A program for removing unnecessary objects from photos
Inpaint- the most common graphic editor that works on operating systems Windows systems and Mas. With this program you can quickly delete selected objects in any graphic files.
Inpaint allows you to instantly remove unnecessary objects, people, watermarks and more from any graphic files.
The program can easily remove from an image a person or animal that accidentally entered the frame during a photograph, remove watermarks, text and other objects from selected areas in the picture, filling them with the appropriate background.
The program also has several features:
combining images and frames;
retouching drawings;
complete removal unnecessary items and objects;
replacing the drawing area;
improving the quality of old photos.
1. Launch the Inpaint program, you can download it at the end of the article. Upload the required photo or image. (file-open)
2. Select a tool. To do this, you can use a marker, a lasso that will cling to the edges of an object, and a magic stick that highlights objects depending on the tone. All these items will help you quickly remove an unwanted object or improve an image.


3. Select the required area to delete. The area for removal is highlighted in reddish color, and the donor structures, as a result of which the application will remove the extra object, are highlighted in green. Therefore, the selection must be made in red to get rid of the unnecessary object.
4. Start painting and deleting the object (erase button)


Inpaint copes with its obligations perfectly. The main thing to remember is that the program is suitable for small objects, but removing something really large is very difficult. For more serious tasks, use other specialized programs that have more potential and other tools. Therefore, Inpaint is recommended for users who perform these actions personally.
Inpaint – will remove absolutely any component from a photo of any complexity. If a third party accidentally got into your photo, or you didn’t take the photo required item, in this case Teorex Inpaint will help. A few manipulations are enough and the photo looks as it was originally intended.
The program can also be used to improve damaged photographs. The entire process of the program is extremely automated; all you need to do is mark an unnecessary object in the frame in red, then erase the selected area and you will get the desired photo.
Download Inpaint— http://www.softportal.com/software-28737-inpaint.html
Quite often, beautiful and high-quality photographs are spoiled due to various little things in the background. Of course, you can transfer photos to your computer and edit them in a graphics editor, but you don’t always have the time and energy for this. But if these photos are on your iPhone, iPad or iPod touch, then you can edit them on your device using useful application from Adva-Soft - .
The operating principle is very similar to the function retouch in iPhoto, which we wrote about in . The application interface is not unique, but is still quite well drawn.

In the main menu of the program you can watch 2 training videos. We recommend that you read them carefully to clearly understand how the program works.
allows you to edit images from your media library or received from the camera, to do this, click the corresponding button.

Once you have uploaded the photo to you, you can start editing it.
The toolbar consists of:
- Lasso - selecting an area using the lasso method (you draw an arbitrary shape)
- Brush—selecting an area using the “brush” method
- Eraser - clears the selected area
- Navigation—zooming and moving around the photo
- Cut - removes a selected area from a photo
- Cloning - painting an area with the selected base
- Saving - allows you to save the edited photo in a photo album, send it by e-mail or publish it on social networks
First, let's remove the people on the right. To do this, let’s enlarge this area and select people with the “brush” tool.

Now let's click on the "cut" button and then reduce the scale, as a result we will get a clear sea on the right without any hint that someone was swimming there.

Let's select the nearby people with the lasso tool and edit the selected borders with the eraser tool.
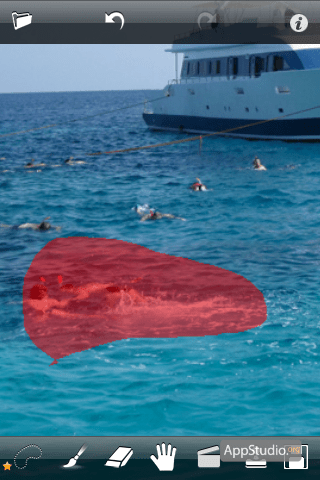
We will paint over the remaining people on the left side with the “clone” tool. In the end, thanks to us, we got a yacht against the backdrop of the sky and sea without any unwanted objects.


To get to the application settings, click on the " i" in the upper right corner. In this menu, in addition to settings, you can watch a training video for beginners and experienced users, read help, and get technical support

The settings allow it.
We remove unnecessary objects from photographs. Today we will talk about how to remove an unnecessary object in a photo using Photoshop - online EDITOR. For example like this. The first photo shows an unnecessary empty basket. On the second I removed it.
Read more...
For a long time we used the wonderful website Webinpaint, in which such objects were removed easily and quickly, in three clicks. I had a lesson on this site, delivered in 2010, which . During this time, the lesson spread very far, and many people used it. But now THE SITE HAS BEEN MADE PAID, and I receive a lot of questions and requests to find something similar.
Alas, everything in our world is becoming more expensive, and all such sites are now paid. Therefore, to everyone who does not know how to use Photoshop, I will show you how to remove an unnecessary object in a photograph using Photoshop - online online Pixlr, simply called EDITOR
If you just want to remove an object on a colored background, you can do this using the BRUSH tool. For example, let’s take this picture. And we’ll take a month away from it. 
Since here the object is on a uniform, blue background, we take the BRUSH tool.

And we select a color to paint over the unnecessary object.
1- open the color selection.
2.- Click the brush in the place which color we need to paint the object. THE PROGRAM WILL SELECT THE COLOR ITSELF.
3.- Confirm the color choice.

Now select the brush size and paint the object with it. In the color selection window the one we need is lit.

Now we just paint over the unnecessary object. That's it.

ATTENTION. This is the simplest option for removing an object, since it only requires ONE color. If the unnecessary object is located on several colors, then you need to SELECT THE COLOR each time. Although this is not difficult, since it is selected automatically. But it's pretty boring.
But if an object we don’t need is located on grass, sand, a forest background, etc., then simply choosing a color won’t do anything about it. Then we start using the STAMP tool.
Let's take a picture from the previous lesson. And we also remove the Christmas tree in the foreground. 
We go to the site in Pixlr.com Editor., and upload the image.

ATTENTION. If you insert a picture from the Internet, then after inserting its address, a download sign will appear. Just wait until the picture loads, the sign will remove itself.
Select the STAMP tool, its size and shape.

Let's get to work. Take the Stamp tool and, holding down the Ctrl key, select the cloning source by simply clicking on it (it should be next to the object to be removed; this is essentially what we will use to sketch this object):

ATTENTION! Please note that the copy point moves along with the stamp tool, that is, periodically, if the pattern does not match, you need to set a new copy point using the Ctrl key.
In our example, the top of the Christmas tree is against the background of red Christmas trees. Having set the copy point, I painted the top red. Next came the yellow grass, and I again set the copy point, holding down the Ctrl key, select the cloning source - GRASS.

And I go to the bottom part, where there is green grass, and also set the copy point, holding down the Ctrl key, select the cloning source - GREEN GRASS

And I remove the very bottom part of the Christmas tree. That's it.

Believe me, this is done much faster than I describe. Hold down the Ctrl key, click, paint over the desired part, click again with the Ctrl key, and paint over again. Everything is pretty fast.
Restoring the lost texture. As you may have noticed, when sketching the Christmas tree, below, the grass was slightly damaged, so I suggest restoring it also using the Stamp tool. Select a clone source with good texture and, using a large stamp brush, preferably a square one, paint over the area where the texture is broken.

If everything suits us, then we save our photo. Click FILE - SAVE, or click on the cross in the right corner. We write the name of our image, select the format and click on “Yes”
This is what we got, with the texture already adjusted a little.

This way, quite quickly, you can remove all unnecessary objects from your photos. Don’t be afraid to ruin something, you can always undo your actions, or paint over it again. Try boldly and you will succeed!
The need to remove any text information This problem occurs quite often among users from images. Typically, candidates for elimination are automatically inserted shooting dates or inscriptions identifying the original source of the photo - watermarks.
This can be done most correctly using Adobe Photoshop or its free analogue- Gimp However, as an option, the necessary operations can be carried out using the appropriate web services. It's even easier than you think.
If you are familiar with the features of working in graphic editors, understanding the web resources presented in the article will definitely not be difficult. The fact is that the services described below follow all the basic concepts of similar desktop programs and offer the same tools.
Method 1: Photopea
An online service that copies as accurately as possible appearance, and a functional part of the well-known solution from Adobe. Same as mentioned above graphic editors, there is no one right “magic” tool for removing captions from images. It all depends on how important or homogeneous/heterogeneous the content of the photo directly below the text is.
- The first step, of course, is to import the image onto the site. You can do this in several ways, namely: click on the link "Open from computer" in the welcome window; use keyboard shortcut "CTRL + O" or select item "Open" in the menu "File".

- For example, you have a beautiful landscape photograph, but with a small defect - the date of shooting is marked on it. In this case, the most simple solution will use one of the group of recovery tools: "Spot Healing Brush", "Healing Brush" or "Patch".
Since the content under the inscription is fairly uniform, any nearby patch of grass can be selected as a source for cloning.

- Zoom in on the desired area of the photo using the key "Alt" and mouse wheel or use the tool "Magnifying glass".

- Set a comfortable brush size and hardness - slightly above average. Then select a “donor” for the defective area and carefully walk over it.

If the background is very varied, instead of "Healing brush" use "Stamp", regularly changing the cloning source.

- Once you've finished working with the photo, you can export it using the menu "File" — "Export as", where and select the final format of the graphic document.

In the pop-up window, set the desired parameters for finished photo and click on the button "Save". The image will be immediately downloaded to your computer's memory.

So, with a little time, you can get rid of almost any unwanted element in your photo.
Method 2: Pixlr Editor
A popular online photo editor with a wide range of functions and its own characteristics. Unlike the previous resource, Pixlr is based on technology Adobe Flash Therefore, for it to work, you must have the appropriate software on your computer.

That's it. Here you do almost all the same manipulations as in a similar web service - Photopea.
Hi all! Today we will talk about such an action in Photoshop as removing unnecessary objects or elements of an object. Although the need for such an operation does not arise so often, this operation is still very necessary, because in this way you can save a good photo.
The traditional way to delete objects is with the Stamp tool. We'll tell you about it as well. And at the beginning I would like to tell you about one new technique - deletion using the “Content-aware Fill” tool. We will show this first. Then we'll look at the techniques you need.
“Content-aware fill” is enough quick removal objects that are quite simple - it would be better to say straightforward. For example, let’s take a photograph of a street from which a pole needs to be removed.

Upload a photo and duplicate the layer to work with. Next, select the Lasso tool, namely the rectangular one. We outline the pillar with it, leaving a little background around the edges.


In the window that opens, in the top line, select “Based on content.” Often, this function is already installed by default. Then you don't need to choose anything.

Leave everything else unchanged and click “Ok”. We get the result - the pillar has disappeared. The wires remain. A miracle happened :):)

This is such a simple, quick operation. But, let's go further and see how you can remove unnecessary elements on your face.
Removing an extra object from the face in the photo
Sometimes, when taking portraits, you suddenly discover that unnecessary objects are clearly visible on the face. Most often it is acne. Depending on the number of pimples, their location and shape, you can act in different ways. For example, we have such a portrait.

Upload the photo, enlarge it to the desired and convenient size, and begin deleting it. The first option that can be used for small objects is a brush. But first, select the eyedropper on the toolbar and click it on a healthy area of skin. At the same time, please note that the main color has changed to the selected one.

Now you can start painting. Select the “Brush” tool, set the size close to the size of the object and click on the pimple until it is painted over.

As you can see, the pimple has disappeared. We delete the rest in the same way. If somewhere a sharp boundary forms between the place of the removed object and the original skin, you can use the Blur tool and correct it.
You can also try and cover up an object with this tool, provided that it does not differ sharply from the background. Here is the result of using these two tools. Quite an effective result, now you know how to save a good photo.

As you can see, large objects have been removed. The same can be done using the “Content Aware Fill” function described above. Using Lasso, select the object, go to edit and fill. In the window that appears, select “Based on content” and click OK. The result is the same.
How to remove an extra object from a face in Photoshop without losing the background?
In this example, we will consider not exactly removing from a face, but from a portrait. We will remove the bow on the head. But, for complex objects on the face, you can use the same method. So, load the photo of the girl with a bow and duplicate the layer.

We need to remove the bow. Let's use the "Content Aware Fill" method. Use the lasso tool to select the bow.

Now go to the edit menu - fill. By the way, it can be made simpler. Right-click on the selected object and select the same item in the menu that opens.

In the window that opens, select based on the content and click “OK.” However, the bow was not cut out quite correctly.

This problem can be solved using another tool – “Stamp”. We find it on the toolbar. The icon looks like a stamp.

Next, press the “Alt” key and, holding it down, use the stamp tool to select the area with which we will replace the unsuccessfully deleted area. Naturally, we choose where the hair is well defined. Here is an example of the result of the first section, where the bow was not removed quite correctly.

In the same way we delete all other incorrect areas. At the same time, do not forget to periodically change the cloning location by pressing the “Alt” button. This is due to the fact that when moving around the painted area, the area from which the copying example is taken also moves and may end up with a color that you do not need. Here is the finished result of removing the bow from the girl’s head.

As you can see, there is not a trace left of the bow. At the same time, the background is preserved, the photo looks natural.
Removing unnecessary things from a photo using the Stamp tool
The stamp is also a very unique tool, just like the fill discussed earlier. Let's look at some more features of this tool. Let's say you need to remove an object from this picture:

Load it into the program and make a duplicate layer. Removing the haystack. Notice that the haystack is in three different parts of the picture. On the field and against the background of the forest and sky. We will clean accordingly according to these parts.
We start with the sky background. Select the stamp, hold down the “alt” button and click on part of the sky background.

Because the stack does not lie against the background of clouds. And more on the dark part, then select it. Release the “alt” button and move the round stamp cursor over the top of the stack. Periodically, if necessary, we again select a part of the sky for cloning. As a result we get:

We clear to the edge of the forest. Now we move on to the forest part of the stack. Similarly, click while holding down the “Alt” button on the forest and clean further. Result:

It remains to remove part of the haystack located on the field. It's a little simpler here. There are a lot of field textures, choose any place and clean it. As a result we get finished image without a haystack.

As you can see, everything is very simple. Good luck in mastering this wonderful program.


