SASS syntax. Sass for Little Ones - A Detailed Guide Is it necessary to use curly braces in sass
Which is needed to compile code on SASS and LESS preprocessors. Let's look at how to work with the SASS preprocessor.
Preprocessing
Writing CSS is fun in itself, but when a stylesheet gets huge, it becomes difficult to maintain. And in this case, the preprocessor will help us. SASS allows you to use features that are not available in CSS itself, for example, variables, nesting, mixins, inheritance and other nice things that return the convenience of writing CSS.
Once you start using SASS, the preprocessor processes your SASS file and saves it as a simple CSS file that you can use on any site.
Variables
Think of variables as a way to store information that you want to use throughout the writing of each project style. You can store colors, font stacks, or any other CSS values you want to use in variables. To create a variable in Sass you need to use the $ symbol. Let's look at an example:
$font-stack: Helvetica, sans-serif; $primary-color: #333; body ( font: 100% $font-stack; color: $primary-color; )
When Sass is processed, it takes the values we set in $font-stack and $primary-color and inserts them in the regular CSS file in the places where we specified the variables as values. This makes variables a powerful feature, for example when working with brand colors used throughout a site.
Body ( font: 100% Helvetica, sans-serif; color: #333; )
Nestings
When writing HTML, you probably noticed that it has a clear nested and visual hierarchy. This is not the case with CSS.
Sass will allow you to nest CSS selectors in the same way as in the HTML visual hierarchy. But remember that excessive nesting makes your document less readable and understandable, which is considered bad practice.
To understand what we mean, here is a typical example of navigation styles on a website:
Nav ( ul ( margin: 0; padding: 0; list-style: none; ) li ( display: inline-block; ) a ( display: block; padding: 6px 12px; text-decoration: none; ) )
Did you notice that the ul, li, and a selectors are nested within the nav selector? This is a great way to make your CSS file more readable. When you generate the CSS file, the output will be something like this:
Nav ul ( margin: 0; padding: 0; list-style: none; ) nav li ( display: inline-block; ) nav a ( display: block; padding: 6px 12px; text-decoration: none; )
Fragmentation
You can create Sass file snippets that contain small snippets of CSS that can be used in other Sass files. This is a great way to make your CSS modular and also easier to maintain. A fragment is a simple Sass file whose name begins with an underscore, for example, _partial.scss. The underscore in a Sass file name tells the compiler that it is only a snippet and should not be compiled into CSS. Sass fragments are included using the @import directive.
Import
CSS has an import feature that allows you to split your CSS file into smaller ones and make them easier to maintain. But this method has a significant drawback: every time you use @import in CSS, another HTTP request is created in CSS. Sass takes the idea of importing files via the @import directive, but instead of creating a separate HTTP request, Sass imports the file specified in the directive into the one where it is called, i.e. The output is one CSS file compiled from several fragments.
For example, you have several Sass file fragments - _reset.scss and base.scss. And we want to import _reset.scss into base.scss.
// _reset.scss html, body, ul, ol ( margin: 0; padding: 0; ) // base.scss @import "reset"; body ( font: 100% Helvetica, sans-serif; background-color: #efefef; )
Note that we use @import 'reset'; in the base.scss file. When you import a file, you do not need to specify the .scss extension. Sass is a smart language and it will figure itself out. When the CSS is generated you will get:
Html, body, ul, ol ( margin: 0; padding: 0; ) body ( font: 100% Helvetica, sans-serif; background-color: #efefef; )
Mixins (mixins)
Some things in CSS are quite tedious to write, especially in CSS3, where on top of that you often need to use a large number of vendor prefixes. Mixins allow you to create groups of CSS declarations that you will use multiple times throughout your site. It's good to use mixins for vendor prefixes. Example for border-radius:
@mixin border-radius($radius) ( -webkit-border-radius: $radius; -moz-border-radius: $radius; -ms-border-radius: $radius; border-radius: $radius; ) .box ( @include border-radius(10px); )
To create a mixin, use the @mixin directive + the name of the mixin. We named our mixin border-radius. Also, in the mixin we use the $radius variable inside the parentheses, thereby allowing us to pass whatever we want in the variable. Once you've created a mixin, you can use it as a CSS parameter by starting the call with @include and the name of the mixin. When your CSS compiles you will get this:
Box ( -webkit-border-radius: 10px; -moz-border-radius: 10px; -ms-border-radius: 10px; border-radius: 10px; )
Inheritance
This is one of the most useful features of Sass. Using the @extend directive, you can inherit sets of CSS properties from one selector to another. This allows you to keep your Sass file "clean". In our example, we'll show you how to style error, warning, and success notifications.
Message ( border: 1px solid #ccc; padding: 10px; color: #333; ) .success ( @extend .message; border-color: green; ) .error ( @extend .message; border-color: red; ) . warning ( @extend .message; border-color: yellow; )
The above code allows you to take the CSS properties from .message and apply them to .success, .error and .warning. During compilation of the CSS file, magic works that will help you avoid writing unnecessary classes in HTML elements. The result looks like this:
Message, .success, .error, .warning ( border: 1px solid #cccccc; padding: 10px; color: #333; ) .success ( border-color: green; ) .error ( border-color: red; ) .warning ( border-color: yellow; )
Mathematical operators
Using math in CSS is very useful. Sass has several standard math operators such as +, -, *, / and %. In our example, we're doing some simple math to calculate the width of aside and article.
Container ( width: 100%; ) article ( float: left; width: 600px / 960px * 100%; ) aside ( float: right; width: 300px / 960px * 100%; )
We created a simple responsive modular grid with a width of 960 pixels. Using mathematical operators, we took the resulting data with pixel values and converted them to percentages without much effort. The compiled CSS looks like this:
Container ( width: 100%; ) article ( float: left; width: 62.5%; ) aside ( float: right; width: 31.25%; )
Practical example:
In our HTML file, we only need very simple code and a link to the CSS file in our project's CSS folder.
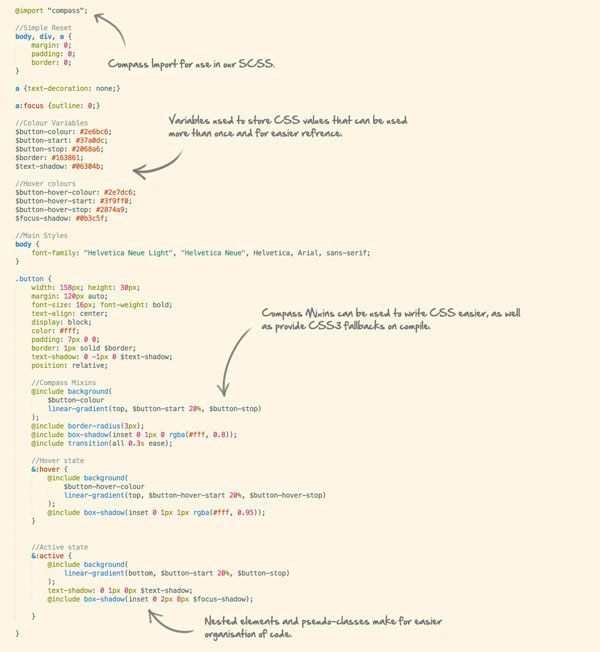
That's all the HTML we need! Now let's move on to Sass. Go to your favorite text editor and create a new file, save it to the sass folder and name it style.scss. To make it easier, we will write everything in SCSS, which Sass can also handle, and SCSS is not very strict with beginners. At the beginning of our file, we will write a basic reset for HTML, an import for Compass, and write color variables for the button.
@import "compass"; //Simple reset body, div, a ( margin: 0; padding: 0; border: 0; ) a (text-decoration: none;) a:focus (outline: 0;) // Color variables $button-colour: #2e6bc6; $button-start: #37a0dc; $button-stop: #2068a6; $border: #163861; $text-shadow: #06304b; //Hover colors $button-hover-colour: #2e7dc6; $button-hover-start: #3f9ff0; $button-hover-stop: #2874a9; $focus-shadow: #0b3c5f; //Basic body styles ( font-family: "Helvetica Neue Light", "Helvetica Neue", Helvetica, Arial, sans-serif; )
At the top of the file we call Compass to include it in the file and use the abstract classes later. In addition, we wrote a simple reset and have already used one property: variables. This gives us the ability to store values that we will use constantly in our CSS, including colors, font values, and many more! Here I use them to store the colors used in the button and to simplify from the entry, as well as to reuse it in the style sheet.
Assigning styles to a button
.button ( width: 158px; height: 30px; margin: 120px auto; font-size: 16px; font-weight: bold; text-align: center; display: block; color: #fff; padding: 7px 0 0; border : 1px solid $border; text-shadow: 0 -1px 0 $text-shadow; position: relative)Let's style this button! We'll start by applying basic styles to the button class tag. I've set some basic button styles here, and notice how I use variables.
Now let's get to the fun part! Remember the Compass import placed at the beginning of the stylesheet? We'll use it here because Compass has a large library of built-in classes that include CSS3 prefixes for those browsers that still need prefix support.
Button ( width: 158px; height: 30px; margin: 120px auto; font-size: 16px; font-weight: bold; text-align: center; display: block; color: #fff; padding: 7px 0 0; border: 1px solid $border; text-shadow: 0 -1px 0 $text-shadow; position: relative; //Compass classes @include background($button-color linear-gradient(top, $button-start 20%, $button- stop)); @include border-radius(3px); @include box-shadow(inset 0 1px 0 rgba(#fff, 0.8));
After the initial styles are defined, we can include several abstract classes for background colors, linear gradients, border radii, and transitions. The best thing is that everything will compile with only the necessary prefixes, and will save us time writing them! The class will compile for now in the style.css file into the following:
Button ( width: 158px; height: 30px; margin: 120px auto; font-size: 16px; font-weight: bold; text-align: center; display: block; color: #fff; padding: 7px 0 0; border: 1px solid #163861; text-shadow: 0 -1px 0 #06304b; position: relative; background: #2e6bc6 -webkit-gradient(linear, 50% 0%, 50% 100%, color-stop(20%, #37a0dc ), color-stop(100%, #2068a6)); background: #2e6bc6 -webkit-linear-gradient(top, #37a0dc 20%, #2068a6); background: #2e6bc6 -moz-linear-gradient(top, # 37a0dc 20%, #2068a6); background: #2e6bc6 -o-linear-gradient(top, #37a0dc 20%, #2068a6); background: #2e6bc6 linear-gradient(top, #37a0dc 20%, #2068a6); webkit-border-radius: 3px; -moz-border-radius: 3px; -o-border-radius: 3px; -webkit-box-shadow: 0 1px 0 rgba(255, 255, 255, 0.8); -moz-box-shadow: inset 0 1px 0 rgba(255, 255, 255, 0.8); box-shadow: inset 0 1px 0 rgba(255, 255, 255) , 0.8); -webkit-transition: all 0.3s ease; -moz-transition: all 0.3s ease; transition: all 0.3s ease; )
Writing styles with nested elements
Another great feature of a preprocessor like Sass is the ability to nest elements and attach classes with a parent element that you assign styles to. This is then compiled into the required CSS to work.
Button ( &:hover ( @include background($button-hover-colour linear-gradient(top, $button-hover-start 20%, $button-hover-stop)); @include box-shadow(inset 0 1px 1px rgba(#fff, 0.95)); &:active ( @include background(linear-gradient(bottom, $button-start 20%, $button-stop)); text-shadow: 0 1px 0px $text-shadow; @include box-shadow(inset 0 2px 8px $focus-shadow) )
After the main button styles, you can nest pseudo-class selectors for the element's :hover and :active states, using an ampersand that tells Sass that this is a nested class attached to the parent element. The hover state can add some drama to the gradient and inner shadow using abstract Compass classes, while the active state reverses the gradient and changes the box shadow to make it look like a button has been pressed.
Button:hover ( background: #2e7dc6 -webkit-gradient(linear, 50% 0%, 50% 100%, color-stop(20%, #3f9ff0), color-stop(100%, #2874a9)); background: #2e7dc6 -webkit-linear-gradient(top, #3f9ff0 20%, #2874a9); background: #2e7dc6 -moz-linear-gradient(top, #3f9ff0 20%, #2874a9); -gradient(top, #3f9ff0 20%, #2874a9); background: #2e7dc6 linear-gradient(top, #3f9ff0 20%, #2874a9); -webkit-box-shadow: inset 0 1px 1px rgba(255, 255, 255, 0.95); -moz-box-shadow: inset 0 1px 1px rgba(255, 255, 255, 0.95); active ( background: -webkit-gradient(linear, 50% 100%, 50% 0%, color-stop(20%, #37a0dc), color-stop(100%, #2068a6)); background: -webkit-linear -gradient(bottom, #37a0dc 20%, #2068a6); background: -moz-linear-gradient(bottom, #37a0dc 20%, #2068a6); background: -o-linear-gradient(bottom, #37a0dc 20%, #2068a6); background: linear-gradient(bottom, #37a0dc 20%, #2068a6); text-shadow: 0 1px 0px #06304b; -webkit-box-shadow: inset 0 2px 8px #0b3c5f; -moz-box-shadow: inset 0 2px 8px #0b3c5f; box-shadow: inset 0 2px 8px #0b3c5f; )
The above shows what happens after the :active and :hover states are compiled in Sass; they are written as pseudo-class selectors to the parent element in actionable CSS, as well as the CSS we need, complete with alternatives, to complete our three-state button.
style.scss file and compiled stylesheet
That's all there is to our entire style.scss file, because it's organized, written simply, and contains abstract classes and variables that do some of the work for us and are then compiled into the final stylesheet file, style.css.

Sass (Syntactically Awesome Stylesheets)- this is a script metamova, which is compiled in the original CSS style. If you are well familiar with CSS + HTML, then you will understand SASS in a few days.
Anyone dealing with CSS larger than 500 rows is going to have a headache about how to fix it. Unfortunately, over the hours of development of standards for cascading styles, their structure has not changed radically. Vimogi before the layout, to whom I will bullshit, - they settled down in a hurry. If 50-70 rows of styles could design a simple site, then today it is obligatory to display something like this on the header. That and that - only on my :).
In 2007, the first version of SASS appeared, developed by Hampton Catlin. I don’t think that a simple set of rules and a simple compiler were intended to be one of the main tools of front-end masters and layout designers of the modern Internet.
Extensions of SASS files can be .sass і . scss- This is due to the selected syntax. The browser, however, does not understand any of them, so for mutual understanding you need to use the compiler. The goal is to convert SASS into simple, classic CSS that will be recognized by any browser.
The compiler role can download server-side js or a program installed on your work machine and monitor changes in work files.
What are the syntaxes in Sass?
The language has two main “dialects”: SASS and the new SCSS. The differences between them are small; if the syntax rules are broken, the file cannot be compiled. The SASS syntax does not have curly bows, the nesting of elements in new ones is implemented using additional inputs, and the style rules are reinforced with new rows.
Regardless of syntax, SCSS is similar to CSS. So, any CSS will definitely be an effective SCSS code.
Due to the lack of bows and caps, the SASS syntax with CSS has no value.
Vigodi Sass
I’ll tell you the beginning in a few words and then give a short report. There have never been any changes in CSS and hacks for cross-browser compatibility are important. Below on the butts you will see that SASS is in danger and the two problems are closer.
Changes (variables)
Sass allows you to assign changes - and this is one of the key advantages. The name, by analogy with php, begins with the dollar sign ($), the values are assigned after the additional double sign.
Messages in Sass can be divided into 4 types:
- number (int)
- string
- Boolean type (so/nor, boolean)
- colors (names, names)
I’ll give you a simple example, after any topic becomes relevant, so that everything will become clear to you and you can understand everything yourself.
SCSS syntax
$blue: #3bbfce; /* color */ $margin: 16px; /* access */ $fontSize: 14px; /* text size */ .content ( border: 1px solid $blue; /* blue border */ color: darken($blue, 20%); /* darken the color by 20% */ ) .border ( padding: $margin / 2; margin: $margin / 2; border-color: $blue)
SASS syntax
$blue: #3bbfce $margin: 16px $fontSize: 14px .content border: 1px solid $blue color: darken($blue, 20%) .border padding: $margin / 2 margin: $margin / 2 border-color: $ blue
Result in CSS
Content ( border: 1px solid #3bbfce; color: #217882; ) .border ( padding: 8px; margin: 8px; border-color: #3bbfce; )
As you can see, as a result we will remove the original CSS. Let's go away.
Nesting rules
I would only value Sass for those that are nesting in the new one. This will make it much easier to edit styles and navigate through the working styles file.
Nav ( ul ( margin: 0; padding: 0; list-style: none; ) li ( display: inline-block; ) a ( display: block; padding: 6px 12px; text-decoration: none; ) )
Nav ul ( margin: 0; padding: 0; list-style: none; ) nav li ( display: inline-block; ) nav a ( display: block; padding: 6px 12px; text-decoration: none; )
You will no longer have to worry about the contribution of elements and the correctness of the decay of classes. Visually inserted into Sass, the middle of the Father's rule element will be preserved within the same hierarchy of CSS rules.
Addition (mixin)
The DRY (Do not Repeat Yourself) rule is implemented in Sass using the mixin technique. Those bits of code that you probably had to duplicate in CSS can be saved here in a separate place and inserted in the required places. The compiler, having made such a change, will save replacing the necessary code with it.
@mixin table-base ( th ( text-align: center; font-weight: bold; ) td, th ( padding: 2px ) ) #data ( @include table-base; )
#data th ( text-align: center; font-weight: bold; ) #data td, #data th ( padding: 2px; )
Arguments
Additionally, you can change the code in the location of the arguments passed to it. For example, cross-browser compatibility with Hakami can be placed in one row.
@mixin border-radius($radius) ( -webkit-border-radius: $radius; -moz-border-radius: $radius; -ms-border-radius: $radius; border-radius: $radius; ) .box -1 ( @include border-radius(10px); ) .box-2 ( @include border-radius(5px); )
Box-1 ( -webkit-border-radius: 10px; -moz-border-radius: 10px; -ms-border-radius: 10px; border-radius: 10px; ) .box-2 ( -webkit-border-radius: 5px; -moz-border-radius: 5px; -ms-border-radius: 5px;
Inheritance (extend)
Having created a rule once, we can vikorize it in the middle of something else. The inheritance element takes away all the powers of the descendant class, which we can add to others.
Error ( border: 1px #f00; background: #fdd; ) .error.intrusion ( font-size: 1.3em; font-weight: bold; ) .badError ( @extend .error; border-width: 3px; )
Error, .badError ( border: 1px #f00; background: #fdd; ) .error.intrusion, .badError.intrusion ( font-size: 1.3em; font-weight: bold; ) .badError ( border-width: 3px; )
These are simple opportunities to increase the fluidity of the layout and prevent the code from being lost in the code. Every time, for me. It’s good to remember that all SASS documentation is on
Writing CSS is fun in itself, but when a stylesheet gets huge, it becomes difficult to maintain. And in this case, the preprocessor will help us. Sass allows you to use features that are not available in CSS itself, for example, variables, nesting, mixins, inheritance and other nice things that return the convenience of writing CSS.
Once you start using Sass, the preprocessor processes your Sass file and saves it as a simple CSS file that you can use on any site.
The easiest way to get this result is to use the terminal. Once Sass is installed, you can compile your Sass to CSS using the sass command. You just need to tell Sass where to get the Sass file and what CSS file to compile it into. For example, by running the command sass input.scss output.css in the terminal, you are telling Sass to take one Sass file, input.scss , and compile it into output.css .
You can also watch for changes to only specific files or folders using the --watch flag. This flag tells Sass to watch for changes to the specified files and, if any, recompile the CSS after saving the files. If you want to track changes (instead of manually recompiling) your file, for example input.scss, then you just need to add a flag to the command:
sass –watch input.scss output.css
You can also specify folders for tracking changes and where to save compiled CSS files, just specify the paths and separate them with a colon, for example:
Sass --watch app/sass:public/stylesheets
Sass will monitor all files in the app/sass directory and compile the CSS into the public/stylesheets directory.
Variables
Think of variables as a way to store information that you want to use throughout the writing of each project style. You can store colors, font stacks, or any other CSS values you want to use in variables. To create a variable in Sass you need to use the $ symbol. Let's look at an example:
SCSS Syntax
$font-stack : Helvetica , sans-serif ;$primary-color : #333 ;
body ( font : 100% $font-stack ; color : $primary-color ; )Sass Syntax
$font-stack : Helvetica , sans-serif $primary-color : #333 body font : 100% $font-stack color : $primary-colorCSS Output
Nestings
body (font: 100% Helvetica, sans-serif; color: #333; )
When Sass is processed, it takes the values we set in $font-stack and $primary-color and inserts them in the regular CSS file in the places where we specified the variables as values. This makes variables a powerful feature, for example when working with brand colors used throughout a site.
To understand what we mean, here is a typical example of navigation styles on a website:
SCSS Syntax
When writing HTML, you probably noticed that it has a clear nested and visual hierarchy. This is not the case with CSS.$primary-color : #333 ;
Sass will allow you to nest CSS selectors in the same way as in the HTML visual hierarchy.Sass Syntax
But remember that excessive nesting makes your document less readable and understandable, which is considered bad practice.nav ( ul ( margin : 0 ; padding : 0 ; list-style : none ; ) li ( display : inline-block ; ) a ( display : block ; padding : 6px 12px ; text-decoration : none ; ) )
Fragmentation
You can create Sass file snippets that contain small snippets of CSS that can be used in other Sass files. This is a great way to make your CSS modular and also easier to maintain. A fragment is a simple Sass file whose name begins with an underscore, for example, _partial.scss. The underscore in a Sass file name tells the compiler that it is only a snippet and should not be compiled into CSS.
Import
Sass fragments are included using the @import directive.
CSS has an import feature that allows you to split your CSS file into smaller ones and make it easier to @import, which creates another HTTP request in the CSS. Sass takes the idea of importing files via the @import directive, but instead of creating a separate HTTP request, Sass imports the file specified in the directive into the one where it is called, i.e. The output is one CSS file compiled from several fragments.
SCSS Syntax
For example, you have several Sass file snippets - _reset.scss and base.scss . And we want to import _reset.scss into base.scss .$primary-color : #333 ;
// _reset.scss html, body, ul, ol ( margin: 0; padding: 0; ) // base.scss @import "reset" ;Sass Syntax
body (font: 100% Helvetica, sans-serif; background-color: #efefef;)// _reset.sass html , body , ul , ol margin : 0 padding : 0 // base.sass @import reset body font : 100% Helvetica , sans-serif background-color : #efefef
Mixins (mixins)
html , body , ul , ol ( margin : 0 ; padding : 0 ; ) body ( font : 100% Helvetica , sans-serif ; background-color : #efefef ; )
SCSS Syntax
Note that we are using @import "reset"; in the base.scss file. When you import a file, you do not need to specify the .scss extension. Sass is a smart language and it will figure itself out.$primary-color : #333 ;
=transform ($property ) -webkit-transform : $property -ms-transform : $property transform : $property .box +transform (rotate (30deg ))Sass Syntax
.box ( -webkit-transform : rotate (30deg ); -ms-transform : rotate (30deg ); transform : rotate (30deg ); )To create a mixin you use the @mixin directive and give it a name. We"ve named our mixin transform . We"re also using the variable $property inside the parentheses so we can pass in a transform of whatever we want. After you create your mixin, you can then use it as a CSS declaration starting with @include followed by the name of the mixin.
Extension/Inheritance
This is one of the most useful features of Sass. Using the @extend directive, you can inherit sets of CSS properties from one selector to another. This keeps your Sass file clean. In our example, we'll show you how to style error, warning, and success notifications using other Sass features that go hand-in-hand with the extension's template classes. A template class is a special type of class that is only output when you use an extension - this will keep your compiled CSS clean and tidy.
SCSS Syntax
%message-shared ( border : 1px solid #ccc ; padding : 10px ; color : #333 ; ) %equal-heights ( display : flex ; flex-wrap : wrap ; ) .message ( @extend %message-shared ; ) . success ( @extend %message-shared ; border-color : green ; ) .error ( @extend %message-shared ; border-color : red ; ) .warning ( @extend %message-shared ; border-color : yellow ; )$primary-color : #333 ;
/* This CSS will print because %message-shared is extended. */%message-shared border : 1px solid #ccc padding : 10px color : #333 // This CSS won't print because %equal-heights is never extended.%equal-heights display : flex flex-wrap : wrap .message @extend %message-shared .success @extend %message-shared border-color : green .error @extend %message-shared border-color : red .warning @extend %message-shared border-color : yellowSass Syntax
.message , .success , .error , .warning ( border : 1px solid #ccc ; padding : 10px ; color : #333 ; ) .success ( border-color : green ; ) .error ( border-color : red ; ) . warning ( border-color : yellow ; )The above code tells the .message , .success , .error , and .warning classes to behave like %message-shared . This means that wherever %message-shared is called, .message , .success , .error and .warning will also be called. The magic happens in the generated CSS, where each of these classes gets CSS properties, just like %message-shared . This will allow you to avoid writing many classes in HTML elements.
You can extend most simple CSS selectors by adding template classes in Sass, however, using templates is the easiest way to ensure that you don't extend a class wherever it is used in your styles, which could lead to unintended style sets in your CSS .
When you generate your CSS it will look like the example below. Please note that %equal-heights is not included in the CSS as it has never been used.
Mathematical operators
Using math in CSS is very useful. Sass has several standard math operators such as + , - , * , / and % . In our example, we're doing some simple math to calculate the width of aside and article .
SCSS Syntax
.container ( width : 100% ; ) article [ role = "main" ] ( float : left ; width : 600px / 960px * 100% ; ) aside [ role = "complementary" ] ( float : right ; width : 300px / 960px * 100% ; )$primary-color : #333 ;
.container width : 100% article [ role = "main" ] float : left width : 600px / 960px * 100% aside [ role = "complementary" ] float : right width : 300px / 960px * 100%Sass Syntax
.container ( width : 100% ; ) article [ role = "main" ] ( float : left ; width : 62.5% ; ) aside [ role = "complementary" ] ( float : right ; width : 31.25% ; )We created a simple responsive modular grid with a width of 960 pixels. Using mathematical operators, we took the resulting data with pixel values and converted them to percentages without much effort. The compiled CSS looks like this.
Hi all! How quickly time flies. I didn't even notice how I switched from writing styles from regular Css to the Sass preprocessor. But I didn’t understand before - what kind of Sass is, what is it needed for, it’s probably for super advanced pros in layout. Yes, using preprocessors is a step to a new level in web development, but there is nothing scary or complicated here, and you will see for yourself by reading this article to the end.
So, what is good about the preprocessor and Sass specifically? I will say right away that there are others, such as Less, Stylus, etc. They all work according to the same principle, but each has its own characteristics. Sass has gained great popularity among professionals, making learning much easier. It’s just that the more popular the technology, the larger the community and the more extensive the documentation.
Preprocessors are designed to relieve the developer of most routine tasks when writing code, thereby increasing the speed and quality of work. In addition to CSS preprocessors, there are also HTML preprocessors, for example, Pug (Jade).
Article structure
Documentation
The developer of Sass is the Frenchman Hugo Giraudel, who has been living in Germany for some time. Naturally, the documentation is in English, but I personally have a good grasp of it (it’s important to know technical English). But there is also a translation into Russian. I would still recommend the English version, this is in order to get used to it and study English more and more deeply. But the Russian one is no worse either.
- English documentation: http://www.sass-lang.com
- Russian documentation: https://sass-scss.ru
Compiling Sass to Css
For the software to compile Sass to Css, I use the Sass task manager plugin. In general, Sass is an application (Gem) of the Ruby language. Therefore, if you want to do without Gulp, then to compile to Css you will need to install the Ruby programming language platform. I won’t show you how this is done now, you can read about it on the official website.
Syntax - Sass, Scss
Let me immediately note that there are 2 syntaxes for writing code: Sass and Scss.
The syntax of Sass differs slightly from Scss. Scss looks more like regular Css code, and Sass eliminates the curly braces and semicolons between rules. There are also differences in how some functions are written and you have to be careful about which syntax you choose. File extensions for Sass − *.sass, and for Scss - *.scss. Sass syntax is older, and Scss came later to make it easier for beginners to learn. I myself started studying this preprocessor in Scss, it was easier to understand it that way. Now I have switched to Sass, it is more convenient for me.
If we talk about Sass, then its code structure is built on the basis of indentations (after all, there are no curly braces in it) and you should be careful here, since both a tabulator (TAB - 4 spaces) and ordinary spaces (usually it's a double space). I always use a tabulator.
Remember! If you use a tab as an indent, then spaces should be excluded so that everything is the same. And vice versa - if you use spaces, then the tabulator should be excluded. Otherwise, the compiler will throw an error.
Sass
.maincontent .main-title font-size: 30px font-weight: 700 margin: 0 0 30px .description margin-bottom: 30px p color: #444444 font-size: 16px line-height: 22pxScss
.maincontent ( .main-title ( font-size: 30px; font-weight: 700; margin: 0 0 30px; ) .description ( margin-bottom: 30px; p ( color: #444444; font-size: 16px; line -height: 22px; ) ) )Most code editors (for example, Sublime Text) have indentation markings in the form of stripes, which prevents us from getting confused. In the examples below I will use Sass syntax.
Simplifying your life with Sass
Nesting of rules
This is what I liked about Sass from the very beginning, it was precisely the nesting of CSS rules one within another. This saves a lot of time, and the code is structured and easy to read. For example, if we want to write styles for elements of a specific parent container, then in Css we need to specify the parent class each time, for example like this:
Main .title ( font-size: 30px; color: #444; ) .main .subtitle ( font-size: 20px; ) .main .description ( font-size: 14px; margin-bottom: 30px; )
That is, we specify the parent class.main everywhere, and this, in turn, is not entirely convenient. Using Sass, you can write it like this:
Scss
.main ( .title ( font-size: 30px; color: #444; ) .subtitle ( font-size: 20px; ) .description ( font-size: 14px; margin-bottom: 30px; ) )Sass
.main .title font-size: 30px color: #444 .subtitle font-size: 20px .description font-size: 14px margin-bottom: 30pxAgree, it looks much neater, and you can write code faster, because we write the parent class.main only once. If you want to follow me without installing Ruby and any similar software, you can use the online compiler for a demonstration.
Nested properties
In addition to nesting rules in Sass, there is the possibility of nesting properties. For example, here's how to write margin values:
Sass
.main .title margin: top: 10px right: 15px bottom: 10px left: 15pxCss
.main .title ( margin-top: 10px; margin-right: 15px; margin-bottom: 10px; margin-left: 15px; )Selector binding or concatenation - & sign
We can speed up writing our code and make it even more compact by using concatenation (connection) using the symbol - & . How it works? For example, we have classes such as: .main-title, .main-subtitle, .main-description. In Sass, these classes can be written as follows:
Main &-title font-size: 30px color: #444 &-subtitle font-size: 20px &-description font-size: 14px margin-bottom: 30px
Main-title ( font-size: 30px; color: #444; ) .main-subtitle ( font-size: 20px; ) .main-description ( font-size: 14px; margin-bottom: 30px; )
Using a symbol & we connect to the root class, that is, in this case there is no need to constantly repeat root.main . At the same time, keep in mind that we have not created any child elements.
/* Link */ a ( color: red; ) a:hover ( color: blue; ) /* Pseudo-elements */ .main::before ( content: ""; display: block; font-size: 20px; ) .main ::after ( content: ""; display: block; font-size: 30px; )
Sometimes you need to specify a chain of selectors up to the current element. You can, of course, move it to the root, but in order not to break the nesting, you can write it as follows:
Main .container & width: 700px
Container.main (width: 700px)
By moving & after the selector, we changed the docking order, i.e. the class.container in this case is the parent.
Binding to the parent selector, but one level higher
Above, as an example, I demonstrated Sass code:
Main &-title font-size: 30px color: #444 &-subtitle font-size: 20px &-description font-size: 14px margin-bottom: 30px
Now imagine that in the .main-title block there is another element that needs to be explicitly styled using the entire chain of parents. For a long time I simply specified the root name (in this case - .main), but this is not very convenient. I started poking around the Sass documentation and found a solution. In fact, everything is simple - we need to declare a link to the parent and use it where necessary.
This is how I did it before:
Main &-title font-size: 30px color: #444 .main__icon // specify the root.main, otherwise, if you use & it will link to .main-title color: #444 width: 20px &-subtitle font-size: 20px & -description font-size: 14px margin-bottom: 30px
And now you can do this:
Main $self: & // link to the parent &-title font-size: 30px color: #444 #($self)__icon // instead of & use a link to the parent color: #444 width: 20px &-subtitle font-size: 20px &-description font-size: 14px margin-bottom: 30px
If you noticed, we declared a reference to the parent - $self: & . This reminds me a bit of a reference to the object (this) that triggered the event in javaScript. Now, in the right place, we can simply call it #($self) . It turns out how simple it all is, but I was scratching my head and thinking that there was no solution to this problem in Sass.
Main-title ( font-size: 30px; color: #444; ) .main-title .main__icon ( color: #444; width: 20px; ) .main-subtitle ( font-size: 20px; ) .main-description ( font-size: 14px; margin-bottom: 30px)
Templates
It often happens that several elements have the same style base, but differ from each other in only a few rules. Let's take buttons for example. If we take the same size of buttons, then they can differ from each other only in color: red, green, gray, etc. If you use pure Css, you will have to specify all the button colors in the base styles, separated by commas, or create a base class. But in Sass it's much easier:
%button background-color: #666 border: 1px solid #666 padding: 0 20px font-size: 15px line-height: 40px height: 40px .button-green @extend %button background-color: green border-color: green . button-red @extend %button background-color: red border-color: red
Button-green, .button-red ( background-color: #666; border: 1px solid #666; padding: 0 20px; font-size: 15px; line-height: 40px; height: 40px; ) .button-green ( background-color: green; border-color: green; ) .button-red ( background-color: red; border-color: red; )
The template in this case is the %button selector (this is indicated by the - %) sign. This is convenient because the template selector itself is not involved anywhere, and its styles are inherited by other selectors through the directive - @extend. This template can be used as many times as you like, thereby reducing the amount of code.
SassScript
In Sass, as in programming languages, there are such features as: creating variables, arithmetic operations (addition, subtraction, division, multiplication, etc.), iterations (loops), functions (mixins) and much more. That is, Sass is a kind of programming language, which is again designed to simplify writing code and speed up work significantly.
Variables
A variable in Sass starts with a sign $ , and the name is written in Latin, for example: $color . It should be noted that the signs: “ — " And " _ » are interchangeable. For example, if you called $color-red , then you can call $color_red . The variable is defined as follows: $name: value, for example: $color: #f6f6f6 .
A variable declared outside of any nesting levels is available globally, i.e. can be used everywhere. If you define a variable at any nesting level of the selector, then it will be available only at this level. For it to work globally throughout the document, you must specify a keyword !global.
Title $font-size: 10px !global font-size: $font-size .subtitle font-size: $font-size
In general, variables are a wonderful thing; you just need to declare them and enter a value, and then you can use them as much as you want, anywhere. For example, we can define colors by giving them specific names, font size, font family, etc. and any meanings in general.
Directives
@extend
We touched on this directive above when we studied the blank template. Let's consolidate our knowledge again. By using @extend we can copy the rules of any selector. For example, during layout it may be that the element “ A" and the element " B"may be similar in appearance. In this case, you can write rules for element “A”, and for “B” you can simply copy the styles of element “A”, slightly redefining the necessary properties.
Block_a background-color: #cccccc border: 5px solid #999999 padding: 20px font-size: 30px height: 150px width: 150px .block_b @extend .block_a padding: 15px
Block_a, .block_b ( background-color: #cccccc; border: 5px solid #999999; padding: 20px; font-size: 30px; height: 150px; width: 150px; ) .block_b ( padding: 15px; )
In this example, we made 2 identical squares. For square “B” we only redefined the padding: 15px. This is how @extend works. I use this directive quite often.
@import
This directive allows you to combine several style files into one. This is very convenient, especially if the project is large. Not to be confused with the directive that exists in Css - @import. In Css, the required attribute is − url().
In fact, it is more convenient to write styles in different files and each has its own purpose. For example, the entire page framework can be divided into regions: header.sass, sidebar.sass, footer.sass. You can collect everything in the main file main.sass using @import. Region files can also be specified using an underscore at the beginning of the file name, for example: _header.sass, _sidebar.sass, _footer.sass. Such files are called fragments. When importing fragments, it is not necessary to specify the file extension.
Simple import
@import "header.sass" @import "sidebar.sass" @import "footer.sass"
Importing fragments
@import "header" @import "sidebar" @import "footer"
Fragment files can have the following extensions: *.sass, *.scss or *.css. For example, the main file could have the extension *.sass, and the site header, for example, with the extension *.scss. That is, it doesn’t matter what extension your main file has. It should be noted that when importing, all variables and mixins (we'll talk about them below) are transferred to the main file into which the import occurs.
You can also specify the import of several files separated by commas: @import “header”, “sidebar”, “footer”.
Keep in mind that the import occurs in the place where you specified the directive @import. This is usually done at the beginning of the document.
@at-root
Directive @at-root speaks for itself and if translated into Russian, it will sound like this - "from the root". In other words, we move the selector to the root, undoing the chain of parent selectors. Here, of course, you can ask the question: “Why is this directive needed if you can move the selector to the root manually?” The answer is simple - the convenience of writing code without breaking the structure. When you learn to work with Sass to its fullest extent, you will understand this.
Main &-title font-size: 30px color: #444 @at-root .main__icon color: #444 width: 20px
Main-title ( font-size: 30px; color: #444; ) .main__icon ( color: #444; width: 20px; )
Control Directives and Expressions
@if directive
This directive executes styles if the expression enclosed in it returns any value except false And null.
$color: green .header @if $color == green background-color: green @else if $color == blue background-color: blue @else background-color: #f6f6f6
Header ( background-color: green; )
Those who are familiar with at least the basics of a programming language (for example, javaScript or Php) will not find it difficult to understand. The essence here is the same, the main thing is to know the syntax of writing code.
@for directive
In a programming language (again in Javascript or Php) using For you can set a cycle. In Sass, this directive does the same thing - it creates a loop. For each iteration (repetition), a counter variable is used that changes the output data.
The directive has 2 forms of writing: 1. @for $var from<начало>through<конец>and 2. @for $var from<начало>to<конец>. If you want the last digit to be included in the loop, then use " through". Let's look at an example:
@for $i from 1 to 6 .elem-item-#($i) background-image: url("images/image-#($i).jpg")
Elem-item-1 ( background-image: url("images/image-1.jpg"); ) .elem-item-2 ( background-image: url("images/image-2.jpg"); ) . elem-item-3 ( background-image: url("images/image-3.jpg"); ) .elem-item-4 ( background-image: url("images/image-4.jpg"); ) . elem-item-5 ( background-image: url("images/image-5.jpg"); )
To specify the final value I used the keyword " to". In this situation, the cycle ends at the number - 5 . Notice how compact the Sass code looks.
@each directive
Directive @each just like @for, it displays values in a loop and is convenient because, in addition to numbers, you can iterate over specific values. Let's take the above loop and change it to some values.
@each $bgItem in animal, lake, sea, landscape, nature .elem-item-#($bgItem) background-image: url("images/image-#($bgItem).jpg")
Elem-item-animal ( background-image: url("images/image-animal.jpg"); ) .elem-item-lake ( background-image: url("images/image-lake.jpg"); ) . elem-item-sea ( background-image: url("images/image-sea.jpg"); ) .elem-item-landscape ( background-image: url("images/image-landscape.jpg"); ) . elem-item-nature ( background-image: url("images/image-nature.jpg"); )
In this case, a counter variable is not created, and the number of iterations depends on the number of created values after the keyword " in". The values are output through a variable (in this example - $bgItem), the name of which can be arbitrary.
Mixins (functions)
Mixins (mixins) are a kind of function, like in a programming language, which is designed to get rid of repetitive code. Mixins can contain entire styling snippets, which are allowed in Sass. Let's look at an example for greater clarity.
@mixin align-center position: absolute top: 50% left: 50% transform: translate(-50%, -50%) .container @include align-center
A mixin is created with the @mixin directive, followed by a space separated by the name of the mixin, as well as optionally passed parameters. Let me immediately note that the hyphen (-) and underscore (_) signs in the mixin name are interchangeable. A mixin can contain not only rules, but also selectors. Above I gave an example of an elementary mixin without parameters.
The mixin is called with the @include directive and then, separated by a space, we indicate the name of the created mixin. In the example above, this is centering the block along the X axis and the Y axis using absolute positioning. If you have to use this often, then you will agree that it is easier to just call a mixin than to write centering styles over and over again.
Now let's look at a mixin with parameters (arguments).
@mixin border($width, $color) border: width: $width style: solid color: $color .square @include border(2px, #ccc)
Square ( border-width: 2px; border-style: solid; border-color: #ccc; )
As you can see, after the name of the mixin in parentheses we specify the arguments, in this case the border width and color. This is the simplest mixin that I provided for clarity. In practice, you can find more complex mixins using various conditions and variables. But let’s not complicate everything now; we should always start with something small and simple, and then move up as we move up.
This concludes my short review of the Sass preprocessor. Why small? Yes, because this is not all that I told you. In general, using the above, you can safely start using Sass instead of Css now. You can learn more about Sass by referring to the documentation I provided above.
Well, thank you all for your attention! As always, ask questions in the comments and subscribe either to the telegram channel or to the email newsletter (form in the sidebar on the right) so as not to miss anything interesting.
See you in my other posts...
Hello friends!
This is a detailed guide to the preprocessor Sass for beginners. Here we will get acquainted with the Sass preprocessor, its advantages, syntax and consider its use with examples.
Cool
Stammer
You can download all examples and the customized project for this lesson from our website
Sass is one of the most developed and stable CSS preprocessors, as well as one of the most popular preprocessors among professionals.
Benefits of Sass
- Compatible with different CSS versions, thanks to which you can use any CSS libraries in your project;
- A huge number of different functions for any occasion. Few CSS preprocessors can boast such rich functionality;
- Sass is one of the oldest CSS preprocessors, having absorbed a lot of experience over the many years of its existence;
- A great opportunity to use Sass frameworks that make life easier for the developer. One such framework is Bourbon, which we use in some editions of Jedi when writing Sass;
- Syntax. You can choose one of two syntaxes that is closer to you - simplified (SASS) and expanded CSS-like (SCSS).
When I first got acquainted with CSS preprocessors, I, like many other novice web developers, did not fully understand the idea of using CSS preprocessors. Why make an additional layer, use some tools, complicate the CSS, I thought. But over time, I began to understand that day after day writing CSS became torture, a gray routine; many actions had to be repeated, selectors, properties, and even entire blocks of CSS code had to be copied to achieve the desired result. Today, using examples, I will show you how you can simplify your work using the Sass preprocessor, diversify your development, and even have a little fun writing some more or less complex functions.
Setting up the environment
As an environment for working with Sass in this lesson, as in our other lessons, we will use the Sass version for the Gulp task manager ( gulp-sass). To use the original Ruby version or compile Sass using special software, you can read the instructions at the office. website. This lesson is primarily of a practical nature, so we will not dwell on possible options for connecting to the project; we will connect Sass in the most popular way, using Gulp.
Make sure you have the latest version of Node.js and Gulp installed. If Node.js is not installed, download it and install it. After installing Node.js, install gulp with the command "npm i -g gulp"(Windows) or "sudo npm i -g gulp"(Linux, OS X). Read: .
Npm i --save-dev gulp gulp-sass
Var gulp = require("gulp"), // Connect Gulp sass = require("gulp-sass"); // Connect the Sass package gulp.task("sass", function() ( // Create a task "sass" return gulp.src(["sass/**/*.sass", "sass/**/*.scss "]) // Take the source.pipe(sass((outputStyle: "expanded")).on("error", sass.logError)) // Convert Sass to CSS using gulp-sass .pipe(gulp.dest(" css")) // Upload the result to the css folder)); gulp.task("watch", function() ( gulp.watch(["sass/**/*.sass", "sass/**/*.scss"], ["sass"]); // Watch behind sass files in the sass folder)); gulp.task("default", ["watch"]);
Pay attention to line 6 - here we use one of the output styles to the resulting file: nested- nested, by default; expanded- expanded; compact- compact, when the selector and its properties in curly braces are displayed on one line; compressed- compressed. In addition, thanks to the processing .on("error", sass.logError) If an error occurs, we won't have to reload the Gulpfile execution command and we will see which line of the Sass file we have an error on. In the examples I will use the output style expanded for clarity.
You should have the following project structure on your file system:
-
myproject/
-
css/
- common.css
-
sass/
- common.sass
- node_modules/
- gulpfile.js
- package.json
-
css/
We start execution of Gulpfile with the command gulp in the project folder terminal.
Here we take all Sass files from the directory sass/ your project and upload the finished CSS result to a folder css/. In addition, here we establish an observation watch for changes in Sass files and automatic compilation into CSS, if such changes take place. The resulting css file is included in the layout.
If you are confused about setting up Gulp packages in this example, read the Gulp manual.
After our environment is configured and Sass is successfully converted to CSS when saving *.sass files in the directory sass/, you can safely continue learning and carry out the examples that we will analyze today in practice.
Sass Syntax
There are 2 variants of writing Sass, 2 syntaxes: SASS and SCSS. The oldest spelling of Sass is indentation syntax. This is the spelling we will use in our lesson. The file extension for this syntax is *.sass. The second option is the syntax, extending CSS syntax, Sassy CSS. SCSS is written like regular CSS, but enhanced with the additional features of Sass. File extension with SCSS syntax - *.scss.
Very important! The indentation syntax requires very strict adherence to the indentation of nested properties, and if you experience errors when running Gulp or implicit errors without specifying a line in the console, most likely the error is in incorrect indentations. Another important detail - if you use tabs as indents, the compiler will throw an error when you try to convert Sass, which, in addition to tabs, also uses spaces as indents. Either you use only tabs or only spaces.
SASS and SCSS syntax:
| SASS - Indentation Syntax | SCSS - extension syntax |
| $font-stack: Helvetica, sans-serif $primary-color: #333 body font: 100% $font-stack color: $primary-color | $font-stack: Helvetica, sans-serif; $primary-color: #333; body ( font: 100% $font-stack; color: $primary-color; ) |
In addition to the basic writing rules (curly braces, semicolons at the end of lines), SASS and SCSS also differ in the writing of some functions. So be careful when using any examples from the Internet, check exactly what syntax is used. If a fairly large example from the Internet is made in SCSS style, and your project is written in SASS, you can import it into your main file without changing the syntax and file extension using the directive @import, for example, if you downloaded a file carousel.scss, then you can connect it to your main.sass line @import "carousel". You can also do the opposite situation, when you need to import *.sass files into the main.scss file. In our example from Github, we import everything _x.x.sass files into one common.sass, where x.x is the title number of the example from this article.
We will use the indentation syntax.
1. Extending CSS with Sass
1.1 Investment rules
Sass gives developers a great opportunity to nest CSS rules within others, thereby reducing the time spent writing/copying long selectors and making the code more structured, with a clear hierarchy.
1.2 Binding to a parent selector
If you want to extend the selector without creating a new rule, you can bind additional selectors to the finished selector using the sign & . On the surface this looks like creating a child selector in the hierarchy, but using & , we are extending the parent selector rather than creating a child one.
Pay attention to the rule body.firefox &, which allows us to get a new chain from any element before the current one if set at the end & .
Additionally, parent binding can be used to create compound selectors:
1.3 Nested properties
For convenience, you can break the property namespace suffix into attachments. For example, margin-top, margin-bottom margin-left, margin-right have a common basis margin and can be broken down into attachments as follows:
1.4 Wildcard selectors
Sometimes a situation arises when several elements on a page use the same CSS base, the same set of properties, specific only to them. These basic CSS rules can be packaged as a wildcard selector for use in multiple places in Sass. Wildcard selectors are inferred using a directive @extend.
2. SassScript
SassScript allows you to significantly expand the capabilities of Sass through the use of custom variables, arithmetic and other functions. SassScript can be used to automatically generate new selectors and properties.
2.1 Variables in Sass
It's a really cool feature to be able to define variables that can be used anywhere in your Sass file. Colors, default values, units, all this can be taken into a variable and used in the future. The variable is defined like this: $name: value.
2.2 Operations with numbers and strings + interpolation
Sass gives you the ability to use standard arithmetic operations on numbers, such as addition (+), subtraction (-), division (/), and modulo (%). Comparison operators (<, >, <=, >=, ==, !=) are also supported for numbers.
In addition, Sass has the ability to concatenate (join) strings.
As we can see from the example $summ: 10 + 20 / 2, priority is observed in performing arithmetic operations - first division, then addition. To define the order of operations, you can use parentheses, as in mathematics. Please note that when adding 12px + 8px, we will get 20px.
Also pay attention to lines 2 and 9, here we use interpolation to place dynamic values anywhere in the Sass file, including in the place where we have the name of the property, the name of the selector, or on any line.
Interpolation- this is obtaining a new value using others.
The most common use of interpolation in Sass is to obtain a new value for a variable by “integrating” it into the value of another variable, through the construct #{} , For example:
You can't just insert a variable into a string without using interpolation, like you can do in PHP with double quotes. Be sure to use interpolation into variables.
2.3 Operations with flowers
Colors in Sass can be added, subtracted, divided, and multiplied. All arithmetic operations are performed for each color separately: red, green and blue.

Please note that when adding rgba colors, the last 0.75 opacity parameter must not be different from the others in the expression, otherwise the addition will fail. Instead, you can adjust the rgba alpha channel using opacify And transparentize or control the opacity of a HEX color using the rgba function.
3. Directives and rules
3.1 @import
You can import into your Sass file sass, scss And css files using directive @import, while all mixins and variables will work in the main file into which the import occurs.
@import will work like regular CSS @import if:
- present in the path to the file http://;
- the file is called via url();
- or the import contains media parameters.
In order for another file to be fully imported into the main Sass file, the file extension must be *.sass, *.scss or *.css.
Let's look at some examples.
The following files are imported will not:
The following files will imported:
Attention! In new versions gulp-sass to import CSS files into Sass you need to specify the .css extension
It is possible to import multiple files, separated by commas: @import "header", "media".
Files that begin with an underscore are called fragments and do not require underscores or extensions to be specified when importing. For example, file _header.sass can be imported like this: @import "header".
Please note that the import occurs at the location where you specify the directive @import. Accordingly, it is possible to do nested imports in the place where it is necessary:#main @import "example"
3.2 @at-root
Directive @at-root lifts the rules contained in it to the root, canceling the chain from the parent. Everything is simple here:
We did not look at all the directives that are in Sass, but only the most used in practice. If you're interested in diving deeper into Sass directives, check out the documentation.
4. Expressions
Sass supports the use of expressions and functions for various conditions, loop implementations, etc.
4.1 @if() Directive
Directive @if() allows SassScript to be executed under certain conditions and has the following syntax:
4.2 @for Directive
@for displays a block with styles a certain number of times. You can set a counter variable at runtime.
You can specify through instead of to, if you need to go from 1 to 11 inclusive, and not just up to 10, as in the example.
4.3 @each Directive
If you want to iterate through a list of values rather than just numbers, you can use the directive @each:
4.4 @while directive
@while loops through style blocks while the expression is true.
5. Mixins
Hagfish- Sass code blocks (or template mixins), which can take arguments (optional) and can significantly expand the possibilities of writing styles and reduce the time spent on applying similar rules and even entire CSS blocks. It's something like a function that can take an argument, do a huge amount of work, and produce a result depending on the input parameter.
A mixin is declared by a directive @mixin, after the announcement it must be indicated Name Hagfish. Called by a mixin directive @include, which takes the name of the mixin and the passed arguments, if any.
Friends, we have looked at the main features of Sass, which are enough for fruitful work with CSS website styles. Some directives and features are not included in this guide, but if you are interested in learning about all the features of Sass, it will be useful.
I’ll answer the question right away - how to work with Sass styles on a finished website, is it really necessary to edit the finished CSS and upload it via FTP? No, you can't do that. You should have a local copy of your Sass styles or even the entire site and, after finishing work, deploy (upload) the finished styles via FTP. For this, you can use the Gulp package vinyl-ftp. Or set up a Sass environment on your server to compile files uploaded via FTP/sFTP.