Set up a VPN connection. How to set up your VPN
Good afternoon everyone! Today we will talk about how to set up a VPN (Virtual Private Network) in Windows XP, Windows Vista or Windows 7 and Lynix.
VPN stands for Virtual Private Network, which means “Virtual Private Network”. A VPN is created on top of an existing network, such as a regular local area network or the Internet, and can connect computers in different parts of the world into one logical network. Moreover, all data transmitted over such a network is usually encrypted to protect against unauthorized eavesdropping and interception. Thus, traffic encryption is one of the main advantages of using virtual private network technology. If computers are physically connected to each other by cable or radio waves (wi-fi), then their logical connection via VPN is only possible using special equipment called a VPN server. It could simply be a computer with special software. The VPN server manages the connection of other (regular) computers to the virtual network.
On a computer connecting to a virtual private network, a special VPN connection is configured, the configuration of which specifies the name of the VPN server and other parameters necessary for a successful connection. In each specific case, these parameters may vary, but the sequence of actions when creating a VPN connection is the same. We will look at it using the Windows Vista and Windows XP operating systems as an example.
Setting up a VPN connection in Windows XP
This section describes how to set up a VPN in Windows XP.
New Connection Wizard
Press the button "Start" in the lower left corner of the desktop, in the main menu of the system that appears, select the item "Control Panel", if your control panel looks like “XP Style” and you cannot find the icon "Network connections", go to the classic panel view by selecting the appropriate item on the left side of the window:
or select "Network connections" directly from the main menu "Start":

If you are seeing a Classic View window, look for the icon "Network connections" and open it, in the window that opens, find and run "New Connection Wizard":

In the first window, just click the button "Further":

In the second, select “Connect to the network at your workplace” and press the button "Further":

In the third select "Connect to a virtual private network" and press the button "Further":

In the fourth, in the free field, enter the name for your connection, for example, "Internet VPN" and press the button "Further":

On some computers where there are other connections, between step 4 and step 5 an additional window appears asking you to dial a number to connect. In this case, you need to stop dialing the number and go to step 5.
In the fifth window, enter the IP address of the default access gateway nas.iksnet(or nas3.iksnet for some subscribers) and click the “Next” button (note that there should not be any spaces or other invisible characters before or after the server name):

In the sixth, for ease of use, check the box “Add connection shortcut to desktop” and press the button "Ready":

Connection properties
After this, the connection window will immediately open; at the bottom of the window, find the button "Properties" and click on it:

Or click the button "Cancel" and having selected the connection, right-click on it and select "Properties":

In the window that opens, select the tab "Options", uncheck the item "Enable login domain in Windows":

In the "Security" tab, remove tick the item "Data encryption required" and click on the “OK” button:

On the tab "Options" you can check the box next to it “Call back when disconnected”, then, in the event of an unexpected break, the connection will be restored on its own:


Let's connect:

Now in the field "User" You must enter your contract number ( for those subscribers who have a three-digit contract number, add “0” in front! For example, an agreement 111 typed as 0111 .), and in the field "Password", your access password to view statistics and mail from the contract. Please note that there should not be any extra spaces after the contract number in the “User” field.

After a successful connection, for ease of use, on the tab "Options" you can uncheck the box “Request name, password, certificate, etc.”, after this you will no longer be prompted for your username and password.
Saving your password
Attention: It is not recommended to save a password in the system, because the saved login and password can be stolen by spyware or your computer can be used to access the Internet in your absence.
Please note that access to the Internet is controlled by name and password, so take this moment more seriously. Do not disclose this data to strangers. If your password is too simple and short, in order to increase security, we suggest changing it. You can do this yourself, from your workplace, using the client part of the new calculation system, available at the link: Statistics. There you can change the password separately for entering the statistics page and separately for accessing the Internet. We hope that you can still find a lot of new, interesting and useful things there!
Note
When the VPN connection is disabled, you can still freely use local network resources as before; a VPN connection is only needed to access the external network. If you have turned it off, be sure to turn it on to create a VPN connection. "LAN connection" otherwise the VPN connection will not be established.
Errors
Most often the system produces the following errors:

Error 619 or 734
- Occurs if you forgot to uncheck the “Required data encryption"In the connection properties, the "Security" tab.
Error 629
This error occurs if your login and password are already connected (remember if you didn’t let someone you know use your Internet), if not, then this connection is not broken on the server. To do this, wait 10 minutes, and try to connect again after this time... If nothing helps on the 3rd attempt, then I advise you to contact support.
Error 650
"The remote access server is not responding":
- The Internet access server is unavailable. Check whether “Local Area Connection” is enabled, whether the network card is working, whether the network cable is working, and whether a specific IP address is set in the IP connection settings.
Error 651 or 800
Your modem (or other device) reported an error" or "There is no connection with the VPN connection server"
- These errors may occur if you deleted or disabled the previous “Local Area Connection” connection.
- Or if you specified in step 5 wrong address. Check it, make sure the numbers are separated by periods and not commas.
- Firewall blocks outgoing requests for VPN connections.
- For some reason the request does not reach the server, i.e. Perhaps the gateway of your segment does not allow the request due to load or failure.
- The server sends a response stating that it is impossible to connect because... There are currently a large number of simultaneous connection attempts.
Possible fixes
- Check whether the local network is working at this point in time.
- Check the passage of the signal using the ping command to your gateway, and then to your authorization server.
- Correct a pair of keys in the registry or reinstall Windows
Error 678
"No response received"
- If it doesn’t help, try re-creating the VPN connection again (pay attention to the connection type, it should be PPTP, not PPPoE or L2TP).
- This error can also occur when negative balance your personal account.
Error 679
- This error occurs when the network adapter is disabled. You need to enable the network adapter by going to “START->Control Panel->System->Device Manager->Hardware”.
Error 691 or 718
"Wrong login or password"
- Check whether the login (contract number) is entered correctly. It must be 4 digits (three-digit contract numbers must be padded with a leading zero). Try typing your username and password again. When typing, make sure that the correct keyboard layout (typing language) is enabled and the Caps Lock indicator is on.
- Or if at the moment
- If the operating system does not prompt you to enter a username and password when connecting, then you need to do the following: Open the “Control Panel”, select “Network Connections”, right-click on your VPN connection and select “Properties” from the menu. The properties of the VPN connection will open. Now you need to go to the “Settings” tab and check the box next to “Request name, password, certificate, etc.” After this, confirm the changes by clicking the “OK” button. The next time you connect, you will be prompted for your username and password.
Error 711
This error occurs if a required service is not running on the computer. In this case, it is impossible to connect to the network, and in some cases, it is impossible to install network adapters. This issue may occur if some or all of the following services are not running.
- Plug and Play device support
- Automatic Remote Access Connection Manager
- Remote Access Connection Manager
- Telephony
To resolve this error, follow these steps for each of the services listed above.
- Open Administrative Tools by clicking Start, Control Panel, System and Maintenance, and Administrative Tools. Administrator permission is required Enter your administrator password or confirm your password if prompted.
- Double-click Services. Administrator permission required Enter your administrator password or confirm your password if prompted.
- Right-click one of the services above and then click Properties.
- On the General tab, in Startup Type, select Manual.
- Click Apply and then click Run.
Error 720
"Cannot connect to the remote computer."
This error occurs when the network protocol stack in Windows is damaged. You can check the integrity of the stack using the netdiag utility.
- Enter the command
- Netdiag will display test results for a number of network components, including Winsock. For more information about this check, run the netdiag command as follows:
- If Netdiag reports an error, you must restore the Winsock2 registry key.
- The easiest and fastest solution:
- After this, we restart the computer and set up a local network connection, since executing this command leads to overwriting the registry settings that are used by the TCP/IP protocol stack, which is equivalent to deleting it and reinstalling it. If necessary, recreate the VPN connection.
- If this does not help, then you can completely reinstall the TCP/IP stack like this:
- Delete the registry key with REG DELETE HKEY_LOCAL_MACHINE\System\CurrentControlSet\Services\Winsock
- Delete the registry key with REG DELETE HKEY_LOCAL_MACHINE\System\CurrentControlSet\Services\Winsock2
- Restart your computer
- Open the %winroot%\inf folder
- In it, find the file nettcpip.inf, make a backup copy of it and then open it in a text editor (for example Notepad).
- Find the lines in it:
- Correct them to:
- Save changes to nettcpip.inf file
- Open Network Connections and right-click on the property of the network connection we need, select Install->Protocol->Add. Next, select “have disk” and specify the path %winroot%\inf (usually this folder is hidden!)
- Select TCP/IP from the list. After this, you will again be taken to the network connection properties window, but for TCP/IP the Uninstall button will now be active.
- Select the TCP/IP protocol from the This connection uses the following items list and click the Uninstall button.
- Restart your computer
- Install the TCP/IP protocol similar to steps 2-5.
- If all of the above does not work, then look at the instructions at
Error 733
- Occurs if you forgot to uncheck all protocols except Internet Protocol And QoS.
Error 734
- Most likely you have a virus WIN32.Sality.
Error 735
- "The requested address was rejected by the server": Occurs if you entered IP address in "TCP/IP Properties"(it should be obtained automatically).
Errors 741 - 743
"Encryption settings are incorrectly configured"
- Go to the VPN connection settings, and in the “Security” tab, disable the “data encryption” item.
Error 764
"Smart card readers are not installed"
- This error occurs if you have configured your VPN connection incorrectly. Try removing it and setting it up again using these instructions.
Error 769
"The specified destination is unreachable"
- The error occurs due to a disabled local network connection or a missing physical link. It is recommended to check the status of the LAN (must be turned on) and the physical connection to the network (network cable must be connected).
- Sometimes it occurs if the router for some reason did not provide the correct IP address via DHCP
Error 781
"The encoding attempt failed because no valid certificate was found."
- Causes: The VPN client is trying to use the L2TP/IPSec protocol to connect.
- Tip: Go to VPN connection settings-Properties->Network->VPN Type and select PPTP VPN
Error 789
"Invalid VPN connection type selected"
- Go to the VPN connection settings and on the “Network” tab, from the “VPN Type” list, select “Automatic” or “PPTP”. Try connecting again.
- This error also occurs if you made a mistake when entering the IP address and enter commas instead of periods to separate octets.
Error 807
If you are using the “Automatic” VPN connection type, then try changing it to “PPTP”. In the properties of the network card you need to set Receive-Side Scaling State - disable and Receive Window Auto-Tuning Level - disable. It is also possible that the connection to the access server is blocked by a firewall. You can also recreate the VPN connection according to the instructions; if the problem is not solved, remove the KB958869 system update, or restore the system to an earlier state.
Error 809
Occurs when:
1 Using the L2TP VPN connection type in Windows Vista and Windows 7 due to the connection being blocked by the Windows firewall. Solution: Change the VPN connection type to PPPtP. Enable the firewall rule "Routing and Remote Access (PPPtP)"
2 Blocked by your installed firewall or antivirus with firewall function Solution: Correctly configure your firewall.
Error 1717
"Unknown interface"
- Try restarting your computer
- If it doesn’t help, then run it from the command line (check the integrity of system files)
Setting up a VPN connection in Windows Vista/7
New Connection Wizard
Similar to setting up a VPN connection in Windows XP, run “Set up a connection or network” and select “VPN connection”:

Select creating a new connection and type PPTP, then press the button Further:
If you have not yet created a single VPN connection, then in the window that appears you need to select “Use my Internet connection (VPN)”

If connections have already been created in the system, then in the window that appears, select “No, create a new connection”

Fill in the field for the server address and check the box Don't connect now and press the button Further:

Enter in the field Username contract number, and in the field Password— password for the VPN connection (specified in Appendix No. 2 to the agreement as Password for viewing statistics, mail and VPN connection) and press the button Create:

VPN connection properties
After that, select “VPN connection properties” and correct in the marked places:

If you uncheck the “Request name, password, certificate, etc.” then when connecting, the computer will not display the connection window and request a login and password. If Windows forgets the login and password (and this happens), the connection will not be established. Error 691 will be displayed. In this case, the user will not be prompted to re-enter the login and password. What to do in this case.


The connection shortcut on the desktop in Windows Vista and 7 can be made as follows: Open the “Network and Sharing Center”, in the left column click the link “Change adapter settings”, in the window that opens you need to find your “VPN connection” (the name may be different, depending on how you specified the “Destination Name” during the setup process). Right-click on the connection and select “create shortcut”. By default, you will be asked to locate this shortcut on the desktop. Click “Yes”.
Errors
Error 609
This method of solving the problem does not always work.
- Launch Command Prompt (CMD) with Administrator rights
- Enter the following commands (removing miniport drivers):
- Now the next two (installing miniport drivers):
Error 619
"Port disabled"
Possible causes and solutions:
- Operating system problems. In this case, we recommend contacting specialists.
- The firewall is enabled. In this case, we recommend turning off the firewall.
Error 651
“Your modem (or other device) reported an error.”
Possible causes and solutions (in order of execution):
- Operating system crash. In this case, we recommend restarting your computer.
- The network card drivers are broken. We recommend reinstalling the drivers and reconfiguring the network.
- Problems with the OS. We recommend reinstalling the operating system.
- The network card is faulty. We recommend replacing the network card.
Error 678
"No response"
Often occurs when the MAC-IP binding is broken. In this case, the VPN servers and gateway are not pinged. In this case, it is recommended to call us and reset the MAC-IP binding.
The error may appear if you try to connect to a server that does not support the PPTP VPN protocol. We recommend reconfiguring the VPN connection using the auto-configurator or checking the settings manually.
Error 691 (Vista/7)
"Access is denied because this username and password are not allowed on this domain."
Appears in the following cases:
- Invalid login/password entered. Completely clear the login/password entry window and enter them again. The login must be 4-digit (three-digit contract numbers must be padded with a leading zero). When typing, make sure that the correct keyboard layout (typing language) is enabled and the Caps Lock indicator is on.
- The VPN session ended incorrectly (connection failure, abnormal computer shutdown). In this case, you need to wait a few minutes.
- Or if at the moment a connection has already been created with your username and password. (If you have more than one computer connected).
- Quite often it happens that Windows “forgets” the entered login and password and then they must be entered again, having first been erased from the input fields.
- If the operating system does not prompt you to enter a user name and password when connecting, then you must perform the following steps: Open the “Control Panel”, select “Network and Sharing Center”, in the left column click on the link “Change adapter settings”, right-click Click on your VPN connection and select “Properties” from the menu. The properties of the VPN connection will open. Now you need to go to the “Settings” tab and check the box next to “Request name, password, certificate, etc.” After this, confirm the changes by clicking the “OK” button. The next time you connect, you will be prompted for your username and password.
Error 711
run in the command line with Administrator rights:
Secedit /configure /cfg %windir%\inf\defltbase.inf /db defltbase.sdb /verbose
in order to launch the command line with administrator rights, you need to click the start menu, then in the run tab, type cmd in the English keyboard, an icon with the inscription cmd will appear in the menu, right-click on it and select “Run with administrator rights”
Error 814
"Base Ethernet connection not found"
- The error is caused by the network adapter used for this connection being unavailable.
Error 868
"DNS name not resolved"
- This error only occurs in Windows 7. The essence of the problem is that in some “builds” of this Windows the DNS client is unstable.
- Solution:
- Check that the DNS server addresses in the local network connection are obtained automatically (at the moment 10.0.1.5 and 192.168.2.1 should be issued)
- Disable the IPv6 protocol (or better yet, everything except IPv4) in the local network connection properties
- Set the access server address instead nas.iksnet in the form of an IP address (10.0.1.11 or 10.0.1.13 at the moment, but it’s better to check with the command
- In some cases, resetting directories helps: enter the commands in the command line
Setting up a VPN on Linux
Debian
First install the required package:
$ apt-get install pptp-linux
Then edit the file describing the network interfaces. Here's an example:
$ cat /etc/network/interfaces auto lo iface lo inet loopback auto eth0 ppp9 iface eth0 inet dhcp iface ppp9 inet ppp provider iksnet pre-up ip link set eth0 up
Then edit the file describing your VPN connection. It should be something like this:
$ cat /etc/ppp/peers/iksnet unit 9 lock noauth nobsdcomp nodeflate #mtu 1300 persist maxfail 3 lcp-echo-interval 60 lcp-echo-failure 4 pty "pptp nas.iksnet --nolaunchpppd --loglevel 0" name
After that, enter your credentials
$ cat /etc/ppp/chap-secrets And after that you can manually connect the VPN: $ifupppp9 And turn it off: $ifdownppp9 The connection can be checked using the command: $ ifconfig ppp9 ppp9 Link encap:Point-to-Point Protocol inet addr:89.113.252.65 P-t-P:10.0.1.11 Mask:255.255.255.255 UP POINTOPOINT RUNNING NOARP MULTICAST MTU:1450 Metric:1 RX packets:40 errors:0 dropped:0 overruns:0 frame:0 TX packets:418 errors:0 dropped:0 overruns:0 carrier:0 collisions:0 txqueuelen:3 RX bytes:7750 (7.5 KiB) TX bytes:1189 (1.1 KiB) Original article http://www.iksnet.ru/wiki/index.php/%D0%9D%D0%B0%D1%81%D1%82%D1%80%D0%BE%D0%B9%D0%BA %D0%B0_%D0%BF%D0%BE%D0%B4%D0%BA%D0%BB%D1%8E%D1%87%D0%B5%D0%BD%D0%B8%D1%8F_%D0 %BF%D0%BE_VPN This instruction demonstrates how to connect to the VPN Gate relay server using the L2TP/IPsec VPN client built into the Android mobile operating system. 2. Starting a VPN connection 3. Internet without restrictions ip8.com This instruction demonstrates how to connect to the VPN Gate relay server on iPhone/iPad using the L2TP/IPsec VPN client built into iOS. 1. Pre-configuration For the L2TP/IPsec Windows, Mac, iPhone, Android No client required column, the list of servers must have a checkmark that indicates support for the custom L2TP/IPsec protocol. 2. Starting a VPN connection 3. Internet without restrictions Once the connection is established, all network traffic will go through the VPN server. You can also go to ip8.com to view your global IP address. You will be able to see your web-visible location, which will be different from your actual location. When connected to a VPN, you will be able to visit blocked websites and use blocked applications. Today, Internet users increasingly use the term VPN. Some recommend using it more often, while others recommend avoiding it. Let's take a closer look at what is hidden behind this term. VPN(Virtual Private Network) is technology, which provides communication closed from external access in the presence of a high connection speed. This connection is carried out according to the principle “ dot - dot" In science, this connection method is called tunnel. You can join the tunnel at PC with any OS, wherein VPN client installed. This program “forwards” a virtual port using TCP/IP to another network. To implement such a connection, you need a platform that quickly scales and ensures data integrity and confidentiality. In order for the PC to IP address 192.168.1.1-100 connected via a gateway to an external network, you need to set the connection rules on the router. When a VPN connection is made, the message header contains the address of the remote PC. The message is encrypted by the sender and decrypted by the recipient using a shared key. After this, a secure connection is established between the two networks. A brief diagram of the protocol's operation was previously described. Now we’ll find out how to connect a client on a specific device. Before you set up VPN connection to Windows 7 PC, should specify IP address or server name. To do this in " Network Sharing Center" on " Control panels" need to " Create a new connection». Select item "" - " (VPN)». At the next stage you should specify Name And server address. You need to wait for the connection to complete. Let's check the VPN connection. To do this in " Control Panel" In chapter " Network connections» Call the context menu by double-clicking on the shortcut. On the " Details" need to check IPv4 address. It must be within the IP range specified in the VPN settings. Now let's look at how to create a VPN connection and configure it on gadgets running Android OS. For this you need: To set up a VPN connection, you need to select “” in your phone settings and create a new one. An icon with a new connection will appear on the screen. The system requires a login and password. You need to enter the parameters and select the "" option. Then at the next session you will not have to confirm these data again. Once the VPN connection is activated, a characteristic icon will appear on the toolbar. If you click on the icon, the connection details will appear. Let's take a closer look at how to automatically configure VPN on computers with Windows 10 OS. Go to PC settings. In chapter " Options"go to the subsection "". ... and add a new VPN connection. On the next page you should specify the VPN connection parameters: Once the connection is established, you need to connect to it. All providers record the activities of their clients. If a request is received from law enforcement agencies, they will provide complete information about which sites the offender visited. Thus, the provider relieves itself of all legal liability. But sometimes situations arise in which the user needs to protect his data: You can, of course, clear your browser history every time you visit a site. But it’s easier to create and configure a VPN server. To do this, call the command line ( Win+R), and then enter your query ncpa.cpl and press Enter. In a new window click Alt and select "". Next, you need to create a user and give him limited rights only to the VPN. You will also have to come up with a new long password. Select a user from the list. At the next stage you need to select the connection option " Through the Internet». Once a new connection has been created, all you need to do is open your browser and load any page. Beginners can skip creating a connection and immediately download a VPN client from the Internet or install a special browser extension. After downloading the program, you need to launch it and click the “ Connect" The client will join another network and the user will be able to view sites prohibited in his region. The disadvantage of this method is that the IP is issued automatically. The user cannot select a country. But the connection is set up very quickly, by pressing just one button. The option of adding an extension also has disadvantages. Firstly, the user must be registered on the official website of the program, and secondly, the extension often crashes. But the user can choose the country through which the connection to the external network will be made. The connection process itself also does not raise any questions. Just press the button " Start" and the browser will reboot on the new network. Let's look at how to install the extension using an example ZenMate VPN. Download the program from the official website. After installation, the following icon will appear in the browser: Click on the icon. The extension window will appear: If you move the mouse cursor to icon with the Russian flag, then the screen will display current IP. If you move the cursor over the icon with the Romanian flag, the IP of the selected server will appear. If desired, you can change the connection country. To do this, click on the globe and select one of the automatic addresses. The disadvantage of the free version of the program is the small number of available servers and the imposition of advertising. Various antivirus programs and firewalls may block the connection. In this case, an error code is displayed on the screen. Let's look at the most popular problems and ways to solve them.
In the modern world, cybernetic space has become much more popular than the real world. Young people are more likely to spend time playing online games and social networks than going for a walk or reading a book. And this is understandable - the availability of information increases awareness and overall human development. However, for some reasons, information and social resources may be blocked by providers, government agencies, or the sites themselves. In this case, do not despair, since in most cases the blocking can be bypassed. VPN (English: Virtual Private Network) is a generalized name for technologies that allow one or more network connections (logical network) to be provided over another network (for example, the Internet). Despite the fact that communications are carried out over networks with a lower or unknown level of trust (for example, over public networks), the level of trust in the constructed logical network does not depend on the level of trust in the underlying networks due to the use of cryptography tools (encryption, authentication, public key infrastructure, means to protect against repetitions and changes of messages transmitted over the logical network). Wikipedia https://ru.wikipedia.org/wiki/VPN To explain it in simple and understandable words, VPN is the ability to access Internet resources through other networks. In this case, several levels of channel changing are used, which means that your IP address is encrypted, and access is provided according to the following scheme: Internet - virtual network (or several virtual networks) - Internet. When using a VPN, providers “see” the connection to a certain network or server, and further requests to resources occur through an encrypted channel. Thus, data packets are returned to you regardless of blocking by the Internet provider. When connecting to the Internet via a virtual network, the provider does not monitor traffic There are several options for setting up a VPN for Windows 10. Conventionally, they can be divided into: Creating a virtual network through Windows Settings is the most time-consuming, but at the same time the most reliable way to gain access to blocked resources. In addition, once the VPN is created, it is quite easy to manage it and, if necessary, change the server address: Open VPN servers can be found on the Internet, for example, or on a similar resource. If you no longer need a VPN or you don’t like the services provided, the created connection can be disabled or deleted: Like most Windows features, creating a VPN connection has been adopted by software developers. As a result, users got a whole market with programs that simplify creating a tunnel and connecting to virtual networks. Most of them are a small window with just one button - connect/disconnect from VPN. One such program is HideGuard VPN. Using her example, it is very easy to see how a connection to a virtual network occurs: Unfortunately, not all routers support VPN connections. To do this, the router must have DD-WRT technology, but devices that are less than four years old almost certainly have the necessary firmware. The settings of routers vary, but in general, virtual network management is located in the same tabs: Instead of setting up a virtual connection for your entire computer, you can resort to partial VPN use in your browser. There are two possibilities for this: “Turbo” modes in some situations can also be considered virtual networks, but they only work when your browser has a low access speed to a certain address; in other cases, the function is ignored. To enable VPN in the Opera browser, you need to slightly change your browser settings. To do this, press the key combination Alt+P, select “Advanced” in the menu, then “Security” and slightly scroll down the page with settings. We find the VPN column and switch the toggle switch to the working position. In other browsers, you can install additional extensions that will add VPN functionality to your browser: I prefer to use a browser-based VPN, and there are several reasons for this. Firstly, for most extensions you can set exceptions in the operation of the virtual network, and this provides huge advantages, for example, applying the service to only one or two sites. For the rest of the Internet, the original connection will be used. Secondly, when downloading files through applications and exchangers, the traffic will not exceed the volume of information received, since packets are often “lost” when passing dozens of nodes in the virtual network. And besides, I always value connection speed, and a virtual network, even a paid and fastest one, will slow down data transfer, which is unacceptable in some cases. Using a VPN on a Windows 10 computer is very easy. Using standard tools, you can create and configure a virtual connection. If necessary, it can be quickly removed or temporarily disabled. Recently, methods of accessing the Internet through VPN networks have become increasingly popular. This allows you to maintain maximum confidentiality, as well as visit web resources blocked for various reasons by providers. Let's see what methods you can use to set up a VPN on a computer running Windows 7. Setting up a VPN in Windows 7, like most other tasks in this OS, is carried out using two groups of methods: by using third-party applications and using only the internal functionality of the system. Next, we will consider in detail these methods for solving the problem. Let's immediately look at the algorithm for setting up a VPN using third-party applications. We will do this using the example of the popular Windscribe software. This program is good because, unlike other free analogues, it can provide a fairly high-quality connection. But the limit of transmitted and received data is limited to 2 GB for anonymous users and 10 GB for those who indicated their email. In field "Choose Username" enter the desired account. It must be unique in the system. If you choose a non-unique login, you will have to change it. You can also generate it automatically by clicking on the icon in the form of arrows forming a circle on the right. Into the fields "Choose Password" And "Password Again" enter the same password that you created. Unlike a login, it does not have to be unique, but it is advisable to make it reliable, using generally accepted rules for composing such code expressions. For example, combine letters in different cases and numbers. In field "Email (Optional)" enter your email address. This is not necessary, but if this field is filled in, you will receive as much as 10 GB of Internet traffic instead of the basic 2 GB. Once everything is filled in, click "Create Free Account". As you can see, the procedure for setting up a VPN and changing the IP address using the Windscribe program is quite simple and convenient, and specifying your email during registration allows you to increase the amount of free traffic several times. You can also set up a VPN using exclusively the built-in tools of Windows 7, without installing third-party software. But to implement this method, you must be registered on one of the services that provide access services for the specified type of connection. You can set up a network connection via VPN in Windows 7 using third-party programs or using only the system functionality. In the first case, you will definitely need to download the application, but the actual settings procedure will be as simple as possible; you will not have to look for any proxy services that provide the corresponding services. When using the built-in tools, you do not need to download anything, but you will need to first find and register on a special VPN service. In addition, you will still need to perform a number of settings, which are much more complicated than when using the software method. So you need to choose for yourself which option suits you best.


Important information
Note


Important information
Note: It is recommended to use the DDNS name - you can continue to use it even if the corresponding DDNS IP address changes in the future. However, in some countries you may not be able to use a DDNS hostname, in which case you must use an IP address.
VPN connection, what is it?

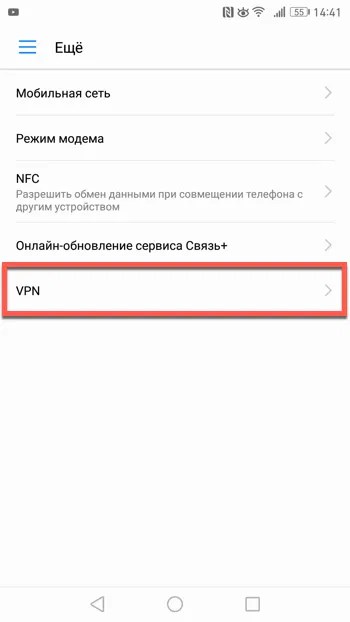
How to connect a VPN
On a computer and laptop


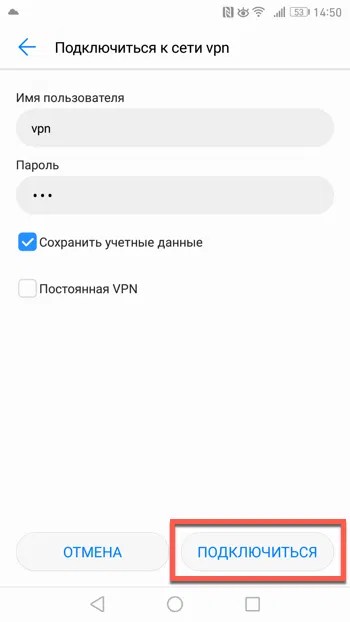
On your phone, iPhone or tablet


How to set up a VPN to work correctly


How to create a VPN server


How to use a VPN


The most common mistakes
Error
Cause
Solution
678
Encryption is not allowed in the OS
You need to open the command line and check the “ProhibitIpSec” parameter in the registry “HKEY_LOCAL_MACHINE\SYSTEM\CurrentControlSet\services\RasMan\Parameters”. It should be equal to 0. If the provider itself uses an encryption channel to provide services, then changing this setting will affect Internet access.
691
Incorrect login/password entered
You need to log in to the network again
692
Firewall Error
Disable your firewall
720/738
User is already connected
Error 720 occurs only on Windows 7. All other operating systems display code 738. If you have to work from different PCs through one client, then you need to create several user names.
734
Automatic VPN
You need to change the connection type from “Automatic” to “L2TP IPSec VPN” in the connection properties. If the error does not disappear, you need to re-create the connection.
766/781
Key not saved/not entered
Open the VPN properties, on the “Security” tab, select “Advanced settings” and enter the key in the new window
768/789 (Windows 7, Vista, XP)
IPSec doesn't work
RMB on the shortcut “My Computer” - “Management”. In the “Services” section, select “IPSec”. Set the connection type to Auto.
What is a VPN connection and why is it needed?
The main disadvantage of a VPN is considered to be a reduction in speed while surfing and downloading files, but technology does not stand still and paid services already provide good communication speeds.
Creating a VPN through Windows Settings
 In the “Windows Settings” block, open the “Network and Internet” element
 Click on the plus icon with the caption “Add VPN connection”
 Click on the connection and click “Connect”
 Video: how to create a VPN connection
How to disable or remove a VPN connection

Automatic configuration of a virtual network using special programs

Setting up via router

VPN in browser
 Turn on the VPN by moving the corresponding toggle switch to the right position
Video: how to install VPN in Chrome, Opera, Mozila browsers
Method 1: Third Party Programs


Method 2: Built-in functionality of Windows 7