How to change the color of clothes in a photo? Coloring images What application is used to make pink shades?
In this tutorial, photographer Tigz Rice will show you how to change the colors in a photo, given a source with a simple white background. You can take something from your own materials or find a suitable image on photo stocks such as iStock, Shutterstock or DepositPhotos. You can also find a lot of useful information in this article. It's best when the model's clothes and accessories have simple colors, as in our example.
One of the biggest design trends in 2017 is the use of contrasting colors. Popular photo stock Getty Images called it a “Color Surge” in its report. Its essence is to harmoniously use areas of color that stand out from others, without overloading the viewer. If you're interested, here's a guide to 2017 design trends.
Tigz will demonstrate the process of extracting an image so you can change the background, how to choose the right color to contrast with the model's outfit, and how to change the colors of individual elements for a harmonious composition.
Step 1
Open the selected photo in Photoshop. First of all, we need to separate the model so that we can change the background to something with more contrast. Perform a rough background selection using the tool Quick selection(Quick Selection tool).
Note: After creating a selection, you need to add a layer mask.
To make mask adjustments easier, invert the selection to include the model instead of the background. Just press Ctrl + Shift + I.
Step 2
Select an item Selection and Mask(Select and Mask). First of all, you need to change the view mode in the properties panel.
Note: You can get acquainted with the operation of the “Selection and Mask” panel in this video tutorial.
From the drop down menu View(View) select On white(On White). Install Opacity(Opacity) 100% to make it easier to see the result.
Translator's note: module Selection and Mask only available forPhotoshopCC and higher. Users of older versions can use the tool Specify edge (RefineEdge), by clicking on the small arrow next to the thumbnail in the line View (View).

Step 3
If some areas remain unselected, this can be corrected using the tool Quick selection(Quick Selection tool).

Step 4
Then we need to clean up the edges of our mask. Select a tool Specify radius(Refine Edge Brush) and paint over the edges around the hair, including any curls that were not immediately highlighted. Don't forget about the other areas.

Step 5
In section Edge detection(Edge Detection) check the box Smart radius(Smart Radius). This will help highlight the smallest details, especially in the hairstyle. Item value Radius will vary depending on the specific photo - I used 5 px.

Step 6
Use block sliders Edge Setting(Global Refinements) to adjust the selection. In my case this was not needed, but usually the points Offset edge(Shift Edge) and Contrast(Contrast) can be useful if you want a clearer, more realistic look to your hair.

Step 7
When the selection is ready, click on the drop-down menu in the section Conclusion(Output) and select Selection(Selection), then click OK.

Step 8
Return to the main Photoshop window, click on the icon New adjustment layer(New Adjustment Layer) at the bottom of the panel Layers(Layers Panel) and select Color(Solid Color). Make it white for now - we'll change the fill later when we select the color scheme.
Clicking OK will confirm the creation of a new layer with a mask. Don't forget to invert the mask using the keyboard shortcut Ctrl + I.

Step 9
Now that our background is hidden using a mask, let's choose a color for it. Let's use the Adobe Color Themes panel for this. It can be found in the menu Window> Extensions>Adobe Color Themes(Window > Extensions > Adobe Color Themes).
Translator's note: If the plugin is not in the menu Extensions, you can download it from the official websiteAdobe or use the online service.
Here you can see available color schemes created by other users. We need a tab Create(Create).

Step 10
We use the color of the clothing as the basis of our scheme. With active instrument Brush(Brush tool), press and hold the key Alt, and then click on the hair, making this the main color. Then, in Adobe plugin Color Themes, click on the middle icon under the color wheel to make the current active color the base color.

Step 11
Then click on the drop-down menu at the top of the panel and select Triads(Triads). Instead of directly matching complementary colors, we end up with two complementary options equally spaced that will match the model's blue outfit.

Step 12
Now that we have our color triad, let's select one of the colors and double-click on it to bring it into the main panel.

Step 13
Double click on the layer Fill color(Solid Color) by opening the color picker window, then click on the primary color at the bottom of the toolbar. Click OK.
You got a photo, but you’re not happy with the color of the clothes? — Using Photoshop, you can change the color of clothes and thereby save a successful photo!
And this is just one example when such skill in working with a program is needed when working with clothes. Also, for example, you found someone else’s photo and to make it unique, you can change the color, then the picture will become suitable for use in your project/collage and safer in terms of sanctions from the search engine. In this lesson you will learn how to change the color of clothes in a photo using Photoshop.
This is what changing the color of clothes looks like:
Let's open the image to work with:

So, before us is a beautiful lady in a rich blue dress. And how many varieties of these dresses there are in the world, different styles, shades, lace and ruffles. But what if you like this particular dress, but don’t like the color? It's OK. The color can be easily and naturally replaced with another shade that you like. There are several ways to implement this idea. We will look at just two of them in this article. The first of which will be Image Correction.
The lesson was prepared by a site subscriber as part of the project:
Can you do no worse? - Submit your application!
Method 1 - Image Correction
Step 1
So, in order to change the color of clothes using correction, select the command Replace color which is located in Image - Correction.

Step 2
In the window that appears, you first need to select the color that you want to replace.
To do this, there are pipettes in the upper left corner of this window. The main eyedropper indicates the selection of one color; with a plus, you can select several colors at the same time; and, accordingly, with a minus, you can remove a color from the list of replaceable ones.
Also using the key Shift You can easily and quickly switch from a regular pipette tool to a plus pipette. And by holding the button Alt to the pipette with a minus.
Using these tools, select the necessary colors for the girl’s dress and adjust the scatter. As you move the slider, the number of shades captured will change.

Now let's change the girl's dress to the color you like using the sliders below:
- Color tone allows you to select the shade from which we will choose the color;
- Saturation is responsible for the richness of the shade we choose;
- Brightness is responsible for how dark or light our color will be.
You can also use the palette to select a specific color.

Finish
The disadvantage of this method is that choosing a natural color can be problematic, because the choice of color always depends on what it was originally, and somewhere there may be pieces of the previous color, which you need to carefully sit on and paint over all the artifacts that appear.
To keep them as small as possible, you should always adhere to the basic advice when working with photographs in Photoshop - take high-resolution sources. Recommendation - .
Method 2 - Hue/Saturation Adjustment Layer
The second way is to use an adjustment layer Hue/Saturation.
To implement this, you first need to select the color that needs to be changed. For this we use Color range, located in the menu Selection, which defines colors in approximately the same way as Changing colors.
Select the desired color and add Layers - New Adjustment Layer - Hue/Saturation.

The advantage of this method is that if somewhere the color has not changed due to poor selection, then you can always go over the adjustment layer with a white brush in places where we need to add more replacements.
Here are our dress color options:
Now you know how to change the color of clothes from one to another. But what if the clothes are white? Then the efforts with the adjustment layer method are useless, and the color replacement works very roughly and poorly. For example, this is what happens if you try to add a red tint:

There is a way to change the white color of your clothes.
Step 1
First, let's highlight the dress in any way convenient for you, be it simple or .

Step 2
Now let's fill it completely Filling or paint the selected area with any color using a new layer.

Step 3
Let's apply it to a new layer, after which we see that the dress has acquired at least some shade, this will be to our advantage.

Step 4
On the main layer we darken with the tool Dimmer areas that are difficult to see - where you should add shadows, in my case these are the arms, stomach and hem of the dress.
With shadows and a dress and create a new one Adjustment Layer, which we previously used to make a green dress. Now we can adjust the color we want. This one will do just fine:

Step 5
Then, using a soft white brush, we go over the adjustment layer along the edges of the dress, where the replacement effect is hard to see. This is what we got.

If you notice an error in the text, select it and press Ctrl + Enter. Thank you!
As you move the tool cursor, Photoshop continuously collects color samples from the pixels located directly below the cross in the center of the cursor. This color will be replaced with the current Foreground color from the color palette. All pixels that fall within the large circle surrounding the cross and whose color matches the sample taken will have their color changed.
For example, if the cross is on a green pixel and the foreground color is red, then all green pixels within the circle will change their color from green to red. In the example, I dragged the cursor a little to the right, the modes in the options bar are by default:
We can change some of the tool’s operation options in the parameters panel (we’ll look at this later), but, in essence, this is exactly the principle of the tool’s operation.
Selecting a placeholder color
The main color on the color palette will be the color that the tool will replace the color with. For example, in the picture below, the main color is red. Consequently, all pixels within the circumference of the cursor circle with a color like the one below the cross will be replaced with red:
Color Replacement Tool Modes
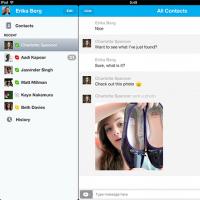
As I mentioned above, the tool has several different modes of operation. It is best to consider them with a specific example. For work, I will take a photo of a girl with a ball:

Let's say I want to change the color of the balloon from blue to green. First, you need to set the primary color to green in the color palette. Then select the “Color Replacement” tool, hover over the ball and begin to “cover up” the space inside the ball. In this case, the color of the blue pixels located inside the cursor will be replaced with green:

But if you accidentally move the cursor crosshair outside the balloon, for example, onto a yellow background, Photoshop will take the yellow color as a reference and begin changing it to green:

If this happens, simply undo the last step by pressing Ctrl+Z, or undo multiple steps by pressing Ctrl+Alt+Z the required number of times, and then continue.
As long as I'm working on the inside of the ball, everything is going fine. But when I get to the edges, artifacts appear in the form of residual blue fringing:

Now we'll look at how to deal with edging.
Tolerance for selecting replacement pixels
Above I mentioned the various parameters of the tool, and one of these parameters is “Tolerance”. "Tolerance" determines how much the replacement color can differ from the sample. The default value is 30%, which is a good starting point. But, in our case, this value is not enough to replace the blue tints of the edges of the ball.
Therefore, I will increase the Tolerance value to 50%, which will expand the range of replacement colors:

At this point, after increasing the Tolerance parameter, replacing the color of the balloon in the photo is complete:

Sampling color from an image
In the example above, I chose a new color for the balloon myself from the color palette, but I could just as easily choose a color directly from the element colors of the photo itself. To do this, with the Color Replacement tool active, hold down the Alt key, which will temporarily switch you to the Eyedropper Tool mode, and you will see how your cursor turns into an eyedropper. Click on the area of the photo with the desired color. Photoshop will make this color the primary color in the color palette. For example, I'll click on the girl's pink and red outerwear:

Now I will paint the balloon with the chosen color:

Please note that even though we painted over the entire balloon, it retained its shiny reflective surface texture and volume, in other words, appearance remained the same, only the color changed. But if we took a regular “Brush” (Brush Tool) and painted the ball with it, it would turn out to have a lifeless flat surface and would not look like a balloon. So what helped us preserve the surface texture? We will look at this in the second part of the material about changing colors in photographs.
They turned out well in the photo, but the color of the dress blends in with the wallpaper of the room? Do you run an Instagram in beige colors and don’t want to ruin the harmony with a purple jacket? Don't give up beautiful photos due to the discrepancy between the shade of the outfit and your wishes. You can easily change the color of clothes in the photo convenient editor"PhotoMASTER". Read the article to find out how to do it!
Change shades to “One, two, three”
The program contains two tools for changing the shade of objects. Which one is best to use depends on the specific situation. We will consider both options. To change the color of clothing you need to do the following:
- Step 1. Preparing for work
First, you should install “PhotoMASTER” on your computer. available on our official website. Wait for the distribution to download and install the software using the Installation Wizard. Find the photo editor shortcut on your desktop and double-click on it. The main menu will appear, where you need to click on the “Open Photo” button and select the desired photo. It will load into the program's working window.
Adding photos to the editor
- Step 2. Change the color of clothes
To change the color of clothing in a photo, you can use one of two methods. The first one is simpler and faster. Under Enhancements in the right panel, find the Color tab. Here you will see sliders with different shades. You need to choose the one that matches the tone of your clothes. To recolor a sea green dress (in the screenshot), you need to change the “Cyan” and “Blue” parameters. Adjust the shade to your taste.

Changing the color of the dress by adjusting the shades of blue and blue
The first method is not suitable if the photograph contains other objects of the same color as the clothing. For example, you need to repaint a green skirt, but there is grass in the frame. You'll have to use another editor tool.
Go to the “Retouching” tab. Select the Corrector tool. It allows you to carefully highlight separate fragment images for further processing.

Selecting the “Corrector” tool
Adjust the brush size using the slider in the right panel. Do not make the diameter too large, otherwise it will be difficult to work with narrow areas. Carefully paint over the item of clothing whose color you want to change. In our case, a pink blouse. Try to completely paint the part without going beyond the boundaries.
The more accurately and evenly you paint an item of clothing, the more natural and attractive the color-changed version will look. Please be a little patient!

Paint over the blouse with a concealer brush
Once the piece of clothing is completely selected, let's change its color. Move the Hue slider. You can repaint the item in any of the basic shades. Choose the option you want. The screenshot below shows how the pink blouse miraculously turned into blue.

Choosing a new color of clothes
Once the base color is selected, you can more flexibly and precisely adjust the hue using other settings. Set saturation, temperature and hue to exactly match your wishes.

Adjust clothing color using hue and saturation settings
- Step 3. Saving the finished image
After completing all the manipulations and obtaining the desired result, all that remains is to save the photo. Press the Ctrl+S key combination on your keyboard. You can also click the “Save” button above the settings panel or go to the save tool through the “File” drop-down list located on the top panel. You will be asked to select a location on your computer where you want to save the edited photo.
Your entire wardrobe in one program
You see, changing the color of clothes in a photo using “PhotoMASTER” is extremely simple. You can endlessly experiment with shades, achieving a perfect match to your wishes. The tool will be useful if you need to choose exactly the color of a dress that will suit your face, if the background color does not harmonize well with the outfit, or in case you want to make a bright accent on a wardrobe item.


The PhotoMASTER program will show that there are simply no limits to the flight of fancy. Photo montage in our editor will make any photo bright and creative!
Do you like to experiment with your own appearance, do you dream of changing your haircut, eye or hair color? It would be a good idea to start by “trying it on” for yourself. Our article contains several best apps for a smartphone, with which you can see yourself in a new look.
To get the most out of mobile software, you need the following:
Hair Color Studio app
This software can change the hair color in a photo in a matter of seconds. There are more than 25 shades to choose from, as well as various effects and shine. Mobile app, which changes hair color, will take up very little space on your device’s memory card and is completely free.
The utility is a powerful photo editor and has a huge number of accessories: earrings, glasses, hats, piercings and much more.
If you have made a radical decision and are planning a trip to the stylist, but are in doubt about the chosen color - this mobile program especially for you. First, look at the results in the photo, choose the shade you like, and only then feel free to bring the idea to life. For some, the application will become a real adviser and assistant, while others will simply have fun using it, changing the hair color of themselves or their friends.

Fabby Look - hair color selection
An application that changes hair color in real time:
- more than 12 stylish colors and neon, platinum, ash, natural shades;
- experiments with hair color online - you can try on colors before taking a photo;
- free application;
- saving images to the gallery;
- function of placing results in in social networks and favorite messengers.
Change hair and eye color
This hair color changer is an instant, easy-to-use styling and makeup tool.
Change eye or hair color, add makeup or accessories, create stunning looks without applying makeup visual effects- not far full list functionality applications.
Peculiarities:

An app that changes hair color: Beauty Mirror
Thanks to this application, you can now get basic makeup lessons and try to change your own appearance at any time and anywhere. Just choose the video tutorial and use the virtual makeup mirror to take advantage of the program's features completely free of charge. Turn your smartphone into the best pocket mirror.
Main characteristics:

Program for Android
Upload a photo to the hair color changing app - Hair Color Changer, shape your hairstyle, and you can start choosing different shades. After you have selected a shade or makeup, the result can be saved to the gallery or sent directly from the application via e-mail or post on social networks.
Peculiarities:
- more than 40 preset colors - various shades of blonde, red, blue, etc.;
- color intensity adjustment function;
- cosmetics - red eye removal, stain removal and teeth whitening;
- wide range of accessories.
Best Makeup
The Makeup application will help you instantly change your hair or eye color, as well as use the built-in function of original accessories.
With this program it is very easy to change hair color, add accessories or colored contact lenses.
Main functions:

Utility “Matching hair color to face”
In addition to a large number of functions for selecting haircuts and makeup, this program is also suitable for changing hair color.
The application has a huge number of hair shades, they all look very natural and realistic. It's as if you've really just visited a fancy hairdresser. In addition, you can add shine to your hair or use color mixing. These effects have not gone out of fashion for several seasons. In total you will find more than 100 decorative elements. Very good for a small application with few operating system requirements.
The advantages of the application include ease and ease of use. Simply upload the photo you want to edit from your gallery or camera. It is better to choose an image with a close-up of the face. Next, you need to decide on the shape of the hairstyle and apply the hair color you like. All actions are very easy to perform, any user can handle it. At any stage, you can save the image or continue trying on various jewelry and accessories. You will find your photos in special folder ModiFace. They can be published on social networks or sent by mail.
Have fun, experiment with hair color and hairstyles, surprise your friends with a new unusual look.
Application "Hairstyles step by step"
By following step-by-step illustrated instructions with descriptions, you can create a hairstyle of any complexity.
Today, the application includes more than 300 photo tutorials on hairstyles of varying complexity. Creating complex hairstyles from basics to master class.
The application is regularly updated with new lessons and contains 6 categories:
- evening hairstyles;
- everyday hairstyles;
- stylish hairstyles;
- children's hairstyles;
- hairstyles with braiding;
- wedding hairstyles.