How to extract an ISO file? How to open an ISO file? What does iso mean in games?
Content
Archiving is a popular and effective option for compressing folders and various files, which helps reduce their size. The resulting document can be shared with other users, copied, and, if necessary, unzipped to extract the contents. Inexperienced users have problems; below are several ways to unzip files from different formats.
What is a file archiver
This is a special program that is needed to compress data. To do this, they use a special algorithm that reduces the size of files. Archive – a container with packed documents. The archiver also works in the opposite direction and can extract information from volumes. Why use archiving:
- Saving. When archiving, you save space on your hard drive; the volume is reduced tenfold. Sometimes the archive does not compress the data.
- Convenience. When transferring data over the Internet, a problem often arises that the service does not send the entire folder and offers to do this with each file separately. Through the file archive, you can send all the data at once.
- Long-term storage. They use rar/zip volume systems to create backup copies of important databases. This is reliable and convenient when there is 1 backup copy in 1 file.
This is the process of extracting the necessary information from a packed volume. The algorithm has the ability to unpack the entire data or extract individual data from it. The procedure can be performed using different tools. Some of them are built right into the Windows or Mac operating system, some are third-party software (paid or free).
Using archivers
A simple and convenient option would be special programs that can pack and unpack files. They are called archivers, they are able to work with a certain data format, but certain versions of the software recognize all types of packed data. The archive is unpacked using the following means:
- built-in Windows tool – works only with Zip format, free;
- winrar program – distributed for a fee, works with rar, zip formats;
- Hamster Lite Archiver is a free program with a convenient and modern interface. Easy to use, works with zip and rar format;
- daemon tools is a powerful tool that unpacks compressed volumes and is able to recognize a virtual disk image.

Free utility Hamster Lite Archiver
This is a modern, convenient and simple program with a clear interface. It can be downloaded for free, but use trusted resources for this and do not download the application from dubious sites. The utility works with ZIP and RAR extensions. Install the application on your computer using the executable file. After this, additional items will appear in your context menu when you right-click on a packaged volume (they are written in English, but the program itself is in Russian):
- Extract files – when clicked, a dialog box will appear;
- Extract Here – unpack data into the same folder where the volume is located;
- Extract to – you can select where to extract the contents of the volume.

How to unzip a file
If a packed volume with data has arrived on your computer, you will not be able to open it without special programs. The exception is the ZIP format, which is compatible with the built-in Windows decompression tool. In other cases, you will need to install one of the utilities for working with archives. There are two types of utilities for working with volumes:
- Add new items to the context menu by right-clicking, through which content is retrieved.
- They launch their own environment where they need to upload a file and can unpack it, run it, or write it to another medium (flash drive, disk).
The program is widely used when it is necessary to unpack rar archive format. It’s better to download it from the official website; you can select the language to use right there (Russian is available). The installation is simple: run the executable file, specify the directory where to install the application. The archiver is distributed on a paid basis, but you can try it for the first 40 days without paying. After this time, the utility still works, but an annoying window constantly pops up reminding you to purchase WinRAR.
After installation, additional items appear in the context menu using RMB (right mouse button). When clicked you will find the following options:
- Extract files – a window with unpacking options will appear;
- Extract to current folder – all content from the top will go to the same directory where the archive is located;
- Extract to – helps to unpack data into a new folder with a name like the archive.
It's easier to use the last and penultimate option. When you select the first item, you will need to specify the location where to unzip the files through a dialog box. This option opens up some additional features, for example:
- Extract and replace files. If the folder already contains documents with the same name, they will be replaced with data from the volume.
- Extract from update. In this case, old documents will be overwritten with new ones (with the latest date).
- Update only existing ones. This option will only extract the data that is already in the folder, the rest will remain in the volume.

Archiver 7-Zip and WinZip
There are several formats that are used when compressing documents. ZIP packaging is widely used together with RAR files. In essence, it is the same processed and packaged volume of information. To unpack ZIP, you need to use the WinZip program, which is very similar to WinRar both in functionality and distribution system (trial period and then payment). All Windows owners can use the system's built-in tool to extract data from a ZIP archive.
Another option for working with this archive format is 7-zip. This is a free program that is popular and allows you to fully work with packed documents. Download the utility from the official website and go through the installation process. After installation, you will have new items in the additional menu for working with ZIP files. The options for unpacking are the same as those already described above:
- unpack into...;
- unpack here...;
- unpack...
The program has its own operating environment, which can be launched through the executive file after installation. Directly from it you can select the necessary files for unpacking and exclude those that are not needed. Simply use the CTRL button to highlight the required archives and click the “Extract” button. Next, an additional window will appear where you can gently indicate the location where to unpack the data.

Features of extracting SFX archives
There is a separate and unique archive format - self-extracting. They are called SFX and have the Exe extension after the dot. The essence of such packaging is that the volume contains both the archive part itself and a special code. Thanks to this, it is able to unpack the contents on its own; no additional programs are needed for this. This is a very convenient format if the computer has a fresh system and there is no unzipping application yet. Sometimes this format is used by attackers to silently install malware along with other programs.
When it is necessary to compress and pack a large amount of data or information from a disk so that it can be launched later, the ISO archive format is used. You can unpack it with any archiver described above (WinRar, WinZIPm 7-zip). You just need to right-click on it and select the extraction option that suits you. When you double click on the file you will see the contents of the image. You can unzip all documents completely or select individual ones and extract them.
There is a special program that belongs to the group of professional tools for working with ISO files. The application allows you to unpack the image, mount it into a drive, create archives and perform other actions with the archive. The utility is called UltraISO, a Trial version is available for review, then you need to pay for it. To work with the program, use these instructions:
- Install the application on your computer and launch it.
- Open the required image using the “File” item, then “Open”. You can also use the keyboard shortcut Ctrl+O.
- Select the contents of the image and right-click. A menu will appear where you need to click on the “Extract” line.
- Select the directory where the information will be copied and wait until the program completes unpacking.

A simple archiver for extracting files
Starting from version 7 of the Windows operating system, during installation you have the opportunity to open any archives with a ZIP extension. To do this, you do not need to download additional programs or utilities. The built-in tool of the system recognizes the archive and can unpack it independently, but this only applies to the ZIP format; it will not be able to process RAR. To extract files you need:
- Right-click on the packed volume.
- Find the line “Extract all...” in the menu and click on it.
- A new dialog box will appear, specify the path where to unpack the contents.
- If you check the box next to the “Show extracted files” option, then after the unzipping procedure a folder with unpacked documents will appear.
- If you wish, you can not extract the contents and run the document directly from the archive.
An emulator program to create an image of the source disk
To work with complex archives, which not only contain individual documents, but also act as a full copy of the installation or boot disk, emulator programs are used. An example of such an application can be considered UltraISO or Daemon Tools Lite discussed above. The latest utility is distributed in a stripped-down version for free; the developers offer to download it to try out the standard functions.
You can extract the contents using Daemon Tools or create a virtual drive and “paste” the image into it. The latest version of the utility automatically sends the image to the drive. Next, just go to my computer, find the virtual disk from the list, double-click on it. You will see the contents of the image and can use it as you wish, as if you had a real CD inserted.

Features of the procedure
Situations may arise in which it is not possible to unpack the archive immediately. For example, the creator can set a password on it so that only trusted persons have access to it. Some problems could also arise during archiving of documents and some of them would be damaged. The programs have built-in functionality by default to solve these problems. Options for overcoming these difficulties are discussed below.
The password is set at the archive creation stage and you will need to enter it to unarchive. There are no differences in the extraction of such data in different programs. The main thing is that without knowing the password you will not be able to “get” the contents, an error will simply pop up. This type of archive in the directory has an additional asterisk icon, which indicates its protection. If you have access to the volume, then you can unpack it using the standard algorithm:
- Right-click on the volume and click “Extract”.
- Next, a window will appear where you must enter a password. If you don't know the code, then at this stage you will stop.
- After entering the password, click the “OK” button and the data will be extracted to the specified folder.

Unpacking a damaged archive
When packaging or copying data from the Internet, an error may have occurred within the archive. With standard unpacking, the program will issue a warning. That the procedure cannot be carried out. To copy the necessary information, you must check the box next to “Leave damaged files on disk.” The archive will open and be extracted, then you can try to restore the missing documents. If it is music or video, then you will be able to play them, but their performance depends on the degree of damage.
To split volumes that are too large, use several small ones. As a rule, they have a serial designation, for example: .z01, .z02, .z03 or Part1, Part2, Part3. To extract data from multi-volume archives, all parts must be available. If there are only 5 parts, and you lost 3 or 4 somewhere, then you won’t be able to complete the process and fully use the contents. You can unpack the contents according to the instructions described above, but you should always start from the first part
Extract the information in the usual way and the remaining volumes will be unzipped automatically. If the package contains a volume without a number, then you should start with it, it will be the basic one. Keep in mind that to work with multi-volume archives, you need the program in which they were created. If packaging was done using WinRAR, then extraction must be done through it; this cannot be done using WinZIP.

Video
Found an error in the text? Select it, press Ctrl + Enter and we will fix everything!Let's say you downloaded a movie, game or video from the Internet. Everything went well, the download process is completed and you, in anticipation of your upcoming vacation, try to open the file. But it does not open and, in addition, it does not have the usual .exe or video .avi format for games, but instead has an .iso extension, which is not clear how to open it.
So, how do you open iso files, otherwise known as virtual disk images?
An .iso file is a digital image of an optical disk (either a copy of a real CD/DVD disk or an artificially created disk image).
Considering all the amount of software that currently exists on the Internet, it is quite difficult to choose a simple, convenient and most suitable program for your goals. A similar situation is observed with programs for launching and opening .iso files. We have selected five programs that, in our opinion, will be most suitable for solving the given problems. Let's look at how to open an iso file using each of these programs.
WinRAR
One of the simplest programs that opens iso files is the well-known WinRAR archiver. Almost all versions of the Windows operating system include this program as part of the standard software set. We will not describe all the properties of the archiver; we will consider only the property we need - opening files that are disk images.
Using the program is quite simple: right-click on the .iso file. A context menu will open in front of you, in which you need to find the “Extract” tab.

The file is automatically opened through WinRAR, which offers a choice of location to extract all content from the disk image. After this, all you have to do is wait until all the information contained in the .iso file is downloaded to the location you specified.

Daemon Tools
Regarding Daemon Tools, we have one - it describes in more detail how to work with this popular program.
Another program that allows you to open and read disk images. It is an emulator that creates virtual drives on a computer, through which virtual disk images with .iso resolution are opened. In other words, the program “tricks” the computer into recognizing the .iso file as a disc found in a CD/DVD drive.
We will not describe all the intricacies of working with Daemon Tools, we will only consider how to open an iso disk image using this utility:

As the name of the program suggests, it is specifically designed to work with files that are disk images. It's quite easy to work with. Let's look at the process of opening and playing an .iso file in several steps:

Alkohol 120%
Quite a popular and well-known program for opening iso images. It can be used to run or play the contents of .iso files. It is immediately worth noting that the program is more difficult to use for inexperienced users and to play files it is necessary to perform an order of magnitude more actions than in previous programs. In addition, the program is paid, and for permanent use you need to buy a licensed version.
Let's look at how to use Alkohol 120% to open disk images:

Power ISO
Power ISO is a small and easy to use emulator program for playing disc images. It is an extended version of the Ultra ISO program, allowing you to play not only .iso files, but also other image files that have permissions .bin, .mdf, .mdl, .md2-5, etc. The principle of operation of the program is exactly the same as that of Ultra ISO, so we will not re-examine the steps required to open the desired file. We simply repeat the same steps and in the same order as in the Ultra ISO program.
Other programs for opening .iso files
In addition to the above programs, you can use others. As a rule, other programs are not so convenient for inexperienced users, or there is no Russian version of the program, or the free version is only available for a certain time. However, if you do not have access to the Internet, but the software allows you to select several options for opening .iso files, you can use programs such as ISOBuster, Roxio Easy Media Studio, WinISO or Gilles Vollant WinImage.
Instructions
Download the Alcohol 120% program to extract the file from the disk image. Wait for the program to download and install it on your computer. Set up the program to work with drives.
Launch the program from the main menu or using a shortcut on the desktop. Go to the “Tools” menu, select “Settings” from the list, go to the “Virtual disk” tab in the window that opens, set the required number of virtual disks. You can make a maximum of 31 disks, but it is recommended to set the number of disks that you need to mount at the same time.
To extract a file from the image, select the number “1” and go to the “File Associations” tab. Check all formats there except *.rar format. Save the settings by clicking on the “OK” button and wait until the settings take effect.
Proceed to create a virtual disk to begin extracting the file from the image. Go to the main menu of the program, select “File”, the “Open” command, specify the path to the disk image. Next, the image file will be added to the program. Right-click on it, select “Mount to device”, select the virtual drive. Next, go to the “My Computer” window, open the mounted drive, find the file you need and copy it to a folder on your hard drive. Extracting the file from the image is complete.
Mount the image in Deamon Tools to extract the file from the image. To do this, download the program and install it on your computer. Next, right-click on the program shortcut in the tray, select the “Virtual Drive” command, create one drive.
Then right-click the program icon again, select the created drive and click “Mount image”. In the window that appears, select the image file from which you want to extract the file. Click "Open". The image will be mounted. Next, open “My Computer”, select the drive, find the file you need on it and copy it to your hard drive.
Sources:
- Extract files from ISO images!
System Restore is a tool provided by Windows developers in case of operating system failure. Such a failure may occur as a result of the incorrect operation of some programs or due to the user's fault. System Restore allows you to return the system to full functionality.
Instructions
To do this, right-click on the “My” icon, select “Properties” and go to the “System Restore” tab. Here you can either check the box next to “Disable the recovery system on all disks.” An unchecked box will mean that the recovery system is enabled.
If for some reason you don't find the My Computer icon, go to the Start menu and go to Control Panel. If the list of Control Panel services is displayed in classic view, select the “System” section. If services are displayed by category, select the Performance and Maintenance section and click the System icon. Then go to the System Restore tab.
Video on the topic
Please note
In some versions of the Windows operating system, the names of sections and menu items may vary slightly.
The Windows operating system has a special System Restore utility. When programs or drivers are installed, it creates recovery checkpoints that, in the event of a failure, allow you to return the system to a working state.

Instructions
Open the Start menu and select Control Panel.
In the window that opens, select the “System and its maintenance” section, and click on the “System” item.
In the window that opens, click on the “Recovery” button.
You will see a list of saved restore points with date and description. Select the appropriate one and click “Next”. Then, to confirm the action, click the “Done” button.
The computer will restart and the system will restore.
Video on the topic
Please note
During recovery, no personal files of users are affected, for example, documents, photographs, etc.
System recovery can only be performed by the computer administrator.
Sources:
- how to restore the system on a computer
The Windows operating system includes a System Restore tool. It is designed to return the state of the system up to a certain time. Sometimes the user takes actions that lead to disruption of the system, and this tool helps to return the system to its original state before changes were made.

You will need
- Windows operating system tool "System Restore".
Instructions
“System Restore” is used when important data is accidentally lost or some processes are irreversible; this tool is launched from the “Start” menu. Click the Start menu, select All Programs. In the list that opens, select the “Standard” section, then “System Tools”, click “System Restore”. If prompted, enter your administrator password (don't forget to confirm your password).
If you have some programs or windows open before starting the tool, close them and save all changes, because System Restore will require a restart of the computer. Don't forget that all changes that will be made by this utility can be done (a checkpoint is created before restoring).
After launching the utility, the main window will appear on the screen, in which you need to click the “Next” button. The “Restore your computer to” window will appear in front of you, in which the recovery points will be displayed. You need to select the desired restore point. Which restore point should you choose? Pay attention to their headings: “Windows Update”, “Installing Quick Time Player”, etc.
After selecting the appropriate point, click on its title, then click the “Next” button. By default, not all recovery points are displayed in this window; to view all options, check the box next to “Show other recovery points.”
The next Restore Point Confirmation window will provide details of the operation that will occur after the computer is restarted. If everything is correct, click the “Finish” button, the computer will automatically restart. When the operating system boots, automatic system recovery will begin to the previously specified date.
“System Restore” will finish in a few minutes and the system will boot. A window will appear on the screen indicating the successful or unsuccessful completion of the recovery operation.
Video on the topic
Please note
System Restore does not support all FAT file systems (FAT 16 and FAT 32). “System Restore” can only be run on disks larger than 1 Gb.
System Restore from the last checkpoint, saving becomes necessary mainly in the case when there are malfunctions in the operation of the software. The restore function itself means returning the state of the parameters and settings of the operating system and other programs at the time the last checkpoint was created, which can be created either automatically or manually.

Instructions
Open the Start menu. Through it, find the list of standard programs; it contains the “Service” sub-item. This is where the utility that serves for system recovery purposes is located. You can also create a checkpoint there in this program.
Click the "Next" button. You will be prompted to select a system restore point. If previously such points were created more than once, then the previous state will be available to you in addition to the last saved one. On the left you will see a calendar, and on the right a table explaining the nature of the circumstances under which the restore point was created.
Please note that most of them are often done automatically by the system, for example, when installing certain programs. This is convenient, given that many of them can adversely affect the operation of the entire system, so you can remove unnecessary software and the consequences of its use through one recovery procedure.
Click the "Next" button. You will see a warning window, please read its contents carefully. At this point, you should have saved all the documents you were working on, because when you perform the restore procedure, the system will reboot automatically, preventing you from applying unsaved changes.
Please note that this may remove all programs that you installed in the period of time between the checkpoint and now. Save copies of the necessary data from these programs so that you don’t have problems restoring them later.
After performing a system restore operation and turning on the computer, check whether there are qualitative changes in operation and whether the problem has been resolved. If not, try choosing a different system restore point; perhaps the changes occurred much earlier and were simply not noticeable until recently.
Video on the topic
Please note
The recovery process is completely reversible.
Useful advice
Perform system checkpointing frequently.
Blocking the System Restore function is the result of malicious applications. To return the system to normal operating condition, it is imperative to fully scan and remove viruses with an antivirus program.

Instructions
Call the main system menu by clicking the “Start” button to initiate the procedure for unlocking the system restore function using Group Policy and go to the “Run” dialog. Enter the value gpedit.msc in the “Open” line and confirm the launch of the “Group Policy Editor” tool by clicking OK.
Expand the "Computer Configuration" link and go to the "Administrative Templates" section. Expand the System node and select System Restore. Select the "Not Specified" checkbox in the "Disable System Restore" group and restart your computer to apply the changes.
Keep the F8 function key pressed during startup if you cannot unlock the System Restore function using the above method. Select "Safe Mode with Command Line Support" from the menu of additional secure boot options that appears using the arrow keys and confirm your selection by pressing the Enter function key.
Enter the value - rstrui - for Windows version 7; - WindowsSystem32
strui.exe - for Windows Vista version; - WindowsSystem32Restore
strui.exe - for Windows version XP in the text field of the command interpreter and confirm the forced launch of the system recovery utility by pressing the Enter function key.
Use the option “Restore your computer to an earlier state” and confirm your choice by clicking the “Next” button. Specify the desired restore point by selecting the date of normal system operation in the calendar, and authorize the application of the changes made by clicking the “Next” button. Confirm the selected action by clicking "Next" in the next dialog box and wait until the process completes.
Yesterday I urgently needed to extract several files from the ISO image, but there was no time to install any programs, so I asked myself the question - how to open an ISO file quickly and without unnecessary movements.
A huge amount of software and operating systems are distributed in the form of ISO images, so you just need to know how to work with this format.
There are several ways to open an iso file, but not everyone knew that it can be opened even by a program that is installed on everyone’s computer. What kind of program is this and what alternative methods are available, read in this article.
What is an ISO image?
So, what is an ISO file and what does it come with? In simple words, an ISO image is an electronic version of an optical disk, which is a file with its own file system and the actual contents of the disk.
Having a disk image, you can connect it in the operating system as a regular optical disk. There are a lot of options for using disk images! Starting from installing games and programs, ending with the work of special programs that work exclusively from an optical disc. Beta versions of operating systems are also posted in image format, for example in an ISO image you can
How to open an ISO file using UltraISO
The first, and once the most convenient way for me to open ISO files, is using the UltraISO program. I won’t give a link to the program; you can buy a paid version on the official website, but in open sources there are versions for which you don’t need to pay;).
To open an ISO file, you need to run the UltraISO program, select “ Open”

and specify the path to your ISO image. Then in the program window you will see the contents of the disk image

In order to extract a file from the image, right-click on the desired file and select the menu item “ Extract to…”

How to open an ISO file using DAEMON Tools
A very cool program for mounting optical disk images. Not the most convenient way if you just need to extract a file from a disk image, but I’ll still describe it as an option.
For us, the version of the program is quite enough DAEMON Tools Lite. You can download it from the official website absolutely free of charge.
After downloading the program, install it and run it. An image catalog window will open, add your image

Now you only need to select the added image and click the “ Mount“,

after which you will have a drive in your system (in my case, drive D)

Working with a mounted disc is no different from working with regular optical discs inserted into a DVD drive.
How to Open an ISO File with 7-Zip
My favorite and, in principle, the most convenient way to open ISO disk images. I found out about it relatively recently, and was pleasantly surprised. After all, today almost every computer has a 7-Zip archiver installed. It's free and easy to use.
You can download it from the official website using a direct link:
After installation, open 7-Zip File Manager, it is a regular explorer with archiver tools

To open an ISO image, you just need to go to the folder in which it is located and double-click on it. It will open like a normal folder
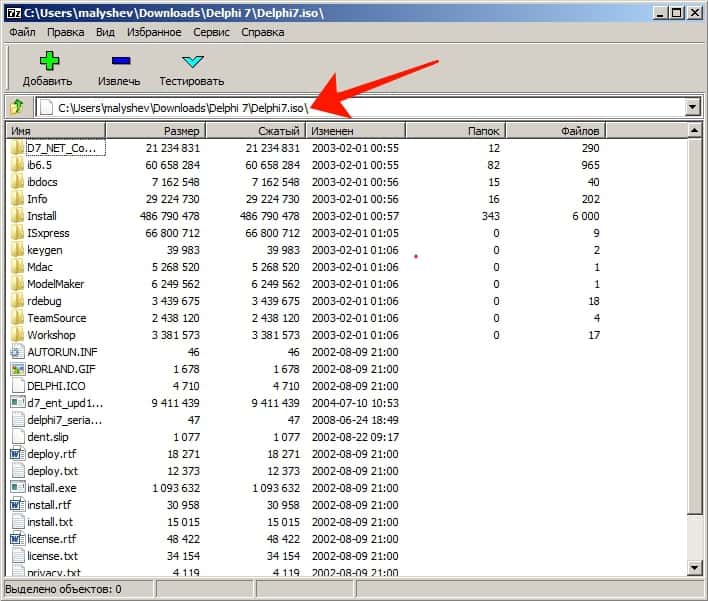
You can extract a file from an ISO image by selecting it and clicking on the “ Extract“.


