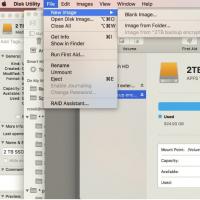
Форматирование диска через diskpart. Как с помощью diskpart создать загрузочную флешку
Сегодня я хочу рассказать Вам о такой замечательной программе, как . Что же в ней такого замечательного? – спросите Вы. А то, что с ее помощью можно ( данные с флешки после форматирования) или диск, и самое интересное – эта программа доступна любому пользователю Windows через командную строку, другими словами, не требует установки. И пускай Вас не пугает словосочетание “командная строка” – использование ее гораздо удобнее и проще, чем кажется на первый взгляд.
Итак, после того, как мы вставили флешку в USB-разъем, запускаем командную строку. Для этого нажимаем Пуск и в строке поиска пишем cmd , и нажимаем Enter .

В появившейся командной строке пишем , тем самым запуская программу для управления дисками. Нажимаем Enter .


В списке устройств находим нашу флешку – ее можно распознать по размеру. В моем случае это Диск 6 . Поэтому далее пишем команду . Если Ваша флешка под цифрой 4, то Вам нужно ввести команду . Если под цифрой 2, то , соответственно. Нажимаем Enter .

Затем вводим команду clean , которая удалит все файлы с флешки или диска. Нажимаем Enter .


Потом вводим команду . Таким образом выбираем указанный раздел и перемещаем на него фокус. Нажимаем Enter .

Затем выполняем команду . Система помечает раздел как активный. Нажимаем Enter .

Теперь необходимо . Оно может быть быстрым или полным. Полное форматирование выполняется командой format fs=NTFS . Если не хочется ждать и время поджимает, то делаем быстрое форматирование командой format fs=NTFS QUICK . Нажимаем Enter .

Ждем окончания форматирования.

Сейчас необходимо присвоить флешке букву. Делаем это с помощью команды assign . Жмем Enter .

Флешке автоматически назначается буква, и следом за этим срабатывает автозапуск носителя.

Теперь можно завершать работу программы . Вводим команду exit и нажимаем Enter .

Последнее, что нужно сделать – это скопировать файлы дистрибутива операционной системы (ту, для которой мы делали загрузочную флешку) на, собственно, наш флеш-накопитель. После этого наша флешка будет загрузочной, и будет загружаться абсолютно везде, на любом устройстве. С ее помощью, можно будет установить Вашу операционную систему где угодно.
Хочу заметить, что с помощью программы можно проводить множество манипуляций как с жесткими дисками (), так и с флеш-накопителями. Рассмотренный сегодня пример – лишь малая часть всех возможностей. Другие команды и примеры работы с этой программе я рассмотрю в следующих статьях.
По этой теме также читают:
 Форматирование флешки в NTFS
![]() Как восстановить данные с флешки после удаления или форматирования?
Как восстановить данные с флешки после удаления или форматирования?
 Как изменить размер диска в Windows 2000/XP/Vista/7/8. Бесплатная программа EaseUS Partition Master Free
Как создать загрузочную флешку UEFI для установки Windows 8.1 и 10?
Как изменить размер диска в Windows 2000/XP/Vista/7/8. Бесплатная программа EaseUS Partition Master Free
Как создать загрузочную флешку UEFI для установки Windows 8.1 и 10?
 Как зафиксировать строку в Excel ?
 Как создать образ диска с помощью Daemon Tools?
Если USB-флешка, карта памяти или любой другой тип носителя информации работает неправильно , очистка диска и его разделов с помощью команды “Clean” и инструмента Diskpart есть одним из способов решения проблем. Таким образом можно решить проблемы с приводом, который не получается отформатировать или ёмкость которого отображается неправильно.
Этот трюк также удалит разделы, которые невозможно удалить встроенными в Windows инструментами, таким как Управление дисками. Этот процесс полностью удалит таблицу разделов диска , что позволит записать её заново.
Внимание: Этот процесс полностью сотрёт весь диск, поэтому побеспокойтесь о сохранности ваших файлов. Также убедитесь в том, что выбран правильный диск, иначе могут случайно быть удалены данные не с того диска.
Запустите командную строку от имени администратора
Для начала, запустите командную строку от имени администратора. В Windows 10 или 8.1, просто кликните правой кнопкой мышки на меню Пуск и выберите «Командная строка (администратор)».
В Windows 7, найдите «Командная строка» в меню Пуск. Кликнув правой кнопкой мышки выберите «Запустить от имени Администратора».
Diskpart
Для очистки диска используем команду Diskpart. Перед тем как продолжить убедитесь, что нужный USB-привод, карта памяти или другое устройство очистить которое вы собираетесь, подключено к компьютеру.
Для того чтобы запустить инструмент diskpart, введите соответствующую команду в окне Командной строки и нажмите Enter:
Diskpart

Отобразите список дисков, установленных на компьютере введя следующую команду:
list disk
Просмотрите результаты выполнения команды и определите номер диска, который необходимо очистить.
Будьте осторожны! Если будет выбран неправильный номер диска, он будет очищен и, возможно, важные данные будут утеряны.
На скриншоте ниже видно, что Диск 0 имеет объём 111 ГБ, а Диск 1 – 15 ГБ. Мы знаем, что нам нужен диск объёмом 15 ГБ. Значит Диск 1 – это USB-диск, а Диск 0 – внутренний жесткий диск компьютера.

После того как был определён номер диска, введите следующую команду заменив знак # на номер диска.
Внимание:
Будьте очень внимательны. Если будет указан неправильный номер диска, будут удалены все данные не с того диска.
select disk #

Командой diskpart выбран указанный диск. Теперь все действия будут производится с ним. Для полной очистки таблицы раздела введите следующую команду и нажмите Enter.
Внимание:
Данная команда удалит все данный на указанном диске! Убедитесь, что у вас есть копии всех важных данных перед тем как продолжить.
Clean

Если всё сделано правильно, увидите “очистка диска выполнена успешно”. Закройте командную строку.
Создание разделов и форматирование диска
Теперь, с помощью встроенного в Windows инструмента Управление дисками, можете создать разделы на диске и отформатировать его. Также можно для этого использовать команду diskpart, но с помощью инструмента Управление дисками намного проще.
Для того, чтобы запустить инструмент Управление дисками в Windows 10 или 8.1, кликните правой кнопкой мышки на кнопке меню Пуск и выберите «Управление дисками».

Теперь вы увидите, что диск, с которым вы работали не имеет разделов. Кликните правой кнопкой мышки на нераспределённой области и выберите «Создать простой том» для того, чтобы создать раздел на диске и отформатируйте его в желаемой файловой системе. По умолчанию, Windows создаст один раздел размером всего диска.

Если описанный метод не работает, например, диск очистили, но не получается разбить его на разделы или отформатировать, или diskpart не определяет его, значит диск повреждён физически и больше не сможет нормально функционировать. Но функция очистки диска через diskpart – это решение которое может возвращать к жизни диски, которые на первый взгляд выглядят абсолютно безнадёжными.
Если же, несмотря на многократные предостережения, вы всё-таки очистили не тот диск (а это бывает ОЧЕНЬ часто), не расстраивайтесь. Данные с него всё ещё можно восстановить. Для этого прекрасно подойдёт инструмент для восстановления данных от компании Hetman Software – Hetman Partition Recovery.
Одним из способов отформатировать флешку является использование командной строки. Обычно к нему прибегают в случае, когда стандартными средствами это сделать невозможно, например, из-за возникающей ошибки. Как происходит форматирование посредством командной строки, мы рассмотрим далее.
Мы рассмотрим два подхода:
- через команду «format» ;
- через утилиту «diskpart» .
Их отличие в том, что ко второму варианту обращаются в более сложных случаях, когда флешка ни в какую не хочет форматироваться.
Способ 1: Команда «format»
Формально Вы проделаете все то же, что и в случае стандартного форматирования, но только средствами командной строки.
Инструкция в данном случае выглядит следующим образом:

При возникновении ошибки, можно попытаться проделать то же самое, но в «безопасном режиме» – так никакие лишние процессы не помешают форматированию.
Способ 2: Утилита «diskpart»
Diskpart – специальная утилита для управления дисковым пространством. Ее широкий функционал предусматривает форматирование носителя.
Чтобы воспользоваться данной утилитой, сделайте вот что:


Таким образом можно задать все необходимые настройки форматирования флешки. При этом важно не перепутать букву или номер диска, чтобы не стереть данные с другого носителя. В любом случае выполнить поставленную задачу несложно. Преимущество командной строки в том, что этот инструмент есть у всех пользователей Виндовс без исключения. Если у Вас есть возможность воспользоваться специальными программами для удаления, воспользуйтесь одной из тех, которые указаны в нашем уроке.
This guide explains how to use the diskpart utility for the following Windows versions: Windows XP, Vista, 7, 8, 8.1 or 10.
What is diskpart
The diskpart utility (available in Windows 2000, XP, Vista, 7, 8, 8.1 and 10) can be used to create or delete partitions on your PC.
The utility allows you to:
- Partion
- Remove partitions
- Remove formatting
- Assign and remove drive letters and mount points
- Convert disks from basic to dynamic
- Create and extend volumes
Most commands that you can perform in Disk Management (see ) are available with diskpart. Because it’s a command line utility, you need to open Command Prompt and type diskpart .
On Windows Vista, 7, 8 and 10 systems, you can type diskpart at Run , click OK or press Enter and Command Prompt will automatically open with diskpart loaded.
When the utility is loaded, you will notice the version installed on your computer:
Microsoft DiskPart version 6.1.7600 Copyright 1999-2008 Microsoft Corporation. On Computer: MY_COMPUTER
Commands and parameters
The diskpart tool has the following commands and parameters available:

Error Codes
You can find a list error codes to debug various errors:
- Code 0 means that no errors occurred
- Code 1 means that a fatal exception occurred
- Code 2 means that the parameters you specified for a command are incorrect
- Code 3 means that diskpart is unable to open the specified file
- Code 4 means that diskpart (one of the services used by the utility) returned a failure
- Code 5 means a command syntax error
diskpart in Windows XP
Note that the fdisk utility found in pre-Windows XP systems is now known as diskpart on Windows XP systems.
If you can boot into Windows XP
If you can boot into your computer, you simply need to open Command Prompt to access diskpart:
- Boot into Windows XP
- Click Start
- Click Run
- Type cmd
- Press Enter or click OK
- At the Command Prompt window, type diskpart
- Press Enter
If you can’t boot into Windows XP
If you can’t boot into Windows XP to access diskpart, you have 2 options:
- Use the original CD to access Recovery Console
If you have the original CD:
If you can’t boot into Windows XP, but you have the original CD, you can access the Recovery Console:
- Insert the Windows XP CD
- Reboot the computer
- Press any key to boot from the CD
- At the Microsoft Setup menu, press R
- Select the operating system and enter the Administrator password, if requested
- When Command Line appears, type diskpart
- Press Enter

diskpart in Windows Vista
You need to run these steps as an Administrator on Windows Vista systems.
If you can boot into Windows Vista with no errors, . Otherwise, follow .
If you can boot into Windows Vista
You simply need to open Command Prompt, if you can boot into Windows Vista:
- Boot into Windows Vista
- Click Start
- Type cmd
- Click Command Prompt from the search results list. You may need to right-click Command Prompt > Run as Administrator, if you are not logged in as Administrator already
- Type diskpart
- Press Enter
If you can’t boot into Windows Vista
If you can’t boot into your system, you have the following options:
- Use the installation disc to access System Recovery Options
- Access System Recovery Options without the installation disc (if installed)
If you can’t boot into Windows Vista, but you have the Windows Vista disc, follow these steps to open diskpart:

For the full list of diskpart commands and paremeters, go to .
If your Windows Vista has the System Recovery Options installed and is available at the Advanced Boot Options menu, you can run Command Prompt from there. Otherwise, see the “If you use Easy Recovery Essentials” set of instructions below.
Follow these steps below to access diskpart without the installation disc:
- Reboot the computer
- Press F8 as your computer starts to boot, but before the Windows Vista logo appears
- Select Repair Your Computer , at the Advanced Boot Options menu
If a “Repair Your Computer” option isn’t listed, System Recovery Options is not installed on your computer. Use the original installation disc or go to the “If you use Easy Recovery Essentials”set of instructions below .


For the full list of diskpart commands and paremeters, go to .
If you use Easy Recovery Essentials:
If you don’t have the installation disc available, can’t boot into Windows Vista or you don’t have the “Repair Your Computer” option listed at the Advanced Boot Options menu, you can use Easy Recovery Essentials to access Command Prompt and load diskpart.
Follow these steps:
diskpart in Windows 7
Note that you need to run these steps as an Administrator on Windows 7 computers.
If you can boot into Windows 7
If you can boot into your Windows 7 system, simply open Command Prompt:
- Boot into Windows 7
- Click Start
- Type cmd
- Click Command Prompt from the search results list. Right-click on Command Prompt > Run as Administrator.
- When Command Prompt loads, type diskpart
- Press Enter
For the full list of diskpart commands and paremeters, go to .
If you can’t boot into Windows 7
Similar to Windows Vista, if you can’t boot into your system, you have the following options:
- Use the installation disc
- Boot into the Advanced Boot Options menu to access System Recovery Options
- Use Easy Recovery Essentials and access Command Line
If you have the installation disc:
If you can’t boot into Windows 7, but you have the installation disc, you can run diskpart using the disc. To do so, follow these steps:
 diskpart
- Press Enter
For the full list of diskpart commands and paremeters, go to .
If you don’t have the installation disc:
Usually, Windows 7 systems should have the System Recovery Options installed on the hard drive. If it’s not (follow steps below), go to the “If you use Easy Recovery Essentials” set of instructions below for an alternative to access diskpart.
Follow these steps to access diskpart without an installation disc on a Windows 7:

For the full list of diskpart commands and paremeters, go to .
If you use Easy Recovery Essentials:
diskpart in Windows 8
If you can boot into Windows 8
If you can boot into your Windows 8 system, you simply need to open Command Prompt to access diskpart. To do so, follow these steps:
For the full list of diskpart commands and paremeters, go to .
If you can’t boot into Windows 8
If you can’t boot into your Windows 8, you have these options available:
- Use the original DVD or USB with Windows 8 or Windows 8.1 to access the Repair your computer option
- Use Easy Recovery Essentials to launch Command Line
If you have the installation disc:

For the full list of diskpart commands and paremeters, go to .
If you don’t have the installation disc:
To access diskpart without an official Windows 8 or Windows 8.1 disc, follow these steps:

For the full list of diskpart commands and paremeters, go to .
If you use Easy Recovery Essentials:
Easy Recovery Essentials can run from any CD, DVD or USB flash drives.
To access diskpart using Easy Recovery Essentials, follow these steps:
diskpart in Windows 10
If you can boot into Windows 10
If you can boot into your Windows 10 system, you simply need to open Command Prompt to access diskpart. To do so, follow these steps:

For the full list of diskpart commands and paremeters, go to .
If you can’t boot into Windows 10
If you can’t boot into your Windows 10, you have these options available:
- Use the original DVD or USB with Windows 10 to access the Repair your computer option
- Boot into the System Recovery Options with Shift and F8
- Use Easy Recovery Essentials to launch Command Line
If you have the installation disc:
If you can’t boot, but you have the installation disc, follow these steps:

For the full list of diskpart commands and paremeters, go to .
If you don’t have the installation disc:
If you don’t have the installation disc, you can boot into System Recovery Options or use Easy Recovery Essentials.
To access diskpart without an official Windows 10 media, follow these steps:

For the full list of diskpart commands and paremeters, go to .
If you use Easy Recovery Essentials:
Easy Recovery Essentials can run from any CD, DVD or USB flash drives.
To access diskpart using Easy Recovery Essentials, follow these steps:
Troubleshooting
Download diskpart
You can not download diskpart utility. This utility is a command line utility part of Windows.
To access diskpart, you have the following options:
- Use the original CD/DVD or USB of your Windows to access Recovery Console (for Windows XP) or System Recovery Options (for Windows Vista-8)
- Boot into the recovery mode of your Windows
- Use Easy Recovery Essentials, our recovery and repair disk, and open Command Line to access diskpart
Instructions on how to access diskpart if you use Easy Recovery Essentials:
- Download
- Burn the ISO Image. Follow . If you’d like to have a recovery USB instead, follow .
- Boot Easy Recovery Essentials from the CD, DVD or USB
- Select Launch Command Line
Instructions on how to access diskpart if you have the installation disc:
Instructions on how to access diskpart if you don’t have the installation disc:
Format USB with diskpart
To format a USB flash drive with diskpart, follow these steps:
- Open the utility by typing diskpart in Command Prompt
- Press Enter
- Once loaded, type list disk: list disk
- Press Enter
- Determine which of the disks listed is your USB flash drive, e.g. Disk 2.
- Type select disk 2 , if #2 is the USB flash drive presented by the list disk command
- Press Enter
- Type clean to clean the USB flash drive: clean
- Press Enter
- Type this command: create partition primary
- Press Enter
- Type active: active
- Press Enter
- You should now receive this confirmation message: DiskPart marked the current partition as active.
- Type this command to format the USB flash drive:
format fs=ntfs label="MY USB DRIVE"
where ntfs is the NTFS file system (you can also use fs=fat32) and “MY USB DRIVE” is the label given to the USB drive.
- Type assign: assign
- Press Enter
- Quit diskpart by typing exit: exit
- Press Enter
Bootable USB with diskpart
To create a bootable USB using diskpart, follow the steps from .
Once successfully formatted the drive, simply copy the files to the USB drive.
USB not showing in diskpart
diskpart will not list external media, e.g. USB flash drive, if you’re using Windows XP.
Windows Vista to Windows 8 systems will show the USB flash drives in diskpart.
More Information
Support Links
- – our repair and recovery disk.
It’s an easy-to-use and automated diagnostics disk. It’s available for , and . It’s also available for Windows XP and Windows Server.
Diskpart – это средство управления дисковыми объектами компьютера: дисками, томами разделами. Представляет собой текстовый командный интерпретатор. Позволяет из последовательности команд пакеты и сохранять их в автоматические сценарии. Входит в состав операционных систем семейства Windows, как домашних (начиная с XP), так и серверных (начиная с 2003).
Запуск и ввод команд
Использование команд и сценарии
Пользуясь последовательностью команд Diskpart мы можем создать, например, загрузочную флешку:

Создание загрузочной флешки в утилите diskpart
Сценарии – это текстовые файлы, та же последовательность команд записана в одну строку. Интерпретатор выполняет их по очереди.
Чтобы запустить сценарий нужно в командной строке ввести: diskpart /s имя_сценария.txt. Вывод при выполнении сценария также можно перенаправить: diskpart /s сценарий.txt>log.txt.
Если при выполнении одной из команд сценария возникнет ошибка, то сценарий прекратит выполнение, чтобы этого избежать нужно добавлять в конце каждой команды сценария:
Create partition primary noerr
format fs=FAT32 label=WinNT quick noerr
Этот параметр заставляет игнорировать ошибки и выполнять сценарий независимо от их появления.